Parse Server Migration Guide for Developers
If you used Parse hosting services as a backend for your mobile applications, now probably the perfect time has come to try the Azure App Service. In connection with the latest news, the guys from Parse offered ways to migrate existing backends from Parse to other sites. We expect that when you look for such an alternative platform, you will try Azure.

As suggested in the migration guide, you can migrate the Parse backend of your application to another host where the server with the Parse API hosted on the Express base is deployed. Azure App Service offers a great alternative for hosting your Parse server implementation. In the end, the Node.js backend offered in the Mobile App in the Azure App Service is also Express. In order to further simplify the first steps, the Azure App Service team offered a ready-made deployment process that makes it much easier for you to launch the first Parse server in App Service.
Before you begin, you should read the Parse migration guide in order to understand what is supported and what is not in the new Parse server. One of the main features that are missing in the Parse server are push notifications, but Azure Notification Hubs will offer you a ready-made alternative.
When the migration is complete, you can continue to use the client Parse SDK in your applications to access the data (of course, clients will need to be updated to use the new SDK versions and use the new service layout.).
Before you begin the process of creating a new Parse server based on Azure, you need to do the following steps:
')
Create your Azure account
If you do not already have an Azure account, then you will need to subscribe. A free trial period is also available .
Configure MongoDB
One of the current requirements of the Parse server is the use of MongoDB (Parse offers guidance for meeting the requirements of MongoDB ). Parse also offers a migration tool to transfer your data from hosting to MongoDB. If this option suits you, the Parse team recommends starting with MongoLab, a fully managed cloud-based database service, which you can easily subscribe to via the Azure Marketplace . Whatever you choose to host your MongoDB server, you will need connection information to run your Parse server.
In the future, you can try using the built-in Azure DocumentDB service managed by NoSQL document-oriented database service. In the following posts, we will reveal more details on how to migrate your data to DocumentDB and use DocumentDB with your Parse server.
Get a github account
The migration path to Azure, which is demonstrated in this article, requires you to have a GitHub account. Understanding how to clone a Git repository, send and confirm changes will also help you.
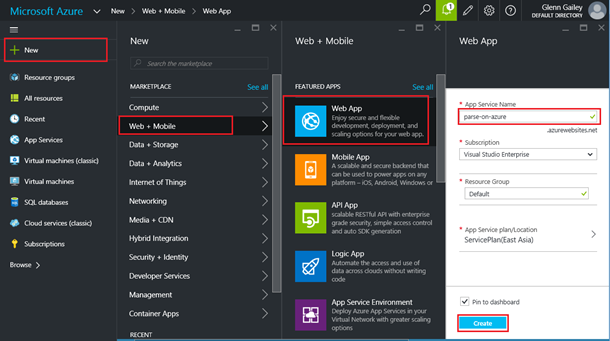
The first step is to create a new backend in the App Service to host your Parse server. In the Azure portal, click + New > Web + Mobile > Web App and enter a unique name for your backend, then click Create .
This step will create a new instance of the backend service that will host your Parse server. Before this action, you may be interested in creating your own payment plan App Service, which affects the pricing of the service . You can always change your App Service plan in the future. For more information, read the detailed overview of App Service plans .
After the deployment of the service instance is complete, you will see a panel to manage your backend.
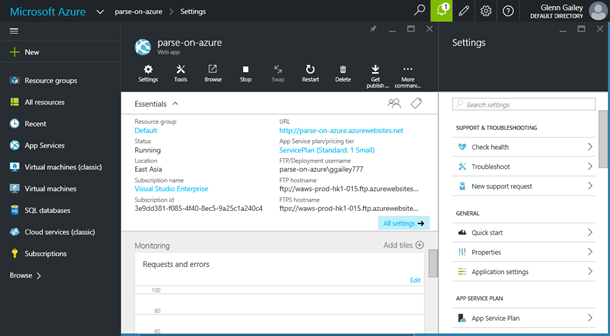
App Service offers several ways to host your applications. Next, you will need to configure the deployment from the Parse server repository.
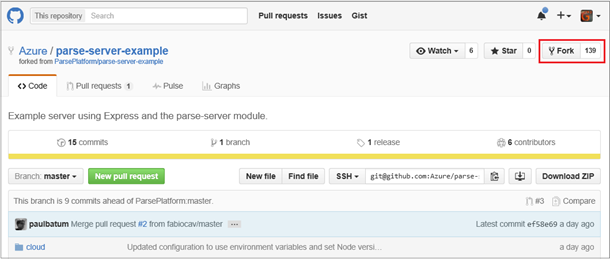
To simplify the procedure for publishing a Parse server to Azure, the App Service team forked a repository with an example of a Parse server to create a customized server that will work correctly in the App Service. On GitHub, install a repository with an example Parse server in your account.
You will use this fork as a source for deploying your backend. Return to the Settings panel in your backend, scroll down and click Continuous deployment > Choose source > GitHub , then click Authorization > Authorize , transfer the rights to the Azure management portal in the GitHub window that appears (you may need to enter a password), then click OK .

Now that the portal is connected to your GitHub account, select your fork parse-server-example as the project, select the master branch and click OK .

After that, the deployment will be completed and the Parse server code will be taken from the project on GitHub and published in Azure. If, for some reason, the deployment does not start automatically, you can start the synchronization manually by clicking the Sync button in the Deployments panel .
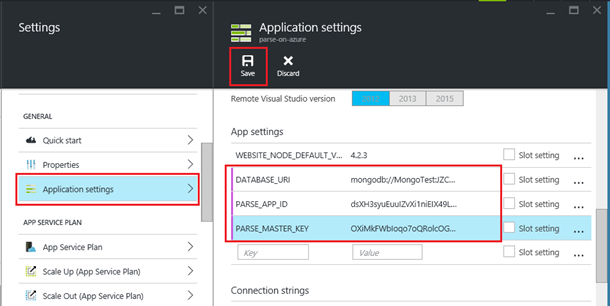
Parse server requires a certain set of data that is best conveyed as environment variables, available as app settings in the App Service. This data includes information about connecting to MongoDB and the values of the application ID and master key. Using app settings offers a higher level of security, since this important information does not remain in your code, where it may be unprotected and randomly placed in a public repository. To create a new app settings, in the Settings panel, click Application Settings , go down to the App settings section and create a new key / value pair for the following settings and then click Save .
After that, you should be able to access your Parse server using REST clients. If your Parse server requires other predefined values, for example, Facebook App ID, you can enable these values in app settings.
The Parse server demo project contains the hello function, which you can call using curl:
For developers using Parse, this should be familiar. But this time the response from the server will be completely different:
{"Result": "Hello from Azure."}
Now that you have verified that the Parse server is working correctly on Azure, it's time to add your cloud code to the backend.
Since you have now configured continuous deployment of your fork of the Parse server, the simplest way to add your cloud code to the backend will be to use this repository.
To add code to the backend, clone your fork of the Parse server to your local computer using a Git client or a command line tool such as GitBush.
From your local Parse deployment, copy the Cloud and / Public subfolders to your new local clone. Then add, commit and send the changes back to GitHub. After sending the changes to GitHub, you will see that the deployment to Azure was launched automatically. After the deployment is complete, you can use your cloud code.
Please note that in the current view you are working with the public GitHub repository. In order to keep your code private you need to create a duplicate of a private repository or switch to using a different deployment method .
The new Parse server and the new hosting environment require an update in the Parse SDK used by your mobile applications. Make sure you follow the instructions in the article Using the Parse SDK with the Parse server .
When you read the Parse migration guide , you'll find the following:
When you start using the Azure App Service cloud service for your Parse server, consider other Azure services that offer some features that were not in Parse or were not in Parse server. For example: analytics, scheduled background tasks, integration with third-party services, such as Twilio and SendGrid. The App Service also offers more built-in authentication options.
We hope you enjoy the Azure experience with hosting your Parse server. We wish you good luck in migrating from Parse to the new home of the backend for your application.
Easy migration path
As suggested in the migration guide, you can migrate the Parse backend of your application to another host where the server with the Parse API hosted on the Express base is deployed. Azure App Service offers a great alternative for hosting your Parse server implementation. In the end, the Node.js backend offered in the Mobile App in the Azure App Service is also Express. In order to further simplify the first steps, the Azure App Service team offered a ready-made deployment process that makes it much easier for you to launch the first Parse server in App Service.
Before you begin, you should read the Parse migration guide in order to understand what is supported and what is not in the new Parse server. One of the main features that are missing in the Parse server are push notifications, but Azure Notification Hubs will offer you a ready-made alternative.
When the migration is complete, you can continue to use the client Parse SDK in your applications to access the data (of course, clients will need to be updated to use the new SDK versions and use the new service layout.).
Before you start
Before you begin the process of creating a new Parse server based on Azure, you need to do the following steps:
')
Create your Azure account
If you do not already have an Azure account, then you will need to subscribe. A free trial period is also available .
Configure MongoDB
One of the current requirements of the Parse server is the use of MongoDB (Parse offers guidance for meeting the requirements of MongoDB ). Parse also offers a migration tool to transfer your data from hosting to MongoDB. If this option suits you, the Parse team recommends starting with MongoLab, a fully managed cloud-based database service, which you can easily subscribe to via the Azure Marketplace . Whatever you choose to host your MongoDB server, you will need connection information to run your Parse server.
In the future, you can try using the built-in Azure DocumentDB service managed by NoSQL document-oriented database service. In the following posts, we will reveal more details on how to migrate your data to DocumentDB and use DocumentDB with your Parse server.
Get a github account
The migration path to Azure, which is demonstrated in this article, requires you to have a GitHub account. Understanding how to clone a Git repository, send and confirm changes will also help you.
Creating a new App Service backend
The first step is to create a new backend in the App Service to host your Parse server. In the Azure portal, click + New > Web + Mobile > Web App and enter a unique name for your backend, then click Create .
This step will create a new instance of the backend service that will host your Parse server. Before this action, you may be interested in creating your own payment plan App Service, which affects the pricing of the service . You can always change your App Service plan in the future. For more information, read the detailed overview of App Service plans .
After the deployment of the service instance is complete, you will see a panel to manage your backend.
App Service offers several ways to host your applications. Next, you will need to configure the deployment from the Parse server repository.
Clone the Parse server repository and deploy to Azure
To simplify the procedure for publishing a Parse server to Azure, the App Service team forked a repository with an example of a Parse server to create a customized server that will work correctly in the App Service. On GitHub, install a repository with an example Parse server in your account.
You will use this fork as a source for deploying your backend. Return to the Settings panel in your backend, scroll down and click Continuous deployment > Choose source > GitHub , then click Authorization > Authorize , transfer the rights to the Azure management portal in the GitHub window that appears (you may need to enter a password), then click OK .
Now that the portal is connected to your GitHub account, select your fork parse-server-example as the project, select the master branch and click OK .
After that, the deployment will be completed and the Parse server code will be taken from the project on GitHub and published in Azure. If, for some reason, the deployment does not start automatically, you can start the synchronization manually by clicking the Sync button in the Deployments panel .
Configuring the backend
Parse server requires a certain set of data that is best conveyed as environment variables, available as app settings in the App Service. This data includes information about connecting to MongoDB and the values of the application ID and master key. Using app settings offers a higher level of security, since this important information does not remain in your code, where it may be unprotected and randomly placed in a public repository. To create a new app settings, in the Settings panel, click Application Settings , go down to the App settings section and create a new key / value pair for the following settings and then click Save .
| Key | Value |
| DATABASE_URI | MongoDB connection string |
| PARSE_APP_ID | Your ID Parse app Id |
| PARSE_MASTER_KEY | Your Parse master key |
After that, you should be able to access your Parse server using REST clients. If your Parse server requires other predefined values, for example, Facebook App ID, you can enable these values in app settings.
Try Hello, world!
The Parse server demo project contains the hello function, which you can call using curl:
$ curl -X POST \ > -H "X-Parse-Application-Id: dsXH3syuEuuIZvXi1niEtX49LLilneJK5oIBcLM3" \ > -H "Content-Type: application/json" \ > -d '{}' \ > http://parse-on-azure.azurewebsites.net/parse/functions/hello For developers using Parse, this should be familiar. But this time the response from the server will be completely different:
{"Result": "Hello from Azure."}
Now that you have verified that the Parse server is working correctly on Azure, it's time to add your cloud code to the backend.
Add your Parse cloud code
Since you have now configured continuous deployment of your fork of the Parse server, the simplest way to add your cloud code to the backend will be to use this repository.
To add code to the backend, clone your fork of the Parse server to your local computer using a Git client or a command line tool such as GitBush.
From your local Parse deployment, copy the Cloud and / Public subfolders to your new local clone. Then add, commit and send the changes back to GitHub. After sending the changes to GitHub, you will see that the deployment to Azure was launched automatically. After the deployment is complete, you can use your cloud code.
Please note that in the current view you are working with the public GitHub repository. In order to keep your code private you need to create a duplicate of a private repository or switch to using a different deployment method .
Updating Parse SDK in client applications
The new Parse server and the new hosting environment require an update in the Parse SDK used by your mobile applications. Make sure you follow the instructions in the article Using the Parse SDK with the Parse server .
What about push notifications?
When you read the Parse migration guide , you'll find the following:
Parse server does not implement push notification functionality. We recommend migration to other push providers.Do not panic. Azure offers a highly scalable Azure Notification Hubs service designed specifically for sending push notifications for mobile apps. As you did in Parse, Notification Hubs also store authentication information for each Push Notification Service (PNS): APNS, GCM, WNS, even Kindle, Chrome, and Baidu. The Notification Hubs library for Node.js will allow you to easily send push notifications from your cloud code or from any other backend service. We will offer you a detailed guide on how to use Notification Hubs to send notifications from the Parse server in the near future.
Conclusion
When you start using the Azure App Service cloud service for your Parse server, consider other Azure services that offer some features that were not in Parse or were not in Parse server. For example: analytics, scheduled background tasks, integration with third-party services, such as Twilio and SendGrid. The App Service also offers more built-in authentication options.
We hope you enjoy the Azure experience with hosting your Parse server. We wish you good luck in migrating from Parse to the new home of the backend for your application.
Source: https://habr.com/ru/post/276407/
All Articles