Procedurally Generated World Maps on Unity C #, Part 2
This is the second article in a series on procedurally generated maps using Unity and C # maps of the world. The cycle will consist of four articles.
Content
Part 1 :
')
Introduction
Noise generation
Beginning of work
Generate elevation map
Part 2 (this article):
Map folding on one axis
Map folding on both axes
Neighbor Search
Bit masks
Fill
Part 3 :
Heat map generation
Humidity Map Generation
River generation
Part 4 :
Biome generation
Spherical map generation
Map folding on one axis
(From the translator: I am not sure that wrapping in the context of mathematical terminology translates as "folding." If someone knows a more appropriate term, write, correct.)
In the first part of the cycle, we set up a small framework that will help us create maps. The height map we created earlier cannot be glued together.
This happened because we created two-dimensional noise data that cannot provide what we need. For the seamless folding of our world, we will add a new dimension to our noise generator.
With the help of three-dimensional noise, we can create data in a circular arrangement, while the final two-dimensional data can be rolled along one axis. The created data is like a cylinder in three-dimensional space.
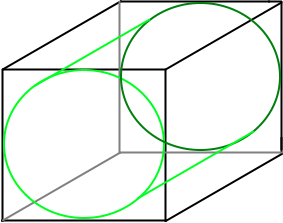
Imagine that we cut this cylinder and spread it on a plane. That is what we are going to do. The edges along which we cut the cylinder will not have a visible seam when gluing together.
To do this, you need to change the GetData function in the Generator class.
private void GetData(ImplicitModuleBase module, ref MapData mapData) { mapData = new MapData (Width, Height); // x,y - for (var x = 0; x < Width; x++) { for (var y = 0; y < Height; y++) { // float x1 = 0, x2 = 1; float y1 = 0, y2 = 1; float dx = x2 - x1; float dy = y2 - y1; // float s = x / (float)Width; float t = y / (float)Height; // float nx = x1 + Mathf.Cos (s * 2 * Mathf.PI) * dx / (2 * Mathf.PI); float ny = x1 + Mathf.Sin (s * 2 * Mathf.PI) * dx / (2 * Mathf.PI); float nz = t; float heightValue = (float)HeightMap.Get (nx, ny, nz); // if (heightValue > mapData.Max) mapData.Max = heightValue; if (heightValue < mapData.Min) mapData.Min = heightValue; mapData.Data [x, y] = heightValue; } } } Running this code will give us a great texture that can roll on the X axis.
Map folding on both axes
In order for our map to roll up on both axes, we need to create four-dimensional noise. This concept is not so easy to understand, it is difficult for our brain to think in four-dimensional space, but it is rather similar to the example of three-dimensional noise.
Instead of one cylinder, we will have two cylinders connected in four-dimensional space.
It should be noted that the creation of four-dimensional data takes much more time than two-dimensional.
The updated GetData () function will look like this:
private void GetData(ImplicitModuleBase module, ref MapData mapData) { mapData = new MapData (Width, Height); // x,y - for (var x = 0; x < Width; x++) { for (var y = 0; y < Height; y++) { // float x1 = 0, x2 = 2; float y1 = 0, y2 = 2; float dx = x2 - x1; float dy = y2 - y1; // float s = x / (float)Width; float t = y / (float)Height; // float nx = x1 + Mathf.Cos (s*2*Mathf.PI) * dx/(2*Mathf.PI); float ny = y1 + Mathf.Cos (t*2*Mathf.PI) * dy/(2*Mathf.PI); float nz = x1 + Mathf.Sin (s*2*Mathf.PI) * dx/(2*Mathf.PI); float nw = y1 + Mathf.Sin (t*2*Mathf.PI) * dy/(2*Mathf.PI); float heightValue = (float)HeightMap.Get (nx, ny, nz, nw); // if (heightValue > mapData.Max) mapData.Max = heightValue; if (heightValue < mapData.Min) mapData.Min = heightValue; mapData.Data[x,y] = heightValue; } } } This code creates a seamless texture procedurally generated from four-dimensional noise.
If you want to know more about how this works, read this and this article.
Neighbor Search
Now we have a seamless elevation map, and we are starting to approach our goal. Now we focus on the class Tile.
It would be very useful if each Tile object had a pointer to each of the adjacent objects (top, bottom, right and left). This is useful for tasks such as creating paths, bitmasks, and fills. Later we will look at these aspects in the article.
First we need to create variables in the Tile class:
public Tile Left; public Tile Right; public Tile Top; public Tile Bottom; The next part is pretty simple. We go through each tile, getting adjacent tiles to it. First, we will create several functions inside the Generator class to make it easier to get the neighbors of the Tile object.
private Tile GetTop(Tile t) { return Tiles [tX, MathHelper.Mod (tY - 1, Height)]; } private Tile GetBottom(Tile t) { return Tiles [tX, MathHelper.Mod (tY + 1, Height)]; } private Tile GetLeft(Tile t) { return Tiles [MathHelper.Mod(tX - 1, Width), tY]; } private Tile GetRight(Tile t) { return Tiles [MathHelper.Mod (tX + 1, Width), tY]; } MathHelper.Mod () collapses the x and y values based on the width and height of the map. In this way, we will never go beyond the map.
Then we need to create a function that assigns neighbors.
private void UpdateNeighbors() { for (var x = 0; x < Width; x++) { for (var y = 0; y < Height; y++) { Tile t = Tiles[x,y]; t.Top = GetTop(t); t.Bottom = GetBottom (t); t.Left = GetLeft (t); t.Right = GetRight (t); } } } Visually, she still does not so much. However, now each Tile object “knows” its neighbors, which is very important for further steps.
Bit masks
I decided to add this part to the article mainly for aesthetic reasons. Creating a bitmask in this context is setting the value of each tile based on the values of its neighbors. Take a look at this illustration:

Based on the data of the tile neighbors, we increase the bit mask, as shown on the left in the illustration. All options are shown on the right side. Note that all values are unique. This allows you to quickly determine the configuration of the unit.
The main advantage of a bitmask is the ability to assign a texture based on the value of the bitmask of each tile, which, with the right approach, makes the cards more beautiful and less grainy.
Another convenience of the bitmask is that if the value of the tile's bitmask is not equal to 15, we know that it is not an extreme map tile.
Add a function to the Tile class to perform the calculations. We take into account only those neighbors that have the same type of height as the analyzed tile.
public void UpdateBitmask() { int count = 0; if (Top.HeightType == HeightType) count += 1; if (Right.HeightType == HeightType) count += 2; if (Bottom.HeightType == HeightType) count += 4; if (Left.HeightType == HeightType) count += 8; Bitmask = count; } Since we already have pointers to neighboring tiles, and also assigned a height type (HeightType), this calculation is rather trivial. Now we will add a function to the Generator class to perform this calculation for all tiles:
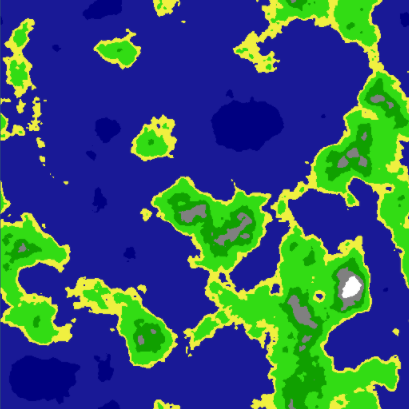
private void UpdateBitmasks() { for (var x = 0; x < Width; x++) { for (var y = 0; y < Height; y++) { Tiles [x, y].UpdateBitmask (); } } } Now if we change our TextureGenerator as follows:
// if (tiles[x,y].Bitmask != 15) pixels[x + y * width] = Color.Lerp(pixels[x + y * width], Color.black, 0.4f); We will see a clear boundary between types of heights:
Fill
It would be great to decide on the following questions:
- where is the lake?
- Where are the oceans?
- where are the sushi arrays?
- what size is each of them?
We can answer this question with a simple fill algorithm.
First we will create an object in which information about our tiles will be stored:
using UnityEngine; using System.Collections.Generic; public enum TileGroupType { Water, Land } public class TileGroup { public TileGroupType Type; public List<Tile> Tiles; public TileGroup() { Tiles = new List<Tile> (); } } The TileGroup class will hold a pointer to a list of tiles. He will also tell us whether a particular group is water or land.
The principle is to divide the connected parts of land and water into TileGroup collections.
We will also slightly modify the Tile class by adding two new variables:
public bool Collidable; public bool FloodFilled; Collidable is set in the LoadTiles () method. Anything that is not a water tile will assign a “true” value to the variable Collidable. The FloodFilled variable is used to track tiles that have already been processed by the fill algorithm.
To add a fill algorithm to the Generator class, you first need a couple of TileGroup variables:
List<TileGroup> Waters = new List<TileGroup> (); List<TileGroup> Lands = new List<TileGroup> (); Now we are ready to mark the land and water arrays on our map.
Since the map can be very large, we cannot use a recursive fill because it quickly leads to the elimination of stack overflow. Instead, we need to use a non-recursive approach to solving this problem:
private void FloodFill() { // Stack<Tile> stack = new Stack<Tile>(); for (int x = 0; x < Width; x++) { for (int y = 0; y < Height; y++) { Tile t = Tiles[x,y]; // , if (t.FloodFilled) continue; // if (t.Collidable) { TileGroup group = new TileGroup(); group.Type = TileGroupType.Land; stack.Push(t); while(stack.Count > 0) { FloodFill(stack.Pop(), ref group, ref stack); } if (group.Tiles.Count > 0) Lands.Add (group); } // else { TileGroup group = new TileGroup(); group.Type = TileGroupType.Water; stack.Push(t); while(stack.Count > 0) { FloodFill(stack.Pop(), ref group, ref stack); } if (group.Tiles.Count > 0) Waters.Add (group); } } } } private void FloodFill(Tile tile, ref TileGroup tiles, ref Stack<Tile> stack) { // if (tile.FloodFilled) return; if (tiles.Type == TileGroupType.Land && !tile.Collidable) return; if (tiles.Type == TileGroupType.Water && tile.Collidable) return; // TileGroup tiles.Tiles.Add (tile); tile.FloodFilled = true; // Tile t = GetTop (tile); if (!t.FloodFilled && tile.Collidable == t.Collidable) stack.Push (t); t = GetBottom (tile); if (!t.FloodFilled && tile.Collidable == t.Collidable) stack.Push (t); t = GetLeft (tile); if (!t.FloodFilled && tile.Collidable == t.Collidable) stack.Push (t); t = GetRight (tile); if (!t.FloodFilled && tile.Collidable == t.Collidable) stack.Push (t); } Using the above code, we separate the land and water arrays, and put them in TileGroups
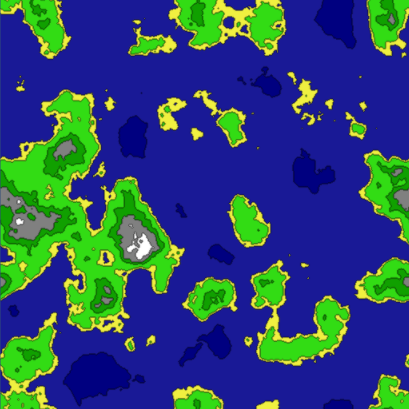
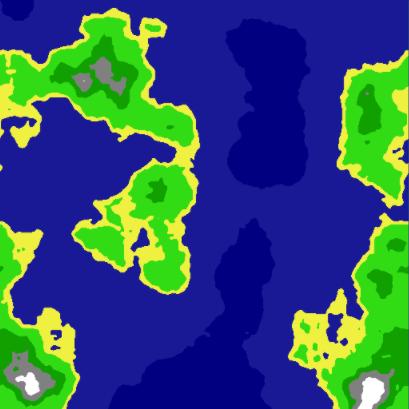
I generated a couple of textures to show how useful this data can be.
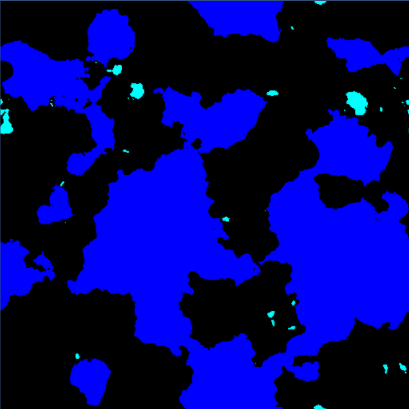
On the left image, all sushi tiles are black. Ocean tiles are blue, and lakes tiles are blue.
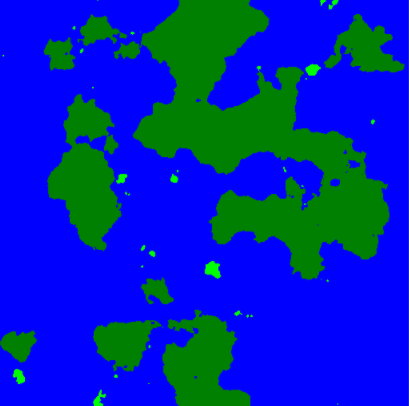
On the right image all water tiles are blue. Large land massifs have a dark green color, and the islands are light green.
As you can see, we now have much more information about the generated map, and this information answers all the questions we raised.
You can download the source code for the second part from github: World Generator Part 2 .
Third part
Source: https://habr.com/ru/post/276281/
All Articles