The Complete Guide to Using ASP.NET Core 1.0 (aka ASP.NET 5) Tag Helpers
Tag Helpers (Tag Helpers) - a new feature MVC, which is convenient to use to generate HTML code. They look like regular HTML elements and attributes, but are processed by the Razor server-side engine. Tag-helpers are in many ways an alternative syntax for HTML Helpers, but they also allow you to do something that was difficult or impossible to do using HTML Helpers. Each tag helper has its own behavior and capabilities. This article will look at the basic tag-helpers that exist in MVC 6 (ASP .NET Core 1.0, as it became known recently).
If you create a new MVC 6 project using Visual Studio, the built-in tag helper will be available by default. You can add tag-helpers from any assembly / namespace using the @addTagHelper directive in cshtml files.
To add tag helper globally for the entire project, add the @addTagHelper directive to the Views / _ViewImports.cshtml file.
As their names imply, these helper tags are designed to make it easy to add link and script tags to the HTML markup that you create. For example, they can be used to simplify adding links to a large number of files in the development environment, using a CDN with rolling back to local files, and invalidating the cache.
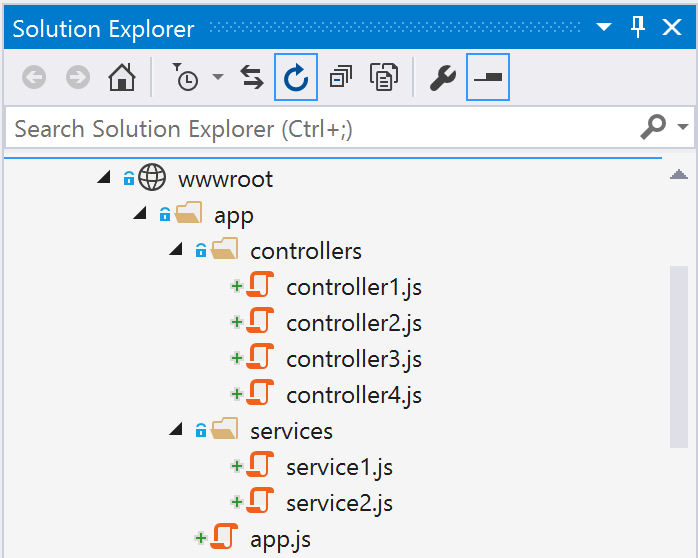
Consider an example in which we want to add links to all js files in a particular folder (Figure 1).
')
We can do this easily with the help of the Script tag-helper, adding all the files by the template:
As a result, the following HTML markup will be generated:
In this example, we used the /app/**/*.js template, because we needed to include js files from subfolders as well. If we want to add links to all js files from one folder, then we use the /app/*.js template.
Along with the asp-src-include attribute, the asp-src-exclude attribute also exists. For example, in the previous example, we can make it so that links to js files in the subfolder services are not added:
The tag-helper Link works the same way, only with the attributes asp-href-include and asp-href-exclude .
Now consider the attributes of these tag-helper, which will help connect the CDN. The advantages of using CDN to host files of such popular frameworks as jQuery and Bootstrap are obvious: the load on our servers is reduced and the client’s performance potentially increases (for example, the current version of the file may already be in the browser cache of the client). Among the minuses - you need to provide the possibility that the CDN is not responding and we need to give the files from your server. With the help of tag-helper it is easier to do:
The asp-fallback-test attributes allow you to specify properties or objects that need to be checked in order to find out if a file has been uploaded or not. If not, the file will be loaded using the path specified in the asp-fallback-href attribute. HTML generated markup:
Cache busting (cache invalidation) is a mechanism that adds a file version identifier (based on its contents) to the file name for css and js files. In this case, you can indicate to the browser that these files can be cached indefinitely, and if they are changed, their name will also change. To enable this mechanism, it is sufficient to add the asp-append-version attribute:
HTML generated:
The Environment tag-helper is used (usually with the Link and Script tag-helper) to generate different HTML markup depending on the environment: development vs test vs production. This helper tag is used as follows: wrap a part of the HTML code in this tag and specify the environment or environments for which this part of the markup should be included in the output file. In the following example, in the development environment, we connect all css files separately, and in the Staging and Production environments we use the combined minified version.
The following HTML code will be generated in the development environment:
In the Staging and Production environments, a link to the minified version will be added:
The environment tag itself is not sent to the client. Its value is set by the Hosting: Environment variable. In ASP.NET Core 1.0 (MVC 6), Hosting: Environment is used for the same purposes for which the Debug / Release configuration was previously used. Usually Hosting: Environment takes values: Development, Staging and Production. The default value when starting a site from Visual Studio is Development. You can verify this by opening the MVC project properties in Visual Studio (Figure 2).
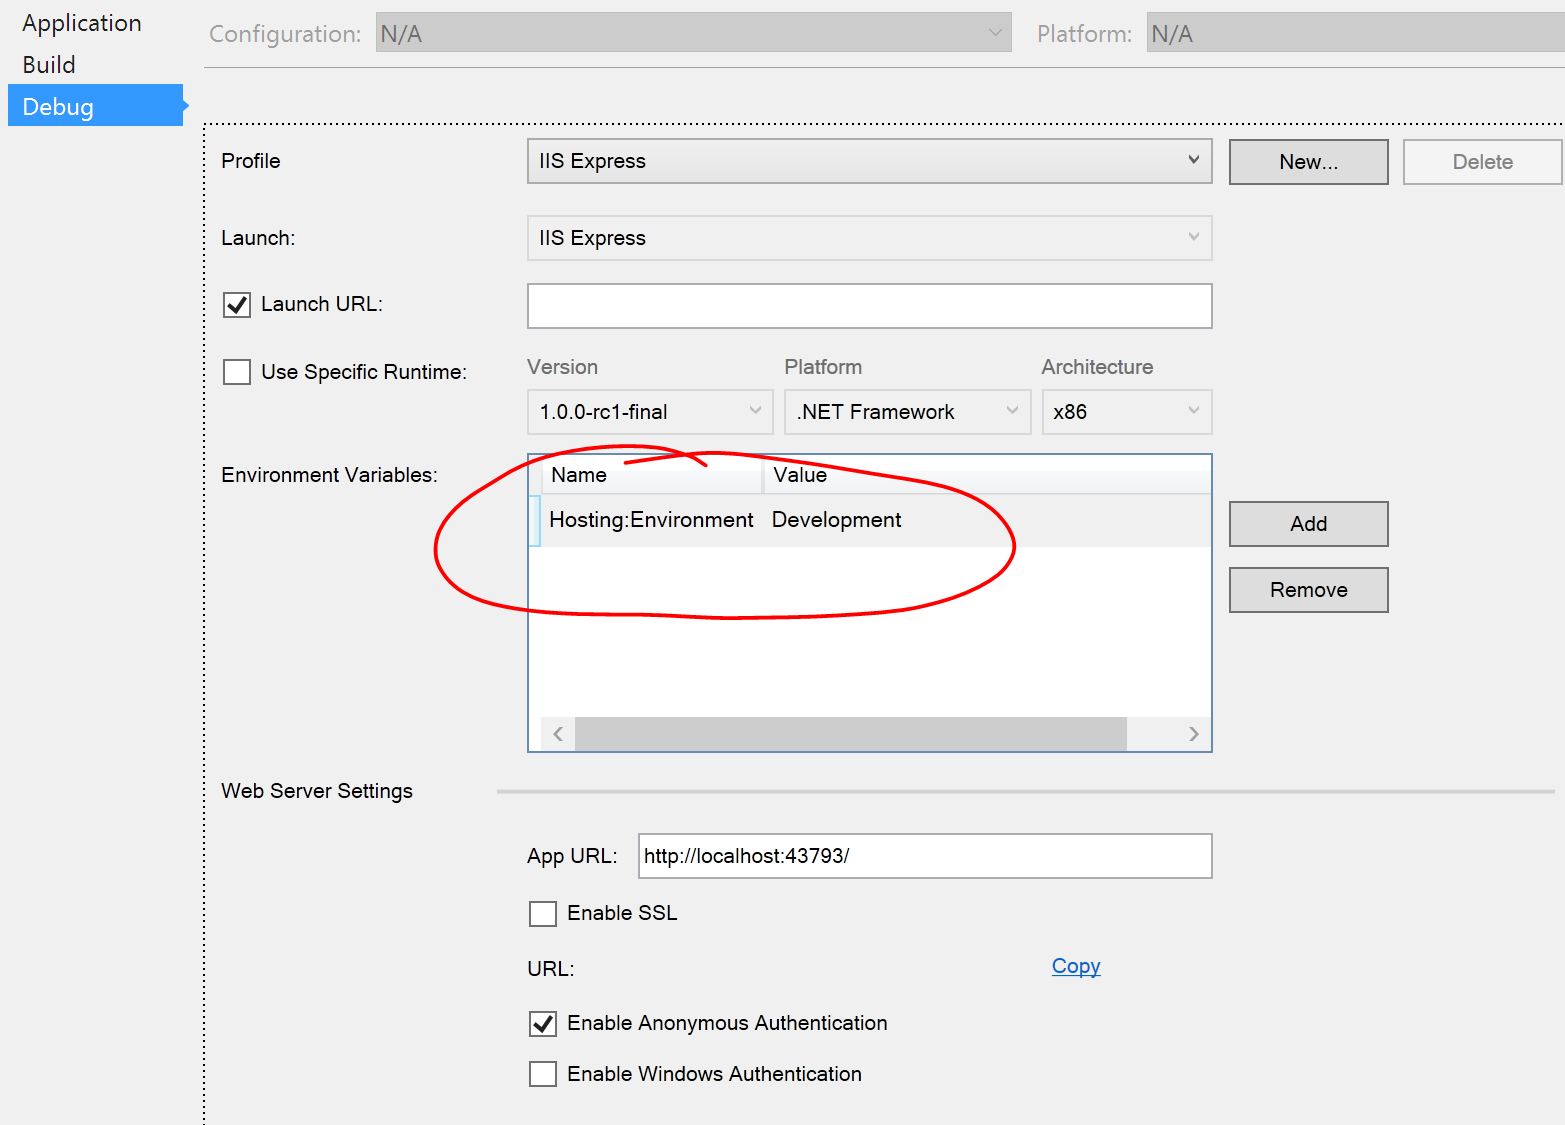
In order to test the Staging or Production environments, you need to create a new debug profile (Debug Profile) and set the required Hosting: Environment value. For example, consider how to create a Production profile (Figure 3).

Now you can select the “IIS Express - Prod” profile in the Run drop-down list in Visual Studio (Figure 4).

It is in this section that tag-helpers do their work best, increasing the readability and simplicity of cshtml views. As an example, consider a simple login form with the following model:
Now let's see how you can generate an input field for the UserName property.
When we use an HTML helper, we call the usual C # method, which returns some HTML markup. With tag-helpers, we deal immediately with the usual HTML markup, in which MVC specific attributes are found. As a result of both approaches, we get the same generated HTML code at the output:
Why is the tag-helper approach better? The code with them becomes readable and easier. For example, we want to add a class to the input field:
In this case, the code using tag-helper definitely wins in beauty and simplicity.
Now we give the code of the entire login form in two versions.
As we can see, the version with tag-helpers looks simpler and more readable. I especially like the lack of a using expression to generate a form, it always seemed like a kind of hack to me. It is also worth noting that we no longer need to explicitly add AntiForgeryToken to the form. The tag-helper form does this automatically, if you do not disable this behavior with the attribute asp-anti-forgery = ”false”.
Of course, Visual Studio highlights the tag-helper attributes so that they can be easily distinguished from standard HTML attributes (Figure 5):

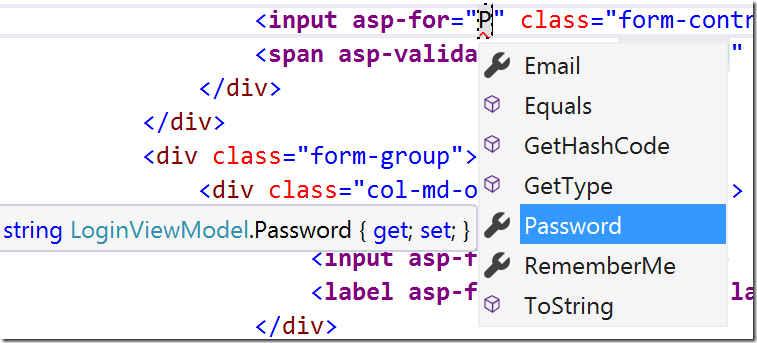
Inside the asp-for attributes, IntelliSense works, prompting the names of model properties (Figure 6).
Now consider the attributes of the tag helper form . For example, in order to associate a form with a specific action of a specific controller, the attributes asp-controller and asp-action are used :
As a result, the following HTML markup will be generated:
As we can see, AntiForgeryKey is added by default, and the form method is assigned the value POST. This behavior can be changed by adding a redefinition of the method attribute to the markup. All HTML attributes added to the markup will fall into the generated code. However, it is worth considering that the action attribute and one of the asp-controller / asp-action attributes cannot be specified at the same time; in this case, an exception will be thrown: “Cannot override the 'action' attribute for. "With an asp-route- or an" asp-action "or an asp-controller" attribute.
Sometimes the controller action needs to pass additional parameters. This can be done using attributes starting with asp-route- . For example, the ReturnUrl parameter is often passed to the Login action, here's how it can be done using tag-helpers:
As a result, the following HTML code will be generated:
Using this syntax, you can specify as many parameters as you need.
Another form helper tag supports the ability to specify a named route instead of a controller / action pair. Suppose we have defined a route named login in the MVC code:
Then we can specify this route for the form using the asp-route attribute:
Which in turn will generate exactly the same HTML markup as in the previous case:
Tag-helper input is an alternative to Html .EditorFor. In the following example, we will use such a simple presentation model class:
The input field for Email can be created using the asp-for attribute:
As a result, we get the following HTML markup:
The tag-helper adds attributes id and name , the value of which is specified by the property name specified in asp-for . The type of generated input was set to text because the property type is Email string. If the property type was bool, then the helper tag would generate input with the checkbox type. Below is a table of correspondence between .NET types and HTML input types.
The tag-helper input takes into account not only the type of the property, but also the validation attributes. For example, add [Required] to the Email property:
In this case, in the generated HTML markup will be the data-val-required attribute that is used by jQuery Validation.
If you add the [EmailAddress] attribute to the model property, input with the email type and the data-val-email attribute will be generated. Below is a table showing .NET attributes that correspond to different types of HTML input.
You can also use child objects in view models. Slightly complicate our model.
In the view, we can create an input field for Address.AddressLine1:
As a result, we get the following HTML code:
Of course, all the attributes that will be applied in the cshtml file to the input tag-helper will be added to the generated HTML markup.
Another feature provided by the tag-helper input is the use of the usual <a href= en msdn.microsoft.com/en-us/library/dwhawy9k.aspx ”> format string, which is widely used in .NET. The asp-format attribute is used for this, for example:
In this case, the number will be shown with 4 decimal places, for example, 1.2000. No additional attributes are added.
As we already said, Visual Studio provides IntelliSense for tag-helper input , highlights errors if there is an error in the property name. The exception in this case will be thrown out at compile time, but by default, Razor views are not precompiled, so this error will only be visible the first time the page is accessed.
The tag-helper textarea is in many ways similar to the previously considered input and is an alternative to Html .TextAreaFor. It also uses the asp-for attribute. Consider the following view model:
We use the tag-helper textarea as follows:
What will generate the following HTML markup:
In the generated textarea element, the name, id are defined, validation attributes are added.
We saw that adding validation attributes is easy, now let's discuss where to show validation messages. Previously, the Html .ValidationMessageFor method was used for this, now the asp-validation-for attribute is applied to the span element.
This will generate the following HTML markup, in case the Email field was made required, but was not filled in:
The tag-helper found a validation message for the Email property and added it to the contents of the span element. He also added data-valmsg- * attributes so that jQuery client validation for the Email field works with this element. Typically, a validation tag helper will be placed on the form next to the field that it validates. As with all the other tag-helper, all the HTML attributes that you add to it will fall into the generated HTML markup.
Now consider an analogue of Html. ValidationSummary (true) - tag-helper Validation Summary , which aggregates validation messages for validation messages of the level of the entire model and / or the level of the properties of the model. This tag-helper is an asp-validation-summary attribute that is added to the div element. Possible values for this attribute:
This code will generate the following markup in case there are no validation errors:
If we have validation errors:
The tag-helper label is the mostboring simple tag-helper, replacing Html .LabelFor. Its only task is to generate a label element for a field whose name is specified in the asp-for attribute. The value for the contents of this label is set by the Name property of the Description attribute. Consider the following presentation model:
Now use the tag helper label :
This will result in the following HTML markup:
The select tag helper is used to create drop-down lists in HTML markup instead of Html . DropDownListFor. Suppose we have a model with the CountryCode property that we want to fill in using the drop-down list:
Now, using the tag-helper, we associate this field with the select element.
And we get the following HTML code:
Of course, this code is not of practical value, because the drop-down list is still empty. There are 2 ways to fill it. First (for very small lists): set all possible options manually in the view:
In this case, the value will be selected based on the value of the property in the model. For example, if CountryCode is “CA”, the following HTML markup will be generated:
The second way to set possible values is dynamic loading from a data source. For this you need a data source of type IEnumerable <SelectListItem> (or SelectList ), even if in our case it is available in ViewBag.Countries. To bind the data source, the asp-items attribute is used:
In order for the generated select element to support the ability to select multiple elements, it is sufficient that the model property has an IEnumerable type, for example:
In the tag-use code, we do not change anything:
But the generated HTML markup will be different:
Anchor tag helper is used to generate links and is a replacement for both Html .ActionLink and Url .Action, with which we usually wrote like this:
As a result, we got two identical links:
Now with the help of anchor tag-helper and attributes asp-controller , asp-action the link can be added as follows:
As with the other tag-helpers, using them makes it easier to add additional classes and attributes for these elements, unlike Html .ActionLink (“Register”, “Create”, “Account”, null, new { class = “css- class "}).
If you need to pass additional parameters to the controller's method, this can be done the same way as for the form tag helper: using the asp-route- * attributes, for example:
You can also specify a named route (again, just like for a form ):
Previously used Html .ActionLink allowed to specify the protocol, host and fragment of the generated URL. The tag helper has its attributes for this:
The cache helper tag has no analogue among Html helper, and it is not an ordinary HTML element. It allows you to cache your contents into memory. Before each processing its content, it checks to see if it has already been saved in MemoryCache. If the content is found in the cache, it is sent immediately to the Razor engine, if not - first Razor will process it, and then it will be saved to the cache. By default, the helper tag will generate a unique ID for its content. This is how it can be used in views:
The cache tag will not be included in the generated HTML markup, it is just a directive for the engine that for 10 minutes you can send the already processed and cached version of the _WhatsNew view to the client.
If you do not specify the lifetime of the cached version, then by default it will be given the entire lifetime of the application (or until the first recycle of the pool). The cache helper tag supports the following options for setting the lifetime of a cached object:
By default, the object key in the cache is generated uniquely based on the tag-helper context, which allows using multiple cache helper tags on the same page without confusing their contents in the cache. Using the vary-by attributes, you can specify more complex keys that allow you to cache different contents of the cache tag helper for different requests. Consider the possible options for vary-by attributes .
Since all cached content is stored in IMemoryCache , its size is limited by the size of available RAM. Therefore, if the process starts to run out of memory, the cache will delete its elements to free up memory. Using the priority attribute, you can specify which objects should be deleted first and which objects should be left in the cache. The possible values for this attribute are Low, Normal, High, and NeverRemove. For example, we point out that the contents of the tag-helper can be considered non-priority:
The limitations of this tag-helper are that it uses MemoryCache in its implementation. The first limitation is due to the fact that any restart of the process, application pool recycling and a similar action invalidates our entire cache, in the cloud this can happen if the site moves to a new machine. Therefore, this cache cannot be considered reliable. The second limitation is also due to the fact that the cache is stored in memory. If a user within a session is redirected to different web servers, he may potentially see different contents of the same element. This is due to the fact that each server will have its own cache version, the MemoryCache implementation is not distributed. In this case, the user can bind to the same server (sticky session, server affinity).
This easy-to-use tag helper consists of just one asp-append-version attribute added to the img tag . If this attribute is set to true, then a line will be added to the image URL, depending on the image content (as in the case of css / js files), which will allow the browser to cache it indefinitely.
As a result, similar HTML markup will be generated:
Using this tag-helper simplifies the choice of a site image caching policy: with a small caching time, the benefit of its application is leveled; with a large one, the client potentially continues to use the old locally cached version of the image for a long time when the image is updated.
On the one hand, it’s bad that all our views with the MVC version <= 5 need to be rewritten, but using tag-helpers they look cleaner, they are easier to use for designers / layout designers, now they look like plain HTML with additional attributes. Next time we will consider creating your tag-helper, but for now download VS 2015 Community Edition, create your first ASP.NET Core 1.0 project!
Documentation on tag-helpers
Documentation on the latest version of ASP.NET MVC
Visual Studio 2015 Community Edition
Adding tag-helper for use in view
If you create a new MVC 6 project using Visual Studio, the built-in tag helper will be available by default. You can add tag-helpers from any assembly / namespace using the @addTagHelper directive in cshtml files.
@addTagHelper "*, Microsoft.AspNet.Mvc.TagHelpers" To add tag helper globally for the entire project, add the @addTagHelper directive to the Views / _ViewImports.cshtml file.
Link and Script
As their names imply, these helper tags are designed to make it easy to add link and script tags to the HTML markup that you create. For example, they can be used to simplify adding links to a large number of files in the development environment, using a CDN with rolling back to local files, and invalidating the cache.
Consider an example in which we want to add links to all js files in a particular folder (Figure 1).
')
We can do this easily with the help of the Script tag-helper, adding all the files by the template:
<script asp-src-include="~/app/**/*.js"></script> As a result, the following HTML markup will be generated:
<script src="/app/app.js"></script> <script src="/app/controllers/controller1.js"></script> <script src="/app/controllers/controller2.js"></script> <script src="/app/controllers/controller3.js"></script> <script src="/app/controllers/controller4.js"></script> <script src="/app/services/service1.js"></script> <script src="/app/services/service2.js"></script> In this example, we used the /app/**/*.js template, because we needed to include js files from subfolders as well. If we want to add links to all js files from one folder, then we use the /app/*.js template.
Along with the asp-src-include attribute, the asp-src-exclude attribute also exists. For example, in the previous example, we can make it so that links to js files in the subfolder services are not added:
<script asp-src-include="~/app/**/*.js" asp-src-exclude="~/app/services/**/*.js" > </script> The tag-helper Link works the same way, only with the attributes asp-href-include and asp-href-exclude .
Now consider the attributes of these tag-helper, which will help connect the CDN. The advantages of using CDN to host files of such popular frameworks as jQuery and Bootstrap are obvious: the load on our servers is reduced and the client’s performance potentially increases (for example, the current version of the file may already be in the browser cache of the client). Among the minuses - you need to provide the possibility that the CDN is not responding and we need to give the files from your server. With the help of tag-helper it is easier to do:
<link rel="stylesheet" href="//ajax.aspnetcdn.com/ajax/bootstrap/3.0.0/css/bootstrap.min.css" asp-fallback-href="~/lib/bootstrap/css/bootstrap.min.css" asp-fallback-test-class="hidden" asp-fallback-test-property="visibility" asp-fallback-test-value="hidden" /> <script src="//ajax.aspnetcdn.com/ajax/bootstrap/3.0.0/bootstrap.min.js" asp-fallback-src="~/lib/bootstrap/js/bootstrap.min.js" asp-fallback-test="window.jQuery"> </script> The asp-fallback-test attributes allow you to specify properties or objects that need to be checked in order to find out if a file has been uploaded or not. If not, the file will be loaded using the path specified in the asp-fallback-href attribute. HTML generated markup:
<link rel="stylesheet" href="//ajax.aspnetcdn.com/ajax/bootstrap/3.0.0/css/bootstrap.min.css" /> <meta name="x-stylesheet-fallback-test" class="hidden" /> <script>!function(a,b,c){var d,e=document,f=e.getElementsByTagName("SCRIPT"),g=f[f.length-1].previousElementSibling,h=e.defaultView&&e.defaultView.getComputedStyle?e.defaultView.getComputedStyle(g):g.currentStyle;if(h&&h[a]!==b)for(d=0;d<c.length;d++)e.write('<link rel="stylesheet" href="'+c[d]+'"/>')}("visibility","hidden",["\/lib\/bootstrap\/css\/bootstrap.min.css"]);</script> <script src="//ajax.aspnetcdn.com/ajax/bootstrap/3.0.0/bootstrap.min.js"> </script> <script>(typeof($.fn.modal) === 'undefined'||document.write("<script src=\"\/lib\/bootstrap\/js\/bootstrap.min.js\"><\/script>"));</script> Cache busting (cache invalidation) is a mechanism that adds a file version identifier (based on its contents) to the file name for css and js files. In this case, you can indicate to the browser that these files can be cached indefinitely, and if they are changed, their name will also change. To enable this mechanism, it is sufficient to add the asp-append-version attribute:
<link rel="stylesheet" href="~/css/site.min.css" asp-append-version="true"/> HTML generated:
<link rel="stylesheet" href="/css/site.min.css?v=UdxKHVNJA5vb1EsG9O9uURFDfEE3j1E3DgwL6NiDGMc" /> Environment
The Environment tag-helper is used (usually with the Link and Script tag-helper) to generate different HTML markup depending on the environment: development vs test vs production. This helper tag is used as follows: wrap a part of the HTML code in this tag and specify the environment or environments for which this part of the markup should be included in the output file. In the following example, in the development environment, we connect all css files separately, and in the Staging and Production environments we use the combined minified version.
<environment names="Development"> <link rel="stylesheet" href="~/css/site1.css" /> <link rel="stylesheet" href="~/css/site2.css" /> </environment> <environment names="Staging,Production"> <link rel="stylesheet" href="~/css/site.min.css" asp-file-version="true"/> </environment> The following HTML code will be generated in the development environment:
<link rel="stylesheet" href="/css/site1.css" /> <link rel="stylesheet" href="/css/site2.css" /> In the Staging and Production environments, a link to the minified version will be added:
<link rel="stylesheet" href="/css/site.min.css?v=UdxKHVNJA5vb1EsG9O9uURFDfEE3j1E3DgwL6NiDGMc"/> The environment tag itself is not sent to the client. Its value is set by the Hosting: Environment variable. In ASP.NET Core 1.0 (MVC 6), Hosting: Environment is used for the same purposes for which the Debug / Release configuration was previously used. Usually Hosting: Environment takes values: Development, Staging and Production. The default value when starting a site from Visual Studio is Development. You can verify this by opening the MVC project properties in Visual Studio (Figure 2).
In order to test the Staging or Production environments, you need to create a new debug profile (Debug Profile) and set the required Hosting: Environment value. For example, consider how to create a Production profile (Figure 3).
- Right-click on the project in the Solution Explorer and select Properties.
- Select the Debug tab.
- Click New ... to create a new profile and name it “IIS Express - Prod”.
- In the Launch drop-down list, select “IIS Express”.
- Add a new environment variable with the name “Hosting: Environment” and the value “Production”.
- Save the project.
Now you can select the “IIS Express - Prod” profile in the Run drop-down list in Visual Studio (Figure 4).
Form
It is in this section that tag-helpers do their work best, increasing the readability and simplicity of cshtml views. As an example, consider a simple login form with the following model:
public class LoginViewModel { public string UserName { get; set; } public string Password { get; set; } } Now let's see how you can generate an input field for the UserName property.
<!-- Html Helper (MVC 5 )--> @Html.EditorFor(l => l.UserName) <!-- Tag Helper (MVC 6)--> <input asp-for="UserName" /> When we use an HTML helper, we call the usual C # method, which returns some HTML markup. With tag-helpers, we deal immediately with the usual HTML markup, in which MVC specific attributes are found. As a result of both approaches, we get the same generated HTML code at the output:
<input name="UserName" class="text-box single-line" id="UserName" type="text" value=""> Why is the tag-helper approach better? The code with them becomes readable and easier. For example, we want to add a class to the input field:
<!-- Html Helper (MVC 5 )--> @Html.EditorFor(l => l.UserName, new { htmlAttributes = new { @class = "form-control" } }) <!-- Tag Helper (MVC 6)--> <input asp-for="UserName" class="form-control" /> In this case, the code using tag-helper definitely wins in beauty and simplicity.
Now we give the code of the entire login form in two versions.
Form code using HTML Helpers
@using (Html.BeginForm("Login", "Account", new { ReturnUrl = ViewBag.ReturnUrl }, FormMethod.Post, new { role = "form" })) { @Html.AntiForgeryToken() @Html.ValidationSummary(true, "", new { @class = "text-danger" }) <div class="form-group"> <div class="row"> @Html.LabelFor(m => m.UserName, new { @class = "col-md-2 control-label" }) <div class="col-md-10"> @Html.TextBoxFor(m => m.UserName, new { @class = "form-control" }) @Html.ValidationMessageFor(m => m.UserName, "", new { @class = "text-danger" }) </div> </div> </div> <div class="form-group"> <div class="row"> @Html.LabelFor(m => m.Password, new { @class = "col-md-2 control-label" }) <div class="col-md-10"> @Html.PasswordFor(m => m.Password, new { @class = "form-control" }) @Html.ValidationMessageFor(m => m.Password, "", new { @class = "text-danger" }) </div> </div> </div> <div class="form-group"> <div class="row"> <div class="col-md-offset-2 col-md-2"> <input type="submit" value="Log in" class="btn btn-primary" /> </div> </div> </div> } Same tag-helper form
<form asp-controller="Account" asp-action="Login" asp-route-returnurl="@ViewBag.ReturnUrl" method="post" class="form-horizontal" role="form"> <div asp-validation-summary="ValidationSummary.All" class="text-danger"></div> <div class="form-group"> <label asp-for="UserName" class="col-md-2 control-label"></label> <div class="col-md-10"> <input asp-for="UserName" class="form-control" /> <span asp-validation-for="UserName" class="text-danger"></span> </div> </div> <div class="form-group"> <label asp-for="Password" class="col-md-2 control-label"></label> <div class="col-md-10"> <input asp-for="Password" class="form-control" /> <span asp-validation-for="Password" class="text-danger"></span> </div> </div> <div class="form-group"> <div class="col-md-offset-2 col-md-10"> <input type="submit" value="Log in" class="btn btn-default" /> </div> </div> </form> As we can see, the version with tag-helpers looks simpler and more readable. I especially like the lack of a using expression to generate a form, it always seemed like a kind of hack to me. It is also worth noting that we no longer need to explicitly add AntiForgeryToken to the form. The tag-helper form does this automatically, if you do not disable this behavior with the attribute asp-anti-forgery = ”false”.
Of course, Visual Studio highlights the tag-helper attributes so that they can be easily distinguished from standard HTML attributes (Figure 5):
Inside the asp-for attributes, IntelliSense works, prompting the names of model properties (Figure 6).
Now consider the attributes of the tag helper form . For example, in order to associate a form with a specific action of a specific controller, the attributes asp-controller and asp-action are used :
<form asp-controller="Account" asp-action="Login"> // </form> As a result, the following HTML markup will be generated:
<form action="/Account/Login" method="post"> // <input name="__RequestVerificationToken" type="hidden" value="CfDJ8AFtmUdx-b5MkQvAyGYbjFmMGSMv0Fmk7gG4RqGXlkNV6yqKqj6fgqnOh4TLT6ZnWSaqtAbKkgpEB20lvfkc2iOKZKIqt3tJ4Jij8DjmatTrZo-DKVOLwwOzj3kB8VKpFwc0rQMjaJTTC_gVv5f0vAg"> </form> type = "hidden" value = "CfDJ8AFtmUdx-b5MkQvAyGYbjFmMGSMv0Fmk7gG4RqGXlkNV6yqKqj6fgqnOh4TLT6ZnWSaqtAbKkgpEB20lvfkc2iOKZKIqt3tJ4Jij8DjmatTrZo-DKVOLwwOzj3kB8VKpFwc0rQMjaJTTC_gVv5f0vAg"> <form action="/Account/Login" method="post"> // <input name="__RequestVerificationToken" type="hidden" value="CfDJ8AFtmUdx-b5MkQvAyGYbjFmMGSMv0Fmk7gG4RqGXlkNV6yqKqj6fgqnOh4TLT6ZnWSaqtAbKkgpEB20lvfkc2iOKZKIqt3tJ4Jij8DjmatTrZo-DKVOLwwOzj3kB8VKpFwc0rQMjaJTTC_gVv5f0vAg"> </form> As we can see, AntiForgeryKey is added by default, and the form method is assigned the value POST. This behavior can be changed by adding a redefinition of the method attribute to the markup. All HTML attributes added to the markup will fall into the generated code. However, it is worth considering that the action attribute and one of the asp-controller / asp-action attributes cannot be specified at the same time; in this case, an exception will be thrown: “Cannot override the 'action' attribute for. "With an asp-route- or an" asp-action "or an asp-controller" attribute.
Sometimes the controller action needs to pass additional parameters. This can be done using attributes starting with asp-route- . For example, the ReturnUrl parameter is often passed to the Login action, here's how it can be done using tag-helpers:
<form asp-controller="Account" asp-action="Login" asp-route-returnurl="@ViewBag.ReturnUrl" method="post" > </form> As a result, the following HTML code will be generated:
<form action="/Account/Login?returnurl=%2FHome%2FAbout" method="post"> <input name="__RequestVerificationToken" type="hidden" value="CfDJ8AFtmUdx-b5MkQvAyGYbjFmMGSMv0Fmk7gG4RqGXlkNV6yqKqj6fgqnOh4TLT6ZnWSaqtAbKkgpEB20lvfkc2iOKZKIqt3tJ4Jij8DjmatTrZo-DKVOLwwOzj3kB8VKpFwc0rQMjaJTTC_gVv5f0vAg"> </form> type = "hidden" value = "CfDJ8AFtmUdx-b5MkQvAyGYbjFmMGSMv0Fmk7gG4RqGXlkNV6yqKqj6fgqnOh4TLT6ZnWSaqtAbKkgpEB20lvfkc2iOKZKIqt3tJ4Jij8DjmatTrZo-DKVOLwwOzj3kB8VKpFwc0rQMjaJTTC_gVv5f0vAg"> <form action="/Account/Login?returnurl=%2FHome%2FAbout" method="post"> <input name="__RequestVerificationToken" type="hidden" value="CfDJ8AFtmUdx-b5MkQvAyGYbjFmMGSMv0Fmk7gG4RqGXlkNV6yqKqj6fgqnOh4TLT6ZnWSaqtAbKkgpEB20lvfkc2iOKZKIqt3tJ4Jij8DjmatTrZo-DKVOLwwOzj3kB8VKpFwc0rQMjaJTTC_gVv5f0vAg"> </form> Using this syntax, you can specify as many parameters as you need.
Another form helper tag supports the ability to specify a named route instead of a controller / action pair. Suppose we have defined a route named login in the MVC code:
routes.MapRoute( name: "login", template: "login", defaults: new { controller = "Account", action = "Login" }); Then we can specify this route for the form using the asp-route attribute:
<form asp-route="login" asp-route-returnurl="@ViewBag.ReturnUrl" method="post" > </form> Which in turn will generate exactly the same HTML markup as in the previous case:
<form action="/login?returnurl=%2FHome%2FAbout" method="post"> <input name="__RequestVerificationToken" type="hidden" value="CfDJ8AFtmUdx-b5MkQvAyGYbjFmMGSMv0Fmk7gG4RqGXlkNV6yqKqj6fgqnOh4TLT6ZnWSaqtAbKkgpEB20lvfkc2iOKZKIqt3tJ4Jij8DjmatTrZo-DKVOLwwOzj3kB8VKpFwc0rQMjaJTTC_gVv5f0vAg"> </form> type = "hidden" value = "CfDJ8AFtmUdx-b5MkQvAyGYbjFmMGSMv0Fmk7gG4RqGXlkNV6yqKqj6fgqnOh4TLT6ZnWSaqtAbKkgpEB20lvfkc2iOKZKIqt3tJ4Jij8DjmatTrZo-DKVOLwwOzj3kB8VKpFwc0rQMjaJTTC_gVv5f0vAg"> <form action="/login?returnurl=%2FHome%2FAbout" method="post"> <input name="__RequestVerificationToken" type="hidden" value="CfDJ8AFtmUdx-b5MkQvAyGYbjFmMGSMv0Fmk7gG4RqGXlkNV6yqKqj6fgqnOh4TLT6ZnWSaqtAbKkgpEB20lvfkc2iOKZKIqt3tJ4Jij8DjmatTrZo-DKVOLwwOzj3kB8VKpFwc0rQMjaJTTC_gVv5f0vAg"> </form> Input
Tag-helper input is an alternative to Html .EditorFor. In the following example, we will use such a simple presentation model class:
public class SimpleViewModel { public string Email { get; set; } } The input field for Email can be created using the asp-for attribute:
<input asp-for="Email" /> As a result, we get the following HTML markup:
<input type="text" id="Email" name="Email" value="thisaddress@isfrommymodel.com" /> The tag-helper adds attributes id and name , the value of which is specified by the property name specified in asp-for . The type of generated input was set to text because the property type is Email string. If the property type was bool, then the helper tag would generate input with the checkbox type. Below is a table of correspondence between .NET types and HTML input types.
| .NET type | HTML input type |
| String | type = "text" |
| Datetime | type = "datetime" |
| Byte | type = "number" |
| Int16, Int32, Int64 | type = "number" |
| Single, Double | type = "number" |
| Boolean | type = ”checkbox” |
The tag-helper input takes into account not only the type of the property, but also the validation attributes. For example, add [Required] to the Email property:
public class SimpleViewModel { [Required] public string Email { get; set; } } In this case, in the generated HTML markup will be the data-val-required attribute that is used by jQuery Validation.
<input type="text" data-val="true" data-val-required="The Email field is required." id="Email" name="Email" value="" /> If you add the [EmailAddress] attribute to the model property, input with the email type and the data-val-email attribute will be generated. Below is a table showing .NET attributes that correspond to different types of HTML input.
| Attribute | HTML input type |
| [EmailAddress] | type = ”email” |
| [Url] | type = ”url” |
| [HiddenInput] | type = "hidden" |
| [DataType (DataType.Password)] | type = ”password” |
| [DataType (DataType.Date)] | type = "date" |
| [DataType (DataType.Time)] | type = "time" |
You can also use child objects in view models. Slightly complicate our model.
public class AddressViewModel { public string AddressLine1 { get; set; } } public class RegisterViewModel { public string UserName { get; set;} public AddressViewModel Address { get; set; } } In the view, we can create an input field for Address.AddressLine1:
<input asp-for="Address.AddressLine1" /> As a result, we get the following HTML code:
<input name="Address.AddressLine1" id="Address_AddressLine1" type="text" value=""> Of course, all the attributes that will be applied in the cshtml file to the input tag-helper will be added to the generated HTML markup.
Another feature provided by the tag-helper input is the use of the usual <a href= en msdn.microsoft.com/en-us/library/dwhawy9k.aspx ”> format string, which is widely used in .NET. The asp-format attribute is used for this, for example:
<input asp-for="SomeNumber" asp-format="{0:N4}"/> In this case, the number will be shown with 4 decimal places, for example, 1.2000. No additional attributes are added.
As we already said, Visual Studio provides IntelliSense for tag-helper input , highlights errors if there is an error in the property name. The exception in this case will be thrown out at compile time, but by default, Razor views are not precompiled, so this error will only be visible the first time the page is accessed.
TextArea
The tag-helper textarea is in many ways similar to the previously considered input and is an alternative to Html .TextAreaFor. It also uses the asp-for attribute. Consider the following view model:
public class SimpleViewModel { [Required] [MaxLength(5000)] public string Description { get; set; } } We use the tag-helper textarea as follows:
<textarea asp-for="Description"></textarea> What will generate the following HTML markup:
<textarea name="Description" id="Description" data-val-required="The Description field is required." data-val-maxlength-max="5000" data-val-maxlength="The field Description must be a string or array type with a maximum length of '5000'." data-val="true"></textarea> In the generated textarea element, the name, id are defined, validation attributes are added.
Validation
We saw that adding validation attributes is easy, now let's discuss where to show validation messages. Previously, the Html .ValidationMessageFor method was used for this, now the asp-validation-for attribute is applied to the span element.
<span asp-validation-for="Email"></span> This will generate the following HTML markup, in case the Email field was made required, but was not filled in:
<span class="field-validation-error" data-valmsg-replace="true" data-valmsg-for="Email"> The Email field is required.</span> The tag-helper found a validation message for the Email property and added it to the contents of the span element. He also added data-valmsg- * attributes so that jQuery client validation for the Email field works with this element. Typically, a validation tag helper will be placed on the form next to the field that it validates. As with all the other tag-helper, all the HTML attributes that you add to it will fall into the generated HTML markup.
Now consider an analogue of Html. ValidationSummary (true) - tag-helper Validation Summary , which aggregates validation messages for validation messages of the level of the entire model and / or the level of the properties of the model. This tag-helper is an asp-validation-summary attribute that is added to the div element. Possible values for this attribute:
- ValidationSummary.All - both the model level messages and messages for all its properties will be displayed.
- ValidationSummary.ModelOnly - only messages of the entire model level will be shown
- ValidationSummary.None - the helper tag does nothing as if you did not add the asp-validation-summary attribute. The only application seems to be the quick disconnection of all validation messages for some of their development needs.
<div asp-validation-summary="ValidationSummary.All"></div> This code will generate the following markup in case there are no validation errors:
<div class="validation-summary-valid" data-valmsg-summary="true"> <ul> <li style="display: none;"></li> </ul> </div> If we have validation errors:
<div class="validation-summary-errors" data-valmsg-summary="true"> <ul> <li>The Email field is required.</li> <li>The Password field is required.</li> </ul> </div> Label
The tag-helper label is the most
public class SimpleViewModel { [Display(Name="Email Address")] public string Email { get; set; } } Now use the tag helper label :
<label asp-for="Email"></label> This will result in the following HTML markup:
<label for="Email">Email Address</label> Select
The select tag helper is used to create drop-down lists in HTML markup instead of Html . DropDownListFor. Suppose we have a model with the CountryCode property that we want to fill in using the drop-down list:
public class SimpleViewModel { public string CountryCode { get; set; } } Now, using the tag-helper, we associate this field with the select element.
<select asp-for="CountryCode"></select> And we get the following HTML code:
<select name="CountryCode" id="CountryCode"> </select> Of course, this code is not of practical value, because the drop-down list is still empty. There are 2 ways to fill it. First (for very small lists): set all possible options manually in the view:
<select asp-for="CountryCode"> <option value="CA">Canada</option> <option value="US">US</option> <option value="--">Other</option> </select> In this case, the value will be selected based on the value of the property in the model. For example, if CountryCode is “CA”, the following HTML markup will be generated:
<select name="CountryCode" id="CountryCode"> <option selected="selected" value="CA">Canada</option> <option value="US">US</option> <option value="--">Other</option> </select> The second way to set possible values is dynamic loading from a data source. For this you need a data source of type IEnumerable <SelectListItem> (or SelectList ), even if in our case it is available in ViewBag.Countries. To bind the data source, the asp-items attribute is used:
<select asp-for="CountryCode" asp-items="ViewBag.Countries"> </select> In order for the generated select element to support the ability to select multiple elements, it is sufficient that the model property has an IEnumerable type, for example:
public class SimpleViewModel { public IEnumerable<string> CountryCodes { get; set; } } In the tag-use code, we do not change anything:
<select asp-for="CountryCodes" asp-items="ViewBag.Countries"> </select> But the generated HTML markup will be different:
<select name="CountryCodes" id="CountryCodes" multiple="multiple"> <option selected="selected" value="CA">Canada</option> <option value="USA">United States</option> <option value="--">Other</option> </select> Anchor
Anchor tag helper is used to generate links and is a replacement for both Html .ActionLink and Url .Action, with which we usually wrote like this:
@Html.ActionLink("Register", "Register", "Account") <a href="@Url.Action("Register", "Account")">Register</a> As a result, we got two identical links:
<a href="/Account/Register">Register</a> <a href="/Account/Register">Register</a> Now with the help of anchor tag-helper and attributes asp-controller , asp-action the link can be added as follows:
<a asp-controller="Account" asp-action="Register">Register</a> As with the other tag-helpers, using them makes it easier to add additional classes and attributes for these elements, unlike Html .ActionLink (“Register”, “Create”, “Account”, null, new { class = “css- class "}).
If you need to pass additional parameters to the controller's method, this can be done the same way as for the form tag helper: using the asp-route- * attributes, for example:
<a asp-controller="Product" asp-action="Display" asp-route-id="@ViewBag.ProductId"> View Details</a> You can also specify a named route (again, just like for a form ):
<a asp-route="login">Login</a> Previously used Html .ActionLink allowed to specify the protocol, host and fragment of the generated URL. The tag helper has its attributes for this:
<a asp-controller="Account" asp-action="Register" asp-protocol="https" asp-host="asepecificdomain.com" asp-fragment="fragment">Register</a> <!-- --> <a asp-controller="Account" asp-action="Register" asp-protocol="https">Register</a> Cache
The cache helper tag has no analogue among Html helper, and it is not an ordinary HTML element. It allows you to cache your contents into memory. Before each processing its content, it checks to see if it has already been saved in MemoryCache. If the content is found in the cache, it is sent immediately to the Razor engine, if not - first Razor will process it, and then it will be saved to the cache. By default, the helper tag will generate a unique ID for its content. This is how it can be used in views:
<cache expires-after="@TimeSpan.FromMinutes(10)"> @Html.Partial("_WhatsNew") *last updated @DateTime.Now.ToLongTimeString() </cache> The cache tag will not be included in the generated HTML markup, it is just a directive for the engine that for 10 minutes you can send the already processed and cached version of the _WhatsNew view to the client.
If you do not specify the lifetime of the cached version, then by default it will be given the entire lifetime of the application (or until the first recycle of the pool). The cache helper tag supports the following options for setting the lifetime of a cached object:
- expires-after : sets the time interval from the current moment, during which the cache is considered valid, for example, 5 seconds. The expires-after attribute expects an object of type TimeSpan:
<cache expires-after="@TimeSpan.FromSeconds(5)"> <!-- --> *last updated @DateTime.Now.ToLongTimeString() </cache> - expires-on : accepts an object of type DateTime, which shows at what point the cache will cease to be valid:
<cache expires-on="@DateTime.Today.AddDays(1).AddTicks(-1)"> <!----> *last updated @DateTime.Now.ToLongTimeString() </cache> - expires-sliding : accepts an object of type TimeSpan, which specifies a period of time, if during which the object in the cache was not requested, the cache ceases to be valid.
<cache expires-sliding="@TimeSpan.FromMinutes(5)"> <!-- --> *last updated @DateTime.Now.ToLongTimeString() </cache>
By default, the object key in the cache is generated uniquely based on the tag-helper context, which allows using multiple cache helper tags on the same page without confusing their contents in the cache. Using the vary-by attributes, you can specify more complex keys that allow you to cache different contents of the cache tag helper for different requests. Consider the possible options for vary-by attributes .
- vary-by-user : , . .
<cache vary-by-user="true"> <!-- --> *last updated @DateTime.Now.ToLongTimeString() </cache> - vary-by-route : , . , id :
<cache vary-by-route="id"> <!-- --> *last updated @DateTime.Now.ToLongTimeString() </cache> - vary-by-query : , . , search :
<cache vary-by-query="search"> <!-- --> *last updated @DateTime.Now.ToLongTimeString() </cache> - vary-by-header : HTTP (, ), . User-Agent :
<cache vary-by-header="User-Agent"> <!-- --> *last updated @DateTime.Now.ToLongTimeString() </cache> - vary-by : - , vary-by-* . , ProductId, ViewBag:
<cache vary-by="@ViewBag.ProductId"> <!-- --> *last updated @DateTime.Now.ToLongTimeString() </cache> - : vary-by , , id:
<cache vary-by-user="true" vary-by-route="id"> <!-- --> *last updated @DateTime.Now.ToLongTimeString() </cache>
Since all cached content is stored in IMemoryCache , its size is limited by the size of available RAM. Therefore, if the process starts to run out of memory, the cache will delete its elements to free up memory. Using the priority attribute, you can specify which objects should be deleted first and which objects should be left in the cache. The possible values for this attribute are Low, Normal, High, and NeverRemove. For example, we point out that the contents of the tag-helper can be considered non-priority:
@using Microsoft.Framework.Caching.Memory <cache vary-by-user="true" priority="@CachePreservationPriority.Low"> <!-- --> *last updated @DateTime.Now.ToLongTimeString() </cache> The limitations of this tag-helper are that it uses MemoryCache in its implementation. The first limitation is due to the fact that any restart of the process, application pool recycling and a similar action invalidates our entire cache, in the cloud this can happen if the site moves to a new machine. Therefore, this cache cannot be considered reliable. The second limitation is also due to the fact that the cache is stored in memory. If a user within a session is redirected to different web servers, he may potentially see different contents of the same element. This is due to the fact that each server will have its own cache version, the MemoryCache implementation is not distributed. In this case, the user can bind to the same server (sticky session, server affinity).
Image
This easy-to-use tag helper consists of just one asp-append-version attribute added to the img tag . If this attribute is set to true, then a line will be added to the image URL, depending on the image content (as in the case of css / js files), which will allow the browser to cache it indefinitely.
<img src="~/images/logo.png" alt="company logo" asp-append-version="true" /> As a result, similar HTML markup will be generated:
<img src="/images/logo.png?v=W2F5D366_nQ2fQqUk3URdgWy2ZekXjHzHJaY5yaiOOk" alt="company logo"/> Using this tag-helper simplifies the choice of a site image caching policy: with a small caching time, the benefit of its application is leveled; with a large one, the client potentially continues to use the old locally cached version of the image for a long time when the image is updated.
Conclusion
On the one hand, it’s bad that all our views with the MVC version <= 5 need to be rewritten, but using tag-helpers they look cleaner, they are easier to use for designers / layout designers, now they look like plain HTML with additional attributes. Next time we will consider creating your tag-helper, but for now download VS 2015 Community Edition, create your first ASP.NET Core 1.0 project!
Links
Documentation on tag-helpers
Documentation on the latest version of ASP.NET MVC
Visual Studio 2015 Community Edition
Source: https://habr.com/ru/post/276277/
All Articles