Add local search system to Android application
Many programs need a search function. Today we look at an example of the implementation of such functionality in the application for a restaurant. Our main goal is to give the user the ability to quickly and easily find in the menu of many dishes what he wants.
We will talk about how we added a local search function to the content of an existing application while maintaining the uniformity of the user interface. Here we will look at the changes made to the user interface and the reasons for these changes; we will also talk about adding a GestureOverlayView object to the element of the Activity class and creating our own gestures. Naturally, special attention will be paid to the search.

Search results screen in the restaurant application
Before you add a search function to your application, you need to take into account some features, answer a number of questions.
')
What exactly should you look for? We want to search for product titles and descriptions so that the user can get the most complete set of results, since the headers alone do not always allow us to understand exactly which dish we are talking about. In addition, hidden metadata can be added to the items being searched.
How to display search results, which layout to use for this? We started with a list (the ListView object), made it in the same style as the shopping cart. However, with this view, the dishes do not look particularly attractive - the small sizes of the photographs are to blame. When we increased the size of the images in the list, it turned out that the page now has too little space to display the results. As a result, it was decided to place the search results in the grid (the GridView element), to do the same as done in the main part of the restaurant menu, but instead of placing a large block with details about the selected dish on the side, we placed a set of products on the whole screen. This, in particular, helps to quickly distinguish the page with the search results from the usual menu screen. In order to see the details of the dish, the user must touch his photo on the search results page. In response to this, a dialog box will appear above the page (the DialogFragment object), it can be seen in one of the figures below. Thanks to this, the user can quickly return to the search page and continue browsing other dishes just by touching the space outside the dialog box. The search should ideally be performed almost instantly, without delay, as users want to find what they need as quickly as possible. Otherwise, they either will not be able to find what they want, or they will simply get tired of waiting for the results, they simply will not search for anything and leave the application.
How to handle confidential user data? You can create a search system that will give hints based on previously entered search queries or a search for which the user will need to enter more or less detailed information about themselves. This raises questions about what other people can see exactly what the user is looking for, and about where exactly the entered personal data is being sent. In our case, we are talking about the application of the restaurant, so if someone finds out that the user likes chocolate cakes, nothing terrible will happen. However, there are projects in which confidentiality must be given the closest attention. In our application, the user does not need to enter any information about himself, search queries are not logged, their history is not maintained.
The first step in implementing a search in the restaurant application is to rework the database class and add a method to it to build a new table with search results. The table will be used to display information on the screen. Details about the database with which we work in this application can be found here . Database search is easy to implement using SQLite queries. In fact, here you need a few lines of code. Here we perform a search in the names and descriptions of products of all that contains a search query entered by the user. As a search result, we return all the database columns, since this information will be needed later to display the details of the dish that the user has touched. Note that if your database is very large, the search may take a considerable time, so you should think about displaying a progress bar or a rotating indicator so that the user can see that the application is running. Here is a method to perform a database search.
Now we need to refine our main Activity, include a search string in the ActionBar. To learn more about configuring ActionBar, refer to this material. Search functionality will be fully implemented within the application. We do not need to have other programs installed on the device participate in the search, we don’t even need to send a search request to some external application.
Add this string variable to the MainActivity class. We will use it to send the query string to the search intent. This is a class variable for adding additional data to an Intent class object.
Now let's update the onCreateOptionsMenu method in the MainActivity class. Add the code to initialize the ActionBar:
Now add the class SearchResultActivity.
Being engaged in the construction of the list, we process and the option when nothing was found as a result of the search. Namely, if the search did not return any results, we will show the user a dialog box, let us know what happened and close the Activity in which it was planned to display the results. As a result, the user will not see a blank page. We do this in the same class SearchResultActivity, its continuation is given below.
The following is an adapter for the GridView element. We built it on the basis of a similar code from the main menu, making minor changes to it. In addition, we can modify the existing layout files. Building consistently looking application screens is one of the benefits of code reuse, complementing the lack of the need to create each screen from scratch. Above, you may have noticed that we reused the OrderViewDialogue class, originally written for the basket, but appropriate here. So, here is the continuation of the code:
Another detail to consider is the use of a portrait or landscape version of the interface. Below is the code of the search_query_grid_results.xml file, which is located in the res / layout-land folder and sets the landscape variant of the interface. The number of columns (numColumns) is set to 4. Almost the same file for the portrait orientation of the interface is located in the res / layout-port folder. It differs from the landscape version only in that the elements in it are arranged in two columns.
This is what the search results screen looks like, over which a dialog box with details about the dish is opened, which the user has touched.
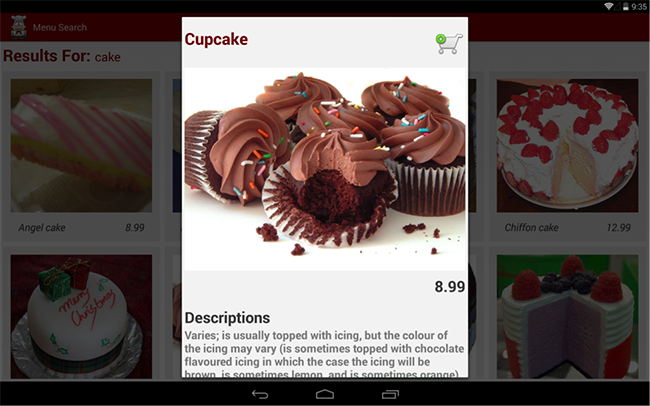
Search screen and window with dish details
In order to exit the search results window, we would like to move, brush it with an appropriate gesture to the left or to the right, just like when viewing other pages in the main menu. The GestureDetector class works fine with lists (ListView), but not with tables (GridView). Therefore, we need to switch to using GestureOverlayView.
First you need to create a library of gestures using the GestureBuilder application, which can be found among the examples that come with the Android SDK. In particular, what we need is located at android \ sdk \ samples \ android-23 \ legacy \ GestureBuilder.
To use the application, you need to compile and run it on the device, and then specify the names and configurations of gestures with it. After adding all the necessary gestures (in our case, this is sliding to the left, left swipe, and sliding to the right, right swipe), copy the “gestures” file from the device and place it in the res / raw folder. The application will tell you the exact location of this file, in our case it was enough to connect the device to the PC via USB and look in the root directory.
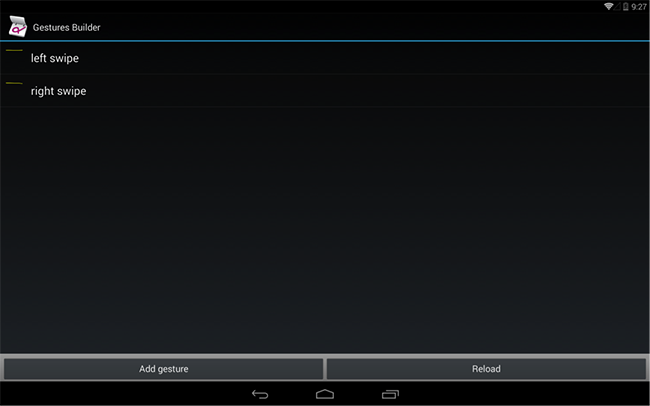
Gesture Builder application
Having copied the gesture file to the right place, you need to update the SearhcResultActivity class, adding variable declarations to it to work with GestureOverlayView:
In the onCreate method, you need to initialize the interface element, load the library, and set up a listener that defines the program's actions in response to gestures performed by the user. For the successful operation of the mechanism in question, you need to make sure that the code uses the same names that are recorded in the gestures library.
As an animation, we decided to apply overridePendingTransition. For inbound animation, the value 0 is used, which means no animation. You can create an empty animation xml file and use it, but this will cause the system to spend a lot of time on “thinking” and the outgoing animation will be performed too quickly.
Here is the code for the left shift animation file, move_left.xml. The file responsible for the right shift animation, move_right.xml, looks exactly the same, except that the value of toXDelta is non-negative.
Note that GrivView cannot have a layout_height parameter equal to 0dp when it is inside a GestureOverlayView, as it will take the specified 0dp instead of expanding, like a LinearLayout. In order to fulfill this requirement, in our case, the layout_height parameter was set to fill_parent. In addition, we do not need gestures to be visible, nor do we need a delay, which is caused by the fact that the line of gestures smoothly disappears from the screen. Our “lines of gestures” are already transparent, and we don’t need any extra delays. Therefore, we set fadeOffset and fadeDuration to 0. Below is the updated xml code that defines the relationship between GridView and GestureOverlayView.
We reviewed the sequence of decisions that need to be made when designing a local search system for an Android application. In addition, we talked about some potential problems, and how to avoid them, gave examples of code and xml markup. Now you can easily integrate search functionality into your own application and at the same time your search will not only work, but also take user requirements into account. And this means that they will find what they need.
We will talk about how we added a local search function to the content of an existing application while maintaining the uniformity of the user interface. Here we will look at the changes made to the user interface and the reasons for these changes; we will also talk about adding a GestureOverlayView object to the element of the Activity class and creating our own gestures. Naturally, special attention will be paid to the search.
Search results screen in the restaurant application
More about the search
Before you add a search function to your application, you need to take into account some features, answer a number of questions.
')
What exactly should you look for? We want to search for product titles and descriptions so that the user can get the most complete set of results, since the headers alone do not always allow us to understand exactly which dish we are talking about. In addition, hidden metadata can be added to the items being searched.
How to display search results, which layout to use for this? We started with a list (the ListView object), made it in the same style as the shopping cart. However, with this view, the dishes do not look particularly attractive - the small sizes of the photographs are to blame. When we increased the size of the images in the list, it turned out that the page now has too little space to display the results. As a result, it was decided to place the search results in the grid (the GridView element), to do the same as done in the main part of the restaurant menu, but instead of placing a large block with details about the selected dish on the side, we placed a set of products on the whole screen. This, in particular, helps to quickly distinguish the page with the search results from the usual menu screen. In order to see the details of the dish, the user must touch his photo on the search results page. In response to this, a dialog box will appear above the page (the DialogFragment object), it can be seen in one of the figures below. Thanks to this, the user can quickly return to the search page and continue browsing other dishes just by touching the space outside the dialog box. The search should ideally be performed almost instantly, without delay, as users want to find what they need as quickly as possible. Otherwise, they either will not be able to find what they want, or they will simply get tired of waiting for the results, they simply will not search for anything and leave the application.
How to handle confidential user data? You can create a search system that will give hints based on previously entered search queries or a search for which the user will need to enter more or less detailed information about themselves. This raises questions about what other people can see exactly what the user is looking for, and about where exactly the entered personal data is being sent. In our case, we are talking about the application of the restaurant, so if someone finds out that the user likes chocolate cakes, nothing terrible will happen. However, there are projects in which confidentiality must be given the closest attention. In our application, the user does not need to enter any information about himself, search queries are not logged, their history is not maintained.
Search in the application for the restaurant
The first step in implementing a search in the restaurant application is to rework the database class and add a method to it to build a new table with search results. The table will be used to display information on the screen. Details about the database with which we work in this application can be found here . Database search is easy to implement using SQLite queries. In fact, here you need a few lines of code. Here we perform a search in the names and descriptions of products of all that contains a search query entered by the user. As a search result, we return all the database columns, since this information will be needed later to display the details of the dish that the user has touched. Note that if your database is very large, the search may take a considerable time, so you should think about displaying a progress bar or a rotating indicator so that the user can see that the application is running. Here is a method to perform a database search.
/** * , (searchTerm) */ public Cursor searchMenuItems(String searchTerm) { SQLiteDatabase db = getReadableDatabase(); SQLiteQueryBuilder qb = new SQLiteQueryBuilder(); qb.setTables(TABLES.MENU); Cursor c = qb.query(db, null, "("+MenuColumns.NAME+" LIKE '%"+searchTerm+"%') " + "OR ("+MenuColumns.DESCRIPTION+" LIKE '%" + searchTerm+"%')", null, null, null, null); return c; } Now we need to refine our main Activity, include a search string in the ActionBar. To learn more about configuring ActionBar, refer to this material. Search functionality will be fully implemented within the application. We do not need to have other programs installed on the device participate in the search, we don’t even need to send a search request to some external application.
Add this string variable to the MainActivity class. We will use it to send the query string to the search intent. This is a class variable for adding additional data to an Intent class object.
/* */ public final static String SEARCH_MESSAGE= "com.example.restaurant.MESSAGE"; Now let's update the onCreateOptionsMenu method in the MainActivity class. Add the code to initialize the ActionBar:
/** * action menu ActionBar */ public boolean onCreateOptionsMenu(Menu menu) { getMenuInflater().inflate(R.menu.action_bar, menu); // MenuItem searchItem = menu.findItem(R.id.action_search); SearchView mSearchView = (SearchView) searchItem.getActionView(); searchItem.setShowAsActionFlags(MenuItem.SHOW_AS_ACTION_IF_ROOM | MenuItem.SHOW_AS_ACTION_COLLAPSE_ACTION_VIEW); // mSearchView.setOnQueryTextListener(new OnQueryTextListener() { @Override public boolean onQueryTextSubmit(String query) { // intent Intent searchIntent = new Intent(MainActivity.this, SearchResultsActivity.class); searchIntent.putExtra(SEARCH_MESSAGE, query); startActivity(searchIntent); return false; } @Override public boolean onQueryTextChange(String query) { // return true; } }); return super.onCreateOptionsMenu(menu); } Now add the class SearchResultActivity.
public class SearchResultsActivity extends Activity{ TextView mQueryText; GridView searchListResults; SearchAdapter adapter; Vector<com.example.restaurant.MenuFactory.MenuItem> searchList; @Override public void onCreate(Bundle savedInstanceState) { super.onCreate(savedInstanceState); setContentView(R.layout.search_query_grid_results); mQueryText = (TextView) findViewById(R.id.txt_query); // GridView searchListResults = (GridView)findViewById(R.id.search_results); searchList= new Vector<com.example.restaurant.MenuFactory.MenuItem>(); // final Intent queryIntent = getIntent(); doSearchQuery(queryIntent); adapter= new SearchAdapter(this,searchList); searchListResults.setAdapter(adapter); // GridView searchListResults.setOnItemClickListener(new AdapterView.OnItemClickListener() { @Override public void onItemClick(AdapterView<?> parent, View v, int position, long id){ FragmentTransaction ft = getFragmentManager().beginTransaction(); Fragment prev = getFragmentManager().findFragmentByTag("dialog"); if (prev != null) { ft.remove(prev); } ft.addToBackStack(null); DialogFragment newFragment = SearchResultsDialogFragment.newInstance(searchList.elementAt(position)); newFragment.show(ft, "dialog"); } }); } Being engaged in the construction of the list, we process and the option when nothing was found as a result of the search. Namely, if the search did not return any results, we will show the user a dialog box, let us know what happened and close the Activity in which it was planned to display the results. As a result, the user will not see a blank page. We do this in the same class SearchResultActivity, its continuation is given below.
/** * . */ private void doSearchQuery(final Intent queryIntent) { // String message= queryIntent.getStringExtra(MainActivity.SEARCH_MESSAGE); // mQueryText.setText(message); RestaurantDatabase dB= new RestaurantDatabase(this); MenuFactory mMF= MenuFactory.getInstance(); Cursor c= dB.searchMenuItems(message); Set<String> categories = new HashSet<String>(); while (c.moveToNext()) { String category = c.getString(c.getColumnIndexOrThrow(RestaurantDatabase.MenuColumns.CATEGORY)); categories.add(category); // MenuItem item= mMF.new MenuItem(); item.setCategory(category); item.setName(c.getString(c.getColumnIndexOrThrow(RestaurantDatabase.MenuColumns.NAME))); item.setDescription(c.getString(c.getColumnIndexOrThrow(RestaurantDatabase.MenuColumns.DESCRIPTION))); item.setNutrition(c.getString(c.getColumnIndexOrThrow(RestaurantDatabase.MenuColumns.NUTRITION))); item.setPrice(c.getString(c.getColumnIndexOrThrow(RestaurantDatabase.MenuColumns.PRICE))); item.setImageName(c.getString(c.getColumnIndexOrThrow(RestaurantDatabase.MenuColumns.IMAGENAME))); searchList.add(item); } c.close(); // , if(searchList.size()==0){ Intent intent = new Intent(SearchResultsActivity.this, OrderViewDialogue.class); intent.putExtra(OrderViewActivity.DIALOGUE_MESSAGE, "Sorry, no matching items found."); startActivity(intent); SearchResultsActivity.this.finish(); } } The following is an adapter for the GridView element. We built it on the basis of a similar code from the main menu, making minor changes to it. In addition, we can modify the existing layout files. Building consistently looking application screens is one of the benefits of code reuse, complementing the lack of the need to create each screen from scratch. Above, you may have noticed that we reused the OrderViewDialogue class, originally written for the basket, but appropriate here. So, here is the continuation of the code:
/** * SearchAdapter GridView . view_grid_item, , . */ class SearchAdapter extends BaseAdapter { private Vector<com.example.restaurant.MenuFactory.MenuItem> mFoundList; private LayoutInflater inflater; public SearchAdapter(Context c, Vector<com.example.restaurant.MenuFactory.MenuItem> list) { mFoundList= list; inflater = LayoutInflater.from(c); } public int getCount() { return mFoundList.size(); } public Object getItem(int position) { return mFoundList.get(position); } public long getItemId(int position) { return 0; } // ItemView , public View getView(int position, View convertView, ViewGroup parent) { View v = convertView; ImageView picture; TextView name; TextView price; if(v == null) { v = inflater.inflate(R.layout.view_grid_item, parent, false); v.setTag(R.id.picture, v.findViewById(R.id.picture)); v.setTag(R.id.grid_name, v.findViewById(R.id.grid_name)); v.setTag(R.id.grid_price, v.findViewById(R.id.grid_price)); } picture= (ImageView) v.getTag(R.id.picture); name= (TextView) v.getTag(R.id.grid_name); price= (TextView) v.getTag(R.id.grid_price); final MenuItem foundItem = (MenuItem) mFoundList.get(position); InputStream inputStream = null; AssetManager assetManager = null; try { assetManager = getAssets(); inputStream = assetManager.open(foundItem.imageName); picture.setImageBitmap(BitmapFactory.decodeStream(inputStream)); } catch (Exception e) { Log.d("ActionBarLog", e.getMessage()); } finally { } name.setText(foundItem.name); price.setText(foundItem.price); return v; } } } Another detail to consider is the use of a portrait or landscape version of the interface. Below is the code of the search_query_grid_results.xml file, which is located in the res / layout-land folder and sets the landscape variant of the interface. The number of columns (numColumns) is set to 4. Almost the same file for the portrait orientation of the interface is located in the res / layout-port folder. It differs from the landscape version only in that the elements in it are arranged in two columns.
<?xml version="1.0" encoding="utf-8"?> <LinearLayout xmlns:android="http://schemas.android.com/apk/res/android" android:layout_width="match_parent" android:layout_height="match_parent" android:paddingLeft="5dp" android:paddingRight="5dp" android:paddingBottom="5dp" android:paddingTop="5dp" android:orientation="vertical"> <LinearLayout android:layout_width="match_parent" android:layout_height="wrap_content" android:orientation="horizontal"> <TextView android:layout_width="wrap_content" android:layout_height="wrap_content" style="@style/FragmentTitle" android:text="Results For: " /> <TextView android:id="@+id/txt_query" android:layout_width="wrap_content" android:layout_height="wrap_content" style="@style/OrderTitle"/> </LinearLayout> <GridView android:id="@+id/search_results" android:layout_width="fill_parent" android:layout_height="0dp" android:paddingTop="10dp" android:numColumns="4" android:verticalSpacing="10dp" android:horizontalSpacing="10dp" android:layout_weight="1" android:stretchMode="columnWidth" android:gravity="center"/> </LinearLayout> This is what the search results screen looks like, over which a dialog box with details about the dish is opened, which the user has touched.
Search screen and window with dish details
Gesture processing
In order to exit the search results window, we would like to move, brush it with an appropriate gesture to the left or to the right, just like when viewing other pages in the main menu. The GestureDetector class works fine with lists (ListView), but not with tables (GridView). Therefore, we need to switch to using GestureOverlayView.
First you need to create a library of gestures using the GestureBuilder application, which can be found among the examples that come with the Android SDK. In particular, what we need is located at android \ sdk \ samples \ android-23 \ legacy \ GestureBuilder.
To use the application, you need to compile and run it on the device, and then specify the names and configurations of gestures with it. After adding all the necessary gestures (in our case, this is sliding to the left, left swipe, and sliding to the right, right swipe), copy the “gestures” file from the device and place it in the res / raw folder. The application will tell you the exact location of this file, in our case it was enough to connect the device to the PC via USB and look in the root directory.
Gesture Builder application
Having copied the gesture file to the right place, you need to update the SearhcResultActivity class, adding variable declarations to it to work with GestureOverlayView:
GestureLibrary gestureLibrary; GestureOverlayView gestureOverlayView; In the onCreate method, you need to initialize the interface element, load the library, and set up a listener that defines the program's actions in response to gestures performed by the user. For the successful operation of the mechanism in question, you need to make sure that the code uses the same names that are recorded in the gestures library.
As an animation, we decided to apply overridePendingTransition. For inbound animation, the value 0 is used, which means no animation. You can create an empty animation xml file and use it, but this will cause the system to spend a lot of time on “thinking” and the outgoing animation will be performed too quickly.
gestureOverlayView = (GestureOverlayView)findViewById(R.id.gestures); // gestureLibrary = GestureLibraries.fromRawResource(this, R.raw.gestures); gestureLibrary.load(); gestureOverlayView.addOnGesturePerformedListener(new OnGesturePerformedListener(){ @Override public void onGesturePerformed(GestureOverlayView view, Gesture gesture) { ArrayList<Prediction> prediction = gestureLibrary.recognize(gesture); if(prediction.size() > 0){ String action= prediction.get(0).name; // "left swipe" "right swipe" if("left swipe".equals(action)){ // SearchResultsActivity.this.finish(); overridePendingTransition(0, R.anim.move_left); } else if("right swipe".equals(action)){ // SearchResultsActivity.this.finish(); overridePendingTransition(0, R.anim.move_right); } } }}); // « » , , gestureOverlayView.setGestureVisible(false); Here is the code for the left shift animation file, move_left.xml. The file responsible for the right shift animation, move_right.xml, looks exactly the same, except that the value of toXDelta is non-negative.
<?xml version="1.0" encoding="utf-8"?> <translate xmlns:android="http://schemas.android.com/apk/res/android" android:duration="500" android:fromXDelta="0" android:toXDelta="-100%" android:interpolator="@android:anim/decelerate_interpolator" /> Note that GrivView cannot have a layout_height parameter equal to 0dp when it is inside a GestureOverlayView, as it will take the specified 0dp instead of expanding, like a LinearLayout. In order to fulfill this requirement, in our case, the layout_height parameter was set to fill_parent. In addition, we do not need gestures to be visible, nor do we need a delay, which is caused by the fact that the line of gestures smoothly disappears from the screen. Our “lines of gestures” are already transparent, and we don’t need any extra delays. Therefore, we set fadeOffset and fadeDuration to 0. Below is the updated xml code that defines the relationship between GridView and GestureOverlayView.
<android.gesture.GestureOverlayView android:id="@+id/gestures" android:layout_width="fill_parent" android:layout_height="fill_parent" android:fadeOffset="0" android:fadeDuration="0" android:eventsInterceptionEnabled="true"> <GridView android:id="@+id/search_results" android:layout_width="fill_parent" android:layout_height="fill_parent" android:paddingTop="10dp" android:numColumns="4" android:verticalSpacing="10dp" android:horizontalSpacing="10dp" android:layout_weight="1" android:stretchMode="columnWidth" android:gravity="center"/> </android.gesture.GestureOverlayView> findings
We reviewed the sequence of decisions that need to be made when designing a local search system for an Android application. In addition, we talked about some potential problems, and how to avoid them, gave examples of code and xml markup. Now you can easily integrate search functionality into your own application and at the same time your search will not only work, but also take user requirements into account. And this means that they will find what they need.
Source: https://habr.com/ru/post/276099/
All Articles