BEM methodology: how it all began and why it is all needed
On Habré, much has already been written about the methodology of BEM, which grew up in Yandex. And we decided that it was time to systematically tell about where it came from and what made BEM as we know it. We think it will be interesting not only to those who already use BEM, but also to those who believe that this methodology is not suitable for their projects. Perhaps they will see that we have solved problems similar to their own, and will find something useful for themselves.
Of course, it all started with Yandex’s own needs. At the same time, as he grew, the number of employees involved in the front-end grew. Gradually, the team has grown so much that it became obvious that without uniform standards it will be difficult to work. In addition, we are located in Yandex offices in different cities. The idea was to create a common methodology that will help organize the processes in a large team working on different projects. And the main thing is that we wanted not only to streamline and accelerate development, but also to lower the project entry threshold for a new developer.
What requirements we formulated:
')
We wanted to improve the quality of the product with an increase in the number of developers. This means that developers should be aware of each other’s work and not reinvent what has already been implemented. We wanted to create a single team that works on different projects.
But when it all began, there was no talk about any component approaches and modularity in web development. All sites were made up, putting the CSS in one
In 2005, the usual, in terms of interface, the project was a set of static HTML-pages. That was the typical project structure of the time:
CSS used
Example
Typical CSS of the time in most cases contained a long cascade.
The slightest changes required a long refactoring. Rolled up static HTML pages were cut into templates. If HTML was changed, all edits needed to be manually transferred to the template.
Layout in large projects was unmanageable.
The technologies (HTML, CSS, JavaScript) that we used varied depending on the requirements of the project, and the principles of BEM should have been universal.
We have formulated the basic rules by which our projects will live and develop, and which will in no way depend on technologies and tools.
To speed up development, it was necessary to facilitate the HTML and CSS support for individual components of the page, to make the code less related. For this we have divided the page into parts. So a new concept appeared - a block . A block could consist of various elements that were not used outside the block itself. The states and behavior of the block and the element could be set using the modifier .
These were the three key concepts on which most of the rules were based. The abbreviation for the three words “Bloc, Element, and M ” is the name of the methodology — BEM.
Logically and functionally independent component of the page. The block is completely self-sufficient: it can have its own behavior, patterns, styles, documentation, and more. Blocks can be used anywhere on the page, repeatedly, even in another project.
Some blocks can be nested in others, assembled, used to create more complex blocks.
The part of the block that cannot be used in isolation from it and makes sense only within the framework of its parent. Items may be required and optional.
When working with elements, it is important to remember the rule: it is not recommended to create elements of elements. If you put one element into another, it will be impossible to change the internal structure of the block: elements cannot be swapped, deleted or added without adjusting the existing code.

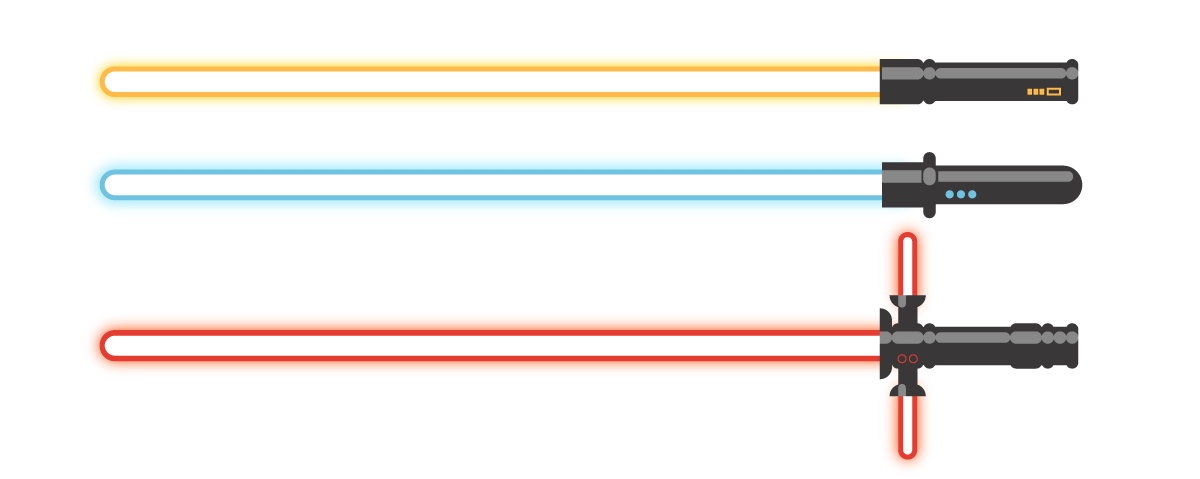
A property of a block or element that changes their appearance, state, or behavior.
The modifier has a name and can have a value. Using modifiers is optional. A block / element can have several different modifiers at the same time.
For example, using the modifier, you can change not only the color of the sword, but also its functionality (as shown in the case of the red sword):
All the principles of BEM were formed and implemented gradually. We started by formulating strict rules for naming CSS selectors.
According to the BEM methodology, the blocks are not unique and can always be reused, therefore, in the description of the CSS rules, the use of
A block should not depend on the blocks surrounding it and should not itself affect neighboring blocks, so the CSS refused from:
An important defining entity in the naming of selectors is the block:
We experimented with prefixes in names for a long time, but eventually we abandoned them.
Example
HTML
CSS
There are a number of alternative naming schemes . The choice is always yours.
But we recommend sticking to the scheme described above, since the BEM platform tools can work with this naming option.
We wanted to streamline HTML and eventually came to the conclusion that we no longer write HTML with our hands. Read more in the section on the description of BEM tools .
In HTML, each BEM entity is defined by its class.
In the simplest case, a block corresponds to a DOM node, one to one. But the DOM node and the block are not always the same. Several entities can be combined on one DOM node. This is called a mix .
With the help of mixes you can:
Example
The buttons are implemented in the
Mix allows you to use a universal button that knows nothing about the indents from the borders of a particular form. In this case, the search form has an element
Instead of a mix, you can create an additional modifier to the
We were not satisfied with the original structure of the project in the file system: it was difficult to navigate and find the necessary technologies of the entities.
What we wanted to get from the new structure:
First we tried to divide the project repository by technology:
This approach showed no dramatic changes. Therefore, we brought the common part of the code, suitable for all projects and platforms, into a separate
So we quickly found the right code for individual projects. But this structure still did not meet all our requirements.
In order to create the necessary project structure for us and to realize our goals, which we set for ourselves, we brought to the forefront blocks, not technologies.
A block in the file system is completely independent: all the technologies necessary for its implementation are located in the directory of this block.
Acceleration development
Acceleration of refactoring
Universal Extensible System
Invented a new term - technology implementation .
Blocks can perform different functions on the page. Depending on the purpose of the unit, its implementation may vary. Under the implementation in BEM understand the behavior, appearance, patterns, documentation for the unit, all types of tests, pictures, and so on.
To implement the block, various technologies are used, for example:
The choice of implementation technologies is not limited, unless the requirements of your project.
In the new organization of the file structure, each implementation technology is a separate file with the appropriate extension. All block implementation files are stored in this block directory.
Everything in the project is rebuilt with respect to this new principle. The block becomes the key concept of BEM. Accordingly, the file system structure changes.
Example
The level of overriding we began to call the directory with the implementation of blocks. The appearance of levels allowed changing the implementation of the block, adding new properties (add) or changing old (override) at another level. The final implementation of the block is collected from all levels sequentially.
Override levels allow you to:
If we compare the levels with the layers, then the base layer is the initial implementation of the block, and each subsequent layer is superimposed on top and complements (inherits) or modifies the base implementation.

Example
As you can see, our team also started working with BEM gradually. The flexibility of the BEM methodology allows you to customize it for your current processes.
There is no universal method to start applying the methodology in your project. Each specific team embeds it in the development process and uses it as it is convenient for it.
For example, you have a project in which you want to apply BEM only for layout. You use CSS and HTML in your project, so you can start with the rules for naming CSS selectors. This is the most common way to use the BEM methodology. Many teams start with him. We also started with this.
As new rules are introduced, the need arises for its own tools and technologies.
In web development, the final product consists of various technologies (for example, HTML, CSS, JavaScript). The basic principle of the BEM methodology is to use common terms and approaches to implementation in all the technologies used.
In order to work in BEM terms and write declarative JavaScript, which can be divided into redefinition levels, we needed our own framework, i-bem .
Typical web development boiled down to what we wrote HTML, then cut it into templates. When you change the design, you had to change the HTML and templates manually.
To get rid of manual work, we added a new level of abstraction - BEM-tree , which allows you to work with the structure of the web page in terms of blocks, elements and modifiers. A BEM tree is an abstraction over a DOM tree.
The BEM tree describes all the BEM entities that are used on the page, their states, order, nesting. It can be expressed in any format that supports a tree structure, such as XML or JSON.
Example
Consider an example of a DOM tree:
It corresponds to the BEM-tree:
It can be compared to the Jade template engine, but the difference is that we do not write HTML, but use abstractions.
This BEM tree will have the following form in XML and BEMJSON formats:
XML
BEMJSON is a JavaScript format that allows you to work in BEM terms. BEMJSON allows you to abstract from HTML markup and describe the page in terms of blocks, elements, and modifiers.
We describe the page that we want to get in the browser as a BEM tree and do not write HTML with our hands: the BEMHTML template engine processes BEMJSON and generates HTML.
To work with all technologies in a convenient form for the developer, we divided the project into many separate files. This gave us the advantages described above. But we needed assembly and optimization that the created code could work in the browser.
It is inconvenient to collect all files manually; we begin to automate most repetitive processes. Bem-tools appear - a set of tools for working with files using the BEM methodology. Later beb-tools replaced the ENB .
To be able to collect disparate files that know nothing about each other, DEPS technology is used , which indicates the dependencies of one block on another or on a set of blocks.
The BEM tools are designed so that the developer writes the code as he likes, and the robots were engaged in optimizing and connecting only the necessary files to the project in the correct order.
Many BEM libraries can be found in open source. The basic ones are:
The bem-components library can be connected in the same way as Bootstrap: add pre-assembled library files and insert them into HTML pages using
This delivery method is called Dist and includes pre-assembled CSS and JavaScript code and templates. With it, you do not need tools for assembly or template engines - the blocks are pre-assembled and work.
How to connect files from CDN or locally, use bower or independently assemble library files from source, read in the description of the library .
You can quickly start developing a BEM project using a project-stub project with pre-installed technologies and tools. It is worth starting an acquaintance with him with the help of a quick start on BEM .
An extended example of using the project-stub is described in the document Creating Your Project in BEM .
BEM methodology is a set of rules and recommendations for organizing work on a project.
At some point we separated the methodology from its practical implementation - the platform.
The BEM platform is a special case of the implementation of the general principles of the BEM methodology. Since all technologies were created taking into account the requirements of our projects and developed gradually, the BEM platform most fully covers all the possibilities offered by the BEM methodology. You can read more about it here .
All parts of the BEM platform are integrated for collaboration, but can be used separately. .
, . . .
Of course, it all started with Yandex’s own needs. At the same time, as he grew, the number of employees involved in the front-end grew. Gradually, the team has grown so much that it became obvious that without uniform standards it will be difficult to work. In addition, we are located in Yandex offices in different cities. The idea was to create a common methodology that will help organize the processes in a large team working on different projects. And the main thing is that we wanted not only to streamline and accelerate development, but also to lower the project entry threshold for a new developer.
What is the BEM methodology for?
What requirements we formulated:
- The developer must understand his code (even returning to it in a year) and the code of any programmer in the BEM project team.
- Any block of code can be reused: you need to create a common knowledge base and not to write everything from scratch every time, but to use ready-made developments.
- Working as a team, developers, managers, designers and layout designers should name the same things the same way. That is, speak the same language.
- Teams can exchange experts for the implementation of a specific functionality.
- The entry threshold for the transition to a new project should be reduced due to the same organization structure of all BEM projects and the same naming rules for all entities.
')
We wanted to improve the quality of the product with an increase in the number of developers. This means that developers should be aware of each other’s work and not reinvent what has already been implemented. We wanted to create a single team that works on different projects.
The history of the development of BEM
How to make up 10 years ago
But when it all began, there was no talk about any component approaches and modularity in web development. All sites were made up, putting the CSS in one
project.css file, the scripts that were very few in project.js , and the pictures in the images folder.In 2005, the usual, in terms of interface, the project was a set of static HTML-pages. That was the typical project structure of the time:
about.html # HTML- index.html … project.css # project.js # images/ # yandex.png CSS used
id , classes and tags.Example
#foot div div div div { background-position: 54%; background-image: url(../i/foot-4.png); } Typical CSS of the time in most cases contained a long cascade.
The slightest changes required a long refactoring. Rolled up static HTML pages were cut into templates. If HTML was changed, all edits needed to be manually transferred to the template.
Layout in large projects was unmanageable.
Fundamentals of BEM Methodology
The technologies (HTML, CSS, JavaScript) that we used varied depending on the requirements of the project, and the principles of BEM should have been universal.
We have formulated the basic rules by which our projects will live and develop, and which will in no way depend on technologies and tools.
To speed up development, it was necessary to facilitate the HTML and CSS support for individual components of the page, to make the code less related. For this we have divided the page into parts. So a new concept appeared - a block . A block could consist of various elements that were not used outside the block itself. The states and behavior of the block and the element could be set using the modifier .
These were the three key concepts on which most of the rules were based. The abbreviation for the three words “Bloc, Element, and M ” is the name of the methodology — BEM.
Block
Logically and functionally independent component of the page. The block is completely self-sufficient: it can have its own behavior, patterns, styles, documentation, and more. Blocks can be used anywhere on the page, repeatedly, even in another project.
Some blocks can be nested in others, assembled, used to create more complex blocks.
Element
The part of the block that cannot be used in isolation from it and makes sense only within the framework of its parent. Items may be required and optional.
When working with elements, it is important to remember the rule: it is not recommended to create elements of elements. If you put one element into another, it will be impossible to change the internal structure of the block: elements cannot be swapped, deleted or added without adjusting the existing code.
Modifier
A property of a block or element that changes their appearance, state, or behavior.
The modifier has a name and can have a value. Using modifiers is optional. A block / element can have several different modifiers at the same time.
For example, using the modifier, you can change not only the color of the sword, but also its functionality (as shown in the case of the red sword):
CSS Naming Guidelines
All the principles of BEM were formed and implemented gradually. We started by formulating strict rules for naming CSS selectors.
According to the BEM methodology, the blocks are not unique and can always be reused, therefore, in the description of the CSS rules, the use of
id abandoned.A block should not depend on the blocks surrounding it and should not itself affect neighboring blocks, so the CSS refused from:
- tags;
- nested selectors;
- global reset rules for the entire page.
An important defining entity in the naming of selectors is the block:
- The full name of the element / modifier is formed so that it can be used to determine the belonging of this element / modifier to a specific block.
- By the name of the element modifier, it should be possible to determine whether this modifier belongs to a specific element of a particular block.
Rules for the formation of the name of the BEM entity
- Each BEM entity must have its own class.
- CSS properties for blocks, elements, and modifiers are described only through classes.
- To separate words in names, a hyphen (
-) is used. - The element is separated from the block by two underscores (
__). The modifier is one (_). - The names of BEM entities are written using lowercase letters and Latin letters.
We experimented with prefixes in names for a long time, but eventually we abandoned them.
Example
- The block name is
header. - The name of the block element -
header__search-formis thesearch-formelement of theheaderblock. - The name of the block modifier is
header_theme_green-forest— thethememodifier in thegreen-forestvalue of theheaderblock. - The name of the element modifier is
header__search-form_disabled— the booleandisabledmodifier of thesearch-formelement of theheaderblock.
HTML
<div class="header header_theme_green-forest">...</div> CSS
.header { color: red; } There are a number of alternative naming schemes . The choice is always yours.
But we recommend sticking to the scheme described above, since the BEM platform tools can work with this naming option.
BEM to HTML
We wanted to streamline HTML and eventually came to the conclusion that we no longer write HTML with our hands. Read more in the section on the description of BEM tools .
In HTML, each BEM entity is defined by its class.
<div class="block-name"> <div class="block-name__elem"></div> ... </div> In the simplest case, a block corresponds to a DOM node, one to one. But the DOM node and the block are not always the same. Several entities can be combined on one DOM node. This is called a mix .
With the help of mixes you can:
- combine the behavior and styles of several BEM entities without duplicating the code;
- create semantically new interface components based on the available blocks, elements and modifiers;
- set the position of the nested block in the parent, without creating additional modifiers. Read more about how to create wrappers in HTML, read on the forum .
Example
The buttons are implemented in the
button block. It is necessary to place the button in the search form ( search-form ) and set indents for the button. To do this, use the mix of the button block and the button element of the search-form block: <div class="search-form"> <div class="button search-form__button"></div> </div> Mix allows you to use a universal button that knows nothing about the indents from the borders of a particular form. In this case, the search form has an element
search-form__button , which knows where it needs to be, and a button block that needs to be displayed.Instead of a mix, you can create an additional modifier to the
button block, but we do not recommend this method, since the positioning of the button block is not necessarily part of the universal block, but only suitable for its particular place of use.File System Organization
We were not satisfied with the original structure of the project in the file system: it was difficult to navigate and find the necessary technologies of the entities.
What we wanted to get from the new structure:
- Unified file system of any BEM project.
- Universal extensible repository structure. When adding additional technology to a project, it is known in advance where the new files will be located.
- Quick search in the project file system.
- Reuse code.
- Unlimited ability to transfer the code of the entire unit from the project to the project.
First we tried to divide the project repository by technology:
css/ html/ js/ xml/ xsl/ This approach showed no dramatic changes. Therefore, we brought the common part of the code, suitable for all projects and platforms, into a separate
common directory. Specific implementations needed only for certain projects were added separately - to the service directory. And examples - in the example directory. common/ css/ js/ xml/ xsl/ example/ html/ service/ auto/ css/ xml/ So we quickly found the right code for individual projects. But this structure still did not meet all our requirements.
Blocks are primary, technologies are secondary
In order to create the necessary project structure for us and to realize our goals, which we set for ourselves, we brought to the forefront blocks, not technologies.
A block in the file system is completely independent: all the technologies necessary for its implementation are located in the directory of this block.
What we have achieved:
Acceleration development
- Blocks can be reused.
- The implementation of the blocks can be changed at the new level of redefinition, without affecting the basic functionality and styles.
- A block is an independent component of a page and its directory contains everything that is necessary for correct functioning. Therefore, it is easy to transfer blocks from a project to a project; simply copy the directory of a block.
Acceleration of refactoring
- The developer works with small blocks of code.
- Technology implementation of one unit is not related to the technology of another.
- The same repository structure allows you to quickly navigate the project and find the files you need.
Universal Extensible System
- There are levels of overriding.
- The number of technologies is not limited. Any new implementation technology is in the file of a specific block. So, when we created a new file structure, we did not plan to write unit tests in JavaScript. But when such a need arose, we knew where we would place these files in the project.
Implementation technologies
Invented a new term - technology implementation .
Blocks can perform different functions on the page. Depending on the purpose of the unit, its implementation may vary. Under the implementation in BEM understand the behavior, appearance, patterns, documentation for the unit, all types of tests, pictures, and so on.
To implement the block, various technologies are used, for example:
- behavior - javascript, coffeeScript;
- appearance - CSS, Stylus, Sass;
- templates - Jade, Handlebars, XSL, BEMHTML, BH;
- documentation - Markdown, Wiki, XML.
The choice of implementation technologies is not limited, unless the requirements of your project.
In the new organization of the file structure, each implementation technology is a separate file with the appropriate extension. All block implementation files are stored in this block directory.
Everything in the project is rebuilt with respect to this new principle. The block becomes the key concept of BEM. Accordingly, the file system structure changes.
Rules for the organization of the file system of the BEM project
- Block - a separate directory in the file system. The name of the block and its directory are the same.
- The implementation of the block is divided into separate files.
- Files related to a block are always in its directory.
- Optional elements and modifiers are placed in separate files.
- The project is divided into override levels .
Example
blocks/ input/ # input _theme/ # theme input_theme_forest.css # theme forest CSS __clear/ # clear input__clear.css # clear CSS input__clear.png # clear PNG input.css # input CSS input.js # input JavaScript button/ # button button.css button.js button.png Override Level
The level of overriding we began to call the directory with the implementation of blocks. The appearance of levels allowed changing the implementation of the block, adding new properties (add) or changing old (override) at another level. The final implementation of the block is collected from all levels sequentially.
Override levels allow you to:
- Connect libraries and update them without making changes to the code.
- Allocate the common parts of block implementations to one level, and special cases (for example, a specific implementation for individual services) to another.
- Split project into platforms. The overall implementation for all platforms is stored on the same level, and platform-specific - to make on the other.
- Avoid copying code and creating new entities, if you need to change the already existing functionality.
If we compare the levels with the layers, then the base layer is the initial implementation of the block, and each subsequent layer is superimposed on top and complements (inherits) or modifies the base implementation.
Example
project/ # input/ # input button/ header/ library-blocks/ # input/ # input button/ popup/ How to start working with BEM
As you can see, our team also started working with BEM gradually. The flexibility of the BEM methodology allows you to customize it for your current processes.
There is no universal method to start applying the methodology in your project. Each specific team embeds it in the development process and uses it as it is convenient for it.
For example, you have a project in which you want to apply BEM only for layout. You use CSS and HTML in your project, so you can start with the rules for naming CSS selectors. This is the most common way to use the BEM methodology. Many teams start with him. We also started with this.
As new rules are introduced, the need arises for its own tools and technologies.
BEM and technology
In web development, the final product consists of various technologies (for example, HTML, CSS, JavaScript). The basic principle of the BEM methodology is to use common terms and approaches to implementation in all the technologies used.
Javascript
In order to work in BEM terms and write declarative JavaScript, which can be divided into redefinition levels, we needed our own framework, i-bem .
BEM tree
Typical web development boiled down to what we wrote HTML, then cut it into templates. When you change the design, you had to change the HTML and templates manually.
To get rid of manual work, we added a new level of abstraction - BEM-tree , which allows you to work with the structure of the web page in terms of blocks, elements and modifiers. A BEM tree is an abstraction over a DOM tree.
The BEM tree describes all the BEM entities that are used on the page, their states, order, nesting. It can be expressed in any format that supports a tree structure, such as XML or JSON.
Example
Consider an example of a DOM tree:
<header class="header"> <img class="logo"> <form class="search-form"> <input type="input"> <button type="button"></button> </form> <div class="lang-switcher"></div> </header> It corresponds to the BEM-tree:
header logo search-form input button lang-switcher It can be compared to the Jade template engine, but the difference is that we do not write HTML, but use abstractions.
This BEM tree will have the following form in XML and BEMJSON formats:
XML
<block:header> <block:logo/> <block:search-form> <block:input/> <block:button/> </block:search-form> <block:lang-switcher/> </block:header> BEMJSON is a JavaScript format that allows you to work in BEM terms. BEMJSON allows you to abstract from HTML markup and describe the page in terms of blocks, elements, and modifiers.
{ block: 'header', content : [ { block : 'logo' }, { block : 'search-form', content : [ { block : 'input' }, { block : 'button' } ] }, { block : 'lang-switcher' } ] } We describe the page that we want to get in the browser as a BEM tree and do not write HTML with our hands: the BEMHTML template engine processes BEMJSON and generates HTML.
BEM and tools
To work with all technologies in a convenient form for the developer, we divided the project into many separate files. This gave us the advantages described above. But we needed assembly and optimization that the created code could work in the browser.
It is inconvenient to collect all files manually; we begin to automate most repetitive processes. Bem-tools appear - a set of tools for working with files using the BEM methodology. Later beb-tools replaced the ENB .
To be able to collect disparate files that know nothing about each other, DEPS technology is used , which indicates the dependencies of one block on another or on a set of blocks.
The BEM tools are designed so that the developer writes the code as he likes, and the robots were engaged in optimizing and connecting only the necessary files to the project in the correct order.
BEM and libraries
Many BEM libraries can be found in open source. The basic ones are:
- bem-core is a basic block library that contains a javascript framework
i-bemand 20 helper blocks for development using the BEM methodology. - bem-components is a universal library of ready-made visual components (blocks). Contains form controls and other basic components for building interfaces.
The bem-components library can be connected in the same way as Bootstrap: add pre-assembled library files and insert them into HTML pages using
link and script elements. <link rel="stylesheet" href="https://yastatic.net/bem-components/latest/desktop/bem-components.css"> <script src="https://yastatic.net/bem-components/latest/desktop/bem-components.js+bemhtml.js"></script> This delivery method is called Dist and includes pre-assembled CSS and JavaScript code and templates. With it, you do not need tools for assembly or template engines - the blocks are pre-assembled and work.
How to connect files from CDN or locally, use bower or independently assemble library files from source, read in the description of the library .
Project Procurement
You can quickly start developing a BEM project using a project-stub project with pre-installed technologies and tools. It is worth starting an acquaintance with him with the help of a quick start on BEM .
An extended example of using the project-stub is described in the document Creating Your Project in BEM .
In conclusion
BEM methodology is a set of rules and recommendations for organizing work on a project.
At some point we separated the methodology from its practical implementation - the platform.
The BEM platform is a special case of the implementation of the general principles of the BEM methodology. Since all technologies were created taking into account the requirements of our projects and developed gradually, the BEM platform most fully covers all the possibilities offered by the BEM methodology. You can read more about it here .
All parts of the BEM platform are integrated for collaboration, but can be used separately. .
, . . .
Source: https://habr.com/ru/post/276035/
All Articles