Caché Class Explorer - explore Caché in UML notation
 Hello. This article is a small overview of the tool that helps to deal with the device and data structure of packages and classes within the Caché DBMS.
Briefly, his mission is to visualize a class or a whole package, show connections between classes and provide maximum information whether it be a programmer or a team leader without having to go to the Studio and look at the program code there.
Those who study or conduct InterSystems technologies, browse or change the codes of various projects for days and just to interested people - I invite you to get acquainted with the Caché Class Explorer!
Introduction to Caché
Caché is a multi-model DBMS. It can be accessed using queries in the SQL language with some extensions, or it can interact with stored objects and procedures through interfaces for various programming languages. The third option is to directly develop the application in the native language for the DBMS - Caché ObjectScript (COS).
')
Caché supports classes at the DBMS level. There are two main types of classes: Persistent, which can be stored in the database, and Registered, which are not stored in the database, but act as programs and handlers. There are also a number of special types: Serial (classes that can be built into the Persistent classes to create complex data types, such as, for example, addresses), DataType (create a custom data type), Index, View, and Stream.
And now about Class Explorer
Caché Class Explorer is a tool that visualizes the structure of Caché classes into a diagram, shows the dependencies between classes and all the necessary information, including code for methods, queries, xData blocks, comments, documentation, and keywords for different class elements. To display, Class Explorer uses a modified UML notation because Caché contains a whole variety of entities that are not provided for in the standard UML notation, but are important for Caché: queries, xData blocks, a lot of keywords for methods and properties (such as System , ZenMethod, Hidden, ProcedureBlock and others), parent-child relationships, one-many, class types, and so on.
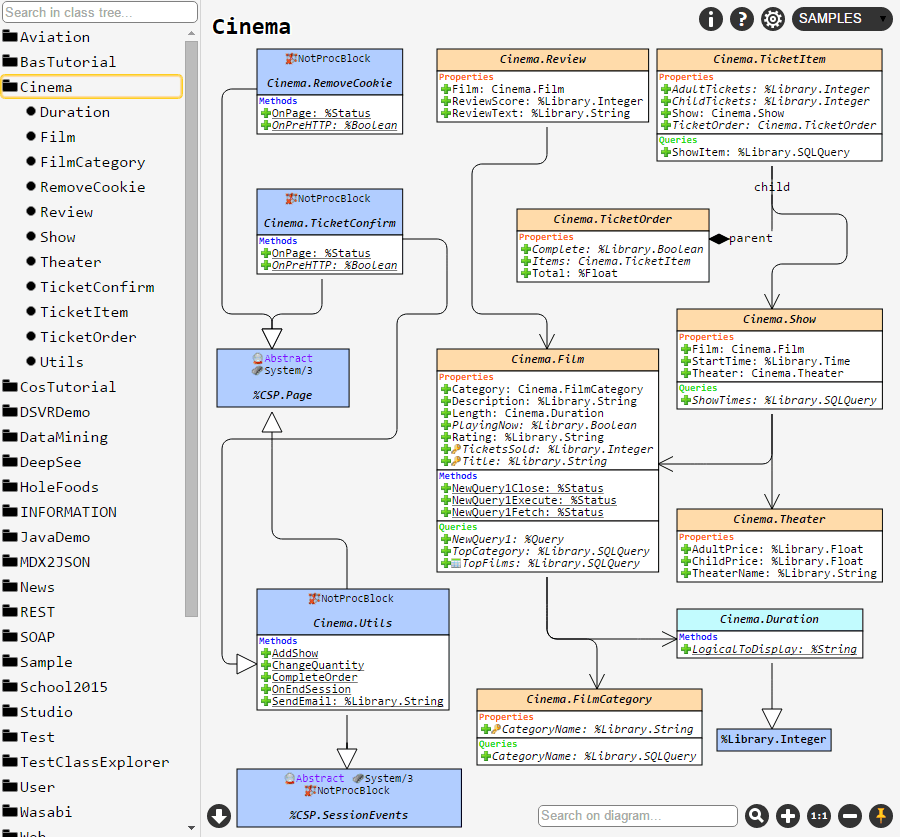
To make the most correct understanding of what will be discussed further, you must first see what the displayed package looks like and, at the same time, the interface of the Class Explorer. For example, take the Cinema package from the SAMPLES namespace:
About functionality
In the Caché Class Explorer (1.14.3) you can:
- Display package hierarchy, class diagram or whole package;
- Edit the appearance of the diagram after the display;
- Save the current class diagram image;
- Memorize the current chart view and restore it the next time it is displayed;
- Search for any keywords displayed on a diagram or class tree;
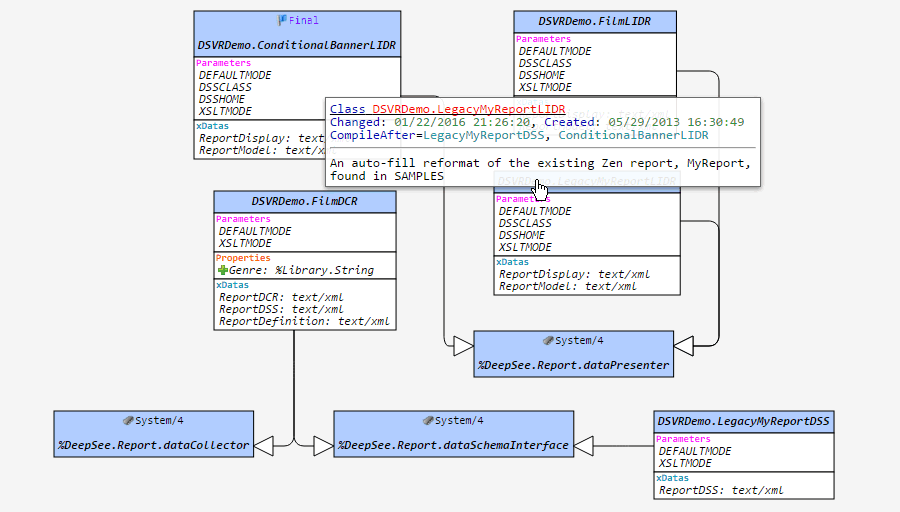
- With the help of tooltips to get full information about the classes, their properties, methods, parameters, queries and xData-blocks;
- View the program code of methods, queries or xData-blocks;
- Enable or disable the display of any chart elements, including graphic icons.
Details and feature overview
On the left side of the application is the package tree. To draw the entire package, you need to click on the button on the right side of the package name when you hover over it. To display a separate class and all classes dependent on it, you just need to select it in this tree.
Class Explorer can display several types of dependencies between classes:
- Of course, inheritance. It is displayed as a sketched white arrow in the direction of the inherited class;
- “Association”, or the relationship between classes. If the field of one of the classes contains the type of another class, such a link will be displayed on the diagram;
- Parent-Child and One-Many relationships: data integrity rules.
If you hover the cursor on the link, then the class will highlight the fields that create this link. It is important to note that Class Explorer will not “deepen” and draw dependencies of those classes that are outside the current package; it will draw only one class. “Going deeper” without end, it will only be in classes that are in the current batch — if you need to limit this, use the “Dependency level” setting.
The class itself is displayed as a rectangle divided into 6 sections:
- Class name: hovering the mouse over the class name, you can find out when it was created and modified, see the comment and all the keywords assigned to it. Clicking a class header will open the documentation;
- Class parameters: all assigned parameters with their types, keywords and comments;
- The properties of the class, all as with the parameters. Inscriptions in italics have a tooltip;
- Methods: any method can be clicked and see the source code of this method, the syntax will be highlighted;
- Queries: as well as methods - you can click on them and view the request code;
- xData-blocks: blocks, mainly containing information in XML. Clicking will show the formatted source code.
By default, the class is displayed with a set of graphical icons, the interpretation of which you can see by clicking on the Help button. If you need more or less strict UML notation, then their display, as well as the display of any sections of the class, can be disabled in the settings.
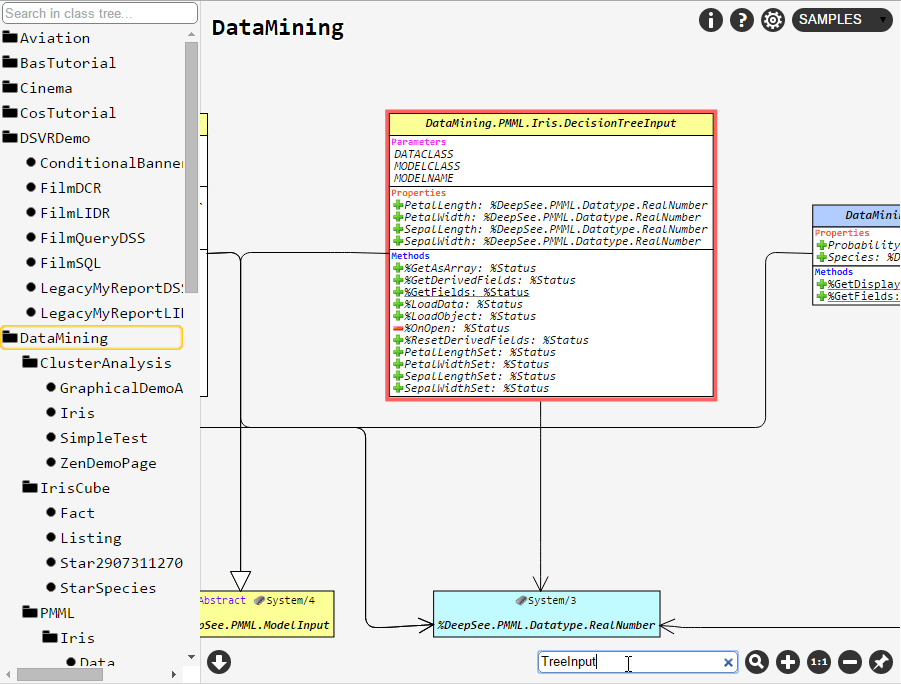
If the chart is big enough and not familiar, you can use the quick search on the chart. A class that contains any part of the entered keyword will be highlighted. To go to the class with the following match, simply press Enter again or click the search button.
And finally, by editing the diagram, deleting all unnecessary links and placing elements to achieve the desired view, you can save it by clicking on the leftmost button.
Installation
In order to install Caché Class Explorer, you just need to import the latest release in any area. After a successful import, you should have a
hostname/ClassExplorer/ web application (a slash at the end is necessary).Detailed installation instructions
- Download the archive with the latest release of Caché Class Explorer
- Unpack the archive and extract the Cache / CacheClassExplorer-vX.XXxml XML file;
- Import the package to any location in one of the following ways:
- Drag the XML file to an open studio;
- Through the management portal: System Browser -> Classes -> Import, and specify the path to the file;
- The command in the terminal: do ## class (% Installer.Installer) .InstallFromCommandLine (“path / Installer.cls.xml”);
- Check the import log - if everything is fine, the web application will be available at hostname / ClassExplorer /. If something went wrong, read about it and make sure that:
- You have sufficient rights to import the package into this area;
- The user of the web application has enough rights to go to different areas;
- With error 404 - that you put a slash at the end of the address bar.
And finally - what it looks like
Under the spoiler - graphics
Tooltips:
Search by chart:
View source code methods:

View xData block source code:

Search by chart:
View source code methods:
View xData block source code:
You can see how the Class Explorer works in the SAMPLES / USER: demonstration area . There is also a small video review of the project. Any feedback, suggestions or comments are welcome - leave them in the corporate repository . Enjoy using!
Source: https://habr.com/ru/post/276003/
All Articles