Course for beginners. The Basics of IP Telephony on Cisco Packet Tracer
Greetings, friends. I recently wrote an article about the integration of all devices in the Cisco Packet Tracer simulator. This article was adopted quite warmly, which greatly pleased.
In this regard, this fact motivated the continuation of articles on IP telephony. Yes, at the moment on the Internet a huge amount of materials on this topic, whether it be websites, blogs, books and much more. However, it is difficult for a beginner to understand all the terms and it is even harder to understand where to start.
Thinking over this topic, an idea was born to create a course for beginners who want to understand the basics of IP telephony.
')
Against the background of a long-standing controversy about which platform for prototyping is better, one can argue forever. And probably many will ask why Cisco Packet Tracer? Therefore, I will answer immediately to this question. As I said in the previous article, the functionality of this simulator is cut down and it is not possible to model more complex schemes in it. For these purposes there are more powerful platforms and emulators, but this in turn requires some skill from a specialist. This course, initially, was positioned for beginners and novice specialists. Therefore, I set a goal for several lessons to show how you can deploy IP telephony and immediately make calls. With these goals, the CPT copes perfectly well. It already has all the necessary devices, is easy to learn, and is not demanding of resources.
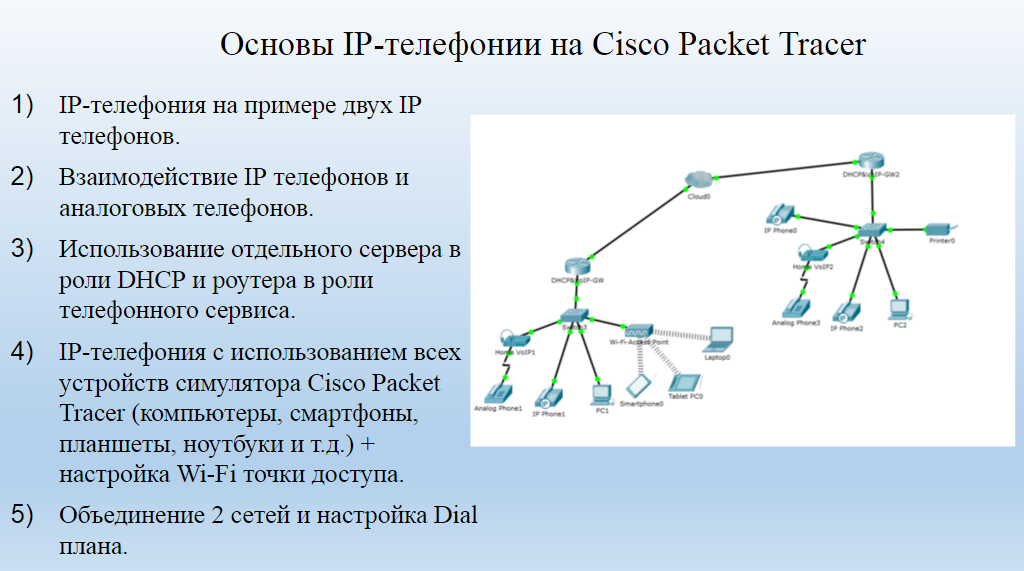
As a result, considered 5 main topics:
1) IP-telephony on the example of two IP phones.
2) The interaction of IP phones and analog phones.
3) Using a separate server in the role of DHCP and a router as a telephone service.
4) IP telephony using all devices of the Cisco Packet Tracer simulator (computers, smartphones, tablets, laptops, etc.) + setting up a Wi-Fi access point.
5) Combining 2 networks and setting up a Dial plan.
For this project, it was decided to create a channel on YouTube and post lessons there. This format is very convenient, as you can observe the whole setup in real time and leave questions, comments and suggestions in the comments.
It was planned to record the entire mini-course for the week, but, unfortunately, was delayed for a month due to lack of time. I also wanted to write this article after the release of the first video lesson, but then I realized that it would be pointless. The reason is that the lessons came out at intervals. And this usually means that while waiting for the next lesson, you forget the previous one. Therefore, the article was waiting for its release after the full completion of all video lessons.
The lessons begin with an explanation of the brief theory (for those who want to learn more, links are given) and ends with detailed network prototyping, and in the description of the video tutorial are given files of finished laboratory work.
Below is the course playlist itself and one of the video tutorials.
Thank you for your attention and enjoy. If you have any questions, feel free to ask.
In this regard, this fact motivated the continuation of articles on IP telephony. Yes, at the moment on the Internet a huge amount of materials on this topic, whether it be websites, blogs, books and much more. However, it is difficult for a beginner to understand all the terms and it is even harder to understand where to start.
Thinking over this topic, an idea was born to create a course for beginners who want to understand the basics of IP telephony.
')
The Basics of IP Telephony on Cisco Packet Tracer.
Against the background of a long-standing controversy about which platform for prototyping is better, one can argue forever. And probably many will ask why Cisco Packet Tracer? Therefore, I will answer immediately to this question. As I said in the previous article, the functionality of this simulator is cut down and it is not possible to model more complex schemes in it. For these purposes there are more powerful platforms and emulators, but this in turn requires some skill from a specialist. This course, initially, was positioned for beginners and novice specialists. Therefore, I set a goal for several lessons to show how you can deploy IP telephony and immediately make calls. With these goals, the CPT copes perfectly well. It already has all the necessary devices, is easy to learn, and is not demanding of resources.
As a result, considered 5 main topics:
1) IP-telephony on the example of two IP phones.
2) The interaction of IP phones and analog phones.
3) Using a separate server in the role of DHCP and a router as a telephone service.
4) IP telephony using all devices of the Cisco Packet Tracer simulator (computers, smartphones, tablets, laptops, etc.) + setting up a Wi-Fi access point.
5) Combining 2 networks and setting up a Dial plan.
For this project, it was decided to create a channel on YouTube and post lessons there. This format is very convenient, as you can observe the whole setup in real time and leave questions, comments and suggestions in the comments.
It was planned to record the entire mini-course for the week, but, unfortunately, was delayed for a month due to lack of time. I also wanted to write this article after the release of the first video lesson, but then I realized that it would be pointless. The reason is that the lessons came out at intervals. And this usually means that while waiting for the next lesson, you forget the previous one. Therefore, the article was waiting for its release after the full completion of all video lessons.
The lessons begin with an explanation of the brief theory (for those who want to learn more, links are given) and ends with detailed network prototyping, and in the description of the video tutorial are given files of finished laboratory work.
Below is the course playlist itself and one of the video tutorials.
Thank you for your attention and enjoy. If you have any questions, feel free to ask.
Source: https://habr.com/ru/post/275949/
All Articles