Building Android applications step by step, part one

In this article we will talk about architecture design and creating a mobile application based on the MVP pattern using RxJava and Retrofit. The topic turned out to be quite large, so it will be delivered in separate portions: in the first we design and create an application, in the second we do DI with the help of Dagger 2 and write unit tests, in the third we add integration and functional tests, and also think about TDD in the realities of Android development .
Content:
- Introduction
- Step 1. Simple architecture
- Step 2. Complicated architecture
- Conclusion or to be continued
Full content
Introduction
For a better understanding and consistent complication of the code, we divide the design into two stages: primitive (minimally viable) and ordinary architecture. In the primitive we will manage the minimum amount of code and files, then we will improve this code.
All sources can be found on github . The branches in the repository correspond to the steps in the article: Step 1 Simple architecture - the first step, Step 2 Complex architecture - the second step.
For example, let's try to get a list of repositories for a specific user using the Github API.
In our application, we will use Rx, so to understand the article, you need to have a general idea of this technology. We recommend reading the series of publications by Grokai RxJava , these materials will give a good idea about reactive programming.
')
Step 1. Simple architecture
Layering, MVP
When designing the architecture, we will adhere to the MVP pattern. More details can be found here:
https://ru.wikipedia.org/wiki/Model-View-Presenter
http://habrahabr.ru/post/131446/
We divide our entire program into 3 main layers:
Model - here we receive and store data. At the output we get Observable.
Presenter - this layer stores all application logic. Get Observable, subscribe to it and pass the result to the view.
View - a display layer, contains all view elements, activations, fragments and so on.
Conventional scheme: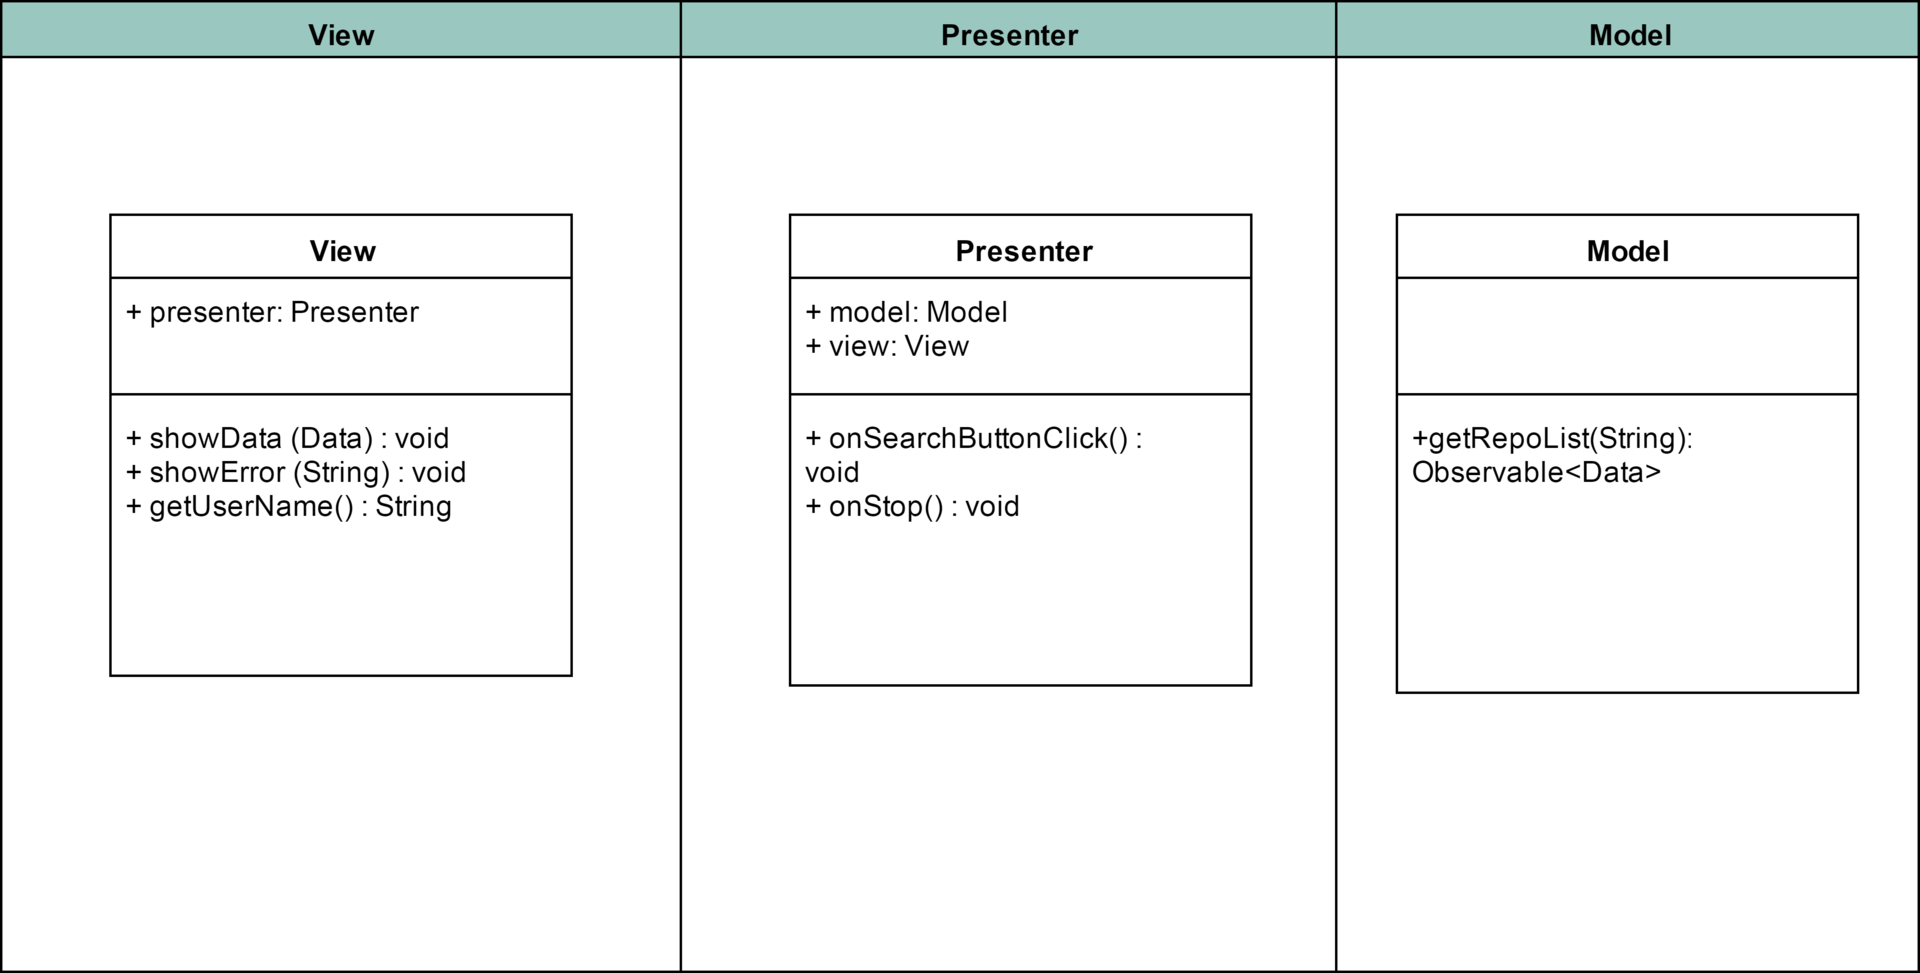
Model
The data layer should give us Observable <List <Repo >>, we will write the interface:
public interface Model { Observable<List<Repo>> getRepoList(String name); } Retrofit
For simplification of work with a network we use Retrofit. Retrofit is a library for working with the REST API, it will take over all the work with the network, we can only describe the requests using the interface and annotations.
Retrofit 2
There are a lot of materials about Retrofit in RuNet ( http://www.pvsm.ru/android/58484 , http://tttzof351.blogspot.ru/2014/01/java-retrofit.html ).
The main difference between the second version and the first is that we have lost the difference between synchronous and asynchronous methods. Now we get a Call <Data> for which we can call execute () for a synchronous or execute (callback) for an asynchronous request. There is also a long-awaited opportunity to cancel requests: call.cancel (). As before, you can get Observable <Data>, though now with the help of a special plugin
The main difference between the second version and the first is that we have lost the difference between synchronous and asynchronous methods. Now we get a Call <Data> for which we can call execute () for a synchronous or execute (callback) for an asynchronous request. There is also a long-awaited opportunity to cancel requests: call.cancel (). As before, you can get Observable <Data>, though now with the help of a special plugin
Interface for getting data about repositories:
public interface ApiInterface { @GET("users/{user}/repos") Observable<List<Repo>> getRepositories(@Path("user") String user); } Model implementation
public class ModelImpl implements Model { ApiInterface apiInterface = ApiModule.getApiInterface(); @Override public Observable<List<Repo>> getRepoList(String name) { return apiInterface.getRepositories(name) .subscribeOn(Schedulers.io()) .observeOn(AndroidSchedulers.mainThread()); } } Work with data, POJO
Retrofit (and GSON inside it) work with POJO (Plain Old Java Object). This means that to get an object from JSON like:
{ "id":3, "name":"Andrey", "phone":"511 55 55" } We need the User class, in which GSON writes the values:
public class User { private int id; private String name; private String phone; public int getId() { return id; } public void setId(int id) { this.id = id; } // etc } It is naturally not necessary to generate such classes by hands, for this there are special generators, for example: www.jsonschema2pojo.org .
We feed him our JSON, choose:
Source type: JSON
Annotation style: Gson
Include getters and setters
and get the code of our files. You can download as a zip or jar and put in our project. For the repository it turned out 3 objects: Owner, Permissions, Repo.
Sample generated code
public class Permissions { @SerializedName("admin") @Expose private boolean admin; @SerializedName("push") @Expose private boolean push; @SerializedName("pull") @Expose private boolean pull; /** * @return The admin */ public boolean isAdmin() { return admin; } /** * @param admin The admin */ public void setAdmin(boolean admin) { this.admin = admin; } /** * @return The push */ public boolean isPush() { return push; } /** * @param push The push */ public void setPush(boolean push) { this.push = push; } /** * @return The pull */ public boolean isPull() { return pull; } /** * @param pull The pull */ public void setPull(boolean pull) { this.pull = pull; } } Presenter
Presenter knows what to download, how to show what to do in case of an error and so on. Ie separates the logic from the presentation. View in this case is the most "easy". Our presenter should be able to handle pressing the search button, initialize the download, send data and unsubscribe if the Activity is stopped.
Presenter interface:
public interface Presenter { void onSearchClick(); void onStop(); } Implementation of the presenter
public class RepoListPresenter implements Presenter { private Model model = new ModelImpl(); private View view; private Subscription subscription = Subscriptions.empty(); public RepoListPresenter(View view) { this.view = view; } @Override public void onSearchButtonClick() { if (!subscription.isUnsubscribed()) { subscription.unsubscribe(); } subscription = model.getRepoList(view.getUserName()) .subscribe(new Observer<List<Repo>>() { @Override public void onCompleted() { } @Override public void onError(Throwable e) { view.showError(e.getMessage()); } @Override public void onNext(List<Repo> data) { if (data != null && !data.isEmpty()) { view.showData(data); } else { view.showEmptyList(); } } }); } @Override public void onStop() { if (!subscription.isUnsubscribed()) { subscription.unsubscribe(); } } } View
We implement the View as an Activity, which is able to display the received data, show an error, notify about an empty list and issue a user name upon request from the presenter. Interface:
public interface IView { void showList(List<Repo> RepoList); void showError(String error); void showEmptyList(); String getUserName(); } Implementing View Methods
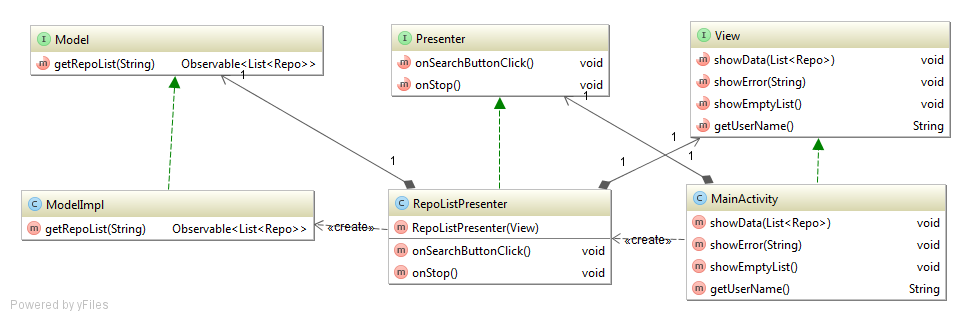
@Override public void showData(List<Repo> list) { adapter.setRepoList(list); } @Override protected void onStop() { super.onStop(); if (presenter != null) { presenter.onStop(); } } @Override public void showError(String error) { makeToast(error); } @Override public void showEmptyList() { makeToast(getString(R.string.empty_repo_list)); } @Override public String getUserName() { return editText.getText().toString(); } As a result, we got a simple application, which is divided into layers.
Scheme:
Some things need improvement, however, the general idea is clear. Now we will complicate our task by adding new functionality.
Part 2. Complicated architecture
Add new functionality to our application, displaying information about the repository. We will show the branches and contributors lists, which are obtained by different requests from the API.
Retrolambda
Working with Rx without lambda is a pain, the need to write anonymous classes every time quickly tires. Android does not support Java 8 and lambda, but Retrolambda comes to the rescue ( https://github.com/evant/gradle-retrolambda ). Learn more about lambda expressions: http://habrahabr.ru/post/224593/
Different data models for different layers.
As you can see, we are working with the same Repo data object on all three layers. This approach is good for simple applications, but in real life we can always face a change in the API, the need to change an object or something else. If several people work on a project, there is a risk of class change in the interests of another layer.
Therefore, the approach is often used: single layer = single data format. And if some fields in the model change, it will not affect the View layer in any way. We can make any changes in the Presenter layer, but in View we give a strictly defined object (class). Due to this, the independence of layers from data models is achieved, each layer has its own model. When changing any model, we will need to rewrite the mapper and not touch the layer itself. This is similar to contract programming, when we know exactly which object will come to our layer and which one we should give away, thereby protecting ourselves and colleagues from unpredictable consequences.
In our example, two data types will be enough for us, DTO - Data Transfer Object (completely copies JSON object) and View Object (adapted object for display). If there is a more complex application, you may need a Business Object (for business processes) or, for example, a Data Base Object (for storing complex objects in a database)
The schematic image of the transmitted data
Rename Repo to RepositoryDTO, create a new class Repository and write a mapper implementing the interface Func1 <List <RepositoryDTO >>, List <Repository >>
(translation from List <RepositoryDTO> to List <Repository>)
Mapper for objects
public class RepoBranchesMapper implements Func1<List<BranchDTO>, List<Branch>> { @Override public List<Branch> call(List<BranchDTO> branchDTOs) { List<Branch> branches = Observable.from(branchDTOs) .map(branchDTO -> new Branch(branchDTO.getName())) .toList() .toBlocking() .first(); return branches; } } Model
We have introduced different data models for different layers, the Model interface now gives DTO objects, otherwise everything also.
public interface Model { Observable<List<RepositoryDTO>> getRepoList(String name); Observable<List<BranchDTO>> getRepoBranches(String owner, String name); Observable<List<ContributorDTO>> getRepoContributors(String owner, String name); } Presenter
In the Presenter layer, we need a common class. A presenter can perform a variety of functions, it can be a simple download-show presenter, there can be a list with the need to upload items, there can be a map where we will request objects on the site, as well as many other entities. But all of them are united by the need to unsubscribe from the Observable in order to avoid memory leaks. The rest depends on the type of presenter.
If we use several Observable, then we need to unsubscribe from all at once in onStop. To do this, you can use the CompositeSubscription: add all our subscriptions there and unsubscribe by command.
Also add preservation state. To do this, we create and implement the onCreate (Bundle savedInstanceState) and onSaveInstanceState (Bundle outState) methods. To translate DTO to VO we use mappers.
Code example
public void onSearchButtonClick() { String name = view.getUserName(); if (TextUtils.isEmpty(name)) return; Subscription subscription = dataRepository.getRepoList(name) .map(repoListMapper) .subscribe(new Observer<List<Repository>>() { @Override public void onCompleted() { } @Override public void onError(Throwable e) { view.showError(e.getMessage()); } @Override public void onNext(List<Repository> list) { if (list != null && !list.isEmpty()) { repoList = list; view.showRepoList(list); } else { view.showEmptyList(); } } }); addSubscription(subscription); } public void onCreate(Bundle savedInstanceState) { if (savedInstanceState != null) { repoList = (List<Repository>) savedInstanceState.getSerializable(BUNDLE_REPO_LIST_KEY); if (!isRepoListEmpty()) { view.showRepoList(repoList); } } } private boolean isRepoListEmpty() { return repoList == null || repoList.isEmpty(); } public void onSaveInstanceState(Bundle outState) { if (!isRepoListEmpty()) { outState.putSerializable(BUNDLE_REPO_LIST_KEY, new ArrayList<>(repoList)); } } General Layer Presenter Layouts:
View
We will use activit to manage the fragments. For each entity, its own fragment, which is inherited from the base fragment. The base fragment using the base presenter interface is written in onStop ().
Also pay attention to the restoration of the state, all the logic has moved to the presenter - View should be as simple as possible.
Base Slice Code
@Override public void onStop() { super.onStop(); if (getPresenter() != null) { getPresenter().onStop(); } } General Layer View Layer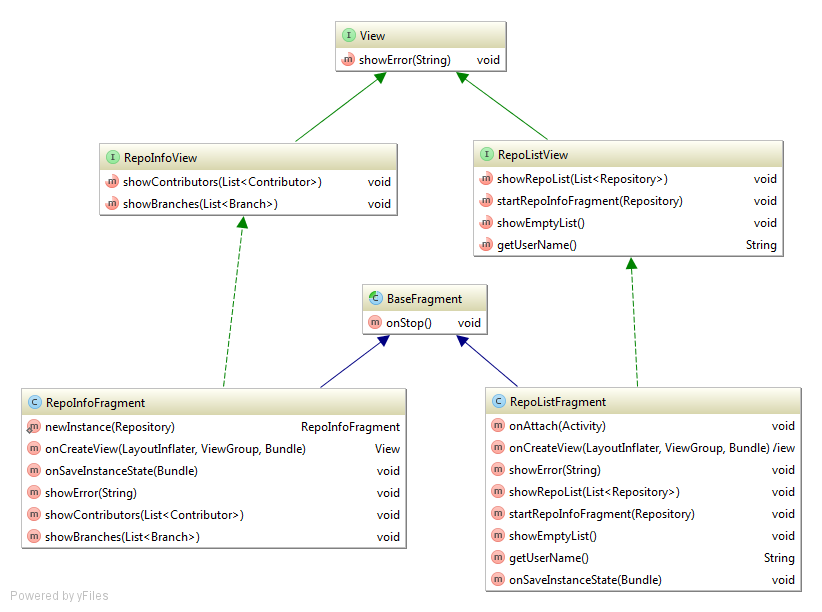
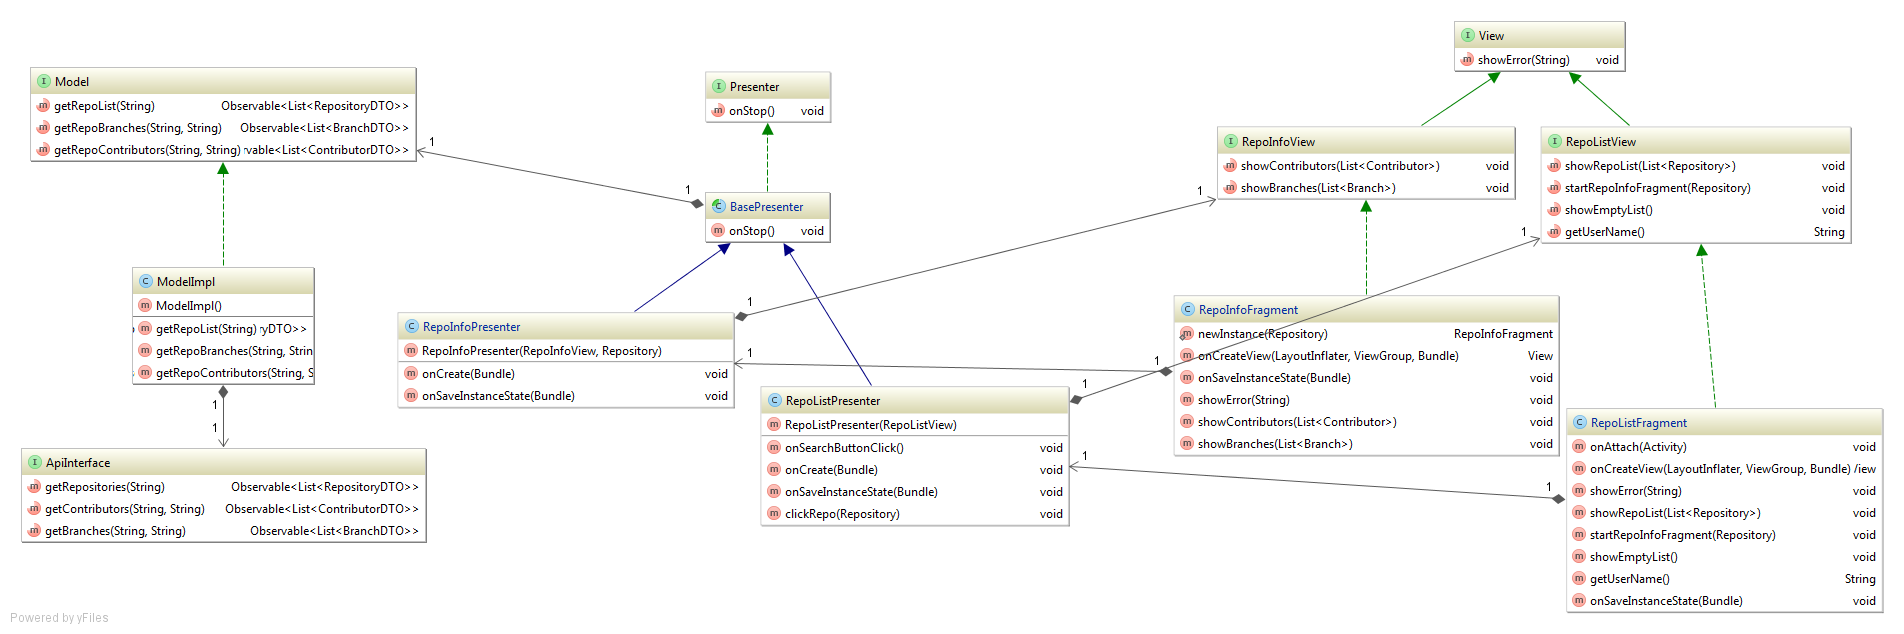
The general scheme of the application in the second step ( clickable ):
Conclusion or to be continued ...
As a result, we got a working application in compliance with all necessary levels of abstraction and a clear division of responsibility by component ( source ). Such code is easier to maintain and complement; a development team can work on it. But one of the main advantages is fairly easy testing. In the next article we will consider the implementation of Dagger 2, we will cover the existing code with tests and write new functionality, following the principles of TDD.
UPDATE
Building Android applications step by step, part two
Building Android applications step by step, part three
Source: https://habr.com/ru/post/275943/
All Articles