Unifi unfolding network. Personal experience from and to
Wi-FI networks have firmly entered our lives and confidently settled on the streets, in homes and offices. So, in my work, the bosses and managers acquired the products of "some kind of fruit company" and desired a wifi. The first thought was to buy a pair of household Wi-Fi routers, set up one as a BS, the second as a repeater, and it seemed like a hat. But there is one inconvenience; when you first switch between points, you have to re-enter the access password. And since the office area was soon to have doubled and, accordingly, the number of such switches had to increase, it was decided to set up Wi-Fi with seamless roaming. Until recently, giants Cisco, HP and others took control of the market for this equipment. Needless to say, the price of their decisions amounts to tens and hundreds of thousands of rubles. But thanks to the invaluable habrahabr and this article , which told about a very inexpensive solution based on Unifi. Ubiquiti's UniFi product is a corporate Wi-Fi system with a free controller. I will describe the whole process of deploying a network based on Unifi from configuring the router to mounting points on the ceiling based on personal experience.
Configure the router.
Since Unifi Access Point (AP) are not stand-alone devices, they need a router for a full life. In my example, such is Netgear JWNR2000 and all the presented settings, of which a little, will be from it. My external IP address is static, so the installation wizard is confidently sent to the garden and go to the “Basic Settings” section. Here we set the necessary data and click apply.

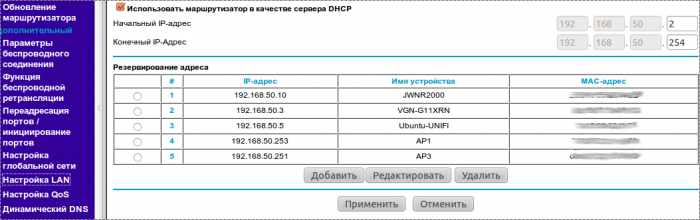
Unifi points also need a DHCP server. In the router, it is enabled by default, and I just fixed the IP addresses for my APs for convenience.
')
These settings are enough for customers connected to Unifi to go online. The rest of the settings at your discretion. Personally, I have enabled remote access via an external address, and it has come in handy more than once.
Install / configure the controller.
As they say on the Unifi.ru website: “The heart of the UniFi system is a programmable controller.” And there are three versions of them: for Windows, for Mac, and for Linux.
Notes regarding Windows. The controller was successfully launched only on a clean installation. Prior to that, the controller was installed on two different laptops, but stubbornly refused to start, although there were no conflicts either on the ports or on anything else.
If you decide to install a controller on Linux, here is a good guide to installing on Ubuntu 10.10. You can skip the step about installing DHCP, because in our case it is on the router. In short, then:
1. Edit /etc/apt/sources.list. Add the repository: deb www.ubnt.com/downloads/unifi/distros/deb/maverick maverick ubiquiti
2. Add a sudo GPG key to the terminal: sudo apt-key adv - keyserver keyserver.ubuntu.com - recv C0A52C50
3. Install the UniFi package:
apt-get update
apt-get install unifi
apt-get upgrade
After installation, it is recommended to turn off the repository, as there may be problems with installing packages. If the errors did not jump out, then the system is installed and already even works.
4. After installation, go to localhost : 8080 /, or to the IP address : 8080 /, confirm the certificate, and enter the system through the Ubiquiti UniFi Wizard.
About the floor plan.
I was interested to get the result as in the screenshots in the internet. Where the radius of the signal is visible. It is not a problem to insert an image and throw access points from the panel on the left, but with a radius of action it is a little more difficult. To do this, you need to set the scale, and this is done with the help of a clever combination of fingers. First, click on the triangle of the ruler, under the slider of increasing the view, click the mouse at any point of the map and draw a line (it is red). The line must be of a perfectly defined size, which should then be indicated.

After we have indicated the scale, click on the “Coverage” button and admire the purple-orange divorces.

I will omit the description of the detailed system settings. About this much is written on Unifi.ru , and the interface is quite intuitive.
AP connection.
The very installation of points on the ceiling does not cause any questions. They were originally designed for installation on ceiling tiles or a wall and the kit has everything you need, but I did not immediately get the physical connection scheme. Although the manual has a seemingly understandable illustration.

By the way: it is not necessary to turn on the computer with the controller directly into a switch or a router after configuration. You can connect to the WIFI network built on Unifi and manage the settings through it.
But if you perform a connection for it, then you will wait for any results for a long time. But it was enough to draw like this.
The adapter and the access point are connected via the POE port and the second port of the LAN adapter is connected to the router, or a switch, as in the picture. That's all. After starting the controller, it will find the devices launched by Unifi about what the “Pending” indicator will tell. After that, go to the “Access Point” tab and click on the “Adopt” button on the found devices. Devices will register in the system about what, among other things, they will tell by a green LED on the case.
A little about domestic.
Reset. It happens that Unifi fails to register or fall off in the process of configuration and experiments. You can return the settings of the access point to the default state, as follows. You can find out the IP address (either on the “access point” tab of the controller, or in the “Connected devices” section of the Netgear router) and try to access it via ssh. There is one nuance. If the point managed to register, then you must enter through the name and password that you set on the controller, but if not, then the name and password are default ubnt / ubnt. After a successful login to the point, you need to run the command 'syswrapper.sh restore-default'. The point will reset the settings after which it will need to register again. I had a situation when it was not possible to enter Unifi via ssh. Already, I cut it (it was pressed with a paper clip for five seconds near the network port) and the power was turned off / on, nothing helped. Already I was about to take under warranty. But after lying for a day and connecting in series Rosette - Adapter - POE port of adapter - Unifi - L AN port of adapter - router, and lo and behold! I managed to log in via ssh, and reset the infusions, and then successfully register .
Access control.
The management made the decision that access should be provided only to MAC addresses. The forum ubnt.com honestly reports that such a function will be, but only in controller version 2. (The beta version of controller 2 is already on the network) There, people share their experience in access control using a RADIUS server, but I did not want to fence the kitchen garden . I had to log in from the router. Netgear JWNR2000 has such a function, only it is designed for Wi-Fi, which he himself distributes. And since we shifted this function to Unifi, the following solution was invented. Go to the admin panel of the router, section "Lock services". Click the Add button. And we prohibit access to all ports throughout the network.

After that, in order to allow anyone access, we add the MAC address of the allowed device to DHCP (this was described above) and remove the allowed IP from the range of blocked addresses.

That's the whole process.
In general, the system is very stable. The daily workload is 30-35 users and there have been no comments so far. Installation and setup of the system takes only a few hours, and the expansion of the system is even less. In general, the most positive impressions. I hope that my experience will help someone and help.
Configure the router.
Since Unifi Access Point (AP) are not stand-alone devices, they need a router for a full life. In my example, such is Netgear JWNR2000 and all the presented settings, of which a little, will be from it. My external IP address is static, so the installation wizard is confidently sent to the garden and go to the “Basic Settings” section. Here we set the necessary data and click apply.
Unifi points also need a DHCP server. In the router, it is enabled by default, and I just fixed the IP addresses for my APs for convenience.
')
These settings are enough for customers connected to Unifi to go online. The rest of the settings at your discretion. Personally, I have enabled remote access via an external address, and it has come in handy more than once.
Install / configure the controller.
As they say on the Unifi.ru website: “The heart of the UniFi system is a programmable controller.” And there are three versions of them: for Windows, for Mac, and for Linux.
Notes regarding Windows. The controller was successfully launched only on a clean installation. Prior to that, the controller was installed on two different laptops, but stubbornly refused to start, although there were no conflicts either on the ports or on anything else.
If you decide to install a controller on Linux, here is a good guide to installing on Ubuntu 10.10. You can skip the step about installing DHCP, because in our case it is on the router. In short, then:
1. Edit /etc/apt/sources.list. Add the repository: deb www.ubnt.com/downloads/unifi/distros/deb/maverick maverick ubiquiti
2. Add a sudo GPG key to the terminal: sudo apt-key adv - keyserver keyserver.ubuntu.com - recv C0A52C50
3. Install the UniFi package:
apt-get update
apt-get install unifi
apt-get upgrade
After installation, it is recommended to turn off the repository, as there may be problems with installing packages. If the errors did not jump out, then the system is installed and already even works.
4. After installation, go to localhost : 8080 /, or to the IP address : 8080 /, confirm the certificate, and enter the system through the Ubiquiti UniFi Wizard.
About the floor plan.
I was interested to get the result as in the screenshots in the internet. Where the radius of the signal is visible. It is not a problem to insert an image and throw access points from the panel on the left, but with a radius of action it is a little more difficult. To do this, you need to set the scale, and this is done with the help of a clever combination of fingers. First, click on the triangle of the ruler, under the slider of increasing the view, click the mouse at any point of the map and draw a line (it is red). The line must be of a perfectly defined size, which should then be indicated.
After we have indicated the scale, click on the “Coverage” button and admire the purple-orange divorces.
I will omit the description of the detailed system settings. About this much is written on Unifi.ru , and the interface is quite intuitive.
AP connection.
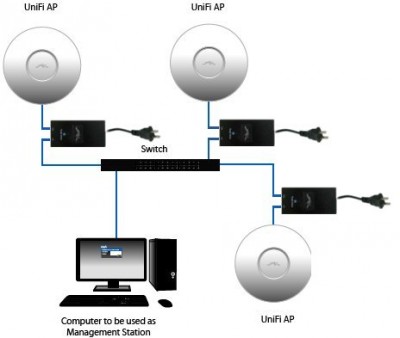
The very installation of points on the ceiling does not cause any questions. They were originally designed for installation on ceiling tiles or a wall and the kit has everything you need, but I did not immediately get the physical connection scheme. Although the manual has a seemingly understandable illustration.
By the way: it is not necessary to turn on the computer with the controller directly into a switch or a router after configuration. You can connect to the WIFI network built on Unifi and manage the settings through it.
But if you perform a connection for it, then you will wait for any results for a long time. But it was enough to draw like this.
The adapter and the access point are connected via the POE port and the second port of the LAN adapter is connected to the router, or a switch, as in the picture. That's all. After starting the controller, it will find the devices launched by Unifi about what the “Pending” indicator will tell. After that, go to the “Access Point” tab and click on the “Adopt” button on the found devices. Devices will register in the system about what, among other things, they will tell by a green LED on the case.
A little about domestic.
Reset. It happens that Unifi fails to register or fall off in the process of configuration and experiments. You can return the settings of the access point to the default state, as follows. You can find out the IP address (either on the “access point” tab of the controller, or in the “Connected devices” section of the Netgear router) and try to access it via ssh. There is one nuance. If the point managed to register, then you must enter through the name and password that you set on the controller, but if not, then the name and password are default ubnt / ubnt. After a successful login to the point, you need to run the command 'syswrapper.sh restore-default'. The point will reset the settings after which it will need to register again. I had a situation when it was not possible to enter Unifi via ssh. Already, I cut it (it was pressed with a paper clip for five seconds near the network port) and the power was turned off / on, nothing helped. Already I was about to take under warranty. But after lying for a day and connecting in series Rosette - Adapter - POE port of adapter - Unifi - L AN port of adapter - router, and lo and behold! I managed to log in via ssh, and reset the infusions, and then successfully register .
Access control.
The management made the decision that access should be provided only to MAC addresses. The forum ubnt.com honestly reports that such a function will be, but only in controller version 2. (The beta version of controller 2 is already on the network) There, people share their experience in access control using a RADIUS server, but I did not want to fence the kitchen garden . I had to log in from the router. Netgear JWNR2000 has such a function, only it is designed for Wi-Fi, which he himself distributes. And since we shifted this function to Unifi, the following solution was invented. Go to the admin panel of the router, section "Lock services". Click the Add button. And we prohibit access to all ports throughout the network.
After that, in order to allow anyone access, we add the MAC address of the allowed device to DHCP (this was described above) and remove the allowed IP from the range of blocked addresses.
That's the whole process.
In general, the system is very stable. The daily workload is 30-35 users and there have been no comments so far. Installation and setup of the system takes only a few hours, and the expansion of the system is even less. In general, the most positive impressions. I hope that my experience will help someone and help.
Source: https://habr.com/ru/post/275843/
All Articles