Learn ActionScript 3. “Hello, world!”
So it is accepted that the first application in any programming language is written, the so-called, “Hello, world!”. We will not depart from the traditions, although we have already written such an application as a test case in the framework of the article Developing Flash Games. Workplace preparation . But, this time we will move a little further. We will not just write the cherished words in the window, but also consider briefly the work with fonts and the transformation of objects.
Note: I only study AS3 myself, and therefore I only share my "discoveries", in simple words ...
So rushed ...
We create a new project in exactly the same way as described in the above-mentioned article. Let's name the new project " HelloWorld ".
')
I specifically use the continuous writing without spaces and punctuation in the names of the projects, so that it is easier to publish ready-made applications on the Internet, because there, spaces and other characters in references to objects are replaced with their code numbers, for example, the space is " % 20 ", etc. This kind of abracadabra only hinders and may require renaming the file when it is placed on the server or other actions. I'm used to doing it right away so that I don't fuss.
Now decide what we will display in the window. I decided to write: " Hello, world! This application was developed using FlashDevelop ". Split this replica into several lines and format each line by giving it its own style, color and font.
Since we are going to write words, we will need to work with objects of the TextField type.
By the way, we must remember that in Flash applications everything that needs to be displayed in the window is objects. And, therefore, for objects to be displayed, there must be something like the following order:
In addition, objects can be added to objects to form a hierarchy of the stage -> ParentObject -> ChildObject .
Thus, to the stage can be added, say, a dozen of parent objects, each of which will contain a different number of child objects.
Well this is so, by the way, so that you know ... In the meantime, we will not bother with it and move on.
In the application template ( main.as file) in the class public class Main extends Sprite at the very beginning (that is, before the Main () function) we will write our text field variables:
And add a text format variable:
Variables declared, you can proceed to the creation of objects.
Inside the function private function init (...) immediately after the line removeEventListener (...) we begin to write our code.
Create an object of the first text field:
The object has been created and now you can set parameters for it, such as: position in the window, size and, of course, text:
After setting the parameters, you can format the text:
TextFormat actually has much more input variables, but you can use only those that should differ from the default values you set. So, in our case, we have installed the Arial font size of 20 pt., In black and in bold.
To make it clearer, I will briefly tell you about the syntax TextFormat :
tf = TextFormat (font, size, color, bold, italic, underline);
font - font name, for example: "Arial Black", "Times New Roman". All their names can be viewed in a text editor. The main thing to remember is that not all fonts that you have will end up with the end user. In order to avoid the fact that your application will appear on the devices of your friends, when you decide to brag about the masterpiece you have created, I advise you to look at the following font table: List of standard Windows fonts . If you think about the quality of the combination with other operating systems - google with the appropriate request to help you.
size - the size of the font in points.
color is the font color in the format 0xRRGGBB, where RR is the hexadecimal value of red, GG is green and BB is blue. I am already accustomed ... And so that you do not bathe - here: http://getcolor.ru/ . Get the outline of any color. And all you need to do is replace the " # " sign with " 0x ".
bold - bold ( true ). By default, false is normal.
italic - italic (slope) ( true ). By default, false - no tilt.
underline - underline ( true ). By default, false is normal.
This is not the entire list of passed values that are in the TextFormat structure. I have listed only the most necessary ones, they are just brought forward the list. Variables are sorted in order of relevance by frequency of use, and those that do not need to be changed can be omitted.
For example, if we need to specify only the font name and size, the remaining values can be omitted:
But! If you do not need to change other parameters, but at the same time make the font underlined, you will have to go through all the values, indicating each of them. Or you can:
In other words, all instances of the TextFormat class are accessible after the full stop . And you can create an empty text format:
Going further ...
Now we have to apply the text format to the text field and add the text field to the stage so that it becomes visible:
This is the whole cycle of adding a text field to the application window. Let's do the same for all the other fields, specifying for each of them their own values:
Fine! Now, if you run the application ( F5 ), you will see the results of the works:

And so, we reviewed the work with text fields and text formats. Go to the transformations ...
Transformations in AS3 are fairly widespread. It is understandable ... Years honed.
All at once you will not consider, and therefore let's talk only about the transformation that we need in this article - this is the rotation (turns).
This transformation has in the postfix of the name of the letter of the axis, relative to (around) which the rotation will occur. Those. There are three of them:
We need the first one.
All angles are counted in degrees. Let's set preliminary values for our text fields:
As you have noticed, each following field is rotated 30 degrees more than the previous one. This is done for non-synchronous rotation of the fields.
And now back to the "visibility" of the fields ...
All fields are added to the stage , and, therefore, they are all displayed. But we need that the "flip-flops" not be shown until they are turned "face".
In AS3, the visible variable is responsible for visibility. If its value is true , then the object is visible, and if false , then invisible.
Let's make all our fields except the first (it is already correctly oriented) initially invisible:
Perfectly. Scene prepared. Now we need to “revive” it. To do this, we need to add a listener to the frame change:
This listener works very simply: every time the ENTER_FRAME frame is being prepared , our function will be called, which we called MyRender .
We write this function next to the function init () .
Each frame will rotate the text fields in increments of 5 degrees until they turn completely, i.e. to 0 degrees:
And make sure that at the moment when the text field is rotated 90 degrees, it becomes visible:
Fine. We did everything. You can press F5 and enjoy the result.
The last thing you can indulge in is to “tailor” the application to the required parameters. Go to the project properties Project -> Properties :
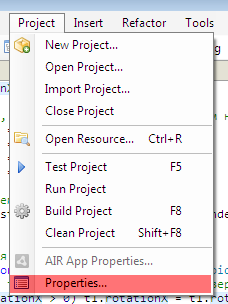
Having passed the specified menu, the project properties window will open:
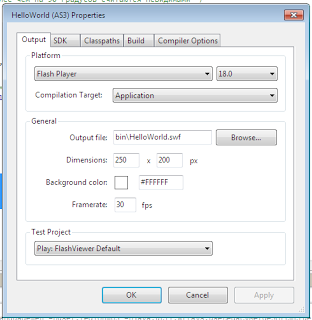
Here we need the fields of the General group:
Dimensions - the original size of the window. The fact is that on the web pages the application can be scaled, BUT! The proportionality of scaling will depend on the specified values of this field. Specified in pixels (dots).
Background color - the background color. No comments…
Framerate - Frame rate. It depends on this value: a) the smoothness of the animation; and b) system load and, as a result, brakes on weak PCs. I would not advise setting the value to more than 30. And in general, I believe that 15 in most cases is more than enough.
Links
You can see the finished example here . There is also a link to download the source code of the example.
Note: I only study AS3 myself, and therefore I only share my "discoveries", in simple words ...
So rushed ...
We create a new project in exactly the same way as described in the above-mentioned article. Let's name the new project " HelloWorld ".
')
I specifically use the continuous writing without spaces and punctuation in the names of the projects, so that it is easier to publish ready-made applications on the Internet, because there, spaces and other characters in references to objects are replaced with their code numbers, for example, the space is " % 20 ", etc. This kind of abracadabra only hinders and may require renaming the file when it is placed on the server or other actions. I'm used to doing it right away so that I don't fuss.
Now decide what we will display in the window. I decided to write: " Hello, world! This application was developed using FlashDevelop ". Split this replica into several lines and format each line by giving it its own style, color and font.
Since we are going to write words, we will need to work with objects of the TextField type.
By the way, we must remember that in Flash applications everything that needs to be displayed in the window is objects. And, therefore, for objects to be displayed, there must be something like the following order:
- Object variable declaration
- Object initialization (its creation)
- Interaction with other objects during preparation is possible.
- Adding object to stage
In addition, objects can be added to objects to form a hierarchy of the stage -> ParentObject -> ChildObject .
Thus, to the stage can be added, say, a dozen of parent objects, each of which will contain a different number of child objects.
Well this is so, by the way, so that you know ... In the meantime, we will not bother with it and move on.
In the application template ( main.as file) in the class public class Main extends Sprite at the very beginning (that is, before the Main () function) we will write our text field variables:
private var t1:TextField; private var t2:TextField; private var t3:TextField; private var t4:TextField; private var t5:TextField; And add a text format variable:
private var tf:TextFormat; Variables declared, you can proceed to the creation of objects.
Inside the function private function init (...) immediately after the line removeEventListener (...) we begin to write our code.
Create an object of the first text field:
t1 = new TextField(); The object has been created and now you can set parameters for it, such as: position in the window, size and, of course, text:
t1.x = 20; t1.y = 20; t1.width = 150; t1.height = 30; t1.text = "Hello, world!"; After setting the parameters, you can format the text:
tf = new TextFormat( "Arial", 20, 0x000000, true ); TextFormat actually has much more input variables, but you can use only those that should differ from the default values you set. So, in our case, we have installed the Arial font size of 20 pt., In black and in bold.
To make it clearer, I will briefly tell you about the syntax TextFormat :
tf = TextFormat (font, size, color, bold, italic, underline);
font - font name, for example: "Arial Black", "Times New Roman". All their names can be viewed in a text editor. The main thing to remember is that not all fonts that you have will end up with the end user. In order to avoid the fact that your application will appear on the devices of your friends, when you decide to brag about the masterpiece you have created, I advise you to look at the following font table: List of standard Windows fonts . If you think about the quality of the combination with other operating systems - google with the appropriate request to help you.
size - the size of the font in points.
color is the font color in the format 0xRRGGBB, where RR is the hexadecimal value of red, GG is green and BB is blue. I am already accustomed ... And so that you do not bathe - here: http://getcolor.ru/ . Get the outline of any color. And all you need to do is replace the " # " sign with " 0x ".
bold - bold ( true ). By default, false is normal.
italic - italic (slope) ( true ). By default, false - no tilt.
underline - underline ( true ). By default, false is normal.
This is not the entire list of passed values that are in the TextFormat structure. I have listed only the most necessary ones, they are just brought forward the list. Variables are sorted in order of relevance by frequency of use, and those that do not need to be changed can be omitted.
For example, if we need to specify only the font name and size, the remaining values can be omitted:
TextFormat( "Calibri", 10 ); But! If you do not need to change other parameters, but at the same time make the font underlined, you will have to go through all the values, indicating each of them. Or you can:
tf = new TextFormat( "Arial", 20 ); tf.underline = true; In other words, all instances of the TextFormat class are accessible after the full stop . And you can create an empty text format:
tf = new TextFormat(); , and only then refer to the instances, indicating their values.Going further ...
Now we have to apply the text format to the text field and add the text field to the stage so that it becomes visible:
t1.setTextFormat( tf ); addChild( t1 ); This is the whole cycle of adding a text field to the application window. Let's do the same for all the other fields, specifying for each of them their own values:
t2 = new TextField(); t2.x = 20; t2.y = 64; t2.width = 150; t2.height = 20; t2.text = " "; tf = new TextFormat( "Arial", 14, 0xff0000, false, true ); t2.setTextFormat( tf ); addChild( t2 ); t3 = new TextField(); t3.x = 20; t3.y = 80; t3.width = 180; t3.height = 20; t3.text = " "; tf = new TextFormat( "Arial", 14, 0xff0000 ); t3.setTextFormat( tf ); addChild( t3 ); t4 = new TextField(); t4.x = 20; t4.y = 110; t4.width = 150; t4.height = 50; t4.text = "Flash"; tf = new TextFormat( "Calibri", 32, 0xd0d0d0, true, true ); t4.setTextFormat( tf ); addChild( t4 ); t5 = new TextField(); t5.x = 90; t5.y = 110; t5.width = 150; t5.height = 50; t5.text = "Develop"; tf = new TextFormat( "Calibri", 32, 0xf09e14, true, true ); t5.setTextFormat( tf ); addChild( t5 ); Fine! Now, if you run the application ( F5 ), you will see the results of the works:
And so, we reviewed the work with text fields and text formats. Go to the transformations ...
Transformations in AS3 are fairly widespread. It is understandable ... Years honed.
All at once you will not consider, and therefore let's talk only about the transformation that we need in this article - this is the rotation (turns).
This transformation has in the postfix of the name of the letter of the axis, relative to (around) which the rotation will occur. Those. There are three of them:
- rotationX
- rotationY
- rotationZ
We need the first one.
All angles are counted in degrees. Let's set preliminary values for our text fields:
t1.rotationX = 90; t2.rotationX = 120; t3.rotationX = 150; t4.rotationX = 180; t5.rotationX = 180; As you have noticed, each following field is rotated 30 degrees more than the previous one. This is done for non-synchronous rotation of the fields.
And now back to the "visibility" of the fields ...
All fields are added to the stage , and, therefore, they are all displayed. But we need that the "flip-flops" not be shown until they are turned "face".
In AS3, the visible variable is responsible for visibility. If its value is true , then the object is visible, and if false , then invisible.
Let's make all our fields except the first (it is already correctly oriented) initially invisible:
t2.visible = false; t3.visible = false; t4.visible = false; t5.visible = false; Perfectly. Scene prepared. Now we need to “revive” it. To do this, we need to add a listener to the frame change:
addEventListener(Event.ENTER_FRAME, MyRender ); This listener works very simply: every time the ENTER_FRAME frame is being prepared , our function will be called, which we called MyRender .
We write this function next to the function init () .
private function MyRender(e:Event = null): void { } Each frame will rotate the text fields in increments of 5 degrees until they turn completely, i.e. to 0 degrees:
if (t1.rotationX > 0) t1.rotationX = t1.rotationX - 5; if (t2.rotationX > 0) t2.rotationX = t2.rotationX - 5; if (t3.rotationX > 0) t3.rotationX = t3.rotationX - 5; if (t4.rotationX > 0) t4.rotationX = t4.rotationX - 5; if (t5.rotationX > 0) t5.rotationX = t5.rotationX - 5; And make sure that at the moment when the text field is rotated 90 degrees, it becomes visible:
if (t2.rotationX == 90) t2.visible = true; if (t3.rotationX == 90) t3.visible = true; if (t4.rotationX == 90) t4.visible = true; if (t5.rotationX == 90) t5.visible = true; Fine. We did everything. You can press F5 and enjoy the result.
The last thing you can indulge in is to “tailor” the application to the required parameters. Go to the project properties Project -> Properties :
Having passed the specified menu, the project properties window will open:
Here we need the fields of the General group:
Dimensions - the original size of the window. The fact is that on the web pages the application can be scaled, BUT! The proportionality of scaling will depend on the specified values of this field. Specified in pixels (dots).
Background color - the background color. No comments…
Framerate - Frame rate. It depends on this value: a) the smoothness of the animation; and b) system load and, as a result, brakes on weak PCs. I would not advise setting the value to more than 30. And in general, I believe that 15 in most cases is more than enough.
Links
You can see the finished example here . There is also a link to download the source code of the example.
Source: https://habr.com/ru/post/275829/
All Articles