Path from prototype to industrial IoT product
Projects based on Intel Galileo and Intel Edison are mostly prototypes of devices. Often this ends. This article will cover the complete path from the prototype to an industrial solution based on Intel Gateway. This will be a system to control the temperature inside the van.
This project has two objectives. The first is to create a working model based on the Intel IoT Commercial Developer Kit with additional sensors. And the second is the subsequent transition to a scalable industrial solution that uses a commercial gateway (Gateway), industrial sensors, McAfee Security and the Wind River platform. The product we are developing is intended for the transport sector, and its purpose is to monitor the state inside the van carrying perishable products and to warn the driver if the temperature exceeds a predetermined threshold.
We will build a working prototype to prove the performance of the idea based on the Intel Galileo board using the basic shield and sensors from the Grove Seeed Starter Kit Plus.
')
By the end of the article, you will see a quick and easy transition from a prototype to an industrial solution, showing how you can quickly connect equipment to the Wind River OS. Using precompiled modules, like RPM, helps to remove unnecessary downloads, OS configuration, and defining the necessary libraries to make the project work.
In the photo is an example of an industrial gateway. It is small in size and can fit on the palm of your hand.

Usage scenario
Our development team was formed to demonstrate the capabilities of the Intel IoT Commercial Developer Kit and the Intel IoT Commercial Gateways solutions. We decided to focus on transport that carries perishable goods.
This project was chosen, as there is a potential possibility of similar decisions in the market. While our project has only basic functionality, it also shows that you can add additional features, such as a web connection, cloud services, remote monitoring, and other necessary components.
After identifying the core application, the team listed the potential for the prototype and product. Various ideas were proposed, such as tracking the status of the tailgate, the temperature inside the van, a warning about changing their states and values, an online application for viewing data and displaying information in the driver's cabin.
The capabilities of the prototype, built on the basis of the Intel IoT Commercial Developer Kit, were determined by sensors that were part of the Grove Seeed Sensor kit. Therefore, all the functionality needed to be implemented using this set.
Project in Intel XDK for interface on Microsoft Surface Pro 3:

Prototype using Commercial Developer Kit
We have divided the project into three key areas:
- Desired user interface:
- The development team started working on the design and design of the user interface.
- Interfaces:
- We started working on what will be used in the final decision.
- We understood that we would need to make changes for the final integrated industrial solution.
- Prototype sensors:
- Creating a working solution with Grove Sensors sensors and using the UPM and MRAA libraries for rapid development.
- This allowed us to create a layout with sensors for the user interface command so that they can use it during development.
Layout with sensors:

By separating the project, we were able to go through the concept confirmation phase faster, using our abilities where they were needed. The user interface was important and took a lot of time to design and implement. Its development was started early, and therefore we were sure that it would be made on time.
In general, we were able to simplify the choice of sensors, because we knew that the door sensor should be simple. This made it possible to focus more on the correct use of the temperature sensor for the test scale and later for the industrial scale.
Using the Grove Sensor Kit, we were able to quickly create a prototype with working sensors for the interface command. This allowed them to quickly develop the design and layout of the elements, which created the basis for the final use case.

The usage example was based on the following scenario:
1. Press the button (door opening simulation).
- Set the temperature limit 5 degrees above the environment.
- The red lamp in the cab turns on.
- The current temperature and door status “open” appear on the LCD screen.

2. Touch the temperature sensor to warm it up.
3. The temperature will rise by 5 degrees:
- A beep sounds.
- The red light flashes continuously.
- The LCD screen turns red, the current temperature is displayed and the status of the door is “open”.

4. Touch the touch button:
- The beep turns off.
5. Press the button to close the door:
- The red light continues to flash until the temperature drops below the threshold.
- LCD screen: high temperature warning. The door status is “closed”.
- When the temperature reaches the lower limit, the flashing red light turns off and the LCD screen begins to glow green.
- LCD screen: temperature, door status - "closed".

In this example, a reduction in the potential loss of products that are temperature sensitive is simulated, tracking the temperature in the van and warning the driver if necessary.
View data from the temperature sensor:

The main type of system:

The following table shows the sensors used in the prototype and commercial product.
| Developer kit | Commercial kit | |
| Squeaker | Grove buzzer | Signal on the phone (web interface or application) |
| LCD screen | Grove LCD panel | Screen on the phone (web interface or application) |
| Red led | Grove Kit LED | Light on the phone (web interface or application) |
| Button | Grove Button Button | Industrial Magnetic Sensor |
| Touch sensor | Grove Kit Touch Sensor | Pressing on the phone (web interface or application) |
| temperature sensor | Grove Kit Temp Sensor | Commercial temperature sensor |
| Heat source | Finger | 20W halogen lamp |
| Connection gateway | Galileo board with Arduino shield | Intel Industrial Gateway |
Targeted Commercial Solution
Having a prototype based on the Intel IoT Commercial Developer Kit, you need to determine how to move to a commercial solution. There are many commercial gateways and each is slightly different depending on the industrial application. We needed the availability of I / O ports for connecting sensors.
In this project, Intel IoT Commercial Gateway was chosen as the gateway, as it has the necessary I / O ports and has enough computing power for our commercial use.
We found it necessary to use a wired Modbus temperature sensor for reliable connection and data acquisition every few seconds. All connections on the device are made by wires or through a local network. The standard libraries MRAA and UPM were used without any changes.
The gateway acts as a web server for the stored data, and it also makes calls to the temperature sensor to get new values. To do this, call curl updates the value directly on the web server, getting the temperature from the sensor. Getting the temperature value is implemented in C using the libmodbus library.
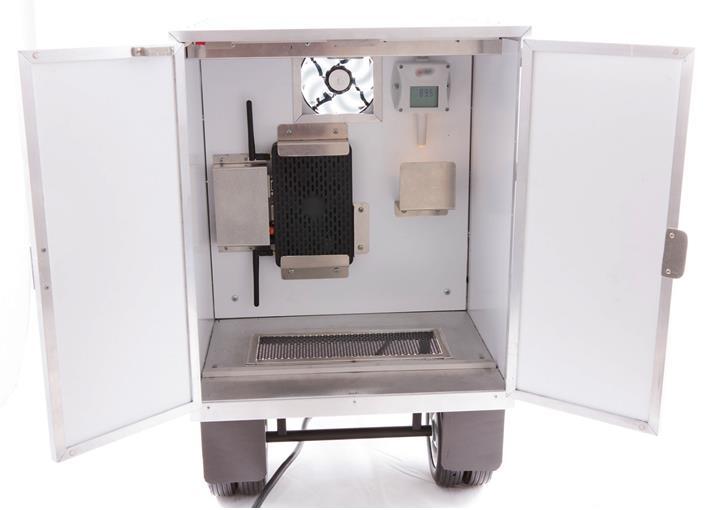
Gateway installed with a temperature sensor in the demo model:

Transfer code to the gateway
Usually, switching to a commercial gateway leads to rewriting the code so that it becomes compatible with the services that are available in the system. In this case, the program for the prototype was written in Python, HTML, and JavaScript, which made the transition to the commercial version simple. There were no problems in making the code work, since the same MRAA and UPM libraries are used.
Transition from Grove sensors to industrial sensors
Steps for moving to a commercial solution:
- Determine the desired industrial equipment. If additional libraries or programs are required, connect them by creating an additional WR layer.
- If the commercial equipment works, integrate it into the existing solution, removing the code from the previous one. Use the existing layers that you created during the prototype implementation process to establish dependencies. Make the necessary changes for the new equipment.
- Take the old and new layers and embed them in the WR runtime.
Completing Product Creation on Intel Gateway - Installation and Testing
Consider adding Intel Galileo to the Gateway network.
During the time that was allocated to us, we were able to use the Galileo Gen 2 board as a sensor controller, but it is still recommended to use an industrial level controller. You can connect Galileo and the gateway using an Ethernet cable. Since the network interface (eth0) on the gateway is configured to access the WAN, additional configuration steps will be required. Assigning static IP addresses to both devices will work, but since there is DHCP on the gateway, it is better to use it in order to use the automatic Galileo configuration.
At the gateway, do the following:
ifconfig eth0 10.0.0.1 netmask 255.255.255.0 up Add to
/etc/dhcp/dhcpd.conf : subnet 10.0.0.0 netmask 255.255.255.0 { range 10.0.0.100 10.0.0.120; option routers 10.0.0.1; } Run dhcpd for the DHCP server. On Galileo, you may need to lower and raise the interface again.
ifconfig enp0s20f6 down ifconfig enp0s20f6 up Test performance with the ping command.
The configuration steps listed above will not be saved after the system is rebooted and will be required again if the gateway is restarted. To make these settings permanent, follow these steps:
On the gateway, change the WAN interface in
/etc/config/network : config interface 'wan' option ifname 'eth0' option proto 'static' option ipaddr '10.0.0.1' option netmask '255.255.255.0' Enable autorun dhcpd on eth0 with the command:
systemctl enable dhcpd.service Note that putting the interface into static mode means that the gateway cannot be used to connect to the WAN using eth0 without canceling the steps taken earlier. Additionally, forwarding and routing of ports between the Wi-Fi network and eth0 will be enabled by default.
Source: https://habr.com/ru/post/275805/
All Articles