"Pixel gallop - part three" - Animation
“Gallop pixel” - part one ( link )
“Gallop pixel” - part two ( link )
"Gallop pixel" - the third part ( link )
"Gallop pixel" - the fourth part ( link )
I am glad to inform you that we have come close to creating animation. As in the case of the first article, we will start with the basics. Because in other ways the animation is not done. We do not get any running and jumping people, sparkling fights and battle scenes, in the event that we do not know how the simplest objects move, until we understand, and most importantly do not feel the principles of movement and dynamics. And as it happened - it will not be something complicated and obscure.
')
I think that everyone has become accustomed to the fact that the material is considered so that the future artist uses the smallest possible amount of tools, with maximum pressure on the main aspects of the topic in question. In this article, you will not read the praises of this or that package, you will not be drawn into the abyss of furious terms, you will not be sent to many third-party web resources, where you will be asked to independently get acquainted with something. All images will be created here, along with you, by elementary means based on the classic time-lapse animation.
Despite the fact that the second part of the cycle of pixel art gathered much less positive reviews and, according to statistics, enjoyed less success on Habré - we will continue to dig pixel art so that the territories we studied are no longer white spots, so that we can finally erect a reliable fortified area here. Popularity thing coming and going. It would be ridiculous to be guided solely by it. Moreover, there are people who insisted on the speedy release of this part of the cycle. I will touch on this topic at the end of the publication.
Spade in hand.

Speaking of fortification, I meant something more similar to the foundation. Base. Bridgehead for those who will fight in the fields of pixel art later. If you have been to Karelia and on the outskirts of it, then you are well aware that hundreds of old, still Finnish foundations are scattered throughout the entire Priozersk direction. Unlike the buildings built on them after, they still stand like bones of the earth. Lined up after the demolition and burning of the original Finnish farms have already managed to decay and fall apart, while the base remained the same, strong and resistant to time.
Onega and other types of petroglyphs, from those that I mentioned in the first publication, are just as alive to this day. They will continue their lives even when the author of these lines and those who read them turn into dust. This tells me only about one thing. If people do something with feeling, their business lives forever. If people do something “building for ages,” from good materials and based on the knowledge of their ancestors, their work is worth ... hundreds of years. If people do something for descendants, the descendants receive their “letters” and material for study. I doubt, however, that my cycle has a long life, but I am also sure that it will encourage someone to write something like this later. More true, more detailed and more skillful. As any topic, even the life of one small Finnish farm, is the story of its life, its inhabitants, and the story of their accomplishments. What to say about such a massive layer of III as pixel art.
Let's frolic with terminology for a bit, and then ... let's go directly to creating animation. In this publication, I will not invent terms. Because before me everything was invented, and invented well. And when I say good, I mean the work of Frank Thomas and Oliver Johnston. These people need no introduction, but it will not be superfluous to note that this is the old guard. The animators of the Walt Disney studio, which many years ago offered to help other animators - “12 principles of animation”.
Of course, an ignoramus like me did not bother to get acquainted with this wonderful, and most importantly short work, in time, trying to achieve these milestones on my own, through trial and error. Looking back, I understand that this was not a very smart idea. Therefore, I can advise you (not hoping, however, for the implementation of this advice) to glance at the works of the old and the wise.
Why not hoping? Because it is precisely young daredevils who question everything and everything become then the engines of progress. Innovative solutions, original moves, risky adventures - all this is characteristic of youth. I will not mention the number of people who missed and slipped along this path. It always has been. Winners unit. The rest are the “second winners” (see Infosphere). To understand this, it suffices to recall the tragic discovery of the South Pole and the race of two legendary polar explorers, Rual Amundsen and Robert Scott.
Chapter I - Playing the ball.
What comes to mind first when mentioning animation or animation terms? Most likely, the movement and frames. These are our first roots, the first milestones for which we cling to a small patch in order to keep this fundamental topic. If with frames, as a first approximation, everything is more or less clear (changing sequence of pictures), then the movement needs to be seriously chewed.
The movement of an object depends on its physical properties. Do not laugh, the pixels also have weight, can be thick and thin, can be deft and awkward. Pixels can be liquid and fluid, can be viscous and stone. Pixels can be alive and non-living. Moreover, the living can be divided into two classes - representatives of the animal world, and Pixeloids already known to us, the humanoid type. Representatives of the animal world can also be divided into those who have bones and those who do not have them. In addition, the movement may depend on the character of the character, his age and his mood. This is a multi-factor system.
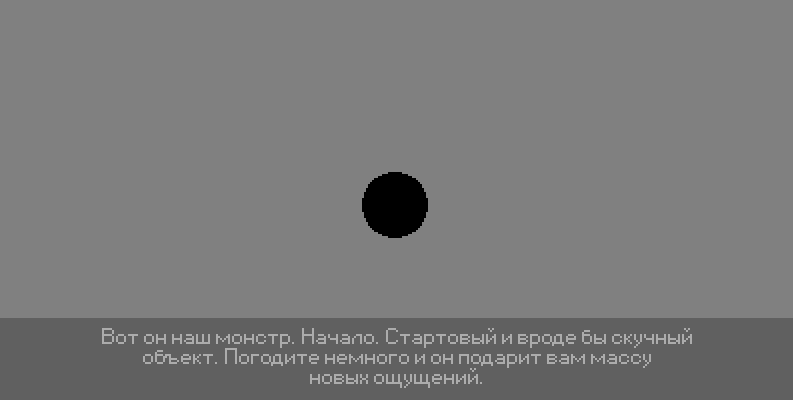
Where do we start, and what to do? As always - move from simple to complex. And the best example of a simple object would be a rubber ball. The fact that the old animators from Disney took the best example of the scope is encouraging. There is a chance that today we are on the right track.
Let's form some properties of this first object:
• Round
• Light
• Good springy
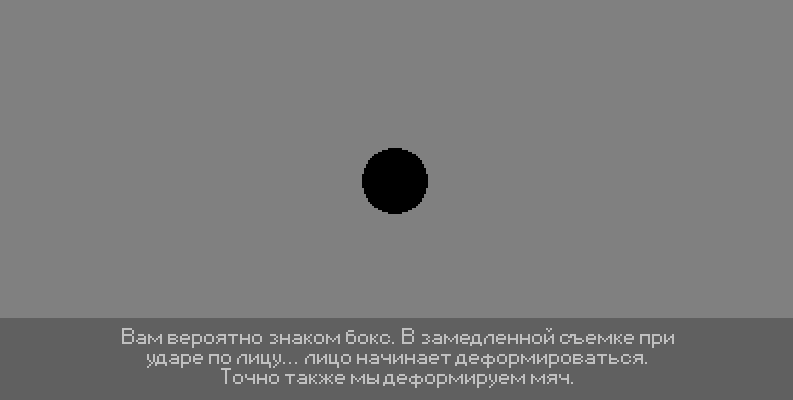
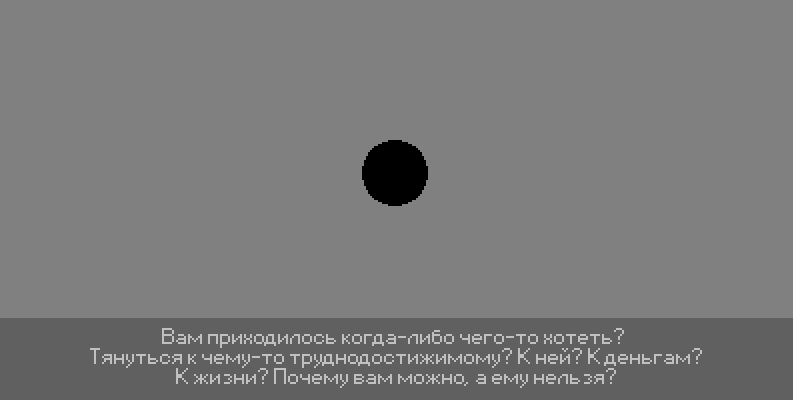
Of these three definitions we have issued, the shape of the object, its weight, and its physical properties are already known. Remember our forms from the first part of the article? Take them and start working. For a better understanding of the process of what is happening on the screen, we do not need colors, because we are going to observe how the laws of physics act on our object. And, no - there will be no formulas. There will be no useless realism. This is not the approach you need when creating an animation. In it, the notorious anvil, falling on the character’s head, leaves only a bump on the head, while real physics would sprinkle your monitor with blood, make holes in it with bone fragments, etc. Well, the article would have received an age rating. We are completely useless. Therefore, we note in advance that when writing this publication, no ball was hurt.
We proceed from the position that in our images the most important is the form formed by the silhouette of the object. It is he who delivers to our brain information about the change in the shape of an object and its position in the world. There is no light, no shadow. Only absolute form.
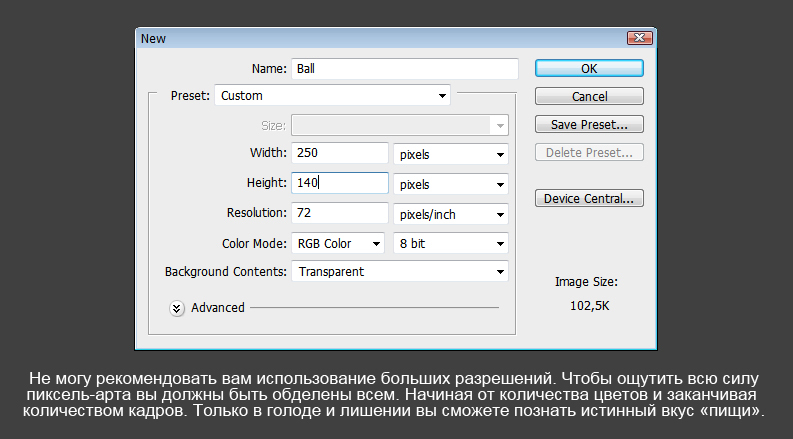
Therefore, we will take at the start only two colors. The background color and the color of the object's silhouette. Plus eight frames for animation, in which our ball will jump up and down. For animation, we use the standard tools of the package Adobe Photoshop. Their beauty is that they are simple. I would even say that they are not. All we have at our disposal is the ability to play frames in a row and adjust the playback speed of these frames. Let's prepare our document so that we can start working with our ball. We already have a layer with it. This is a ball. And we have a background. This frightening simplicity will soon lead us into the world of motion.
Preparation of the document for work
I will sign this very short stage and I will do it in great detail. The fact is that this is where newcomers have problems. Animation, as it turns out, is quite simple. Sit and draw frames. But how to organize everything so that the process goes and how to make it so convenient for the animator to work - there are always problems with this. It is on this occasion that I often receive something similar to the following text in the mail:
- “Tell me not how to do the animation, but how to make it all be in Photoshop, where is it at all?”.
These questions demonstrate gaps in the “bone work”. Let's investigate it together and write down another opened case to your account. A new document is created either through the File / New menu or with the keyboard shortcut Ctrl + N. Over time, the “shortcut keys” will become something reflex for you, and when you are asked “through which menu do you do this?” You won’t know what to say. After this operation, you get to the file / project creation menu. Select a resolution close to the classic 320x200, call the project Ball, and press the OK key.
With layers you have long been familiar. You can create them using the Create a New Layer icon. Eight layers - eight future frames. And here we are already waiting for the first nuance. Every second newcomer begins to draw his animation on one layer, and this is fundamentally not true. Why? Because - uncomfortable. Redrawing the details on one layer is long and impractical. Therefore, each of our frames will consist of multiple layers, each of which will be responsible for its task. Just like in the mini-production.

Also, each frame will be not just a layer, but a group in which there will be any number of layers that are convenient for us. Let us ask ourselves a simple question - “Why is this being done?”. And they themselves will respond to it.
Suppose you have in the scene not only the ball. Suppose this person is divided in turn into a body, a jacket, a head, hands, and pants with boots. If all the layers in the project are in disarray, after a couple of hours of work you will get a mess that no one can figure out. Including you. One fatal mistake (for example, the wife called and reported that today is the last day of payment of the loan) and the layers are messed up, dooming you to sorting and re-adjusting the visibility of the layers. I would not advise you to face it. Turning off your cell phone while working is also not an option, wives are usually very furious in such cases. Furious wife can lead not only to the confusion of layers in the animation project. Tested by time and your humble servant.
Each frame in an animation using Photoshop is not only a collection of pictures, but also an indication of which layers will be visible and which will not. Imagine that frames (correctly named groups with sprite sets) are not in groups, but are presented in the form of layers. A bunch. You just created the layers you needed and painted on them. And imagine that there are two hundred forty layers in your project (240). Ten (10) layers for each frame, in the case of twenty-four (24) frames. You will surely make a mistake somewhere, and one of two hundred forty layers will come out in the frame you do not need. You are doomed to look for him. While you search for him - screw up somewhere else. All this will not happen if each frame is a group with a set of layers.
No frame needed - hid. Needed - displayed on the screen. And no hassle. Only 24 groups which became your shots. And more you do not need. 24 frames is super smooth animation that only real psychos dare to do. I am not kidding. See any industry project. In the richest case, frames in animations will be sixteen (16), but not twenty-four (24). And no, I don’t need to give me an example of old games. There, developers are not lazy, as they do today.
So let's go back to our layers and put each of them into a group. To create a group, you can press the key combination Ctrl + G on the layers you have chosen, and then give the group the name Frame1 (where 1 is the frame number and the word Frame is the frame designation, not any other group). Thus, each of our layers will be in a group with sequence numbers from Frame1 to Frame8.

Now there is one empty layer in the groups. Also, virginal purity can reign there, which will soon be broken by the button “create a new layer” (eng. Create a new layer ). But this is not the frame. They do not take turns and are not lost. These are just groups with layers, and no more. We turn, finally, to setting up the upcoming animation.
Using the Window / Animation tab, we call the animation control panel. Most likely, it will look like this:
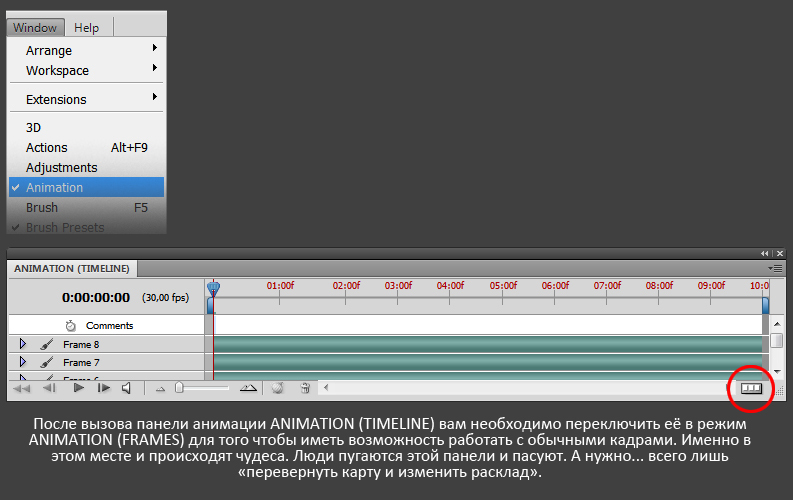
We need a classic frame view so that we can work as regular animators, changing from one frame to another. Those who traveled to the panel from the image above often passed and started writing me letters about the complexity of creating animation using Photoshop. I will not hide it - it (the panel) frightens and confuses the observer. Damn it, I scare myself every time I see it. Therefore, we will use the icon in the lower right corner of this panel. And our panel will change to the following panel. No more fear. There are no frames yet, but we can easily create them using the icon from the image below. Eight clicks and we have eight frames.
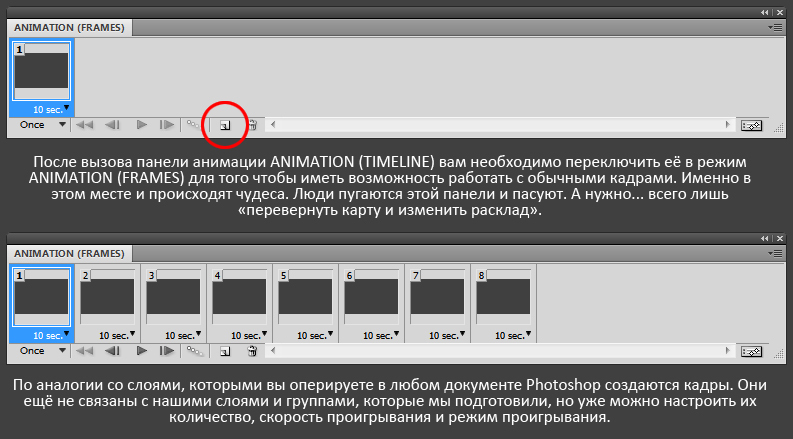
At the same time, we note that aliens appeared on our side panels in our layers. With each press of the “Duplicates selected frames” icon, a “left” layer appears. These are the new layers that could become our frames by default. Could ... but did not. They infiltrated our PSD file in an illegal way. But we know what to do with these aliens. Select them and ... erase.
Nothing personal, we are not against these émigrés, but we already have our own layers, our own groups and left trash - we don’t need it. We keep the population of our small PSD file under control. All that is needed now is to link them with frames from the “ruler”, that is, to assign the order of output of our groups to the screen and adjust the speed of their playback.
It's time to assign a sequence to play. To do this, go to the animation panel, select the first frame, and in the layers section on the right, make one frame visible (one of our groups). For the first frame we select the group Frame1. In the second frame, the Frame2 group will be visible, but all the others will not be visible. And so on. Until we get to the eighth frame and the Frame8 group. As already happened in the eighth frame, this group will be visible, and no more. The background on all frames is visible. We do not touch him, as we are engaged in ball animation.

That's not all. Although the hardest is over. Seriously. When I told you that the beauty of Photoshop functionality in its simplicity - I was not deceived. All that is needed is “to put an end to the sentence”. Let's take a look at, finally, point by point, what is a frame from the Adobe Photoshop animation panel. What can we do with the animation panel? What we have? A little, frankly. And this is good. It's easy to learn, which means that after a few minutes we will be able to start doing animation. There are final touches to the settings of our project.
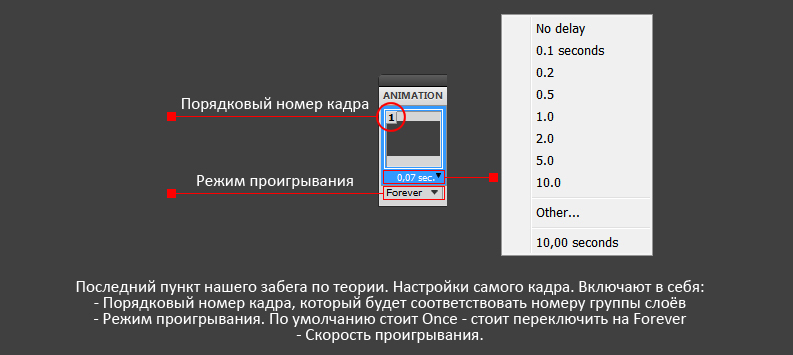
The frame window contains an indication of this frame (its sequence number), the ability to select the frame delay, or its absence. Delay is a very useful tool. It not only allows you to make an animation with a smaller number of frames (albeit rather jerky), but also gives you the opportunity to set different frames - different playback speeds. One frame can be played a second, and another as many as ten! Let's say your character drinks soda water. It takes 7 frames, and in the eighth you put a delay of 10 seconds. And in your animation, the character does nothing for exactly 10 seconds. Then again gets out of the pocket soda and quickly sips.
The panel below, right below the frame shows us the ability to choose the "number of losses." We are interested in only one word - forever (born forever), which means that your animation will play in a loop, time after time, until the last PC on Earth dies.
At this setting ends. Our cadres are trained and numbered. Our group frames are linked to frames in the animation panel. Our frames can be played and they have a playback speed. Our animation is cyclical, so we can create loops (eng. Loop) of whatever length we can and conveniently see the flaws that we allow in order to fix them in turn. If you chose the Once play mode (that is, once), we would have to press the Play button each time to see the result. This is unacceptable. We want to see the result of our creativity in the cycle.
You can hardly believe it. But the most difficult chapter in our today's narrative was this one. Seriously. Making yourself write a process that is done at the subconscious level is rather difficult. I got used to it and do not see anything in it except routine. Someone will open this publication for the first time, and we should not scare him with the deliberate complexity of the process and should not forget about the little things. Because the reward for this will be the world of animation. Reward, you see, substantial. So much so that the head of the theory can be patient.
Let's go back to our ball and teach him to do at least something in this life. Let him stop, finally, be a spherical loafer and take up the mind. Let him at least. And yes ... let's promise each other that today we will no longer touch any settings. Let everything that comes after this brief and tedious chapter be creative and enjoyable.
Keyframes
The concept of a keyframe determines the most important, key points in the creation of any animation.The most important moments of the "life" of the object, determining the character and dynamics of the hero, describing the action that he performs even in statics. Then the rest of the frames are drawn between them. We can say that keyframes are the nature of your object.
In the case of our ball, this is the position where it reaches at the time of the rebound, and the position where the ball touches the ground, or the point of falling. Two peak values of our future miniature. In other cases, these would be the most spectacular poses of a character, or zones of maximum disclosure of limbs during movement. The bottom line is that the keyframe is responsible for the most important and noticeable actions of your character. The beginning and end of a step, or the beginning of a lunge with a sword or its ending, the beginning of a detonation and the maximum release of fire during an explosion, etc. All other frames are drawn after and between key frames. For Disney animators, this principle is called using layouts. There is another way, through traffic, where instead of keyframes, the animation of an object is drawn as it is, from the first frame to the end of the animation (see Infosphere - “12 principles of animation”)
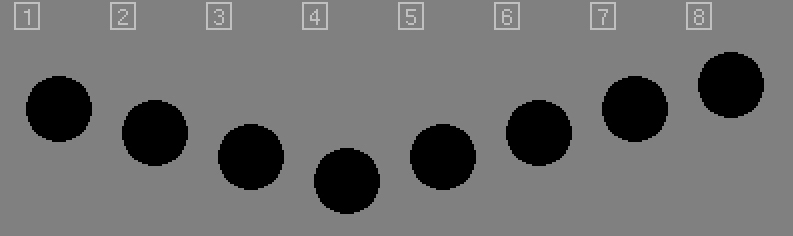
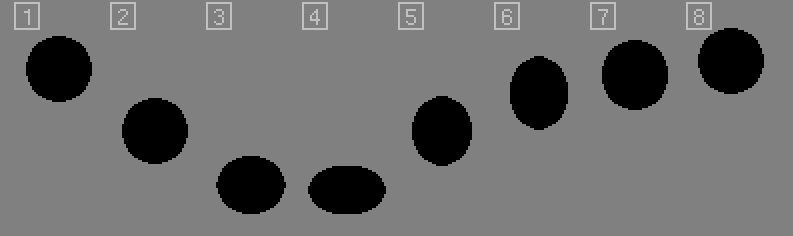
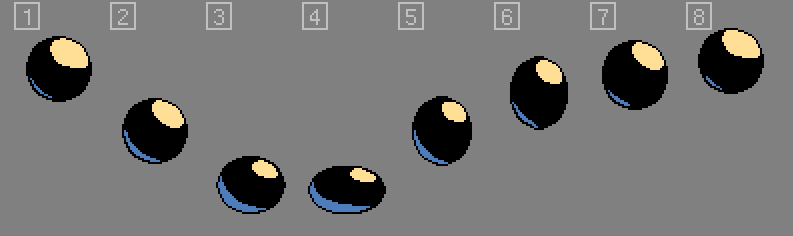
I will consider the animation gradually. Span by Span. So that you do not miss anything important. Let's start with the key frames. Two of the eight have already "gone" to the top and bottom of the animation. Six left. I propose to determine the three frames under the rebound, and three more frames to drop. And let all of them be at the same distance from each other. For example, twelve pixels (well, I like the phrase about twelve pistols).
In statics looked good. But in the dynamics, the children are already running towards you with sobs, pointing their fingers at the terrible monster who was in the ball since morning. He is lifeless. Not that dead. Certainly not walking. But ... obviously not jumping. Not real. Not realistic. What is missing from this ball? I will answer myself. Physics.He moves contrary to the laws of physics. It is uniform in its ups and downs, and in our world there is a law of attraction. It is for this reason that it is worthwhile to fear bricks falling from a great height.
Force of gravity
Remember our verbal portraits from article number two? For our fictional characters? Let's try to describe how real balls behave. Without furious formulas and demonstrations of deep knowledge of fifth grade physics. We will use the verbal portraits technique we used, in this case, to describe not the nature of the object, but its physical properties and its movement.
Verbal portrait: At the moment of hitting the ground, the ball bounces off of it reaches the point of its maximum take-off and freezes for a while in the air. His speed is not completely extinct, he is still striving upward, but the force of gravity is already dragging the poor man back.
Let's perform the exact same manipulation with our animation. Hitting the ground, a sharp rebound, and a freeze. Let's start with the hang. The eighth frame (8) is the maximum point of the approach of the ball. Pull back adjacent frames. So that it can be seen that the ball is “stuck” at the top. Tries to fly further but cannot. At this point, in contrast to the fall, smoothness should be concentrated. This is the damping of the take-off speed, and so far the missing fall rate.


I do not like the height of our flight. Captain, let's raise this carriage higher. Well, we'll raise the eighth frame (8), together with the seventh (7) and first (1) up. Another twelve pistols.
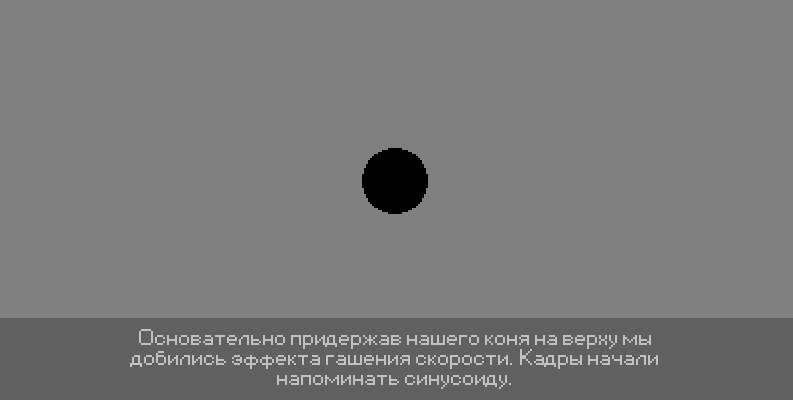
Now let's work with the fall. Let all the fall take place in one frame. The ball is in the middle of a point between two keyframes (4 and 8). Then two shots of the ball lying on the ground, and then two more shots from the remaining ones to take off. We assume that the bounce rate is exactly the same as the fall rate. The animation is looping and never ends. What we have?
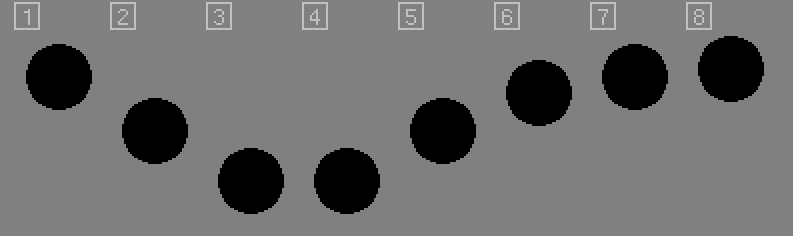
Already much better, but still bad. Children still hesitantly crumple behind your back. There is still something sinister in the ball. And it is not very clear why I made two shots of a ball lying on the ground, having given such an incredible number of shots to the dances in the sky. Everything has its time.
Elasticity
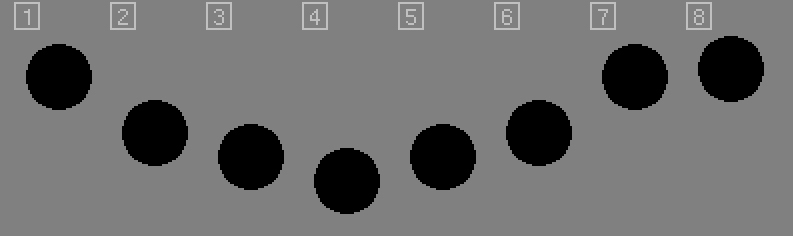
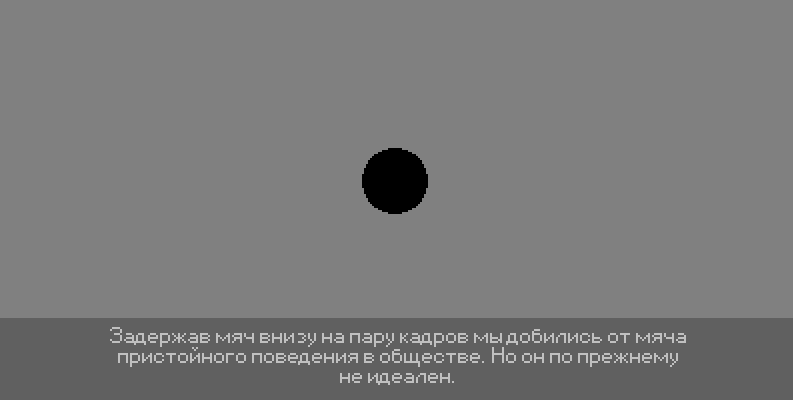
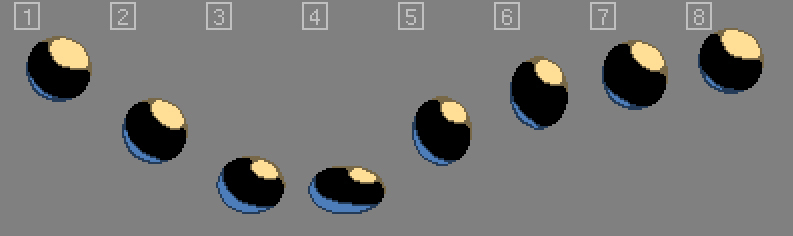
Physics again? Maybe mat? In general, yes. The ball is rubber. He at least somehow has to change shape while hitting the ground. Well, in animation, especially in pixel-art animation, it will be good form to create a grotesque animation, where you can clearly see how it shrank, and unclenched, flying away upwards. Shouldn't we start with the cuffs?
Remember the third and fourth frames, where the black carcass lies breathlessly on the ground? This is the area of the magic cuff. In the third frame, we crash into the ground. It is quite logical to deform these two frames in such a way that the observer could see - “thats something, but shmuknulis!”. Let's look at the same animation as before, but with a bruise. Not bad, huh?They gave us only two shots, and the result was already on the face.
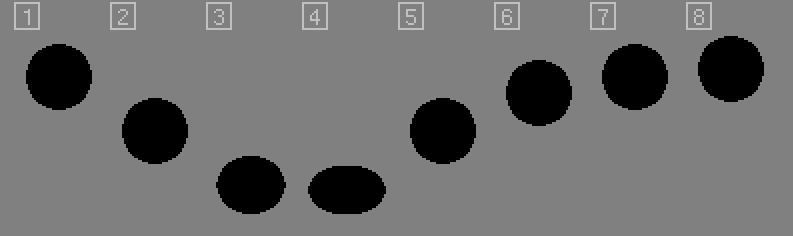
I would venture to suggest that, flying upward, the ball should stretch out like a rocket, strive upwards like an insane carrot to meet waves and danger. In other words, there lies ahead the dream of his life. How similar it is to the vital activity of the average man!
Therefore, we compress it horizontally, and stretch it vertically. Along the way, we change the shapes of objects and their height so that the movement is filled with harmony. The work of an animator is to constantly change forms, play animations, and again change forms until the object begins to sound like something acceptable. If the sculptor cuts corners and roughness on one static object, sculpture, then the animator must process a large number of replicas, for each of his sculptures is a frame. Eight frames - eight sculptures.
I will not be mistaken, saying that it became better. Take a look back and see where we started. That first guy that scared everyone to stupidly, and this dark hotel wanting a better life. That spineless rag and this cheerful man. However, the black ball is frighteningly black.
Therefore, we will send the children to their mothers for lunch, and we will equip our object with color and light. Now you can. We, as in the case of creating a base for a static pixel art, made sure that our form works and works well. That is, the same scheme works as before. Initially, the shape indicated by the silhouette, then the light and shadow. Literally in a few paragraphs, we mastered the concepts of key personnel, remembered that in our world there is a law of attraction, and defined the term elasticity of objects.
Light, Shadow and Color
Let the ball be blue, from the bottom left let the cold light source beats, and on the right and above let the light beats warm. Add them individually to see how our scene changes. The effect of each light source was indicated by one color. Why we will find out below.
We see how the shape of our object changes, we even arranged the “arches” of our light to change its shape. What do you think?There is something, but dry and unprofessional.

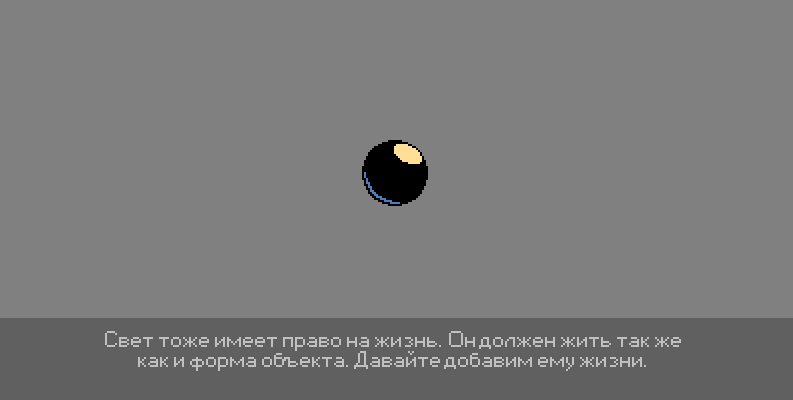
But where it would be better to further revitalize our image. How?Imagine, for example, that a warm light source is not so far from the earth, and that our ball jumps to it, and, consequently, the halo of light at the highest jump point is maximum. We will do the same trick with a cold light source, at the moment of maximum compression our light bulb will flood with cold radiance because the cold light source is very close to the floor and illuminates the falling ball well on those shots where it is closer to the floor.
Complete transformation of the image. Our ball is alive. Spring, jumping, playing glossy sides. Now, finally, you can smooth out the highlights. Along their edges, so that the broken lines of the highlights are not strongly callous to the eye. After all, we are sure that today we will not work with the shape of the ball today. Pay attention to the number of layers, we gradually increase their number, each frame contains information about the shape, color, light of the two light sources. But this is not the end of the work on our miniature. Remember, I advised to collect all the layers in groups? If you have not done it yet, please do it. Otherwise, then you will be tight.
With the second colors we smoothed both the light flare and the dark cold one. In total, it took us five (5) colors. The shape of the ball. Cold flare and smoothing. Warm highlight and smoothing. Yes, we are mean, what is to hide. But only limitations can enable us to understand the power of our tools. In the words of one of the characters of "Vanilla Sky" - "Sweet is not sweet, without bitterness."
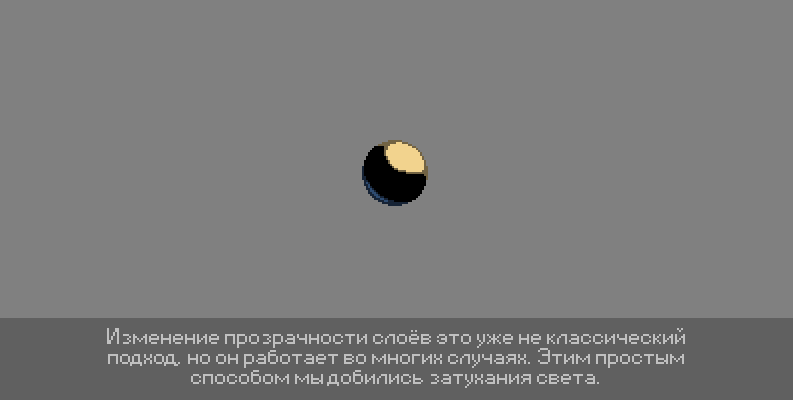
We will not stop at the achieved result. Let's group the objects in yellow, and the objects in blue in two groups. Blue and Yellow. And then we change a little the transparency of these groups. Very gently, no more than 5% for each frame, so as to achieve the illusion that at the very top the ball is illuminated more than below because of its proximity to the source of illumination. This effect is elusive, and almost imperceptible. And you know what?The perfect work of any effect has just been described. Good effect is one that you do not poke in the face, but in the absence of which you feel deprived.
Also relevant is the analogy with the perfumes of girls. There is this type of ... perfume. Barely invisible, but disturbing. Once smelling - I want to repeat. But there is another option. Spirits ... like a tank. Meeting with which gives an unequivocal understanding that if you do not get out of the zone of their defeat, normal life will be over. Nothing personal, but I love tanks as an image of power and from afar.

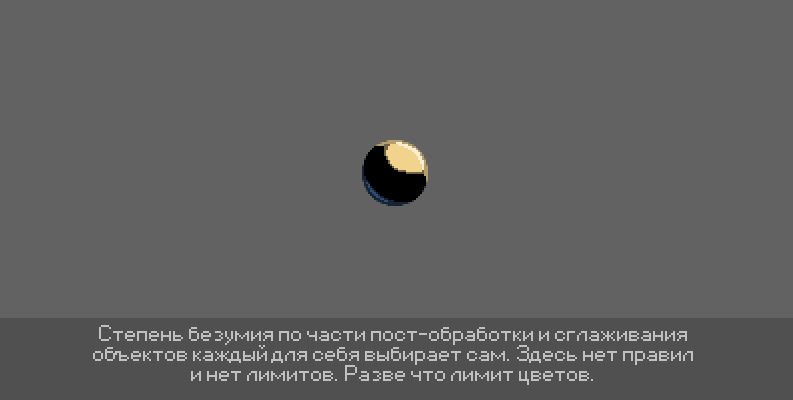
I will allow myself to work a little also with additional light and smoothing along the contour. The degree and level of madness in the form of detail each defines for itself. This is your battlefield. Your land. And you decide how to live on it.

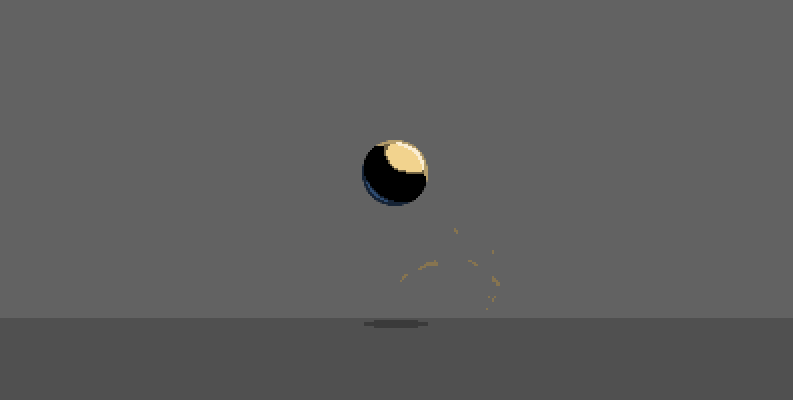
We mentioned light, color and shade. And the last, as it seems to me, is greatly deprived of our attention. The fact is that there is no shadow as such. There are illumination from light sources. But there is no shadow from him. Neither on the ball, nor under it. And we know that on a clear day we would see at least some spot of shadow under the ball. Correct our omission. We draw the shadow layer with black color, and then set the transparency we need on each frame (if we want, I will put it on the next image), and make sure that it changes evenly and smoothly, without sudden changes. By changing the size of the shadow under the ball, we denote its ups and downs.

We went pretty far. If in Wikipedia, in the “Twelve Principles of Animation”, the example of the ball indicated compression and contraction, then we, as always in a hurry, have already managed to add here light, shadow and color.
Expressive detail
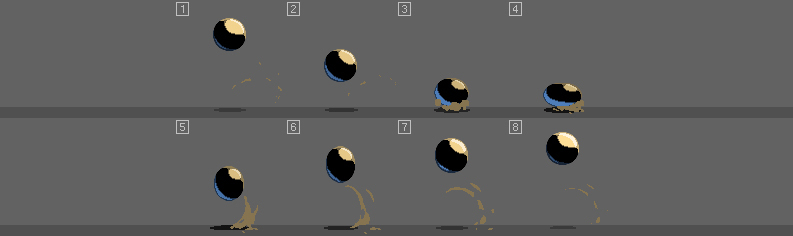
One of the points of creating a good image can be - expressive detail. Something peculiar to this character. Its feature, its feature. Chewing gum, cigarette in the teeth, or smoke ... although no, wait, what kind of smoke? The article is not 18+, it's a damn tutorial. And we don’t have a character, only a rubber ball. No smoke - let it be dust. The dust that the ball knocks when it hits the ground. And no, we will not turn our ball into something sweet and casual. He will have no eyes, no stupid mouth. Let the talking balls stay where they are supposed to be. In children's cartoons. We are busy with adults here. We animate different things.
Note: About casual characters. If you have never visited the resources for the recruitment of workers in our field, then you most likely have not seen ads searching for various artists. And this, by the way, is a very informative place. "You must be able to create cute and sweet characters", "you must be able to create a character so that you immediately want to love him." That is exactly what they write in search advertisements for job seekers. In this place, an image of a horror film is immediately born in the head, where all these plasticine monsters go to catch and love their hapless creators, because 70-80% of what igrodely create is a real plastic deformity, how adults represent “mercy”. They are really sweet. Sweetly sweet. Crispy on the teeth, with an incredibly dull facial expression and wide smiles.
Do you know why I remember this? Potential customers often address me, and the order form goes something like this: “We know you, you painted amazing and very dark post-apocalyptic works for Wasteland 2, we all like them very much. Do you want to do about N ".
Where N is - plastic freaks, pink scumbags, eager for your love. These customers do not care from whom to order their future flock. They just need to complete the task and then tick the statements. But with this approach, the task simply cannot be solved correctly. Under the cute characters, you need a cute artist. And I'm not joking. There are special, special artists, they are excellent draw such characters and do it reliably. Well, asking a person who draws mostly rust to concoct something cute ... is utopia.
I am sure that with these passages I will not seek the love of these people, but I don’t need it. The character must be truthful and sincere. He may be cute, but there should be a story behind him. A wide smile, dazed eyes and something that I want to stroke (I really do not want to) is not all that a truly cute character should have. Avoid in your works a showy ridicule, do not try to please everyone who you can like, be honest and truthful. Even ... in relation to the balls.
Let's return, however, to our ball. We already understood that it will not be casual, but it will be dusty. Dust is a new entity that needs to be added to our scene. Dust also needs to be described. You need to understand what it is. And we will do it.
Verbal portrait: Dust is something lightweight. Dust dissolves in the air in seconds, unless it is a dust storm or a dusty trail behind the machine. Dust has a light color, classically yellow. Dust consists of small grains of sand, which together form clouds. Dust changes its intensity depending on the concentration. That is, the level of visibility changes. A lot of dust - not a damn thing to be seen. Little dust - we can see anything through it.
We will need keyframes again. At least the maximum intensity of dust. It will fall on the very next frame after hitting the ball on the ground. We have only eight of them, so it is necessary to A - to have time to show the dust, and B - to dissolve it before the “arrival of the next ball”. That is, we assume that the second keyframe is somewhere near the maximum ball upwards.
The best thing you can do is create and process dust separately by remembering and using your keyframes. There are two reasons for this. Firstly, when working with a character, your eye gets used to it, and it needs rest. If you spend half an hour or an hour creating dust without even thinking about the ball, it will be good for your eye. He will withdraw from the object and immediately find errors, if any, when re-viewing. Secondly, purely psychologically, the presence on the stage of a 100% finished object causes laziness, which is difficult to fight. There is a syndrome "and so it will come down", and in principle he even has the right to life, because one object already exists and it looks good. The truth is simple. All entities on stage should look good. Not one, and not two. All of them. Without exception. In love with his work and a passionate artist knows this very well. Those who manage it are well aware that for good sales you don’t have to do it at all - everything. It is enough to make that part which can be designated by the main accent, and on the rest to hammer.
Create another group in each frame of your animation project. And call it - Dust (born Dust). All other layers in each frame, hide, and do not open until you finish working with dust. If you do not have enough courage - create an animation in a separate file. Remember, your image will play like pure gold, only if you work through each of the accents of your scene. And nothing else. There are no orchestras where you can say that the cello or violin are the main ones at this concert. The orchestra is a skillful canvas of all possible instruments within the framework of the composition being created. Like a ship crew. One captain will not swim away, even if he yells into his mouthpiece better than anyone.
In pixel art the man orchestra is you. You should play the violin, the cello and even the double bass. This means that each game must be played without a hitch, without a hitch. And this means that every essence of your animation should be played, as if you were playing for the last time.
We will build on our dust spots. Let's leave the black form of the ball in the project so as not to be mistaken with the distribution of clouds of dust. Let us remember that the ball, as it were, cuts dust from the earth, which is then understood upwards, and dissolves, dividing into smaller cloud objects, which then decrease. But at the same time - fool around. You see, an object that moves in one place can be made to move forward. Illusion Arranging the clouds and the nature of dust in such a way that they create the illusion that it flies backwards (in our case to the right).


What we have? Not the worst dust. We did almost everything that could be done. Why almost? Because there is no limit to perfection. After all, you can knock out small particles of sand with the ball, change its transparency, break open the earth, do anything. Only one limiter - your own imagination. And do not stop it with a thorough presentation of each grain of sand in this scene. There must be a place for freedom.
However, we are pleased with our dust. Moreover, we know that we will be able to stick it in any place where something fell. The running man and his feet at the moment of hitting the ground, hitting a stone on the surface, hitting a meteorite (and who said that we cannot use these things in a scene of a continental scale?). Now you can open those layers that we sensibly hid so that they do not distract us from work and do not push the banal into the brain "and so it will come down." Now our scene is complete. Look where we started and where we came from.
At this point, this tutorial could end, but this is where everything can start. Death I prefer birth. Therefore, we summarize this first chapter and move on. You won't be fed alone with balls, we need something more serious than children's toys.
In this chapter, we looked at such entities as:
• Keyframes
• Force of gravity
• Elasticity
• For the umpteenth time - Light, Shadow and Color
• Expressive detail
Elasticity can be interpreted as flexibility and elasticity, as a certain property of the material of which the object consists. Even the metal body can be elastic to the vividness of the character being created. And even if modern 3D models in games continue to “drag on” at certain points during the animation - we can also afford to bend our metal as we please.
Expressive detail , it is a collective term denoting the presence of any additional stroke. This may be a waving scarf of the protagonist, a tube in the teeth of a detective, a constantly working valve on the body of the robot. In a word, everything that will add individuality to your image and will be characteristic only for it. Probably, it will not be very fun if a working valve appears around the perimeter of the scene, on mushrooms, trees, forester, and even hares. In the event that it is not a steampunk terry.
Mushroom PS
If suddenly you still have a dumb question about what you can learn with a simple ball - address it to these mushrooms. They will answer. Three objects. Different sizes, as a result of different weights (apparently also different degrees of age, which leaves an imprint on cheerfulness). And ... three different moods. Eight frames and some flowers. Separately, they would have said little to you. But together, like a trio, they may well say that even small things can be the key to understanding.

The principle of development is the same. We threw out of the equation the dynamic change of light, because the effects are not the most important thing. We did not create expressive details for this object. And left the following options:
• Keyframes
• gravity
• Elasticity
Putting your hand on your heart can be honest. This miniature would work even at the level of a two-color silhouette image composed only of the background color and the color of the silhouette.
Brief advice
• I recommend placing all layers in groups.
• At the beginning of your journey I do not recommend using the “game of transparency”. First, the basics - then the effects, but vice versa. Do not try to cover the effects of the paucity of animation.
• Focus on the shape of the object and how it “plays” in the animation. Make it self-sufficient - any subsequent change with almost 100% probability will lead to better results.
• Work with a minimum of colors. Only in hunger you will know the richness of colors, you will begin to talk about many things through small things. You will be able to learn to “speak” with your pixels using the minimum number of “words”. I still need to work with this. Take a look at the number of words in the article.
• Do not forget that everything begins with a good silhouette. Any blemish at the borders of the forms in the animation is immediately visible. The object must breathe, and any breathing is natural.
• Do not forget about the brother and sister, whose name is Light and Shadow.
• Change the shape of the object during the animation process, because it is alive. If he doesn't seem alive to you, you have done something wrong.
Note: I did not want to touch on the character animation today, but I know that it needs to be done. At least in general terms at the level of a number of elements. So that in the next part of our cycle we work with something that we already know. Of course, we will not create complex animations now and confine ourselves to something like Idle animations, or inaction animations (see Infosphere).
Chapter II - IDLE-Animation
Let us get to the conclusion that IDLE is a type of idle animation. When your character seems to be doing nothing, but must stay alive. Seem alive. Live. Damn it, he must breathe in the end? Perhaps this is the shortest definition of this type of animation. If you hear the following dialog:
- The scene is empty!
- Well ... insert the character in the character, twist some screw, let it go.
Now you know what it is about. Two people talk about how to give a dead static scene liveliness. Twisting objects, flickering lights, fluttering ribbons or polyethylene, clouds of smoke or fog - all this is cheap, and most importantly, effective ways to diversify the visual range, to make it live, and not be dead. When the same operation is done with a character, this is called IDLE animation. The character does not walk, does not jump, does not perform any actions, because the player, for example, has ceased to control him. What to do? Let the poor fellow live his own life! Eat a cheeseburger hidden from you, smoke a cigar, read the evening press or drink, finally, something from your small flask. Well, of course, this is orange juice, what questions could there be?
One object as a self-sufficient product
We have already prepared characters with you in the second part of the cycle. Therefore, here we skip the entire character creation stage, remembering only that the character has a distinctive silhouette and a small amount of colors, so that it is easier for us to animate it. Nevertheless, I want to mark the stages of how this character was created. Several slices that will help you restore the flow of my thoughts and describe the character better than if he appeared right out of nowhere, like a gin from a bottle.

What we have? Some big-bellied pretzel. And this dog's paw on the left of the image is my palette. The very first thought that came to me then (and this image was made for the article six months ago) to pull it over the belly. No sooner said than done. We pull.


Not impressive? Me guys too. But I will comment on this with the words of Serezha from “Peculiarities of the National Hunt”:
- Just someone needs to start.
In this case, the instigator I mean and me. I, of course, did not make this breakthrough down, but in every animation I need to start somewhere. Select a reference point. Now we need to compensate for this push and from above, so that the stomach looks more adequate.


This is quite a sharp movement, and especially sharply it looks against the complete inaction of all other parts of the character. So let's make the guy shake his head. And as soon as he shook it - he immediately drew the image of a guy in headphones. This can explain such an intense shaking. I began to move my head, headphones with her, as if nailed to it, and of course a bang to increase the level of dynamics. Hair, as well as matter (clothes and other soft body kit) work fine in public.


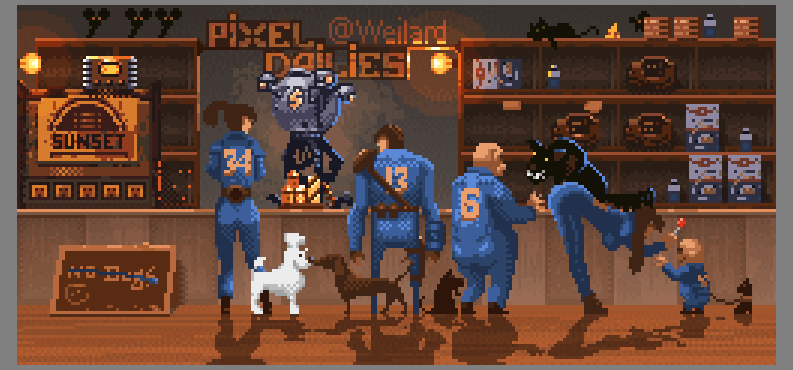
I want to note especially - in the animation your character should live even in statics. It must breathe with all its nature, unless you want to make it intentionally static. I used this technique in the work devoted to the release of “Fallout 4”. It was fun. A pair of cheap tricks, a bit surreal physics and your audience. It was also a psychological test to once again confirm the fact that the public always grabs the bait, if you offer it a piquant theme. Want to make sure? Drop into the hub of "Fallout 3" in the online store Steam. There, this work, in the presence of works, far better than herself, firmly occupies the first place. This is not bragging. Rather, a slight disappointment in terms of taste tastes of the public.
But back from bragging to our character. We see that with the dynamics that have appeared, the static of the other elements of the body has sharpened to the limit. I thought that it would be nice to make him squat a little bit so that he would do it, as if to the beat of non-existent music.


On this one could stop. But don't you think that, just as we “played” with a backpack, it is worth doing with a sleeve? And cut, for example, with a collar, a certain fatty substance of a person that does not arouse any liking in the observer?


Now you can say stop. After all, the character looks good, is not it? But ... I won't let you go. We will continue to move forward, and go through polishing around the perimeter of the character, adding significant and minor details, polishing the form so that when moving it becomes as little as possible jerks. We will recycle the backpack, hairstyle, and especially we will stand on the pants.


This is the result I am ready to recognize as final. And now let's look at why we needed the last step.
First, the character lacked bright and noticeable accents. Secondly, you should always look at how you can easily improve your animations, sometimes a couple of dots are enough for the objects on the stage to play. And finally, but not least, the design “and it will come down” for you is not an option. If someone does not do this, and if there are other quality standards in the industry, spit on them. If someone says that during this time it would be possible to make two or three mediocre characters - spit on him. Your time on this planet is limited. Do not spend your life on mediocre results. If half an hour or an hour of polishing work provides you with a uniquely better result, spend it.

Let's take a look at the very work dedicated to “Fallout 4”. It consists of the same characters. Nobody runs anywhere, everything moves in a cycle. Each of the characters was developed separately. And remember, I talked about static as a reception? Two of the characters deliberately froze in place, as if emphasizing the rest of the dynamics. Well ... and also because of the cultural shock due to the appearance of a unique natural phenomenon next to them. Physics of the body, which can not exist in reality. At least, critics are convinced of it. I disagree with them. In life I have seen a lot of different physics, including this one. I am sure that you have come across it.
In addition, I also want to draw your attention to the fact that assessing the animation with the realities of the world around is stupid.It’s like taking a cartoon from Disney and starting to criticize the anvils that are abundantly falling on the head of a variety of characters. The same can be said about hypertrophied forms. The same can be said about the surreal change of proportions.
You can see that many colors are used in this work. I would call it meat pixel art. And the word "meat" in this case does not mean a compliment. This is a very sloppy job, which pulled out the "physics of waving." That's what my fans called her. Many colors, many forms and a lot of animation do not yet talk about the quality of work. Often, brevity is much stronger. I want to draw your attention to another work dedicated to the game "The Long Dark". Only 8 colors. But 24 frames. It seems to me that the soul in it is much more. Why do I need so many frames for such a primitive work, I will tell in the next article of the cycle. Because there we will consider various tricks.
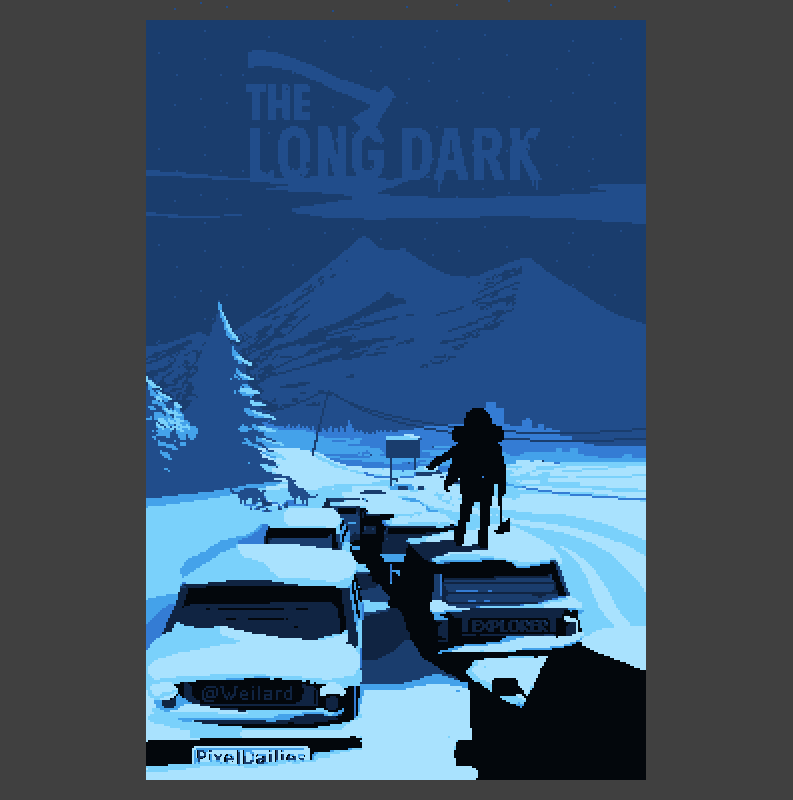
If you start to disassemble it, you can see that the cat was crying animations in it. A girl with an ax, wolves in the background and a few snowflakes falling down. However, this is quite enough to form an image. Message. Mood. This will help us composition. We considered it in the second part of the “Gallop Pikel” cycle. Armed with the knowledge of these three articles - you can already make small vignettes that will speak little about many things.
Quick tips
• . . ? ? , . . .
• .
• - , - . .
• .
• Separate the movement of the character on the main and minor. In the case of our example, the sleeves, backpack, hair, head, and headphones are secondary. They should be done first. The movement of the body is the primary animation, and how strange it is to do it last, after all the simplest animations are completed. Since otherwise, reciprocation will prevent you from appreciating the animation as a whole.
Owl Syndrome
It may seem to you that the last two images are a manifestation of the “owl syndrome”, a curious term born in connection with a meme dedicated to various articles, where the artist shows a couple of sticks, some vague sketches, and then puts the final image with the words rest". But…
You are not right.In the first two parts of the cycle, we examined the basis of pixel art. Work with form, composition, light and shadow, strokes and more. Already the first two articles should be enough to build a primitive composition, which may be present character. And even a ball. Yes, at least here is such a little man. You can already do this. The concept of a character or object as a self-contained element implies that there is one soldier in the field. Put your self-sufficient element with its own character, its animation, its characteristic features on the scene prepared for it, and you will already receive miniature ones from those that I dedicated to the games “Fallout 4” and “The Long Dark”.
Everything turned out to be simpler than it seems. In the complex, such work looks difficult, but if you look into it, it will become clear that this complexity goes to her as Soya pince-nez. If you look into it, it will become clear that this complexity is nothing more than a system of simple components. Hodgepodge. Constructor. Where you form the scene, and then work with its elements. Separately. Do not be afraid of a giant house in the event that you build it gradually. Brick for brick. Beam behind the beam.
The groups of layers that make up your frames may include other groups. In which there may be characters, equipment, elements of saturation and entourage, which at any time can be hidden. And focus on one element. At one facility. And make it, in the words of Admiral Adama for a strong six. After that you add one more element. And one more element until your work is done. What should not be done is to look at such vignettes as something unattainable.
Can you get a box of matches? A pack of cigarettes. A jar of olives. Marinated cucumbers. Can you take a couple more bananas, a stick of sausage, a bottle of “Absolute” and throw them on the table? It is possible, is not it? Similarly, you can move these incredibly eloquent objects and form a composition of them. Not difficult, right? All that remains is to capture this thing on the “canvas”. It's one thing if your tool is a brush, and completely different if your tool is a pixel that you put on the screen with a mouse or tablet pen. In a dozen pixels, you can concentrate the whole object, and its small size will not allow you to make radical errors in perspective and color.
When you master these rather simple basics for you it will not be a terrible image of the following character. Owl? Not.Just a canvas, about four times larger than what we use. And we work in regions close to the classic 320x200. The principle of its creation is exactly the same. Only three kilograms more pixels. It scares. Visually it seems weighty. But the bones of any such work are simple. If you know how they work.

I want to say goodbye to you in the framework of this article with the words of one of my favorite characters (there are a lot of them, and therefore quotes you can type a bucket):
- You have been taught this. And you are ready for this. Commander Adam.

Thanks
I want to publicly thank a number of people. These are the people who made this article possible. With all the images shown in it. It was a good race and it would hardly have been so fast if they had not helped me. Therefore, I consider it my duty to thank them separately:
Sergey Kalin, Gleb Rushashnikov, Kalam, Alexander Kulinich, Paddle Po, Necrys, Matej Jan, Pavel Bartchuk, Anton Reshetnikov, Nikolai Izoderov, Stas Gailiunas, XRust and Oleg.
These are the guys who support me on the Patreon. There are no words, and there is no opportunity to convey to them how grateful I am for this support. They give me the most valuable resource possible on this planet. Time. At least one working day per month. Someone may say that this is nothing. But this is not the case. This is a jewel. And the older I get, the more precious for me is the free time that I can devote to pixel art, art, and these articles. Thank you dear readers. Thank you dear ammo. Not only did I do this. We did it.
PS
We will meet soon. Required.The next article will contain even more educational material. Together we will go through more than one lesson, and most likely we will examine all the "12 principles of animation" from Walt Disney animators. As always.Gallop. However, those simplest ways to create animations that we briefly reviewed today should be enough for us. I am sure about that. You just need to take and sit down. But not for trifles, but picking up a pen or mouse. With a clear belief that there is no going back. That there is nowhere to retreat. That pixels should be bigger and they should be better.
Pps
Tonight. Around 20: 00-21: 00 MSK will begin streaming in support of this article. Night pixel spree with yours truly. Come. It will be fun. I hope so. At least last time in five hours of continuous stream, we created such an animation. With explanations, tricks, jokes from the audience and musical pauses. Burge of Wellard on Twitch (Twitch link)
PPPS
Stream was successful. Began as planned at 21:00 MSK. About 7 hours were recorded from it, then at 4:00 am I asked the public to disperse. It was very impolite to allow them to stay. Friday-Friday, but damn it, morning began outside the windows. Nevertheless, it took me another three hours to bring work to mind. I am very grateful to everyone who spent this stream with me. I hope you enjoyed it as much as I did. And here is the result of our joint work.
Bunker Herr Text
The first note is classically justified.
. , . , , . . – . «» — . . (). . , . . -.
, .
. , . . - . . , - . , , – . . – . .
, .
. - , - ( ), - , «». , - . , . . , .
. , . , , . . – . «» — . . (). . , . . -.
, .
. , . . - . . , - . , , – . . – . .
, .
. - , - ( ), - , «». , - . , . . , .
Last edited date in article: 01/23/2016 Time: 19:37
- There is a rivet of trifles. Edit spelling.
- The result of the evening stream that went into the morning was added.
- Earned Infosphere, while in a simplified mode. The most important thing in it is a link to the "12 principles of animation" article, which is worth reading for each animator.
Source: https://habr.com/ru/post/275703/
All Articles