Entity Framework in WinForms. Part 1
Introduction
I bring to your attention a translation of the article by Bernardo Castilho on the binding of entity data to WinForms controls. I hope you article will also help in the work as I do.
- Download sample (EF4, C #) - 1.03 MB
- Download example (EF4, C #, separating data layer from the UI layer) - 120 KB
- Download sample (EF4, VB, provided by Mr 'VBForever') - 946 KB
- Download example (EF5, C #) - 1.3 MB
- Download example (EF6 C #) = 1.3 MB
Today, Winforms is still a platform for many data-oriented business applications, and data binding is an integral part of Winforms development. If you used the standard ADO.NET classes to work with data, then you are familiar with the tools used to create DataSet classes and link these classes during development using their DataSource , DataMember or Binding properties.
The bad news is that these rich development capabilities do not apply to Entity Framework data sources. Even a simple binding requires writing code. To get a working basic binding, quite a bit of code is enough, but to get a full-fledged binding, which we are used to (such as automatic sorting, filtering, and hierarchical binding), a significant amount of work is required.
')
The good news is that using the EFWinForms library, you can easily perform data binding and create a reusable component for data binding in Winforms. There are two components in the library:
- EntityDataSource : a component that encapsulates a data entity model and presents its elements as data sources suitable for binding, with full support during development.
- EntityBindingNavigator : A control that provides navigation for viewing and provides a user interface for adding and deleting entries, saving or canceling changes in the database.
EntityDataSource component
The EntityDataSource component plays the role of a DataSet and BindingSource in standard ADO.NET programming. To use it, you first need to create an Entity Data Model.
After that, drag the EntityDataSource component onto the form and set the ObjectContextType property of the ObjectContext type into one of the contexts presented by the Entity Data Model. (If you have EF6, use the DbContextType property instead of ObjectContextType). When you do this, the EntityDataSource component creates a context object and uses reflection to find all the data sources available in the context. These data sources then appear in the designer using the IListSource implementation.
After that, you can add controls to the form and link them to the EntityDataSource using their DataSource , DataMember and Binding properties as usual. One EntityDataSource provides access to all tables and views in the model and saves changes only by calling the SaveChanges method.
Examples
The best way to understand how the EntityDataSource works is to look at a few examples. The following section describes how to use an EntityDataSource to implement four typical data binding scenarios. All scripts use the same Entity Data Model based on the Northwind database.
To use it, you first need to create an Entity Data Model.
Creating an Entity Data Model
To create an Entity Data Model , right-click the project tree in the Solution Explorer and then select “Add | New Item ... " .
The “Add New Item” dialog box appears . Select “ADO.NET Entity Data Model” , set the model name and click the “Add” button at the bottom of the form.

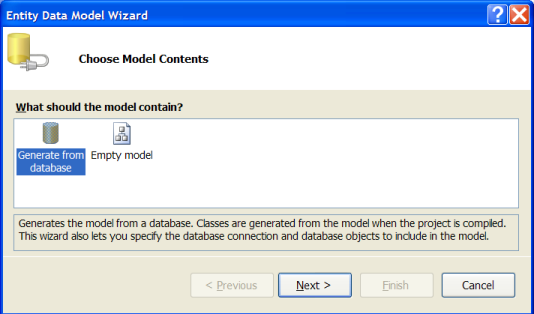
The “Entity Data Model Wizard” dialog box appears in which you need to choose which model you will create: a model generated from an existing database or an empty model. Select the first option and click “Next” .
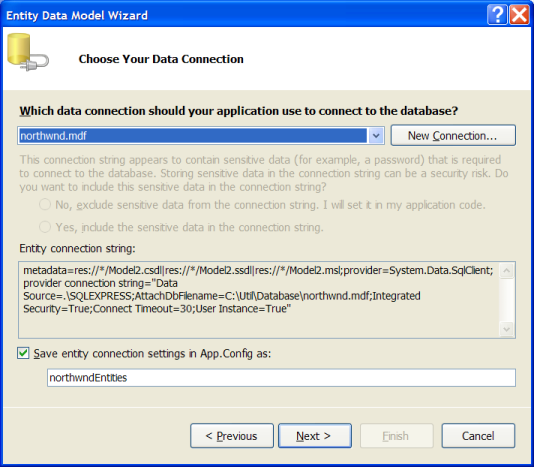
The next step is to choose a database to create a model. You can select an existing connection, or use the “New Connection” button to create a new one. In our example, we will create a connection to the SQL Server database “Northwind”.
The database file is called “NorthWnd.mdf and is included in the sample. After you select a database, the wizard will prompt you to select the tables, views, and stored procedures that you want to include in the Entity Data Model . In our example, we simply select all the tables, as shown in the figure below:

Click the “Finish” button to create a model. Two elements will be added to your project: the “Model1.edmx” file describing the conceptual model using XML and the associated Model1.Designer.cs which contains the generated code, including the ObjectContext used for data access and entity classes such as Product , Employee , etc.
Double-click on the edmx file. The Entity Data Model Designer window will appear, where you can view, edit the model, and re-create it at any time if you suddenly change the database schema or if you want to change the list of tables and views that need to be included in the model. All automatically generated classes in the “Designer.cs” file are declared as partial. This allows us to expand them by adding business logic to individual files that will not be changed if you recreate the model from the database.
Now you can use the data model as shown below:
public Form1() { InitializeComponent(); using ( var ctx = new NORTHWNDEntities()) { dataGridView1.DataSource = ctx.Products.ToList(); } } This code creates an ObjectContext object that provides data for the model, builds a list containing all products, and displays the list in a table. You can edit products and save changes to the database by calling the ctx.SaveChanges () method.
If you run the code, you will notice some serious limitations: you cannot sort or filter data, you cannot add or remove items from the list, and of course you cannot customize table columns (Grid) during development using the table editor (Grid).
These limitations are due to the fact that a list is used as a source (just a “snapshot” of data). IBindingList , which Winforms creates automatically, in this case provides only minimal functionality.
Creating a Grid View (With AutoLookup)
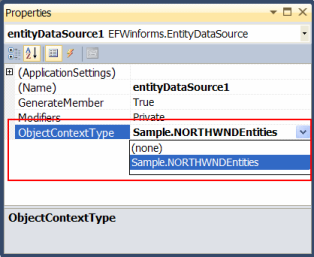
To eliminate these shortcomings, add an EntityDataSource component to the form and in the Properties window, set its ObjectContextType property to “Sample.NORTHWNDEntities”, as shown in the figure below (Note: if you have EF6, use DbContextType instead of ObjectContextType):
The EntityDataSource component uses a value from ObjectContextType to create an object context to generate views for all elements described in the data model.
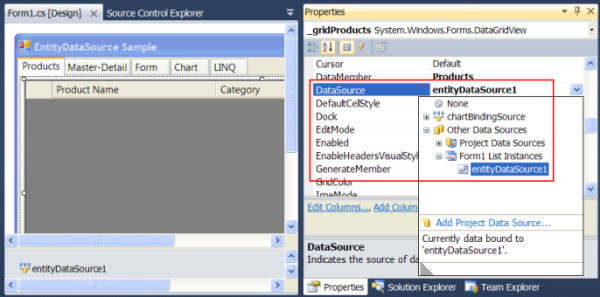
Now add the DataGridView control to the form and in the Properties window, set the DataSource property to the entityDataSource1 , and the DataMember property to Products , as shown below:
In the DataGridView, columns are automatically created to display the properties of the Product class. In Designer mode, you can reorder the columns, set their width, heading, alignment, format, and so on.
If you start the project now, you will see that the table is filled automatically, and you can perform all the actions you want, including editing, sorting, adding or deleting elements.
All this is possible because the EntityDataSource component wraps a list of products in the EntityBindingList class, which implements the IBindingListView interface and supports sorting, filtering, adding and deleting elements.
Saving changes
After editing the data, you probably want to save changes to the database. To demonstrate how this can be done, add three buttons to the form and set their Text property to “Save”, “Cancel”, and “Refresh” and attach the following handlers to the Click events of these buttons:
// save/cancel/refresh changes in the data source void _btnSave_Click(object sender, EventArgs e) { entityDataSource1.SaveChanges(); } void _btnCancel_Click(object sender, EventArgs e) { entityDataSource1.CancelChanges(); } void _btnRefresh_Click(object sender, EventArgs e) { entityDataSource1.Refresh(); } This code is self explanatory. The first button saves all changes back to the database. The second cancels the changes by re-extracting the data, and the third saves the changes and selects the data again.
There is one important detail that is often forgotten: when saving changes to the database, exceptions are possible. For example, while maintaining changes that violate the integrity constraints of the database. Unfortunately, there are no general recipes for dealing with this type of exception. Their nature depends on the database schema and the application itself.
Regardless of how you plan to deal with possible exceptions, the first thing to do is catch them. To do this, you need to wrap the call to the SaveChanges method with a try / catch block , or add a DataError event handler to the EntityDataSource component. This is how our application will be able to handle possible errors when saving data:
// report any errors void entityDataSource1_DataError(object sender, DataErrorEventArgs e) { MessageBox.Show("Error Detected:\r\n" + e.Exception.Message); entityDataSource1.CancelChanges(); e.Handled = true; } The code issues a warning, discards the changes, and sets the Handled parameter to True to indicate that the error has already been processed and no need to generate exceptions.
Using dictionaries to represent related entities
To finish with this example, let's consider the usual scenario. The Product class has two properties, Category and Supplier, which are related entities. By default, these properties are not presented in the table, but using the column editor you can add columns for these entities to our table. The image below shows how this can be done:
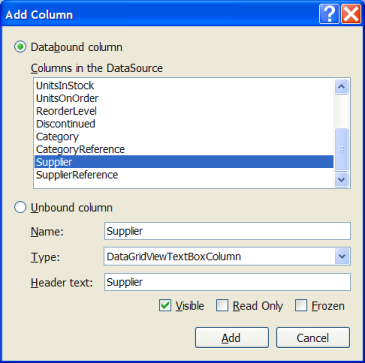
The problem is that the DataGridView does not know how to display a related entity, by default the ToString method is simply used, and as a result we get two read-only columns, the cells of which are filled with the values “Sample.Category” and “Sample.Supplier” .
But to do real work, a column is required that shows the categories and names of suppliers, ideally with an editor that allows you to change categories and suppliers by choosing from lists. This is usually done by writing code to create and link custom columns (in a DataGridViewComboBoxColumn if you use the DataGridView control).
Since This is a common scenario. The EntityDataSource component supports the extended AutoLookup property. This property automatically becomes available in any DataGridView or C1FlexGrid control placed on a form (in a C1FlexGrid it is a popular component of a tabular view of data, much faster and more sophisticated than a DataGridView ).
Note that although the EntityDataSource component supports the C1FlexGrid , the EFWinForms assembly is independent of the C1FlexGrid assembly. This is achieved using the "dynamic" keyword, which relies mainly on reflection to link properties at run time. The same mechanism can be used to extend the EntityDataSource component to support other components of the table data view.
The figure below shows how you can turn on the AutoLookup property in the DataGridView :
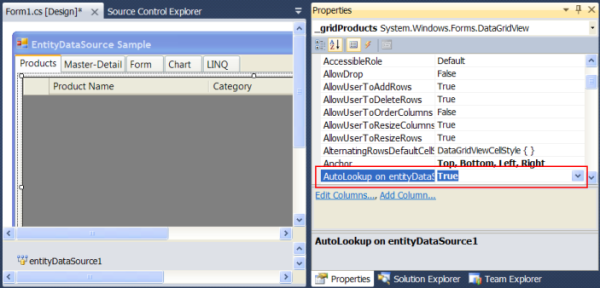
As soon as you enable the AutoLookup property, the EntityDataSource component will automatically scan the columns in the table to replace the columns linked to the entities with editable data map-based columns containing the list of possible values of the related entities and the display of values for each of them.
The figure below shows the result of setting the AutoLookup property to True:

Notice how the “Category” and “Supplier” columns show the category names and supplier names, and that you can change the supplier for a product simply by selecting a new one from the list.
You may wonder how the EntityDataSource selects the correct field from the related entities to display in the table. This is done using the following algorithm:
- If the class implements the ToString method (and not just inherits), then the ToString implementation is used to represent the entity.
- Otherwise, if the class has a property of type string , the name of which has the word “Name” , then this property is used to represent the entity.
- Otherwise, if the class has a property of type string , the name of which has the word “Description” , then this property is used to represent the entity.
- If none of the above applies, then data binding cannot be performed for this class.
The first rule is the most general and flexible. For example, the Employee class in the Northwind database has the Firstname and Lastname properties . One of them can be used to represent entities in the list, but ideally I would like to use both. To do this, we simply override the ToString method in the Employee class and create a string consisting of both properties:
/// <summary> /// Add a field with the employee's full name /// </summary> public partial class Employee { public string FullName { get { return string.Format("{0} {1}", FirstName, LastName); } } public override string ToString() { return FullName; } } Note that using a partial class extends the standard class created using the ADO.NET Entity Framework wizard. If at some point you decide to regenerate the data entity model, our implementation of the ToString method will not be affected.
In the Northwind database, Employee is the only class that requires any special methods for data binding. All other classes have properties such as “CustomerName” or “CategoryDescription” , which are automatically used by the EntityDataSource component and provide the desired effect.
This concludes the first example.
Source: https://habr.com/ru/post/275607/
All Articles