AnyConnect and Address Space Intersection

Hi habr! In this article I would like to discuss the topic of intersection of address spaces when providing access to remote users. I will consider remote access using Cisco AnyConnect VPN client. As a VPN hub, consider the Cisco ASA. The examples described in this article have been configured on the ASA5505 with software version 9.1 (6) 6. The used version of the Anyconnect client is 4.1. Personal computers with Windows 7 and 8.1 operating systems were used as VPN client devices.
Many employees who want to work remotely, use SOHO routers to connect to the Internet at home, and very often the routers are installed with factory settings. And, as is well known, in most cases the factory settings assume a LAN subnet of 192.168.0.0/24 or 192.168.1.0/24. As practice shows, the probability of having a company’s 192.168.0.0/24 and 192.168.1.0/24 networks in the central office (the CO) is high. It turns out the intersection of address spaces. In this note I will consider three options for setting up connections to the CO through AnyConnect, highlight the pros and cons of each option and describe how access will work if the address spaces intersect.
')
The first option is the easiest. It consists in the rejection of Split tunneling (as we remember, Split tunneling allows you to specify which traffic should be wrapped in a tunnel, and which should not). In this case, absolutely all traffic is wrapped in a VPN tunnel. This behavior is configured by the split-tunnel-policy tunnelall directive in the VPN connection group policy. When Split tunneling is disabled, the route to the local network disappears from the routing table of the connected device and a new default route with the best metric appears. Below are examples of output print route of a windows-based computer to the established VPN connection and after connecting:

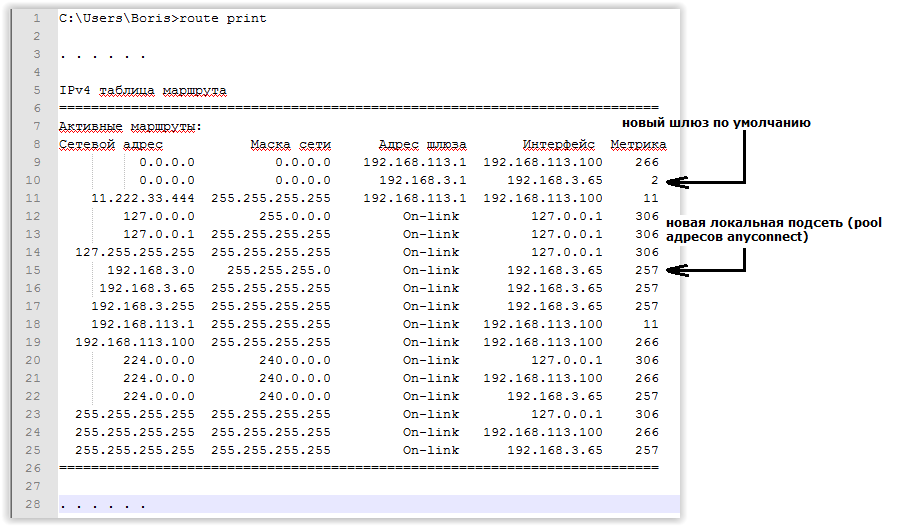
At the same time, we can organize Internet access for the connected device only through the Internet channel of the office to which the user has connected. Note that with the configured access to the Internet through the CO, the channel will be utilized twice as much by the remote user traffic.
To configure Internet access for remote connections on the Cisco ASA, just enough to observe two nuances. The first caveat is to correctly configure dynamic nat | pat for the pool of addresses issued by AnyConnect. An example of setting nat:
object network anyconnect-pool subnet 192.168.3.64 255.255.255.248 nat (outside,outside) dynamic interface The second caveat is to remember to enable the same-security-traffic option to permit intra-interface.
This option allows packets to leave the same interface to which traffic was received.
Pluses of the first option:
- Easy setup;
- Uniform behavior for all remote users regardless of the network settings of the connected device.
Disadvantages of the first option:
- The need to configure Internet access for connected users via the Internet channel DH, and, as a consequence, double utilization of the channel DH Internet traffic of the remote user;
- The connected device loses access to its own local network. For example, a network printer or network storage in the local network becomes unavailable to the user during the AnyConnect session.
The above disadvantages are relevant absolutely for all remote users. Even if the user has a local network different from corporate networks and the intersection of address spaces does not occur. Anyway, all user traffic will be tunneled during the AnyConnect session.
The second option is to use Split tunneling policies. Split tunneling policies come in two forms: Split Include and Split Exclude. In the first case, you need to specify which networks need to be tunneled, in the second - on the contrary, it indicates which networks do not need to be wrapped in a tunnel.
In our experience, Split Include is used most often. In this case, you need to configure the access list, which will determine which networks you need to tunnel. Setup Example:
# object network subnet1 subnet 192.168.0.0 255.255.255.0 object network subnet2 subnet 192.168.1.0 255.255.255.0 object-group network enterprise network-object object subnet1 network-object object subnet2 # access-list acl-split-tunnel extended permit ip object-group enterprise any # Split tunneling Split Include group-policy GroupPolicy1 attributes split-tunnel-policy tunnelspecified split-tunnel-network-list value acl-split-tunnel tunnel-group TEST general-attributes default-group-policy GroupPolicy1 In the case of intersection of address spaces, the remote user simply loses access to his local network. That is, if the user has a local network of 192.168.0.0/24 or 192.168.1.0/24, the traffic to the hosts of these networks will be wrapped in a tunnel. At the same time, the Internet access for the remote user will remain through the local Internet provider. In our experience, this setting suits users in most cases.
Split Tunneling of the Split Exclude type, on the contrary, allows remote users to maintain access to their own local network in any case. Of course, in the case of intersection of address spaces, access to the conflict DH network will not work. Below is an example of setting up Split Exclude. In this case, we will include networks that do not need to tunnel into the access list. In the example, we will not tunnel public address ranges (this will provide access to the Internet using a local Internet provider), nor will we tunnel a network of the type 0.0.0.0/255.255.255.255, which describes the client's local network in the ASA settings. Network recording 0.0.0.0/255.255.255.255 helps to achieve universality: no matter what kind of network the user is local, access to it will always work.
# object network range1 range 0.0.0.0 9.255.255.255 object network range2 range 11.0.0.0 172.15.255.255 object network range3 range 172.32.0.0 192.167.255.255 object network range4 range 192.169.0.0 255.255.255.255 object-group network net-exclude-RFC1918 network-object object range1 network-object object range2 network-object object range3 network-object object range4 # access-list acl-exclude-tunnel extended permit ip object-group net-exclude-RFC1918 any access-list acl-exclude-tunnel extended permit ip host 0.0.0.0 any # “host 0.0.0.0” “0.0.0.0 255.255.255.255” # Split tunneling Split Exclude group-policy GroupPolicy1 attributes split-tunnel-policy excludespecified split-tunnel-network-list value acl-exclude-tunnel tunnel-group TEST general-attributes default-group-policy GroupPolicy1 However, in order for the user's access to his own local network to work, you need to remember one more nuance. In the settings of the Anyconnect client, the Allow local (LAN) access option must be explicitly specified:
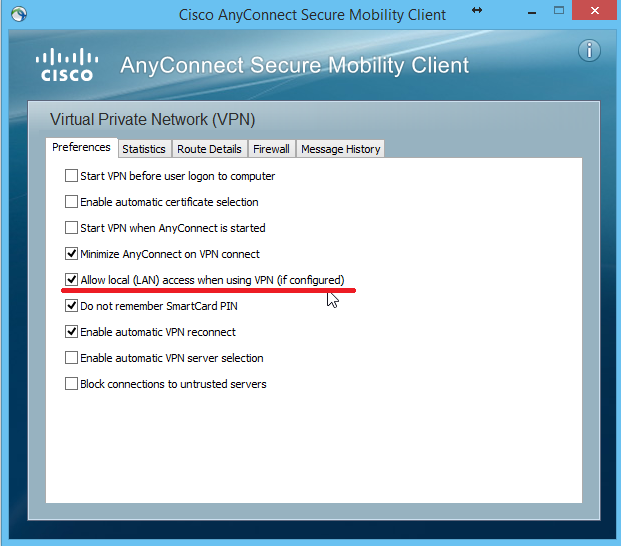
This option can be set centrally in the Anyconnect client profile settings on the Cisco ASA:

The advantages of the second option:
- Internet access can be configured through a local provider. Here I would like to make a reservation: to ensure the maximum level of security, it is recommended to organize remote users accessing the Internet through corporate gateways, ITU and web proxy servers. But in practice, many neglect this requirement;
- For users who have no intersection of address spaces with the CO, access to the local network works without problems.
The disadvantages of the second option:
- For users who have the intersection of address spaces with the CO, access to the local network is lost. Split Exclude helps to avoid loss of access to the local network, but in this case access to the conflicting DH network will be lost.
The third option is to use Split tunneling policies and NAT rules. When the network engineer hears the phrase “intersection of address spaces,” probably the first thing that comes to mind is to resolve the conflict with the help of network address translation. Consider how this can be configured on the ASA in the case of connecting remote users.
Suppose our task is to organize access in such a way that even users who have the intersection of the address space always have access to both the conflicting DH network and their own local area network. To do this, we need to transmit the conflicting DH network to another network for remote users. For example, a conflict network 192.168.1.0/24. Configure the broadcast of the entire network 192.168. 1 .0 / 24 to some other network 192.168. 25 .0 / 24. Then remote users wishing to connect to the host in the CO with the address, for example, 192.168. 1.10, they will have to use the translated address 192.168 for the connection. 25 .10. On the ASA, the construction described can be configured using the twice NAT rules as follows:
# object network net-1 subnet 192.168.1.0 255.255.255.0 # , object network net-25 subnet 192.168.25.0 255.255.255.0 # , Anyconnect object network anyconnect-pool subnet 192.168.3.64 255.255.255.248 # . , nat (inside,outside) source static net-1 net-25 destination static anyconnect-pool anyconnect-pool no-proxy-arp Of course, working with IP addresses for end users is not convenient. Especially in the case described, you will have to remember that in order to get to the host 192.168.1.10, you need to use the address 192.168.25.10 (that is, you already have to remember two IP addresses). DNS and DNS doctoring on ASA comes to the rescue. DNS doctoring allows you to change the IP address in DNS responses in accordance with the rules of NAT. An example of DNS Doctoring is shown in the figure below:
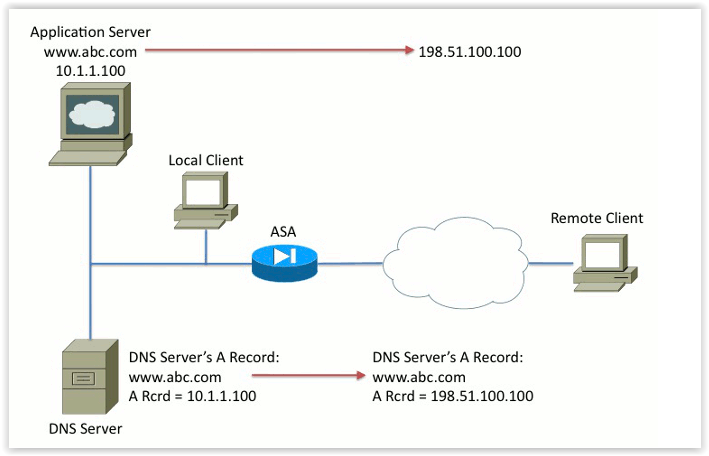
In this example, the Application Server with the internal IP address 10.1.1.100 is published on the Internet at the public address 198.51.100.100. On the corporate DNS server there is an A-record for the resource of this server www. abc.ru A Rcrd = 10.1.1.100. The DNS doctoring feature enabled on the ASA causes the A record to automatically change when the DNS response passes through the ASA. In the DNS response, the internal IP address of the server is replaced with the public IP address accessible from the Internet.
Note 1 : to use the DNS doctoring feature on the ASA, DNS inspection must be enabled:
policy-map global_policy class inspection_default inspect dns Note 2 : To use the DNS doctoring feature, the VPN client must use an internal corporate DNS server (located behind the ASA).
On the ASA, when setting up DNS doctoring there is a nuance. DNS doctoring cannot always be configured in the Twice NAT rule. The dns option in the NAT rule becomes unavailable once the destination static directive appears after source static :
# destination static, dns nat (inside,outside) source static net-1 net-25 ? configure mode commands/options: description Specify NAT rule description destination Destination NAT parameters # DNS doctoring dns Use the created xlate to rewrite DNS record inactive Disable a NAT rule no-proxy-arp Disable proxy ARP on egress interface route-lookup Perform route lookup for this rule service NAT service parameters unidirectional Enable per-session NAT <cr> # destination static dns nat (inside,outside) source static net-1 net-25 destination static anyconnect-pool anyconnect-pool ? configure mode commands/options: description Specify NAT rule description inactive Disable a NAT rule net-to-net Net to net mapping of IPv4 to IPv6 no-proxy-arp Disable proxy ARP on egress interface route-lookup Perform route lookup for this rule service NAT service parameters unidirectional Enable per-session NAT <cr> This behavior is documented on the Cisco website .
If we do not use destination static , the conflicting AC network 192.168.1.0/24 will be broadcast to the new network 192.168.25.0/24 always, and not just for remote employees. This behavior is not acceptable. To prevent this from happening, we need to put the rule of translation of the conflicting network at the end of the NAT rules. In this case, the higher translation rules concerning the conflict network, we must upgrade in such a way that the rules always work, except in the case of data exchange with remote users. In this case, the order of the rules of NAT is crucial, therefore, very briefly recall the order of NAT rules for ASA version IOS 8.3 and higher. NAT rules are executed in the order of three sections:
Section 1. Twice NAT in Configuration Order
Section 2. Network Object NAT
- Static
- Dynamic
- First, where there are less IP addresses to broadcast
- Low IP numbers first
- By alphabet (by name Obj gr)
I will give an example. To organize access to the Internet from a conflicting DH network, as a rule, the corresponding rule is required dynamic nat | pat. If dynamic nat | pat is configured using Network Object Nat, you will have to modify the setting for the Twice NAT type. This is necessary in order to be able to add the destination static directive to the rule (we get the so-called Policy NAT). The dynamic pat rule must be set above the nat rule for remote users. This can be done in different ways: specify the position of the rules explicitly in section 1, transfer the nat rule for remote users to section 3 after auto, etc. Setup Example:
# object network range1 range 0.0.0.0 9.255.255.255 object network range2 range 11.0.0.0 172.15.255.255 object network range3 range 172.32.0.0 192.167.255.255 object network range4 range 192.169.0.0 255.255.255.255 object-group network net-exclude-RFC1918 network-object object range1 network-object object range2 network-object object range3 # dynamic pat # dynamic pat nat (inside,outside) 1 source dynamic net-1 interface destination static net-exclude-RFC1918 net-exclude-RFC1918 # 192.168.1.0/24 192.168.25.0/24 dynamic pat # dns nat (inside,outside) 2 source static net-1 net-25 dns no-proxy-arp If we use Split tunneling of the Split Include type, do not forget to specify the translated net-25 network in the corresponding access list:
# access-list acl-split-tunnel extended permit ip object-group net-25 any # Split tunneling Split Include group-policy GroupPolicy1 attributes split-tunnel-policy tunnelspecified split-tunnel-network-list value acl-split-tunnel tunnel-group TEST general-attributes default-group-policy GroupPolicy1 The advantages of the third option:
- All the benefits of using Split Tunneling are inherent in the third option;
- For users who have the intersection of address spaces with the CO, it is possible to get access to the conflict network of the CO, while maintaining access to their own local network.
The disadvantages of the third option:
- The complexity of the configuration. When using DNS doctoring, it is necessary to modify the address translation rules for conflicting networks.
Conclusion
In this article, I looked at three options for configuring remote user connections using the Cisco Anyconnect client to the Cisco ASA ITU:
- no split tunneling;
- using Split Tunneling of two types: Split Include and Split Exclude;
- using Split Tunneling in conjunction with NAT rules and the DNS doctoring option.
For each option, I tried to consider the work of remote access in case of intersection of address spaces and highlight the features of each option.
Waiting for your comments. Maybe someone can share their experience or another way to solve the problem of intersection of address spaces.
Source: https://habr.com/ru/post/275517/
All Articles