Gradle: managing dependencies
Dependency management is one of the most important functions in the arsenal of build systems. With the arrival of Gradle as the main build system for Android projects in terms of dependency management, a significant shift occurred, the era of manual copying of JAR files and long dances with a tambourine around the failed project configurations is over.

The article discusses the basics of dependency management in Gradle, provides in-depth practical examples, small life hacks and links to the right places in the documentation.
')
As you know, Gradle does not have its own repositories and uses Maven and Ivy repositories as a source of dependencies. At the same time, the interface for working with repositories does not differ at the basic level; you can find out more about the differences in parameters using the IvyArtifactRepository and MavenArtifactRepository links . It should be noted that the 'http', 'https' or 'file' protocols can be used as url. The order in which the repositories are recorded affects the order in which dependencies are searched for in the repositories.
In the example above, you see a build script in which two dependencies are connected for different configurations (compile and testCompile) to compile the project. JsonToken will connect during the compilation of the project and compilation of the project tests, jUnit only during the compilation of the project tests. More details about the compilation configurations - by reference .
You can also see that we connect jUnit dependencies as dynamic (+), i.e. the latest available version 4. + will be used, and we will not need to keep track of minor updates (I recommend not to use this feature in the compile-type compilation of the application, as unexpected, possibly difficult to localize problems may appear).
Using the jUnit-dependency example, consider the standard Gradle mechanism for finding the necessary dependency:
Gradle implements a caching system that, by default, stores dependencies for 24 hours, but this behavior can be overridden.
After the time set for storing data in the cache is out, the system, when running tasks, first checks the possibility of updating dynamic (dynamic) and changeable (changing) dependencies and, if necessary, updates them.
Gradle tries not to upload those files that were previously uploaded, and uses a verification system for this, even if the URL / source of files is different. Gradle always checks the cache (URL, version and module name, cache for other versions of Gradle, Maven cache), HTTP request headers (Date, Content-Length, ETag) and SHA1-hash, if available. If no match is found, the system will download the file.
Also in the assembly system there are two parameters, using which at startup you can change the caching policy for a specific task.
- –offline - Gradle will never attempt to contact the network to check for dependency updates.
- –refresh-dependencies — Gradle will attempt to update all dependencies. It is convenient to use if the data in the cache is corrupted. Verifies the cached data and, if different, updates it.
More details about dependency caching can be found in the Gradle User Guide .
There are several types of dependencies in Gradle. The most commonly used are:
- External dependencies of the project - dependencies downloaded from external repositories;
- Project dependencies - dependence on the module (subproject) within one project;
- File dependencies - dependencies connected as files (jar / aar archives).
There are also client module dependencies, Gradle API dependencies, and local Groovy dependencies. They are rarely used, so within the framework of this article we will not analyze them, but you can read the documentation about them here .
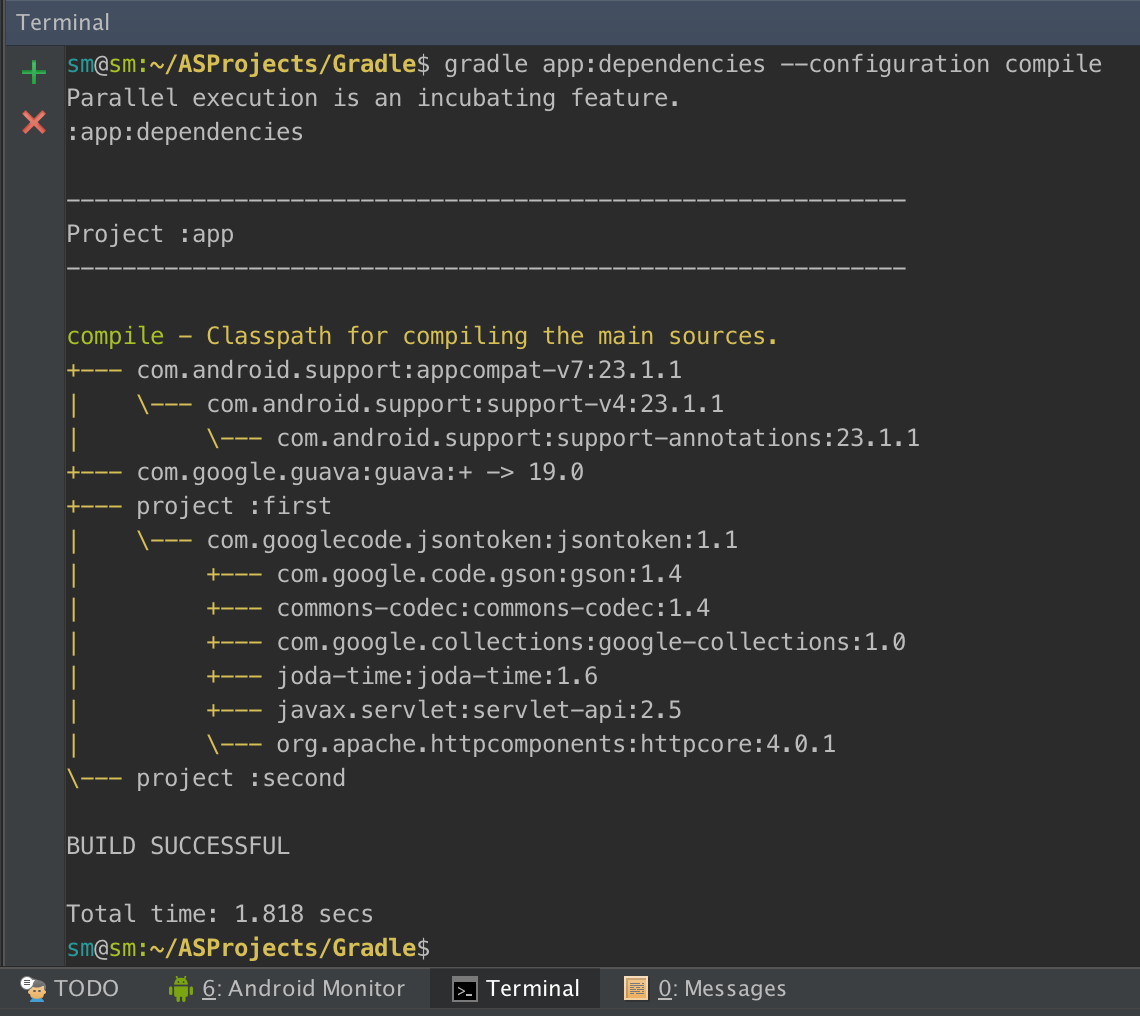
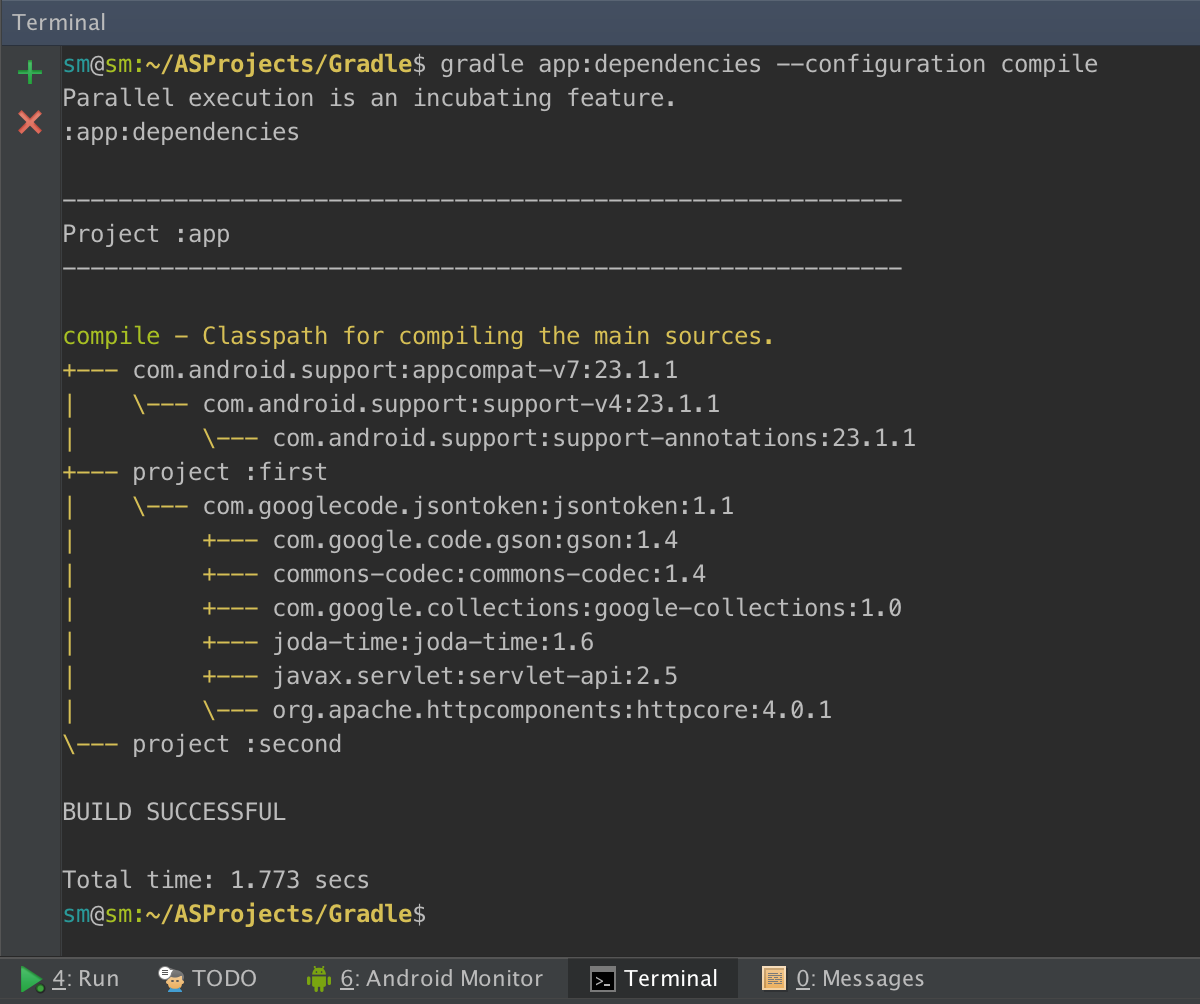
Each external or project dependency can contain its own dependencies, which must be taken into account and downloaded. Thus, when compiling, dependencies are loaded for the selected configuration and a dependency tree is built, the human representation of which can be seen by running the Gradle task 'dependencies' in Android Studio or using the command gradle% module_name%: dependencies in the console, being in the project root folder. In response, you will receive a list of dependency trees for each of the available configurations.
Using the configuration parameter, we specify the name of the configuration in order to see the dependency tree of only the specified configuration.
Take the specially prepared source code of the repository located on github and try to get the dependency tree for a specific configuration (at the moment the project is in the 0 state, ie, build.gradle.0 is used as build.gradle):

After analyzing the dependency tree, you can see that the app module uses two external dependencies (appcompat and guava) as dependencies, as well as two project dependencies (first and second), which in turn use jsontoken versions 1.0 and 1.1 as external dependencies. Obviously, a project cannot contain two versions of the same library in Classpath, and no need for that. At this point, Gradle turns on the conflict resolution module.
Gradle DSL contains a component used to resolve dependency conflicts . If you look at the dependencies of the jsontoken library on the dependency tree above, we will see them only once. For the second module, the dependencies of the jsontoken library are not specified, and the output of the dependency itself additionally contains '-> 1.1', which means that version 1.0 of the library is not used, but was automatically replaced with version 1.1 using the Gradle-conflict resolution module.
To explain how the conflict was resolved, you can also use Gradle-dependencyInsight, for example:

It is worth paying attention that version 1.1 is selected as a result of conflict resolution, it is also possible to choose as a result of other rules (for example: selected by force or selected by rule). The article will provide examples of the use of rules that affect the strategy for resolving dependencies, and following the dependencyInsight task, you can see the reason for choosing a specific version of the library at each of the steps below. To do this, during the transition to each stage, you can independently perform task dependencyInsight.
If necessary, it is possible to redefine the logic of the Gradle-module of conflict resolution, for example, by specifying Gradle to fall when conflicts are detected during project configuration. (state 1)
After that, even when trying to build a dependency tree, Gradle Tasks will be interrupted due to the presence of a conflict in the application dependencies.

The problem has four solutions:
The first option is to remove lines that override the conflict resolution strategy.
The second option is to add the rule of mandatory use of the jsonToken library to the conflict resolution strategy, indicating the specific version (state 2):
When applying this solution, the dependency tree will look as follows:

The third option is to add the jsonToken library explicitly as a dependency for the app project and assign the dependencies to the force parameter, which explicitly indicates which of the library versions to use. (state 3)
And the dependency tree will look like this:

The fourth option is to exclude from one of the project dependencies jsontoken from its own dependencies using the exclude parameter. (state 4)
And the dependency tree will look like this:
It is worth noting that exclude does not need to pass both parameters at the same time; only one can be used.
But despite the correct derivation of the dependency tree, when trying to build the application Gradle will return an error:
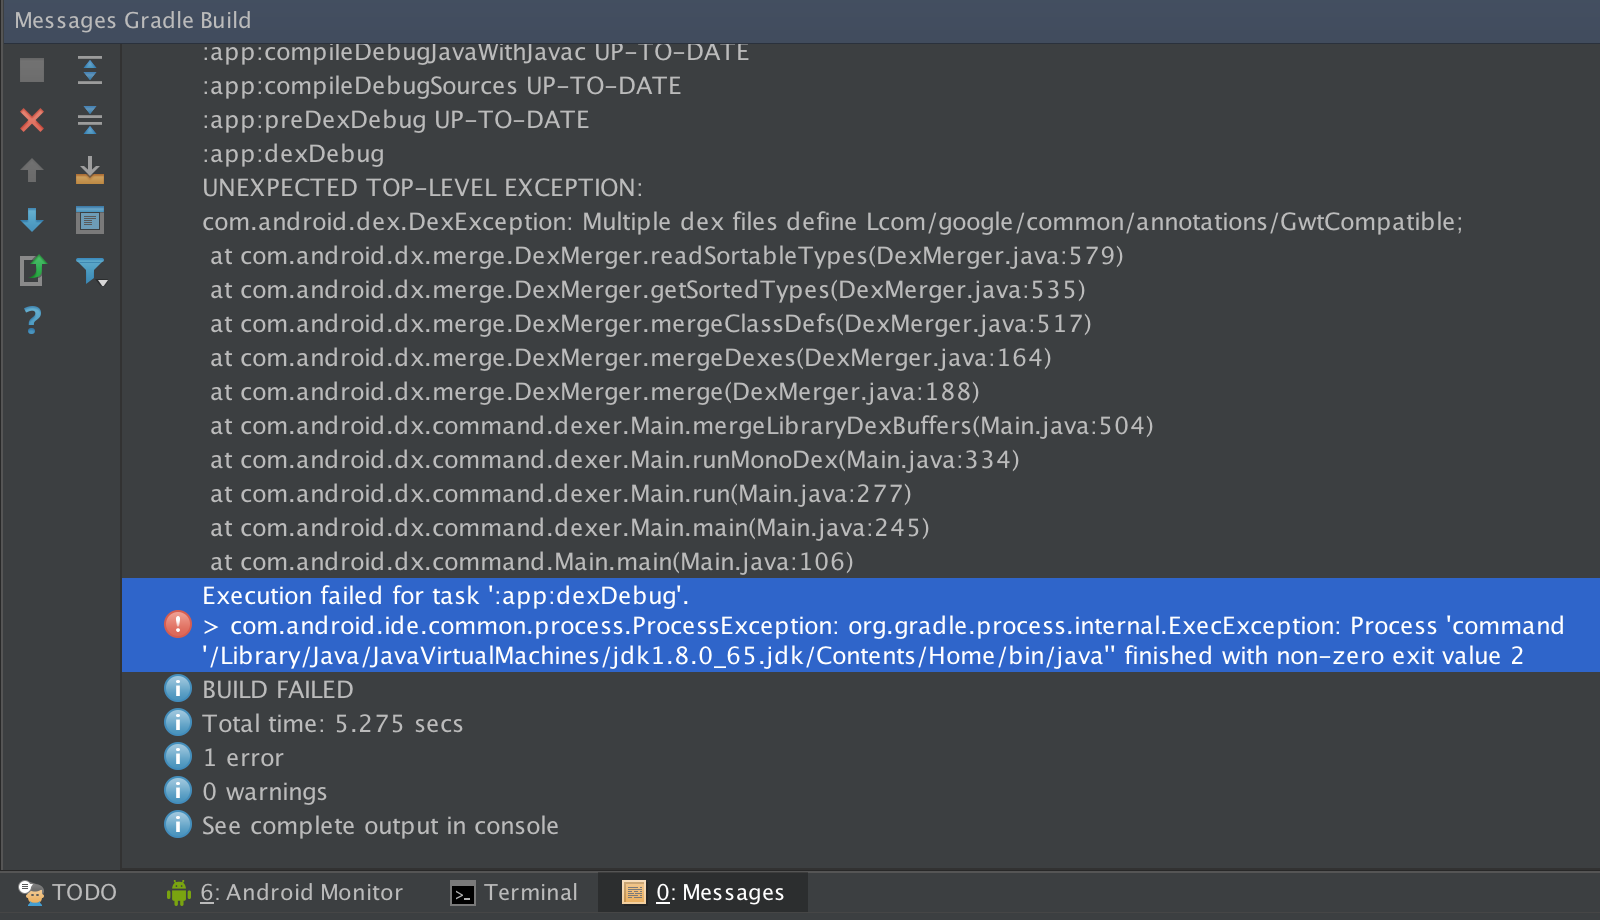
The cause of the error can be understood from the output messages of the assembly task execution — the GwtCompatible class with the identical package name is contained in several dependencies. And this is true, the fact is that the app project uses the guava library as a dependency, and the jsontoken library uses outdated Google Collections in dependencies. Google Collections is included in Guava, and their sharing in one project is impossible.
To achieve a successful project build can be in three options:
The first is to remove guava from the dependencies of the app module. If you use only the part of Guava, which is contained in Google Collections, then the proposed solution will be quite good.
The second is to exclude Google Collections from the first module. To achieve this, we can use the previously described exception or configuration rules. Consider both options, first using exceptions (state 5)
An example of using configuration rules (state 6):
The dependency tree for both implementations of the Google Collections exception will be identical.

The third option is to use the module substitution functionality (state 7):
The dependency tree will look like this:

It should be noted that if you leave the predefined conflict resolution logic, which indicates to interrupt the assembly in the presence of any conflict, then the execution of any task will be interrupted at the configuration stage. In other words, the use of module replacement rules is one of the rules of conflict resolution strategy between dependencies.
It is also important to note that the last of the voiced options is the most flexible, because when you remove guava from the Gradle dependency list, Google Collections will remain in the project, and the functionality depending on it will be able to continue execution. And the dependency tree will look like this:
After each of the options we will succeed in the form of an assembled and running application.
But let's consider another situation (state 8), we have only one strongly shortened (to reduce the size of screenshots) dynamic wiremock dependency. We use it purely for training purposes; instead, submit the library that your colleague supplies, it can release a new version at any time, and you will definitely need to use the latest version:
The dependency tree looks like this:

As you can see, Gradle downloads the latest available version of wiremock, which is beta. The situation is normal for debug builds, but if we are going to provide the build to users, then we definitely need to use the release version to be sure of the quality of the application. But at the same time, due to the constant need to use the latest version and frequent releases, there is no way to refuse to specify the wiremock version dynamically. The solution to this problem is to write your own rules for the strategy of choosing dependency versions:
It is worth repealing that this rule will apply to all dependencies, not just wiremock.
After that, running the task of displaying the dependency tree in the information mode, we will see how the beta versions of the library are discarded, and the reason why they were discarded. In the end, the stable version 1.58 will be chosen:

But during testing it was found that in version 1.58 there is a critical bug, and the assembly cannot be released in this state. You can solve this problem by writing another rule for choosing the dependency version:
After that, the version of wiremock 1.58 will also be dropped, and version 1.57 will start to be used, and the dependency tree will look like this:

Despite the fact that the article turned out to be quite voluminous, the topic Dependency Management in Gradle contains a lot of information that was not voiced within this article. It’s best to get deeper into this world using the official User Guide paired with the Gradle DSL documentation, which you will have to invest a lot of time to learn.
But as a result, you will be able to save dozens of hours, both thanks to automation, and by understanding what needs to be done when various bugs appear. For example, lately, bugs with 65K-methods and Multidex have become quite active, but thanks to competent viewing of dependencies and the use of exclude, problems are solved very quickly.
See also: Gradle: 5 Utility for the Developer
The article discusses the basics of dependency management in Gradle, provides in-depth practical examples, small life hacks and links to the right places in the documentation.
')
Repository
As you know, Gradle does not have its own repositories and uses Maven and Ivy repositories as a source of dependencies. At the same time, the interface for working with repositories does not differ at the basic level; you can find out more about the differences in parameters using the IvyArtifactRepository and MavenArtifactRepository links . It should be noted that the 'http', 'https' or 'file' protocols can be used as url. The order in which the repositories are recorded affects the order in which dependencies are searched for in the repositories.
// build.gradle repositories { maven { url "http://example.com" } ivy { url "http://example.com" } } Addiction
// build.gradle apply plugin: 'java' repositories { mavenCentral() } dependencies { compile group: 'com.googlecode.jsontoken', name: 'jsontoken', version: '1.1' testCompile group: 'junit', name: 'junit', version: '4.+' } In the example above, you see a build script in which two dependencies are connected for different configurations (compile and testCompile) to compile the project. JsonToken will connect during the compilation of the project and compilation of the project tests, jUnit only during the compilation of the project tests. More details about the compilation configurations - by reference .
You can also see that we connect jUnit dependencies as dynamic (+), i.e. the latest available version 4. + will be used, and we will not need to keep track of minor updates (I recommend not to use this feature in the compile-type compilation of the application, as unexpected, possibly difficult to localize problems may appear).
Using the jUnit-dependency example, consider the standard Gradle mechanism for finding the necessary dependency:
1. compile ("org.junit:junit:4.+") 2. group: "org.junit" name: "junit" version: "4.+" 3. [junit:4.1] … [junit:4.12] 4. [junit:4.12] 5. [junit:4.12] dependencies { … } artifacts { … } 6. junit-4.12.jar junit-4.12-source.jar junit-4.12-javadoc.zip Cache
Gradle implements a caching system that, by default, stores dependencies for 24 hours, but this behavior can be overridden.
// build.gradle configurations.all { resolutionStrategy.cacheChangingModulesFor 4, 'hours' resolutionStrategy.cacheDynamicVersionsFor 10, 'minutes' } After the time set for storing data in the cache is out, the system, when running tasks, first checks the possibility of updating dynamic (dynamic) and changeable (changing) dependencies and, if necessary, updates them.
Gradle tries not to upload those files that were previously uploaded, and uses a verification system for this, even if the URL / source of files is different. Gradle always checks the cache (URL, version and module name, cache for other versions of Gradle, Maven cache), HTTP request headers (Date, Content-Length, ETag) and SHA1-hash, if available. If no match is found, the system will download the file.
Also in the assembly system there are two parameters, using which at startup you can change the caching policy for a specific task.
- –offline - Gradle will never attempt to contact the network to check for dependency updates.
- –refresh-dependencies — Gradle will attempt to update all dependencies. It is convenient to use if the data in the cache is corrupted. Verifies the cached data and, if different, updates it.
More details about dependency caching can be found in the Gradle User Guide .
Types of dependencies
There are several types of dependencies in Gradle. The most commonly used are:
- External dependencies of the project - dependencies downloaded from external repositories;
// build.gradle dependencies { compile "com.android.support:appcompat-v7:23.1.1" } - Project dependencies - dependence on the module (subproject) within one project;
// build.gradle dependencies { compile project(':subproject') } - File dependencies - dependencies connected as files (jar / aar archives).
build.gradle repositories { flatDir { dirs 'aarlibs' // , aar- } } dependencies { compile(name:'android_library', ext:'aar') // aar- compile files('libs/a.jar', 'libs/b.jar') compile fileTree(dir: 'libs', include: '*.jar') } There are also client module dependencies, Gradle API dependencies, and local Groovy dependencies. They are rarely used, so within the framework of this article we will not analyze them, but you can read the documentation about them here .
Dependency tree
Each external or project dependency can contain its own dependencies, which must be taken into account and downloaded. Thus, when compiling, dependencies are loaded for the selected configuration and a dependency tree is built, the human representation of which can be seen by running the Gradle task 'dependencies' in Android Studio or using the command gradle% module_name%: dependencies in the console, being in the project root folder. In response, you will receive a list of dependency trees for each of the available configurations.
Using the configuration parameter, we specify the name of the configuration in order to see the dependency tree of only the specified configuration.
Take the specially prepared source code of the repository located on github and try to get the dependency tree for a specific configuration (at the moment the project is in the 0 state, ie, build.gradle.0 is used as build.gradle):
After analyzing the dependency tree, you can see that the app module uses two external dependencies (appcompat and guava) as dependencies, as well as two project dependencies (first and second), which in turn use jsontoken versions 1.0 and 1.1 as external dependencies. Obviously, a project cannot contain two versions of the same library in Classpath, and no need for that. At this point, Gradle turns on the conflict resolution module.
Conflict resolution
Gradle DSL contains a component used to resolve dependency conflicts . If you look at the dependencies of the jsontoken library on the dependency tree above, we will see them only once. For the second module, the dependencies of the jsontoken library are not specified, and the output of the dependency itself additionally contains '-> 1.1', which means that version 1.0 of the library is not used, but was automatically replaced with version 1.1 using the Gradle-conflict resolution module.
To explain how the conflict was resolved, you can also use Gradle-dependencyInsight, for example:
It is worth paying attention that version 1.1 is selected as a result of conflict resolution, it is also possible to choose as a result of other rules (for example: selected by force or selected by rule). The article will provide examples of the use of rules that affect the strategy for resolving dependencies, and following the dependencyInsight task, you can see the reason for choosing a specific version of the library at each of the steps below. To do this, during the transition to each stage, you can independently perform task dependencyInsight.
If necessary, it is possible to redefine the logic of the Gradle-module of conflict resolution, for example, by specifying Gradle to fall when conflicts are detected during project configuration. (state 1)
// build.gradle // … configurations.compile.resolutionStrategy { failOnVersionConflict() } After that, even when trying to build a dependency tree, Gradle Tasks will be interrupted due to the presence of a conflict in the application dependencies.
The problem has four solutions:
The first option is to remove lines that override the conflict resolution strategy.
The second option is to add the rule of mandatory use of the jsonToken library to the conflict resolution strategy, indicating the specific version (state 2):
// build.gradle // … configurations.compile.resolutionStrategy { force 'com.googlecode.jsontoken:jsontoken:1.1' failOnVersionConflict() } When applying this solution, the dependency tree will look as follows:
The third option is to add the jsonToken library explicitly as a dependency for the app project and assign the dependencies to the force parameter, which explicitly indicates which of the library versions to use. (state 3)
// build.gradle // … dependencies { compile fileTree(dir: 'libs', include: ['*.jar']) compile 'com.android.support:appcompat-v7:23.1.1' compile 'com.google.guava:guava:+' compile project(":first") compile project(":second") compile ('com.googlecode.jsontoken:jsontoken:1.1') { force = true } } And the dependency tree will look like this:
The fourth option is to exclude from one of the project dependencies jsontoken from its own dependencies using the exclude parameter. (state 4)
// build.gradle dependencies { compile fileTree(dir: 'libs', include: ['*.jar']) compile 'com.android.support:appcompat-v7:23.1.1' compile 'com.google.guava:guava:+' compile project(":first") compile(project(":second")) { exclude group: "com.googlecode.jsontoken", module: 'jsontoken' } } And the dependency tree will look like this:
It is worth noting that exclude does not need to pass both parameters at the same time; only one can be used.
But despite the correct derivation of the dependency tree, when trying to build the application Gradle will return an error:
The cause of the error can be understood from the output messages of the assembly task execution — the GwtCompatible class with the identical package name is contained in several dependencies. And this is true, the fact is that the app project uses the guava library as a dependency, and the jsontoken library uses outdated Google Collections in dependencies. Google Collections is included in Guava, and their sharing in one project is impossible.
To achieve a successful project build can be in three options:
The first is to remove guava from the dependencies of the app module. If you use only the part of Guava, which is contained in Google Collections, then the proposed solution will be quite good.
The second is to exclude Google Collections from the first module. To achieve this, we can use the previously described exception or configuration rules. Consider both options, first using exceptions (state 5)
// build.gradle dependencies { compile fileTree(dir: 'libs', include: ['*.jar']) compile 'com.android.support:appcompat-v7:23.1.1' compile 'com.google.guava:guava:+' compile(project(":first")) { exclude module: 'google-collections' } compile(project(":second")) { exclude group: "com.googlecode.jsontoken", module: 'jsontoken' } } An example of using configuration rules (state 6):
//build.gradle configurations.all { exclude group: 'com.google.collections', module: 'google-collections' } dependencies { compile fileTree(dir: 'libs', include: ['*.jar']) compile 'com.android.support:appcompat-v7:23.1.1' compile 'com.google.guava:guava:+' compile project(":first") compile(project(":second")) { exclude group: "com.googlecode.jsontoken", module: 'jsontoken' } } The dependency tree for both implementations of the Google Collections exception will be identical.
The third option is to use the module substitution functionality (state 7):
// build.gradle dependencies { modules { module('com.google.collections:google-collections') { replacedBy('com.google.guava:guava') } } compile fileTree(dir: 'libs', include: ['*.jar']) compile 'com.android.support:appcompat-v7:23.1.1' compile 'com.google.guava:guava:+' compile project(":first") compile(project(":second")) { exclude group: "com.googlecode.jsontoken", module: 'jsontoken' } } The dependency tree will look like this:
It should be noted that if you leave the predefined conflict resolution logic, which indicates to interrupt the assembly in the presence of any conflict, then the execution of any task will be interrupted at the configuration stage. In other words, the use of module replacement rules is one of the rules of conflict resolution strategy between dependencies.
It is also important to note that the last of the voiced options is the most flexible, because when you remove guava from the Gradle dependency list, Google Collections will remain in the project, and the functionality depending on it will be able to continue execution. And the dependency tree will look like this:
After each of the options we will succeed in the form of an assembled and running application.
But let's consider another situation (state 8), we have only one strongly shortened (to reduce the size of screenshots) dynamic wiremock dependency. We use it purely for training purposes; instead, submit the library that your colleague supplies, it can release a new version at any time, and you will definitely need to use the latest version:
// build.gradle configurations.all { exclude group: 'org.apache.httpcomponents', module: 'httpclient' exclude group: 'org.json', module: 'json' exclude group: 'org.eclipse.jetty' exclude group: 'com.fasterxml.jackson.core' exclude group: 'com.jayway.jsonpath' } dependencies { compile 'com.github.tomakehurst:wiremock:+' } The dependency tree looks like this:
As you can see, Gradle downloads the latest available version of wiremock, which is beta. The situation is normal for debug builds, but if we are going to provide the build to users, then we definitely need to use the release version to be sure of the quality of the application. But at the same time, due to the constant need to use the latest version and frequent releases, there is no way to refuse to specify the wiremock version dynamically. The solution to this problem is to write your own rules for the strategy of choosing dependency versions:
// build.gradle //… configurations.all { //… resolutionStrategy { componentSelection { all { selection -> if (selection.candidate.version.contains('alpha') || selection.candidate.version.contains('beta')) { selection.reject("rejecting non-final") } } } } } It is worth repealing that this rule will apply to all dependencies, not just wiremock.
After that, running the task of displaying the dependency tree in the information mode, we will see how the beta versions of the library are discarded, and the reason why they were discarded. In the end, the stable version 1.58 will be chosen:
But during testing it was found that in version 1.58 there is a critical bug, and the assembly cannot be released in this state. You can solve this problem by writing another rule for choosing the dependency version:
// build.gradle //… configurations.all { //… resolutionStrategy { componentSelection { // … withModule('com.github.tomakehurst:wiremock') { selection -> if (selection.candidate.version == "1.58") { selection.reject("known bad version") } } } } } After that, the version of wiremock 1.58 will also be dropped, and version 1.57 will start to be used, and the dependency tree will look like this:
Conclusion
Despite the fact that the article turned out to be quite voluminous, the topic Dependency Management in Gradle contains a lot of information that was not voiced within this article. It’s best to get deeper into this world using the official User Guide paired with the Gradle DSL documentation, which you will have to invest a lot of time to learn.
But as a result, you will be able to save dozens of hours, both thanks to automation, and by understanding what needs to be done when various bugs appear. For example, lately, bugs with 65K-methods and Multidex have become quite active, but thanks to competent viewing of dependencies and the use of exclude, problems are solved very quickly.
See also: Gradle: 5 Utility for the Developer
Source: https://habr.com/ru/post/275515/
All Articles