Atmel Software Framework (ASF): how does it work?
Some theory
Atmel Software Framework (ASF) is a software library that contains a wide range of embedded code for Atmel microcontrollers of all families: megaAVR, AVR XMEGA, AVR UC3 and SAM.
Main advantages:
- Simplified use and development of microcontrollers, as the library is written at high and medium levels of abstraction;
- ASF is designed for use at any design stage;
- ASF is integrated into Atmel Studio with a graphical user interface, but can also be used with IAR and GCC compilers;
- ASF is free.

A little about Atmel Studio
Atmel Studio is a free development environment for Atmel microcontrollers, the successor of AVR Studio. The visual shell is taken from Microsoft Visual Studio. GCC is still used as a compiler.
As you can see from the figure above, ASF consists of several layers of abstraction:
- PCB (Board)
- Drivers (Drivers)
- Components
- Services (Services)
- application (Applications).
The ASF uses three component blocks:
- Module : a software module that does not contain an int main (void) function (for example, a USART module, a USB stack). ASF modules are layers: drivers, components, and services. The ASF module is configured statically and / or dynamically.
- Application / example : software code in ASF that can be compiled, wired into the microcontroller and executed. ASF applications consist of layers: drivers, components, services, application. For ASF applications, only static configuration is available.
- Printed circuit board : an abstract layer for each Atmel debug whale supported by ASF. Usually one microcontroller corresponds to one whale. There is also a special user board “user board” , which is an empty abstraction layer for creating an application based on a user board.
For each project, the directory tree (see figure below) consists of:
- Folders for the selected Atmel MK family (in the “sam0” picture)
- Folders with a common code (in the “common” and “common2” picture)
- Folders with third-party software (in the “thirdparty” picture).
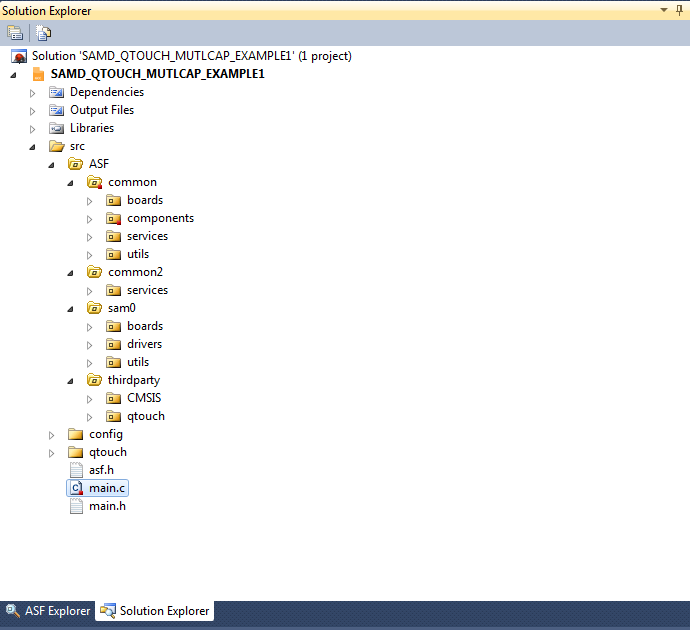
In each of these folders, the organization of subfolders corresponds to levels of abstraction (applications, services, components, drivers, cards).
The main stages of working with ASF
Step by step writing code using ASF in Atmel Studio looks like this:
- Download ASF (using the extension manager, done once).
- Choose a sample project or create your own (on the Atmel Studio start page).
- Add required modules (ASF Wizard).
- Configure modules (xxxx_conf.h files).
- Write the logic of the work (the actual application code).
Next, we analyze each of the stages in more detail.
')
ASF download
Extensions for Atmel Studio (including the ASF library) are downloaded using Extension Manager. To install the required extension:
- Open Extention Manager ( Tools -> Extension Manager )
- Enter keywords in the search field
- Download the installation file (to do this, you must be a registered user at atmel.com )
- Install the application
Updating already installed applications is also carried out through the Extention Manager.

Project creation
When you start Atmel Studio, you are offered the choice to create a new project , create an example project or open an existing project .
There are many examples of projects, and it is most convenient to start studying Atmel Studio, ASF and Atmel microcontrollers from them. To select the desired project, enter the family of microcontrollers, a debugging board, or a keyword in the appropriate field.
After selecting a project, specify the folder for placement and name (if you want it to differ from the default name).
When creating a new project, its type is selected. The number of available project types depends on the installed extension modules. The figure below shows that Qtouch projects are available , which can only be created after installing Qtouch Library and Qtouch Composer.

ASF Wizard
If you have opened a ready-made example or created your own project and you need to add a new peripheral module (for example, UART) or a library (for example, FATFS), help ASF Wizard (menu Project -> ASF wizard or icon
 ). In it you can find modules by keyword and by type (driver, component, service). If necessary, you can configure how they will work: by interruption ( callback in Atmel terminology) or polled ( polled ), how to be clocked or what role to play (master, host, mass storage, etc. depending on the type of peripherals or library ).
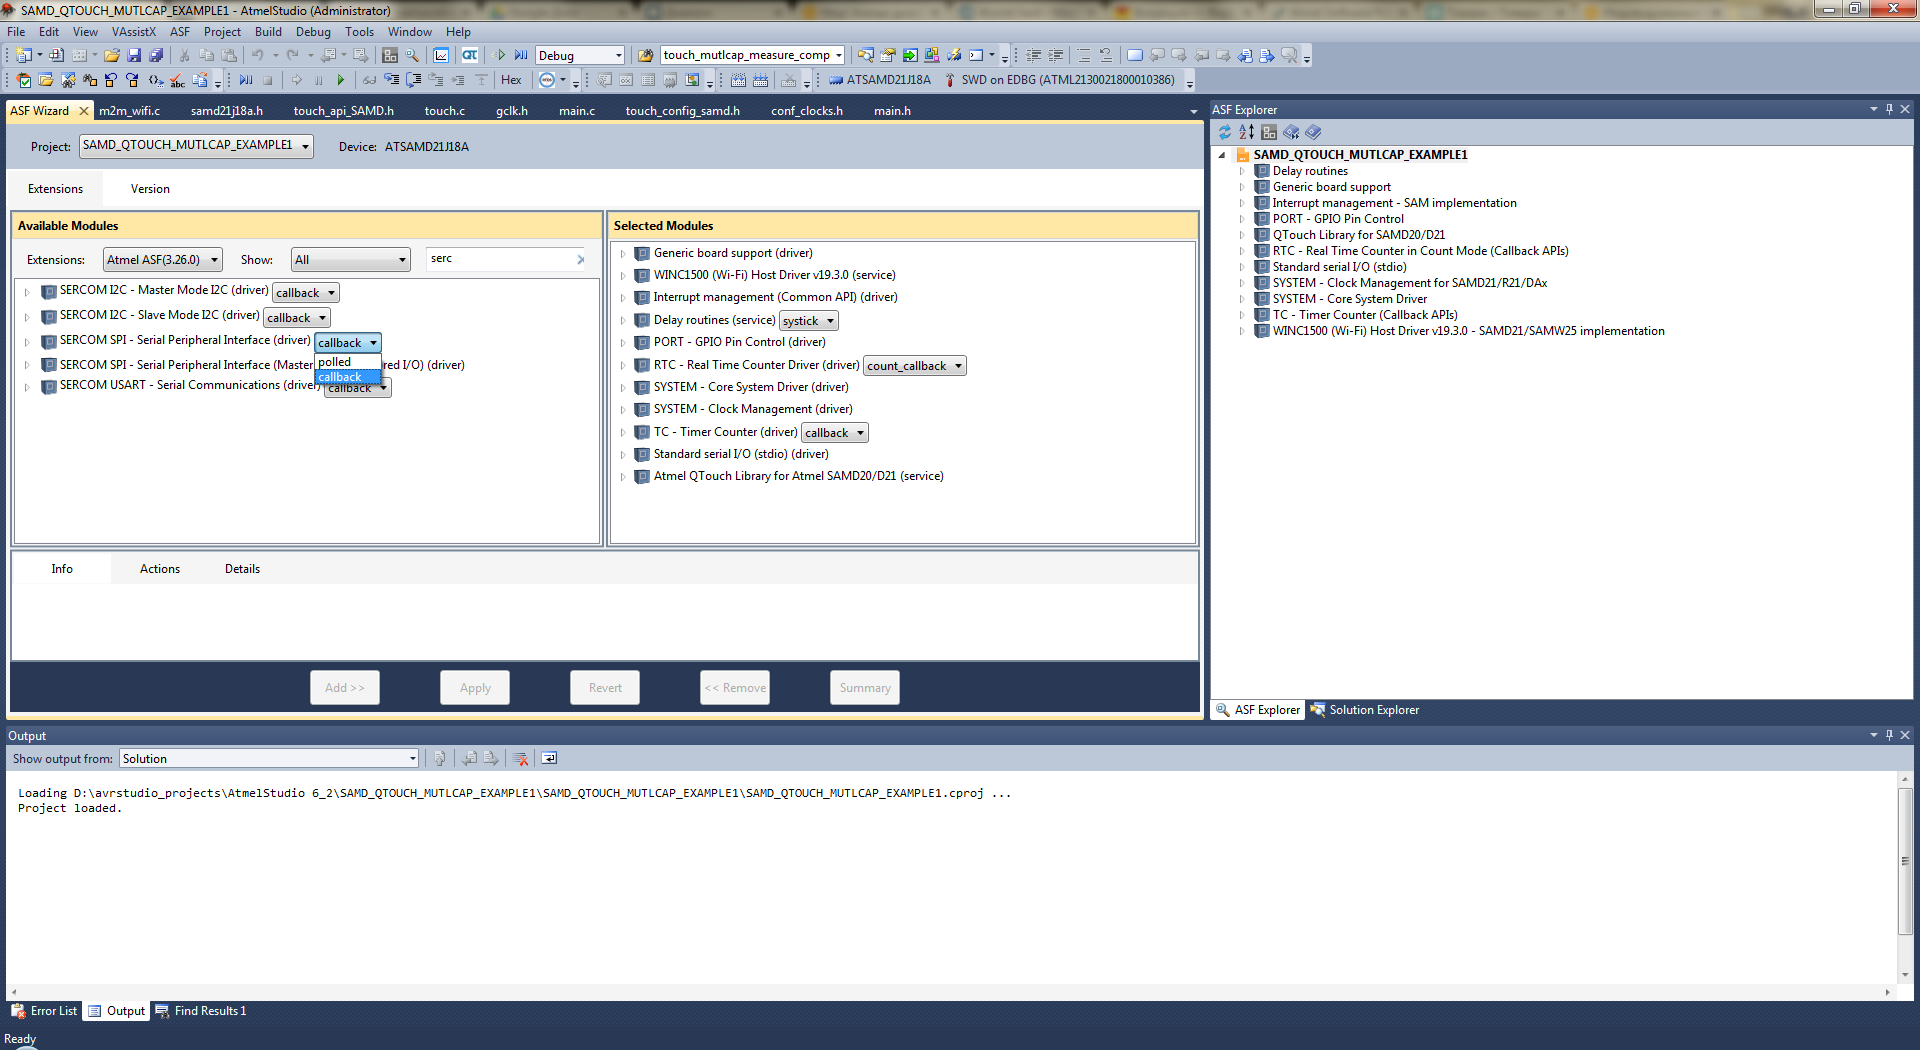
Module configuration
After adding a module to a project, the corresponding file with the name of the conf_xxxx.h type appears in the directory tree in the config folder. It contains general library module settings.
The configuration of the corresponding peripherals is carried out in 4 stages:
- Read the default parameters using the appropriate function.
- Change some parameters if required.
- Write new parameters.
- Allow peripherals to work.
Consider the procedure for adding a new periphery to a project using an example.
Code writing
After adding the necessary modules, setting them up and turning on, let's start writing the code.
Example
Suppose we want to learn how to flash the LEDs on the SAM D21 Xplained Pro Evaluation Kit .
Consider in detail how to do this in Atmel Studio.
Launch Atmel Studio and press the button New Example Project :

Download and install the latest version of ASF, if this has not been done before (see above how to do it).
Create a new example project (see picture).
Select the samd controller family , enter the led keyword in the search. We see a list of available projects.

We select from them the necessary.
Enter the new project name and select the location.

Done! Click "OK". Now we have an example project that can be compiled and poured into the debug board.
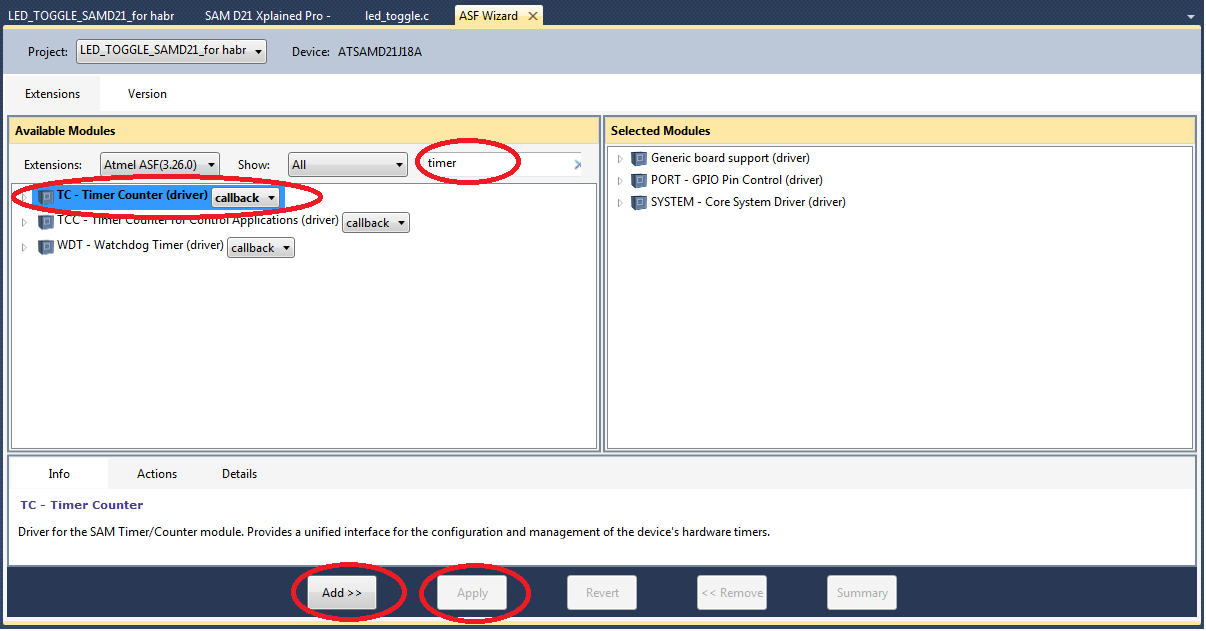
Now we change the code. Let our LEDs light up on a timer. To launch the ASF Wizard, enter the keyword timer in the search, select the callback mode, then click the Add and Apply buttons.
We configure the timer. To do this, we declare globally the structure that will store the timer parameters:
struct tc_module tc_instance_tc0; Now you need to set the timer. Add a function:
void configure_tc0(void) { struct tc_config config_tc; tc_get_config_defaults(&config_tc); config_tc.wave_generation = TC_WAVE_GENERATION_MATCH_FREQ; config_tc.counter_16_bit.compare_capture_channel[0] = 1000; config_tc.clock_prescaler=TC_CLOCK_PRESCALER_DIV1024; // config_tc.oneshot=true; tc_init(&tc_instance_tc0, TC3, &config_tc); tc_enable(&tc_instance_tc0); } Explanation of the function:
- struct tc_config config_tc is an auxiliary structure that stores the timer settings
- tc_get_config_defaults (& config_tc) read the default settings (fill in the structure). To see which settings are actually set by default, right-click on the function and select “goto implementation” in the drop-down menu. To find out the name of the function that records the default settings, type the name of the periphery and the word "get" through the underscore, and auto-complete will prompt the full name.
- We change the settings we need. In this case, it is a prescaler, the mode of operation and the contents of the comparison register.
- tc_init (& tc_instance_tc0, TC3, & config_tc) Write the changed data into the structure and associate the program structure with the hardware timer (TC3).
- tc_enable (& tc_instance_tc0) Allow timer operation.
Now we set up the interrupts and write the code that will be executed on the interrupt. To do this, we write functions:
void configure_tc0_callbacks(void) { tc_register_callback(&tc_instance_tc0,tc0_callback,TC_CALLBACK_CC_CHANNEL0); tc_enable_callback(&tc_instance_tc0, TC_CALLBACK_CC_CHANNEL0); } void tc0_callback(struct tc_module *const module_inst) { port_pin_toggle_output_level(LED_0_PIN); } The first function sets what interrupt handler is called (tc_register_callback (& tc_instance_tc0, tc0_callback, TC_CALLBACK_CC_CHANNEL0);) and allows this call (tc_enable_callback (& tc_instance_tc0, TC_CALLBACK_CC_CHECH). The second function and this is what is executed in the interrupt handler (callback).
Compile, run, ready!
Atmel Studio together with the Atmel Software Framework are good tools for initial acquaintance with the periphery of Atmel microcontrollers, significantly reducing the time to master a new family of microcontrollers due to the large number of examples and convenient development environment.
ASF + IAR
ASF can be used with IAR. In this case, the stand-alone version of ASF is downloaded and is connected to the project in IAR manually, the paths to the required library files are indicated in the Options-C / C ++ Compiler -> Preprocessor menu.
Source: https://habr.com/ru/post/275371/
All Articles