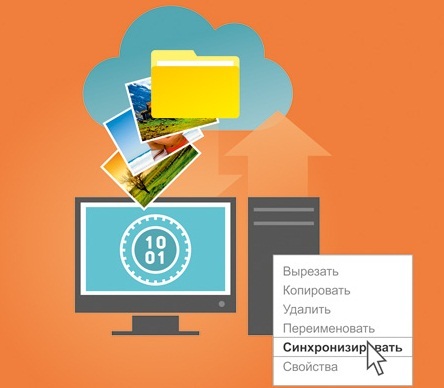
Photo Encryption on Google Drive
Need to encrypt important photos and other documents, put them into the cloud in an encrypted form and synchronize with another Android device? It seems to you that all this is quite difficult, and it will be inconvenient to work with encrypted data. This is not true. This article will show you how to implement this script in just two minutes.
How was it possible to encrypt data in the cloud? The easiest way is to place the files in a cryptocontainer, and place the file of the container itself on Google Drive or any other cloud storage. Then, to work with files on another device, you had to load the container, open it, view / edit files, and copy it back to the cloud. Such a scheme is quite possible, there are plenty of Android applications for creating cryptocontainers, for example, EDS Lite. But with this scheme, there are two drawbacks:
')
It's clear that the old file encryption scheme in the cloud is no good. You can use it unless you use a set of files in person, the size of the container is small, and you put the container file in the cloud for backup reasons, not collaboration on different devices.
But it was like this before, but now we offer to see how you can encrypt and synchronize your data with the cloud using the CyberSafe Mobile 2 application in just a few minutes. Next, we look at the four most likely scenarios for using CyberSafe Mobile 2. We will use photos as secret data, but the application does not limit the type of data, and you can protect any data.
The easiest scenario is to encrypt a cloud folder on Google. Everything is very simple: you need to open the side menu, select the Google Drive command, select your Google account and encrypt one of the folders. To make the encryption process faster, it is better to encrypt an empty folder. Create a folder (fig. 1), and then select Encrypt current folder (fig. 2) from the menu. A cybersafe.cloud.conf file will appear in the folder - confirmation that the folder is encrypted. After that, you can copy the files to an encrypted folder. A lock icon means that the file is encrypted (Fig. 3).
However, for this scenario to be so simple, you must first create your own key and add a Google account. Next will be shown how to do it.
Suppose that you have some photos that you would like to hide from the eyes of others (when someone takes your smartphone into your hands).
The first step is to create a safe - a cryptocontainer that will contain your files in encrypted form. When creating a safe, you need to specify the path to the safe file (no matter where the safe will be located - on the SD card or in the device’s memory), the password, and the size of the safe (Fig. 3). The larger the size of the safe, the longer it takes to create it. And if the mode of filling free space with random data is enabled, then you will have to be patient.
Then the created safe will appear in the list of safes, you need to click on it to open it - the program will ask you to enter the password specified during its creation (Fig. 5). After opening the program will display a list of files and folders safe. It is clear that it will be empty - because we have just created a safe. Therefore, open the side menu (Fig. 6) and go to the file manager.
The file manager (Fig. 7) allows you to view the device’s memory, files on the SD card, as well as network folders. It should be noted that there is no automatic search for network resources in the application, so the user needs to know the computer name and the folder name in order to add it to the list.
Navigate to the location containing the files and folders you want to encrypt (Figure 8). Select the files and select Copy (or Cut ). Note that in the command list there is a command for deleting files with overwriting, which is useful for deleting the source files after encryption (Fig. 9).
Open the side menu, click on the safe in which you want to put the copied / cut photos, select the Paste command and wait until the files are placed in the safe. At the end of the copying operation, you will be notified via the notification area (Fig. 10), and there will be a button on it that allows you to delete the original photos (if you chose to copy the photos).
The CyberSafe Mobile 2 application is equipped with a built-in photo viewer (Fig. 11), which also allows you to rotate the image and supports full-screen viewing (Fig. 12).
Actually, if the task is to encrypt data on only one device and it is not intended to work with them on different devices, that's all. However, this script does not use even a third of the program’s functionality. Let's try to complicate the task and mount the safe to the DCIM folder. This means that all photos created by the Camera application will be automatically encrypted! But for this you need root rights, otherwise it will be impossible to perform a mount operation.
The first step is to enable the mount if you did not do it when you first started the program. But you could not do this for two reasons - or you do not have root rights (then you wouldn’t have a request to enable mount) or you simply did not want to.
In the program settings (the Settings command in the side menu, the Mount settings section), you must enable the Mount using FUSE option (Fig. 13). The Base Mount Path parameter specifies the directory to which safes will be mounted if the mount path is not specified in the safe settings.
When mounted, the following parameters will appear in the Safe Properties window (Fig. 14):
To mount the file to the DCIM folder (full path / sdcard / DCIM), you need to specify this path as the mount path in the safe settings, and then enable the Remember password and Automatically mount safe options on boot options. After that, you need to restart the device.
It is important to remember - the program does not increase the size of the safe "on the fly", so when creating you need to take care that the safe is the right size. The size of the photo file created by a very ordinary 5 megapixel camera is approximately 1.2 MB. Consequently, about 1,700 photos will fit in a 2048 MB safe. Much or less - you decide.
Syncing a safe with the cloud is useful in several cases. The easiest is synchronization for the sake of backup. You want to make backup copies of your confidential data, but you do not want to keep the backup in the clear. The second case is synchronization for the sake of working with one set of files on different devices. The third is if you need to “share” some files with other users.
The principle of the application is quite simple: a key pair is created and, before the file is “sent” to the cloud, the files are encrypted with your public key. Your private key is used to decrypt files.
When files are “shared” by other users, they are encrypted with the recipients' public keys, which allows them to decrypt files with their private keys. Needless to say, the program performs encryption / decryption absolutely transparent, so the user does not even think about it.
The sequence of actions to synchronize photos between two Android devices:
Consider the process of setting up a safe sync with Google Drive. Perform a long press on the safe you want to sync. From the menu that appears, select Sync Safe with Google Drive (Fig. 15). Further, the application will offer to create or load a key (Fig. 16). On the first device, you need to create a key, on the second - download the one created earlier. When creating a key, you need to select only an e-mail (if several Google accounts are “linked” to the device) and enter the password. If only one Google account is configured, just enter the password. After creating the key, the key management menu will appear (Fig. 17). You can export a key to copy it to another device. In this case, it is necessary to enable the With private key parameter, otherwise only the public (public) part of the key will be exported. The key publishing button allows you to publish your public key on the key server (publishing is free) so that other users can easily find your public key. Publication on the key server eliminates the need to exchange public keys on your own.
When importing a key, you need to open the id file that will be created as a result of exporting the key (Fig. 18). Click the Back button on your device to go to the Google Drive setup. Initially, the list of Google-drives is empty (Fig. 19). Click the button in the upper left corner to add a Google Drive.
Select one of the accounts registered on the device (Fig. 20). After that, the selected account will appear in the list (Fig. 21). You can add multiple Google accounts at once.
Select the desired Google Drive, a list of folders will appear. Select (or create) a folder that will be used as a synchronization folder with your safe. Click the Select button (fig. 22). The file synchronization process will start (fig. 23). At the end of this process, you will receive a notification, and the downloaded files will appear in the synchronization folder (Fig. 24). It is desirable that the synchronization process takes place when you are connected to the Internet via Wi-Fi or 3G / 4G (the higher the data transfer rate, the faster the synchronization will be completed).
Now consider the process of “sharing” files. Select the files you want to share and click the arrow and user button (Fig. 25).
Next you need to add users (Fig. 26). If the user has published the key, then click the search button and enter the user's e-mail (Fig. 27). If the user did not publish the key, you need to press the button with a floppy disk (such nostalgia) and select the public key of the user (before that, the user must provide you with his public key)
Next, select the user (or users) to whom you want to send the file (Fig. 28). The process of sharing (fig. 29) to the files will begin, at the end of which you will receive a notification, and the user to whom you “sent” files will be able to access them through Available to me (fig. 30). Please note: in the Available section, not only the files shared with you through the CyberSafe Mobile 2 application are displayed to me, but also those that have been shared with you on Google Drive. The encrypted files shared by other users through CyberSafe Mobile are located in the CyberSafe folder <username> <date>.
Previously, it was shown how to synchronize the contents of the safe with Google Drive and how to provide access to some files to some users. But what if there is a set of files that a group of users should work with, and some of them work on a PC running Windows?
To access encrypted files on a PC, you need the CyberSafe Top Secret program.
First of all, CyberSafe Top Secret needs to create (or import into the program) the keys of all users (Fig. 31).
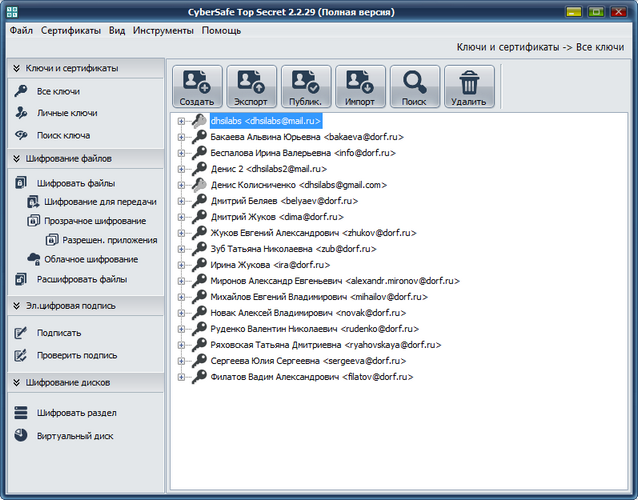
Fig. 31. CyberSafe Top Secret Program
As a rule, all users work under their own accounts, and the public folder belongs to another account. Therefore, you must give all users access to the Shared Documents folder, if this has not already been done. Open the Google Drive’s web interface with an account containing shared documents. Right-click on the required directory and select the Share command (Figure 32).
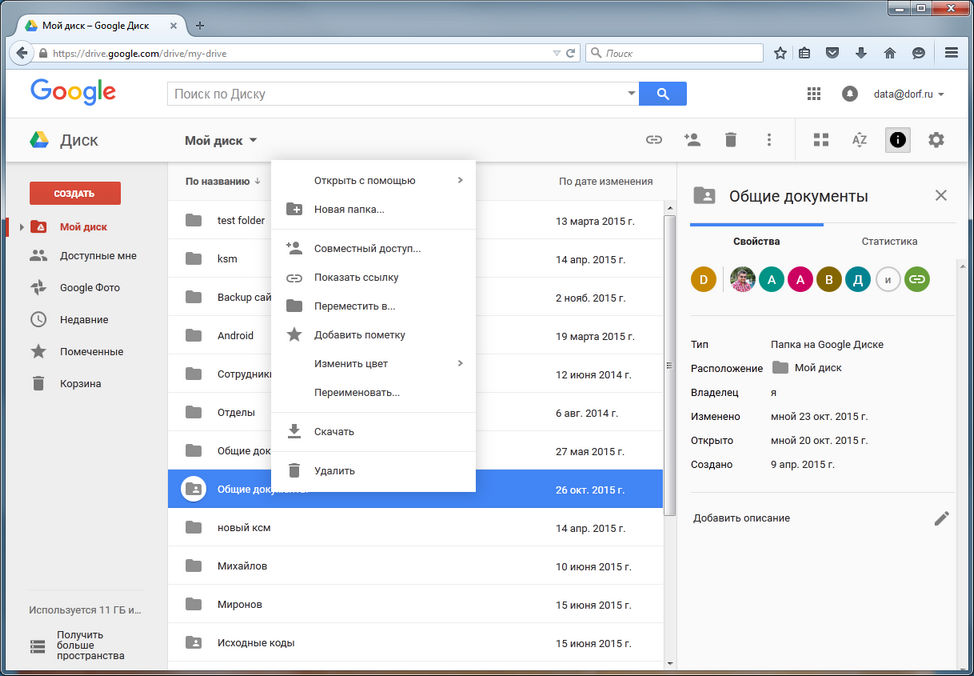
Fig. 32. Select the Sharing command.

Fig. 33. Providing access to the folder for users
Give access to the Shared Documents folder to everyone who needs to work with it. After that click the Send button (Fig. 33).
Half done. Now it remains to encrypt the folder. Go to the CyberSafe Top Secret section of Cloud Encryption and add the Google Drive folder (Figure 34). When adding a folder, select the keys of all users who should work with the folder. Be sure to also click the Enable button before using the folder. Details on setting up cloud encryption are described in the CyberSafe Top Secret program guide.
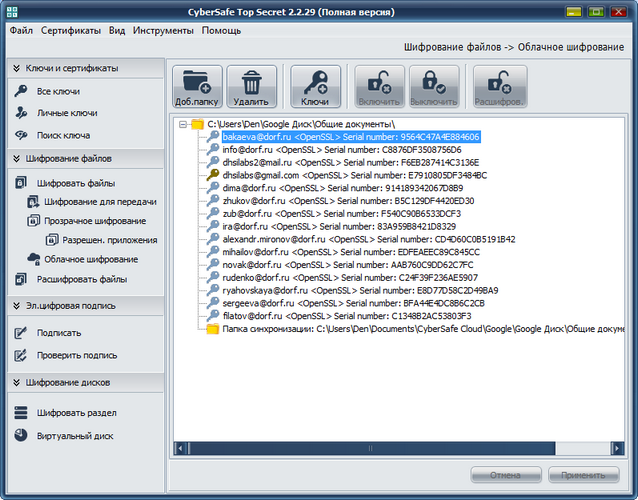
Fig. 34. Shared Documents folder added to CyberSafe Top Secret
Actually, that's all. After encrypting and synchronizing files, users of Android devices will be able to work with encrypted files. The Shared Documents folder will be displayed in the Available to me section. Since the folder was encrypted with the keys of all users, each user will be able to decrypt the files in it. No additional configuration of CyberSafe Mobile is required.
How was the cloud encrypted before?
How was it possible to encrypt data in the cloud? The easiest way is to place the files in a cryptocontainer, and place the file of the container itself on Google Drive or any other cloud storage. Then, to work with files on another device, you had to load the container, open it, view / edit files, and copy it back to the cloud. Such a scheme is quite possible, there are plenty of Android applications for creating cryptocontainers, for example, EDS Lite. But with this scheme, there are two drawbacks:
')
- Inconvenience. All operations need to be performed manually - download the container to a local device, open, then close, upload to the cloud again. In addition, if the container is several gigabytes in size, and you need to change a file that is several kilobytes in size, then such a scheme can hardly be called rational, and if you have a slow Internet connection, it is generally hopeless.
- Synchronizing files while using the same set of encrypted files on different devices is impossible in principle. Since there is no access to the set of files, you have to synchronize huge crypto containers: yeah, on the first device, the crypto container is “fresher”, which means that all 10 GB need to be downloaded to the second device. Do not forget that we are talking about mobile devices and mobile connections, which are not as fast and cheap as we would like.
It's clear that the old file encryption scheme in the cloud is no good. You can use it unless you use a set of files in person, the size of the container is small, and you put the container file in the cloud for backup reasons, not collaboration on different devices.
But it was like this before, but now we offer to see how you can encrypt and synchronize your data with the cloud using the CyberSafe Mobile 2 application in just a few minutes. Next, we look at the four most likely scenarios for using CyberSafe Mobile 2. We will use photos as secret data, but the application does not limit the type of data, and you can protect any data.
Scenario 1: Encrypting a cloud folder
The easiest scenario is to encrypt a cloud folder on Google. Everything is very simple: you need to open the side menu, select the Google Drive command, select your Google account and encrypt one of the folders. To make the encryption process faster, it is better to encrypt an empty folder. Create a folder (fig. 1), and then select Encrypt current folder (fig. 2) from the menu. A cybersafe.cloud.conf file will appear in the folder - confirmation that the folder is encrypted. After that, you can copy the files to an encrypted folder. A lock icon means that the file is encrypted (Fig. 3).
 Fig. 1. Creating a new folder |  Fig. 2. Folder Encryption | 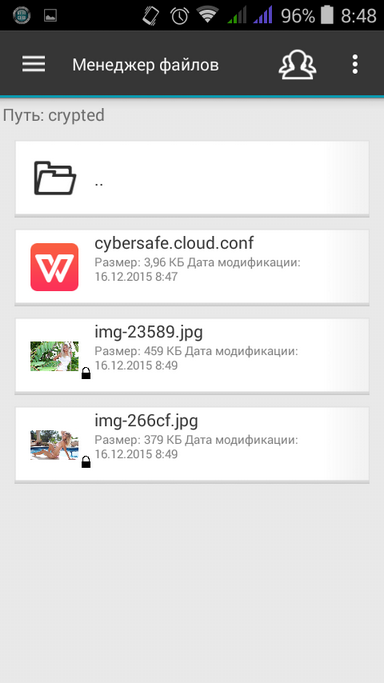 Fig. 3. Added files to the encrypted folder. |
However, for this scenario to be so simple, you must first create your own key and add a Google account. Next will be shown how to do it.
Scenario 2. Encryption of photos on the device
Suppose that you have some photos that you would like to hide from the eyes of others (when someone takes your smartphone into your hands).
The first step is to create a safe - a cryptocontainer that will contain your files in encrypted form. When creating a safe, you need to specify the path to the safe file (no matter where the safe will be located - on the SD card or in the device’s memory), the password, and the size of the safe (Fig. 3). The larger the size of the safe, the longer it takes to create it. And if the mode of filling free space with random data is enabled, then you will have to be patient.
 Fig. 4. Creating a safe |  Fig. 5. Opening of the created safe | 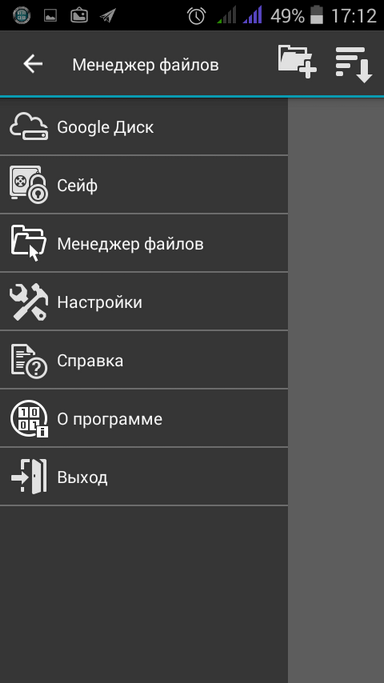 Fig. 6. Side menu |
Then the created safe will appear in the list of safes, you need to click on it to open it - the program will ask you to enter the password specified during its creation (Fig. 5). After opening the program will display a list of files and folders safe. It is clear that it will be empty - because we have just created a safe. Therefore, open the side menu (Fig. 6) and go to the file manager.
The file manager (Fig. 7) allows you to view the device’s memory, files on the SD card, as well as network folders. It should be noted that there is no automatic search for network resources in the application, so the user needs to know the computer name and the folder name in order to add it to the list.
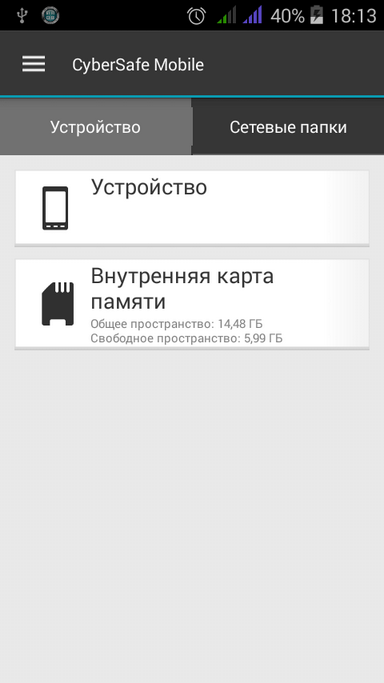 Fig. 7. File manager | 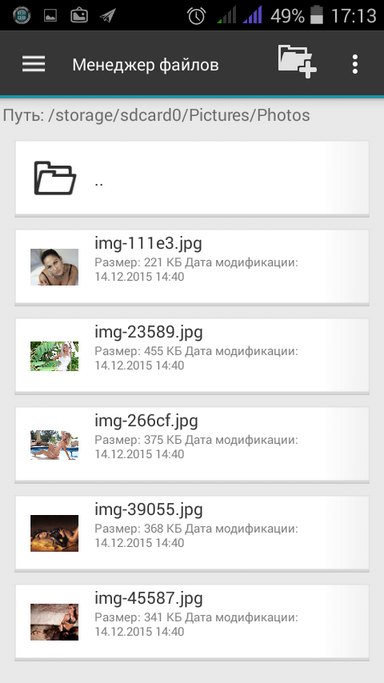 Fig. 8. Files to encrypt | 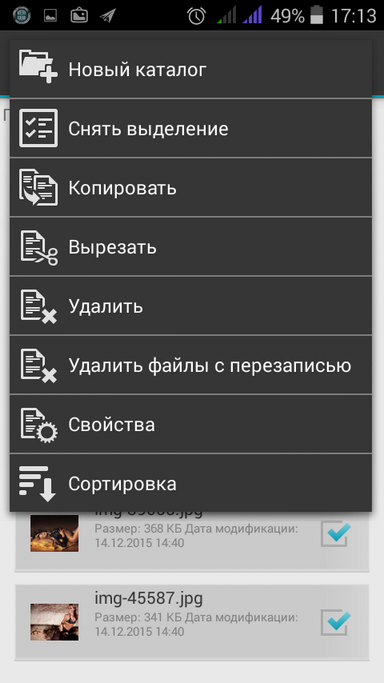 Fig. 9. File operations |
Navigate to the location containing the files and folders you want to encrypt (Figure 8). Select the files and select Copy (or Cut ). Note that in the command list there is a command for deleting files with overwriting, which is useful for deleting the source files after encryption (Fig. 9).
Open the side menu, click on the safe in which you want to put the copied / cut photos, select the Paste command and wait until the files are placed in the safe. At the end of the copying operation, you will be notified via the notification area (Fig. 10), and there will be a button on it that allows you to delete the original photos (if you chose to copy the photos).
The CyberSafe Mobile 2 application is equipped with a built-in photo viewer (Fig. 11), which also allows you to rotate the image and supports full-screen viewing (Fig. 12).
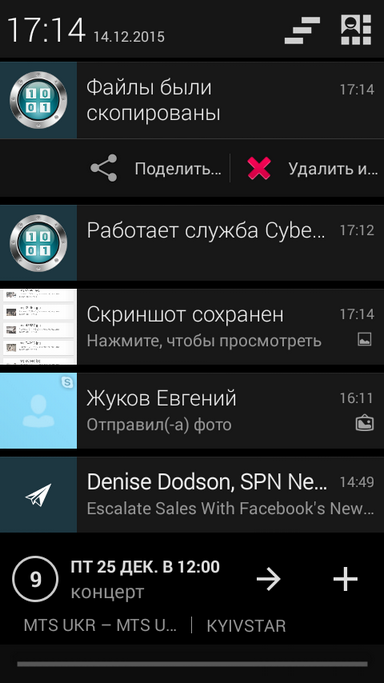 Fig. 10. Files placed in safe |  Fig. 11. Photo viewer |  Fig. 12. Image operations |
Actually, if the task is to encrypt data on only one device and it is not intended to work with them on different devices, that's all. However, this script does not use even a third of the program’s functionality. Let's try to complicate the task and mount the safe to the DCIM folder. This means that all photos created by the Camera application will be automatically encrypted! But for this you need root rights, otherwise it will be impossible to perform a mount operation.
The first step is to enable the mount if you did not do it when you first started the program. But you could not do this for two reasons - or you do not have root rights (then you wouldn’t have a request to enable mount) or you simply did not want to.
In the program settings (the Settings command in the side menu, the Mount settings section), you must enable the Mount using FUSE option (Fig. 13). The Base Mount Path parameter specifies the directory to which safes will be mounted if the mount path is not specified in the safe settings.
When mounted, the following parameters will appear in the Safe Properties window (Fig. 14):
- Path to mount - here you need to specify the directory to which the safe will be mounted. If this field is left blank, the safe will be mounted to the default \ safename directory. The default directory is defined in the program settings.
- Automatically mount safe when loading - the safe will be mounted automatically when Android is loaded. This parameter is suitable for the program usage scenario described earlier.
- Automatically mount a safe at the start of the program - the safe will be mounted after launching the program. Until you enter the master password, the safe will not be mounted.
To mount the file to the DCIM folder (full path / sdcard / DCIM), you need to specify this path as the mount path in the safe settings, and then enable the Remember password and Automatically mount safe options on boot options. After that, you need to restart the device.
 Fig. 13. Enable Mount | 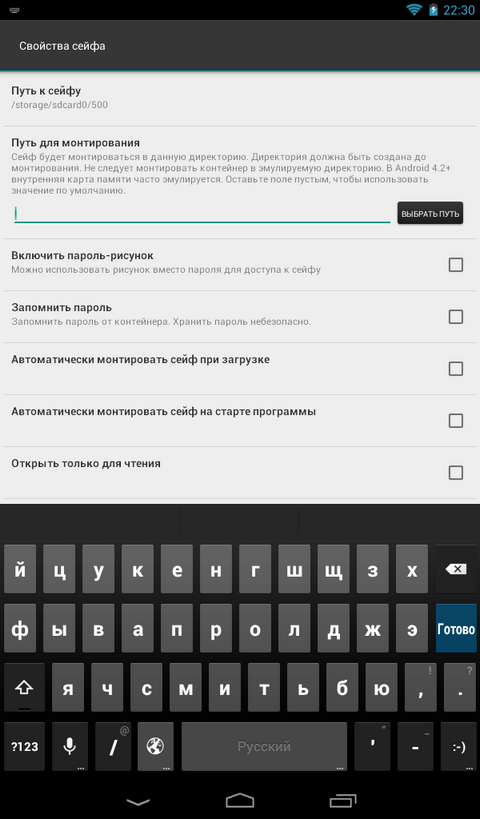 Fig. 14. Parameters of the safe (when mount is on) |
It is important to remember - the program does not increase the size of the safe "on the fly", so when creating you need to take care that the safe is the right size. The size of the photo file created by a very ordinary 5 megapixel camera is approximately 1.2 MB. Consequently, about 1,700 photos will fit in a 2048 MB safe. Much or less - you decide.
Scenario 3. Sync photos with the cloud
Syncing a safe with the cloud is useful in several cases. The easiest is synchronization for the sake of backup. You want to make backup copies of your confidential data, but you do not want to keep the backup in the clear. The second case is synchronization for the sake of working with one set of files on different devices. The third is if you need to “share” some files with other users.
The principle of the application is quite simple: a key pair is created and, before the file is “sent” to the cloud, the files are encrypted with your public key. Your private key is used to decrypt files.
When files are “shared” by other users, they are encrypted with the recipients' public keys, which allows them to decrypt files with their private keys. Needless to say, the program performs encryption / decryption absolutely transparent, so the user does not even think about it.
The sequence of actions to synchronize photos between two Android devices:
- Create a safe suitable size (albeit 3 GB) on the first device.
- Set up synchronization with the cloud folder, let it be the mysafe folder.
- Export the key pair created during synchronization and copy its files to the second device.
- Create a safe of the same (3 GB) size on the second device.
- Set up a second Google Account on the second device as the first.
- When setting up synchronization, import the key that was previously copied to the second device and select the mysafe synchronization folder.
Consider the process of setting up a safe sync with Google Drive. Perform a long press on the safe you want to sync. From the menu that appears, select Sync Safe with Google Drive (Fig. 15). Further, the application will offer to create or load a key (Fig. 16). On the first device, you need to create a key, on the second - download the one created earlier. When creating a key, you need to select only an e-mail (if several Google accounts are “linked” to the device) and enter the password. If only one Google account is configured, just enter the password. After creating the key, the key management menu will appear (Fig. 17). You can export a key to copy it to another device. In this case, it is necessary to enable the With private key parameter, otherwise only the public (public) part of the key will be exported. The key publishing button allows you to publish your public key on the key server (publishing is free) so that other users can easily find your public key. Publication on the key server eliminates the need to exchange public keys on your own.
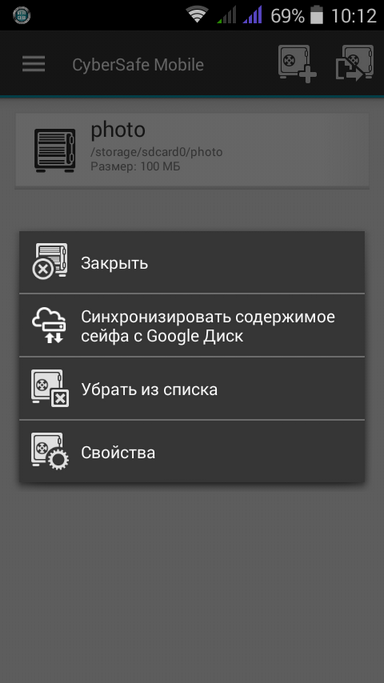 Fig. 15. Turn on safe synchronization |  Fig. 16. Create or upload key | 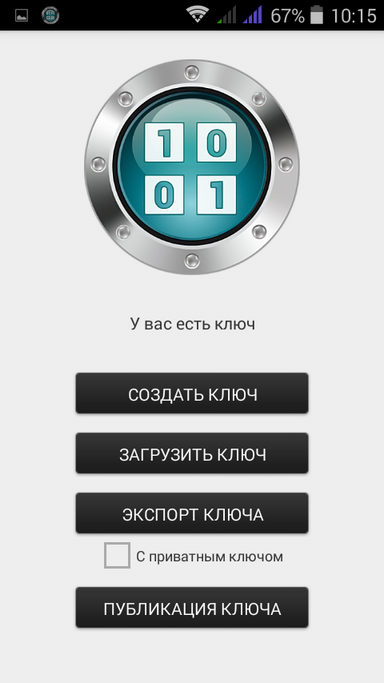 Fig. 17. Key operations |
When importing a key, you need to open the id file that will be created as a result of exporting the key (Fig. 18). Click the Back button on your device to go to the Google Drive setup. Initially, the list of Google-drives is empty (Fig. 19). Click the button in the upper left corner to add a Google Drive.
Select one of the accounts registered on the device (Fig. 20). After that, the selected account will appear in the list (Fig. 21). You can add multiple Google accounts at once.
 Fig. 18. Import key | 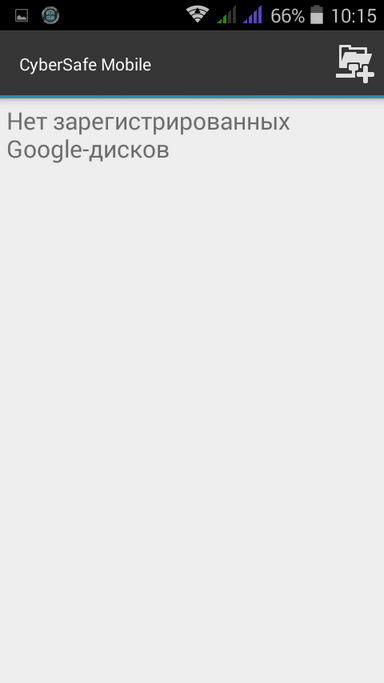 Fig. 19. Empty Google Drives List |
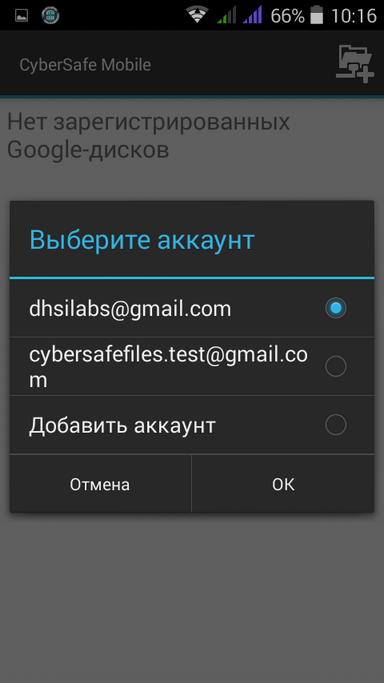 Fig. 20. Choosing a Google Account |  Fig. 21. List of registered Google Disks |
Select the desired Google Drive, a list of folders will appear. Select (or create) a folder that will be used as a synchronization folder with your safe. Click the Select button (fig. 22). The file synchronization process will start (fig. 23). At the end of this process, you will receive a notification, and the downloaded files will appear in the synchronization folder (Fig. 24). It is desirable that the synchronization process takes place when you are connected to the Internet via Wi-Fi or 3G / 4G (the higher the data transfer rate, the faster the synchronization will be completed).
 Fig. 22. Select Sync Folder | 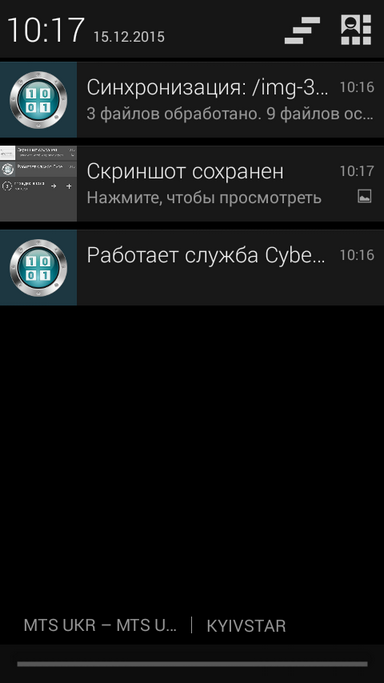 Fig. 23. Status of the synchronization process |  Fig. 24. Photos from the safe are synchronized with the Google Drive folder |
Now consider the process of “sharing” files. Select the files you want to share and click the arrow and user button (Fig. 25).
Next you need to add users (Fig. 26). If the user has published the key, then click the search button and enter the user's e-mail (Fig. 27). If the user did not publish the key, you need to press the button with a floppy disk (such nostalgia) and select the public key of the user (before that, the user must provide you with his public key)
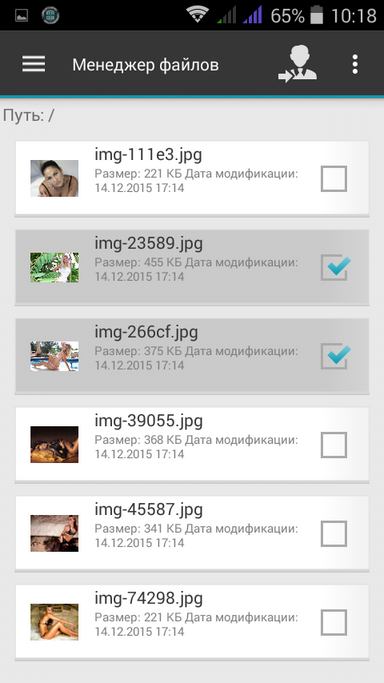 Fig. 25. Files selected |  Fig. 26. No users |  Fig. 27. User search |
Next, select the user (or users) to whom you want to send the file (Fig. 28). The process of sharing (fig. 29) to the files will begin, at the end of which you will receive a notification, and the user to whom you “sent” files will be able to access them through Available to me (fig. 30). Please note: in the Available section, not only the files shared with you through the CyberSafe Mobile 2 application are displayed to me, but also those that have been shared with you on Google Drive. The encrypted files shared by other users through CyberSafe Mobile are located in the CyberSafe folder <username> <date>.
 Fig. 28. User selected | 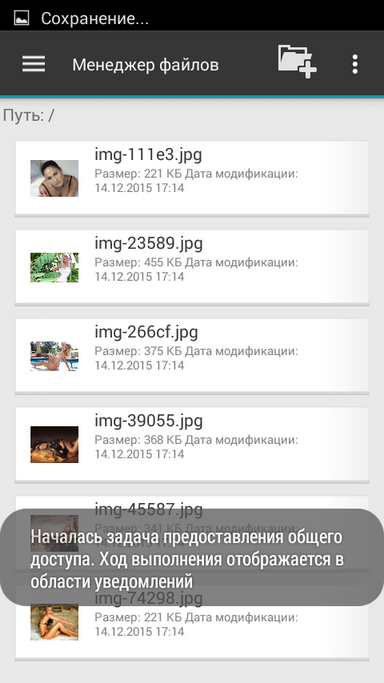 Fig. 29. Sharing |  Fig. 30. Available to me |
Scenario 4: Synchronize Windows PCs with the cloud
Previously, it was shown how to synchronize the contents of the safe with Google Drive and how to provide access to some files to some users. But what if there is a set of files that a group of users should work with, and some of them work on a PC running Windows?
To access encrypted files on a PC, you need the CyberSafe Top Secret program.
First of all, CyberSafe Top Secret needs to create (or import into the program) the keys of all users (Fig. 31).
Fig. 31. CyberSafe Top Secret Program
As a rule, all users work under their own accounts, and the public folder belongs to another account. Therefore, you must give all users access to the Shared Documents folder, if this has not already been done. Open the Google Drive’s web interface with an account containing shared documents. Right-click on the required directory and select the Share command (Figure 32).
Fig. 32. Select the Sharing command.
Fig. 33. Providing access to the folder for users
Give access to the Shared Documents folder to everyone who needs to work with it. After that click the Send button (Fig. 33).
Half done. Now it remains to encrypt the folder. Go to the CyberSafe Top Secret section of Cloud Encryption and add the Google Drive folder (Figure 34). When adding a folder, select the keys of all users who should work with the folder. Be sure to also click the Enable button before using the folder. Details on setting up cloud encryption are described in the CyberSafe Top Secret program guide.
Fig. 34. Shared Documents folder added to CyberSafe Top Secret
Actually, that's all. After encrypting and synchronizing files, users of Android devices will be able to work with encrypted files. The Shared Documents folder will be displayed in the Available to me section. Since the folder was encrypted with the keys of all users, each user will be able to decrypt the files in it. No additional configuration of CyberSafe Mobile is required.
Source: https://habr.com/ru/post/274999/
All Articles