Software Internet gateway for a small company (Shorewall, OpenVPN, OSPF). Part 2
I present the second article in the series, aimed at "continuing" system administrators, for experienced ones, I can hardly discover something new.
In these articles, we will look at building an Internet gateway on linux, allowing you to link several company offices, and provide limited access to the network, traffic prioritization (QoS) and simple load balancing with redundancy between two providers.
Specifically in this part:
And in the previous part were considered:
In the third part :
In the fourth part :
Everything described below is valid for CentOS 7.1 (and above, the 6th series is also suitable, but with some minor features)
')
The last time we set up a rather trusting and primitive mode of operation, we will now turn on a bit of sensible paranoia.
This is not difficult to do, let's edit the file:
The new configuration has become easier, but it's too early to rejoice, the rules file will swell considerably:
And we will use the INCLUDE directive to spread the rules across several files:
Now all traffic is under our control, we let only those protocols that we want. Pay attention to the rules for SSH, we have limited the frequency of connections to 3 per minute, from each ip source. But you have to be very careful with this parameter, by incorrectly specifying the key s: or d :, you can make your service easily amenable to DDoS attack. And for Web traffic (and indeed any), it must be borne in mind that many potential customers can sit behind NAT, and then one IP, the source of connections, can generate a significant number of connections.
Pay attention to how we dealt with the SIP and FTP protocol. We simply registered them, and Shorewall, using macros, hid from us all the subtleties of working with the nf_nat_ * and nf_conntrack_ * modules (without the appropriate modules, for each protocol, which besides the command connection (or in general all the ports are dynamic, like RPC), it also creates and secondary ports on unknown ports, Shorewall, like iptables, will not be able to dynamically open ports for these connections). In the examples for SIP, I used almost manual configuration, specifying the protocol, port, and helper used.
With helpers, Shorewall works automatically (if it is not disabled), as soon as the protocol is encountered, or the use of the helper column is explicitly specified, Shorewall loads the appropriate module. You can view the known shorewall modules and their settings in the file: / usr / share / shorewall / helpers. If there is a need to change them, copy the file into / etc / shorewall, then this copy will override the standard file.
If we need to forward ports to internal servers, this is not difficult:
In addition, Shorewall supports ipsets (verify that the package is installed: yum install ipset), which are simply named address lists. Useful when you need to configure a certain rules for a group of hosts that can not be combined into a subnet.
It is not difficult to use them in configs, it is enough where you use addresses or subnets + <ipsets name>.
If we want Shorewall to save and restore us ipsets during its restarts, then you need to set SAVE_IPSETS = Yes in the shorewall.conf file
Here’s what a configuration with and without ipsets might look like:
First, let's announce our ipsets:
That's all, we can see what we have recorded: ipset -L
I will say right away, and balancing and redundancy, only configured using Shorewall, he himself does not provide any functionality for detecting the loss of a channel or a uniform distribution of the real load.
All setup is reduced to editing one file:
If anyone remembers, in the last article there was a section from “Shorewall.conf”. It is needed just to configure the labeling of packages and work with providers. There we set which bits from the packet label, set the provider ID, which tags just (I’m not using them anywhere, but Shorewall uses them for its own needs), and which ones to track connections.
Here we described two providers, asked how to label packets for them, on which interface each one is sitting, and what is the gateway.
Here is the OPTIONS column, I need to explain a bit. Here the fallbak key forces to generate additional routing rules, in case balancing cannot process the packet (the interface is adjacent to the example), and the dial sets the interface weight. The track parameter indicates the need to track which provider the connection went to, and send the next packet from this connection to the same provider (if TRACK_PROVIDERS = Yes is installed in shorewall.conf, then this option is written automatically to all providers). , the more often new connections will come to the interface (as a result, relative weight is used, who has higher weight in proportion, traffic is more frequent there, it is not recommended to set a large weight value). Balancing occurs on the principle of roundrobin by the kernel itself and is based on the fact that a client-server connection is established (as a client, your router and the server, respectively, are a remote server). At the same time, the routes are cached for some time, and the following effect is obtained: someone in LAN, for example, reached a certain site (which has one IP), traffic went through provider 1, then someone else got there, and the traffic would run again through provider 1 (if the cache did not have time to be reset). It may also turn out that you do not have symmetric providers, as in the example, and so lucky, every fourth connection falling on the first provider will be the most difficult, and we wanted to avoid it ... There are no simple solutions, and this article will not help you in any way.
But not everything is so bad, and even so it works with dignity (by the way, it works so for most solutions, quite simple solutions are used for “fair” balancing, which often do not work without support from providers (both of them)).
Added variable file:
You may notice that the second provider has the gateway specified as the “detect” keyword that works on connections with dynamic addressing. For some cases (for example, PPtP), Shorewall itself cannot correctly determine the gateway, for which a file with an auxiliary script is used:
And importantly, you need to disguise it all correctly:
The detect parameter, in the ADDRESS column, forces you to determine the outgoing address on the interface for SNAT (with several providers it becomes necessary).
And the script for NetworkManager will complement all this (a simpler version was in the last article, and it did not take into account that after raising the interface, Shorewall does not always correctly build the routing policy, so we simply restart it for such interfaces).
Having given the command, after shorewall restart:
You can see the constructed routing scheme:
But, is it possible to send any traffic to a specific provider? Answer Yes!
Here we have marked all traffic from 172.16.0.4 to any network, except 172.16.0.0/12, with the label of the second provider. Conditions can be trickier, you just have to take into account, for the traffic generated on our gateway, you need to remove the ": P" rule.
Immediately it is necessary to clarify this: to really adjust the speed, we can only when sending. Incoming traffic has already reached our interface, bypassing all the bottlenecks, and pushing in queues for the right to be at our doorstep.
But it is too early to despair, and there are mechanisms that are not as elegant and reliable as we would like, but solve this problem. In networks based on IP family of protocols, this is solved in the following way:
The source smoothly increases the sending speed, while the delivery responses (ACK packets in the TCP protocol) generally arrive or come with a normal delay. If there is a loss or increase in ACK delay, the speed is reduced. Then, after a certain period of time, they try to raise the speed again. And this happens before the end of the transfer.
What about UDP? And with it, everything is simple, there is no control of delivery, there is no headache. Sent and OK (this let the recipient suffer).
Of course, in its pure form, UDP is usually not used in complex data transfer tasks. This protocol is usually used as the basis for implementing its own delivery control option (you can say for your TCP implementations, in cases where the standard does not suit you). Therefore, in many protocols running over UDP, delivery control is also there. That does not negate the ability to send a continuous stream of UDP in full force, clogging the communication channel of the target (the same version of DDoS).
How can we organize the prioritization of traffic and bandwidth allocation of incoming traffic? The answer is higher: create a delay in receiving on your side (as a result, a delay in generating an ACK) or if the delay is indecently high, discard the packet.
In Linux, this is implemented by creating a pseudo-interface IFB, which seems to rise between the physical interface and the gateway itself, passing incoming traffic through itself. The traffic enters the physical interface (we have already accepted it on it), and immediately goes to the IFB, which already controls how fast and in what order to pass this traffic (or discard it altogether).
Shorewall will help us with the configuration (although you can also register it in /etc/modprobe.d):
Here it is trivial, they created three pseudo-interfaces of the IFB and raised them.
Next, we describe the interfaces on which we will regulate traffic:
Here we explicitly specify the numbers of the interfaces used (if not specified, Shorewall will number them in the order of the file declaration), associate the IFB with real interfaces, set the maximum outgoing speed (remember, only we adjust it and the ifb interface is in fact line) and set the classification discipline and that we will classify the traffic.
Important! The speed needs to be set slightly lower than the speed given by the provider. If the speed with which we operate is higher than the provider gives us, then the bandwidth limitation will happen on its side, which means all our attempts at classification, etc. (not completely, but largely) will be in vain. It’s not very easy to make QoS channels with variable bandwidth, because of all the working tools you will only have to reorder the packets, in the hope that valuable traffic will crawl through the channel (the sufferers on the radio channels sigh sadly).
We describe those same classes:
For now, we will not do anything complicated (and therefore interesting and useful), while we will tie two classes to each interface (including IFB).
In the first column, we associate an interface with classes. <interface number>: <parent class number>: <class number being described>.
The interface is always a class 1, which we essentially described in tcdevices.
Further, we did not mark the packets, and therefore we will not use the column, then comes the most interesting, the minimum guaranteed bandwidth, and the maximum possible (no more than that of the parent class) for this class.The priority will be given to the order of resolving the dispute (for someone less, he will go first if he has gone beyond the boundaries of the guaranteed lane, and she has already been completely occupied by someone else). Finally, the options go, default says that if nothing is found by the filters (packages are not assigned to classes), then assign them a default class).
Further, historically, the rules for classifying real interfaces are in the file:
And for virtual IFB in:
In the example above, I placed the incoming traffic from the HTTP (S) server to class number 3 on the physical interface, and to the virtual one associated with it, and I made the outgoing one in the same way, but “deploying ports”. Be very careful about the fact that connections are often bidirectional, and it is necessary to describe their classification separately for each direction, regardless of who initiated the client or server.
It is here that the roof begins to pop. To understand the picture will help (I ask you not to hit them with your feet, I don’t really know how to work in Visio).
You can cut traffic as a result at different sites, without applying IFB, if you have one provider and the gateway itself does not accept traffic (it is not its recipient). If there are more providers, and the gateway itself actively receives traffic (for example, it serves a VPN), then it’s not easy to get out without an IFB.
PS
In the next article, I plan to elaborate more on QoS, especially in light of the spread of VoIP technologies. The topic is big, and you need to plan everything well. If you are interested in a certain aspect in more detail, write a request in the comments, I will consider the wishes in the next article.
In these articles, we will look at building an Internet gateway on linux, allowing you to link several company offices, and provide limited access to the network, traffic prioritization (QoS) and simple load balancing with redundancy between two providers.
Specifically in this part:
- More detailed setting Shorewall
- Terrible and not clear QoS
- Load balancing and redundancy
And in the previous part were considered:
- The simplest setting is Shorewall
- Awfully tricky dnsmasq setup
- No less complicated setting OpenVPN
- And for many continuing admins atypical, dynamic routing, for example, OSPF
In the third part :
- Full QoS in Shorewall
- More detailed setting Shorewall
- Channel traffic scaling according to protocols
- Crutches, without them, nowhere
In the fourth part :
- Automatic events
- Macros
Everything described below is valid for CentOS 7.1 (and above, the 6th series is also suitable, but with some minor features)
In-depth customization Shorewall
')
The last time we set up a rather trusting and primitive mode of operation, we will now turn on a bit of sensible paranoia.
This is not difficult to do, let's edit the file:
policy
# # Shorewall -- /etc/shorewall/policy # # For information about entries in this file, type "man shorewall-policy" # # The manpage is also online at # http://www.shorewall.net/manpages/shorewall-policy.html # ############################################################################### #SOURCE DEST POLICY LOG LIMIT: CONNLIMIT: # LEVEL BURST MASK $FW all REJECT grn all REJECT tun all REJECT red all DROP The new configuration has become easier, but it's too early to rejoice, the rules file will swell considerably:
/ etc / shorewall / rules
# # Shorewall -- /etc/shorewall/rules # # For information on the settings in this file, type "man shorewall-rules" # # The manpage is also online at # http://www.shorewall.net/manpages/shorewall-rules.html # ###################################################################################################################################################################################################### #ACTION SOURCE DEST PROTO DEST SOURCE ORIGINAL RATE USER/ MARK CONNLIMIT TIME HEADERS SWITCH HELPER # PORT(S) PORT(S) DEST LIMIT GROUP ?SECTION ALL ?SECTION ESTABLISHED ?SECTION RELATED ?SECTION INVALID ?SECTION UNTRACKED ?SECTION NEW INCLUDE rules.fw INCLUDE rules.grn INCLUDE rules.red INCLUDE rules.red-dnat INCLUDE rules.tun And we will use the INCLUDE directive to spread the rules across several files:
rules.fw
# # Shorewall -- /etc/shorewall/rules.fw # # For information on the settings in this file, type "man shorewall-rules" # # The manpage is also online at # http://www.shorewall.net/manpages/shorewall-rules.html # ###################################################################################################################################################################################################### #ACTION SOURCE DEST PROTO DEST SOURCE ORIGINAL RATE USER/ MARK CONNLIMIT TIME HEADERS SWITCH HELPER # PORT(S) PORT(S) DEST LIMIT GROUP DNS(ACCEPT) $FW red Web(ACCEPT) $FW red FTP(ACCEPT) $FW red OpenVPN(ACCEPT) $FW red Ping(ACCEPT) $FW all OSPF(ACCEPT) $FW tun SSH(ACCEPT) $FW all rules.grn
# # Shorewall -- /etc/shorewall/rules.grn # # For information on the settings in this file, type "man shorewall-rules" # # The manpage is also online at # http://www.shorewall.net/manpages/shorewall-rules.html # ###################################################################################################################################################################################################### #ACTION SOURCE DEST PROTO DEST SOURCE ORIGINAL RATE USER/ MARK CONNLIMIT TIME HEADERS SWITCH HELPER # PORT(S) PORT(S) DEST LIMIT GROUP DNS(ACCEPT) grn $FW Web(ACCEPT) grn red FTP(ACCEPT) grn red Ping(ACCEPT) grn all SSH(ACCEPT) grn all - - - - s:3/min #, , SIP ( ) ACCEPT grn red udp 5060 - - - - - - - - sip rules.red
# # Shorewall -- /etc/shorewall/rules.red # # For information on the settings in this file, type "man shorewall-rules" # # The manpage is also online at # http://www.shorewall.net/manpages/shorewall-rules.html # ###################################################################################################################################################################################################### #ACTION SOURCE DEST PROTO DEST SOURCE ORIGINAL RATE USER/ MARK CONNLIMIT TIME HEADERS SWITCH HELPER # PORT(S) PORT(S) DEST LIMIT GROUP OpenVPN(ACCEPT) red $FW SSH(ACCEPT) red $FW - - - - s:3/min SIP(ACCEPT) red grn rules.tun
# # Shorewall -- /etc/shorewall/rules.tun # # For information on the settings in this file, type "man shorewall-rules" # # The manpage is also online at # http://www.shorewall.net/manpages/shorewall-rules.html # ###################################################################################################################################################################################################### #ACTION SOURCE DEST PROTO DEST SOURCE ORIGINAL RATE USER/ MARK CONNLIMIT TIME HEADERS SWITCH HELPER # PORT(S) PORT(S) DEST LIMIT GROUP Ping(ACCEPT) tun $FW OSPF(ACCEPT) tun $FW SSH(ACCEPT) tun $FW - - - - s:3/min SSH(ACCEPT) tun grn - - - - s:3/min Now all traffic is under our control, we let only those protocols that we want. Pay attention to the rules for SSH, we have limited the frequency of connections to 3 per minute, from each ip source. But you have to be very careful with this parameter, by incorrectly specifying the key s: or d :, you can make your service easily amenable to DDoS attack. And for Web traffic (and indeed any), it must be borne in mind that many potential customers can sit behind NAT, and then one IP, the source of connections, can generate a significant number of connections.
Pay attention to how we dealt with the SIP and FTP protocol. We simply registered them, and Shorewall, using macros, hid from us all the subtleties of working with the nf_nat_ * and nf_conntrack_ * modules (without the appropriate modules, for each protocol, which besides the command connection (or in general all the ports are dynamic, like RPC), it also creates and secondary ports on unknown ports, Shorewall, like iptables, will not be able to dynamically open ports for these connections). In the examples for SIP, I used almost manual configuration, specifying the protocol, port, and helper used.
With helpers, Shorewall works automatically (if it is not disabled), as soon as the protocol is encountered, or the use of the helper column is explicitly specified, Shorewall loads the appropriate module. You can view the known shorewall modules and their settings in the file: / usr / share / shorewall / helpers. If there is a need to change them, copy the file into / etc / shorewall, then this copy will override the standard file.
If we need to forward ports to internal servers, this is not difficult:
rules.red-dnat
# # Shorewall -- /etc/shorewall/rules.red-dnat # # For information on the settings in this file, type "man shorewall-rules" # # The manpage is also online at # http://www.shorewall.net/manpages/shorewall-rules.html # ###################################################################################################################################################################################################### #ACTION SOURCE DEST PROTO DEST SOURCE ORIGINAL RATE USER/ MARK CONNLIMIT TIME HEADERS SWITCH HELPER # PORT(S) PORT(S) DEST LIMIT GROUP Web(DNAT) red grn:172.16.0.2 #, , DNAT : #Web(DNAT) red grn:172.16.0.2 - - - 192.168.10.37 #, : #DNAT red grn:172.16.0.2 tcp 80,443 #DNAT red grn:172.16.0.2 tcp 80,443 - 192.168.10.37 # : #DNAT red grn:172.16.0.2:80 tcp 8080 In addition, Shorewall supports ipsets (verify that the package is installed: yum install ipset), which are simply named address lists. Useful when you need to configure a certain rules for a group of hosts that can not be combined into a subnet.
It is not difficult to use them in configs, it is enough where you use addresses or subnets + <ipsets name>.
If we want Shorewall to save and restore us ipsets during its restarts, then you need to set SAVE_IPSETS = Yes in the shorewall.conf file
Here’s what a configuration with and without ipsets might look like:
rules
# # Shorewall -- /etc/shorewall/rules # # For information on the settings in this file, type "man shorewall-rules" # # The manpage is also online at # http://www.shorewall.net/manpages/shorewall-rules.html # ###################################################################################################################################################################################################### #ACTION SOURCE DEST PROTO DEST SOURCE ORIGINAL RATE USER/ MARK CONNLIMIT TIME HEADERS SWITCH HELPER # PORT(S) PORT(S) DEST LIMIT GROUP # ipsets OpenVPN(ACCEPT) red:192.168.10.4,192.168.23.2 $FW # ipsets OpenVPN(ACCEPT) red:+ovpn_allow $FW First, let's announce our ipsets:
# iphash ( , man ipset ) ipset -N ovpn_allow iphash # ipset -A ovpn_allow 192.168.10.4 ipset -A ovpn_allow 192.168.23.2 That's all, we can see what we have recorded: ipset -L
Name: ovpn_allow Type: hash:ip Revision: 1 Header: family inet hashsize 1024 maxelem 65536 Size in memory: 16560 References: 0 Members: 192.168.23.2 192.168.10.4 Simple load balancing and redundancy at Shorewall
I will say right away, and balancing and redundancy, only configured using Shorewall, he himself does not provide any functionality for detecting the loss of a channel or a uniform distribution of the real load.
All setup is reduced to editing one file:
providers
# # Shorewall -- /etc/shorewall/providers # # For information about entries in this file, type "man shorewall-providers" # # For additional information, see http://shorewall.net/MultiISP.html # ############################################################################################ #NAME NUMBER MARK DUPLICATE INTERFACE GATEWAY OPTIONS COPY pr1 1 0x10000 - $IF_RED1 $GW_RED1 track,fallback=1 pr2 2 0x20000 - $IF_RED2 $GW_RED2 track,fallback=4 If anyone remembers, in the last article there was a section from “Shorewall.conf”. It is needed just to configure the labeling of packages and work with providers. There we set which bits from the packet label, set the provider ID, which tags just (I’m not using them anywhere, but Shorewall uses them for its own needs), and which ones to track connections.
Here we described two providers, asked how to label packets for them, on which interface each one is sitting, and what is the gateway.
Here is the OPTIONS column, I need to explain a bit. Here the fallbak key forces to generate additional routing rules, in case balancing cannot process the packet (the interface is adjacent to the example), and the dial sets the interface weight. The track parameter indicates the need to track which provider the connection went to, and send the next packet from this connection to the same provider (if TRACK_PROVIDERS = Yes is installed in shorewall.conf, then this option is written automatically to all providers). , the more often new connections will come to the interface (as a result, relative weight is used, who has higher weight in proportion, traffic is more frequent there, it is not recommended to set a large weight value). Balancing occurs on the principle of roundrobin by the kernel itself and is based on the fact that a client-server connection is established (as a client, your router and the server, respectively, are a remote server). At the same time, the routes are cached for some time, and the following effect is obtained: someone in LAN, for example, reached a certain site (which has one IP), traffic went through provider 1, then someone else got there, and the traffic would run again through provider 1 (if the cache did not have time to be reset). It may also turn out that you do not have symmetric providers, as in the example, and so lucky, every fourth connection falling on the first provider will be the most difficult, and we wanted to avoid it ... There are no simple solutions, and this article will not help you in any way.
But not everything is so bad, and even so it works with dignity (by the way, it works so for most solutions, quite simple solutions are used for “fair” balancing, which often do not work without support from providers (both of them)).
Added variable file:
params
# # Shorewall -- /etc/shorewall/params # # Assign any variables that you need here. # # It is suggested that variable names begin with an upper case letter # to distinguish them from variables used internally within the # Shorewall programs # # Example: # # NET_IF=eth0 # NET_BCAST=130.252.100.255 # NET_OPTIONS=routefilter,norfc1918 # # Example (/etc/shorewall/interfaces record): # # net $NET_IF $NET_BCAST $NET_OPTIONS # # The result will be the same as if the record had been written # # net eth0 130.252.100.255 routefilter,norfc1918 # ############################################################################### IF_RED1=eth0 GW_RED1=192.168.10.1 IF_RED2=eth2 GW_RED2=detect IF_GRN=eth1 NET_GRN=172.16.0.0/23 IF_TUN=tap+ #LAST LINE -- DO NOT REMOVE You may notice that the second provider has the gateway specified as the “detect” keyword that works on connections with dynamic addressing. For some cases (for example, PPtP), Shorewall itself cannot correctly determine the gateway, for which a file with an auxiliary script is used:
findgw
# # Shorewall version 4 - Findgw File # # /etc/shorewall/findgw # # The code in this file is executed when Shorewall is trying to detect the # gateway through an interface in /etc/shorewall/providers that has GATEWAY # specified as 'detect'. # # The function should echo the IP address of the gateway if it knows what # it is; the name of the interface is in $1. # # See http://shorewall.net/shorewall_extension_scripts.htm for additional # information. # ############################################################################### LANG='C' nmcli --terse --fields IP6.GATEWAY device show ${1} | cut -f2- -d':' #IPv6 LANG='C' nmcli --terse --fields IP4.GATEWAY device show ${1} | cut -f2- -d':' #IPv4 And importantly, you need to disguise it all correctly:
masq
# # Shorewall -- /etc/shorewall/masq # # For information about entries in this file, type "man shorewall-masq" # # The manpage is also online at # http://www.shorewall.net/manpages/shorewall-masq.html # ################################################################################################################################### #INTERFACE:DEST SOURCE ADDRESS PROTO PORT(S) IPSEC MARK USER/ SWITCH ORIGINAL PROBABILITY # GROUP DEST $IF_RED1 $NET_GRN detect $IF_RED2 $NET_GRN detect The detect parameter, in the ADDRESS column, forces you to determine the outgoing address on the interface for SNAT (with several providers it becomes necessary).
And the script for NetworkManager will complement all this (a simpler version was in the last article, and it did not take into account that after raising the interface, Shorewall does not always correctly build the routing policy, so we simply restart it for such interfaces).
/etc/NetworkManager/dispatcher.d/30-shorewall.sh
#!/bin/bash IF=$1 # , STATUS=$2 # function check_prov() { PARAM=$(grep -v '^#' /etc/shorewall/params | grep $1 | cut -d '=' -f 1) if [ -z "$PARAM" ]; then grep -v '^#' /etc/shorewall/providers | grep -q $1 [[ $? == 0 ]] && shorewall restart else grep -v '^#' /etc/shorewall/providers | grep -q $PARAM [[ $? == 0 ]] && shorewall restart fi } case $STATUS in up) # shorewall enable $IF shorewall6 enable $IF check_prov $IF ;; down) # shorewall disable $IF shorewall6 disable $IF check_prov $IF ;; esac Having given the command, after shorewall restart:
shorewall show routing You can see the constructed routing scheme:
Routing example
Shorewall 5.0.2.1 Routing at cent1.domain.local - 8 23:41:30 MSK 2016 Routing Rules 0: from all lookup local 999: from all lookup main 10000: from all fwmark 0x10000/0xff0000 lookup pr1 10001: from all fwmark 0x20000/0xff0000 lookup pr2 20000: from 192.168.10.37 lookup pr1 20000: from 192.168.10.36 lookup pr2 32765: from all lookup balance 32767: from all lookup default Table balance: Table default: default nexthop via 192.168.10.1 dev eth0 weight 1 nexthop via 192.168.10.1 dev eth2 weight 1 Table local: local 192.168.10.37 dev eth0 proto kernel scope host src 192.168.10.37 local 192.168.10.36 dev eth2 proto kernel scope host src 192.168.10.36 local 172.16.3.1 dev tap0 proto kernel scope host src 172.16.3.1 local 172.16.3.129 dev tap1 proto kernel scope host src 172.16.3.129 local 172.16.248.1 dev lo proto kernel scope host src 172.16.248.1 local 172.16.0.1 dev eth1 proto kernel scope host src 172.16.0.1 local 127.0.0.1 dev lo proto kernel scope host src 127.0.0.1 broadcast 192.168.10.255 dev eth2 proto kernel scope link src 192.168.10.36 broadcast 192.168.10.255 dev eth0 proto kernel scope link src 192.168.10.37 broadcast 192.168.10.0 dev eth2 proto kernel scope link src 192.168.10.36 broadcast 192.168.10.0 dev eth0 proto kernel scope link src 192.168.10.37 broadcast 172.16.3.255 dev tap1 proto kernel scope link src 172.16.3.129 broadcast 172.16.3.128 dev tap1 proto kernel scope link src 172.16.3.129 broadcast 172.16.3.127 dev tap0 proto kernel scope link src 172.16.3.1 broadcast 172.16.3.0 dev tap0 proto kernel scope link src 172.16.3.1 broadcast 172.16.248.1 dev lo proto kernel scope link src 172.16.248.1 broadcast 172.16.1.255 dev eth1 proto kernel scope link src 172.16.0.1 broadcast 172.16.0.0 dev eth1 proto kernel scope link src 172.16.0.1 broadcast 127.255.255.255 dev lo proto kernel scope link src 127.0.0.1 broadcast 127.0.0.0 dev lo proto kernel scope link src 127.0.0.1 local 127.0.0.0/8 dev lo proto kernel scope host src 127.0.0.1 Table main: 192.168.10.1 dev eth2 scope link src 192.168.10.36 172.16.3.1 dev tap0 proto zebra 172.16.3.129 dev tap1 proto zebra 172.16.248.2 via 172.16.3.2 dev tap0 proto zebra metric 13 172.16.12.129 via 172.16.3.2 dev tap0 proto zebra metric 3 172.16.11.1 via 172.16.3.2 dev tap0 proto zebra metric 3 172.16.3.128/25 dev tap1 proto kernel scope link src 172.16.3.129 172.16.3.0/25 dev tap0 proto kernel scope link src 172.16.3.1 192.168.10.0/24 dev eth2 proto kernel scope link src 192.168.10.36 metric 101 192.168.10.0/24 dev eth0 proto kernel scope link src 192.168.10.37 metric 100 172.16.8.0/23 via 172.16.3.2 dev tap0 proto zebra metric 13 172.16.0.0/23 dev eth1 proto kernel scope link src 172.16.0.1 metric 100 Table pr1: 192.168.10.1 dev eth0 scope link src 192.168.10.37 default via 192.168.10.1 dev eth0 src 192.168.10.37 Table pr2: 192.168.10.1 dev eth2 scope link src 192.168.10.36 default via 192.168.10.1 dev eth2 src 192.168.10.36 But, is it possible to send any traffic to a specific provider? Answer Yes!
mangle
# # Shorewall -- /etc/shorewall/mangle # # For information about entries in this file, type "man shorewall-mangle" # # See http://shorewall.net/traffic_shaping.htm for additional information. # For usage in selecting among multiple ISPs, see # http://shorewall.net/MultiISP.html # # See http://shorewall.net/PacketMarking.html for a detailed description of # the Netfilter/Shorewall packet marking mechanism. # #################################################################################################################################################### #ACTION SOURCE DEST PROTO DEST SOURCE USER TEST LENGTH TOS CONNBYTES HELPER PROBABILITY DSCP # PORT(S) PORT(S) MARK(0x20000):P 172.16.0.4 0.0.0.0/0!172.16.0.0/12 Here we have marked all traffic from 172.16.0.4 to any network, except 172.16.0.0/12, with the label of the second provider. Conditions can be trickier, you just have to take into account, for the traffic generated on our gateway, you need to remove the ": P" rule.
Scary and terrible QoS
Immediately it is necessary to clarify this: to really adjust the speed, we can only when sending. Incoming traffic has already reached our interface, bypassing all the bottlenecks, and pushing in queues for the right to be at our doorstep.
But it is too early to despair, and there are mechanisms that are not as elegant and reliable as we would like, but solve this problem. In networks based on IP family of protocols, this is solved in the following way:
The source smoothly increases the sending speed, while the delivery responses (ACK packets in the TCP protocol) generally arrive or come with a normal delay. If there is a loss or increase in ACK delay, the speed is reduced. Then, after a certain period of time, they try to raise the speed again. And this happens before the end of the transfer.
What about UDP? And with it, everything is simple, there is no control of delivery, there is no headache. Sent and OK (this let the recipient suffer).
Of course, in its pure form, UDP is usually not used in complex data transfer tasks. This protocol is usually used as the basis for implementing its own delivery control option (you can say for your TCP implementations, in cases where the standard does not suit you). Therefore, in many protocols running over UDP, delivery control is also there. That does not negate the ability to send a continuous stream of UDP in full force, clogging the communication channel of the target (the same version of DDoS).
How can we organize the prioritization of traffic and bandwidth allocation of incoming traffic? The answer is higher: create a delay in receiving on your side (as a result, a delay in generating an ACK) or if the delay is indecently high, discard the packet.
In Linux, this is implemented by creating a pseudo-interface IFB, which seems to rise between the physical interface and the gateway itself, passing incoming traffic through itself. The traffic enters the physical interface (we have already accepted it on it), and immediately goes to the IFB, which already controls how fast and in what order to pass this traffic (or discard it altogether).
Shorewall will help us with the configuration (although you can also register it in /etc/modprobe.d):
/ etc / shorewall / init
# # Shorewall -- /etc/shorewall/init # # Add commands below that you want to be executed at the beginning of # a "shorewall start", "shorewall-reload" or "shorewall restart" command. # # For additional information, see # http://shorewall.net/shorewall_extension_scripts.htm # ############################################################################### modprobe ifb numifbs=3 ip link set ifb0 up ip link set ifb1 up ip link set ifb2 up Here it is trivial, they created three pseudo-interfaces of the IFB and raised them.
Next, we describe the interfaces on which we will regulate traffic:
tcdevices
# # Shorewall -- /etc/shorewall/tcdevices # # For information about entries in this file, type "man shorewall-tcdevices" # # See http://shorewall.net/traffic_shaping.htm for additional information. # ############################################################################### #NUMBER: IN-BANDWITH OUT-BANDWIDTH OPTIONS REDIRECTED #INTERFACE INTERFACES 1:$IF_GRN - 1000mbit hfsc,classify 2:ifb1 - 1000mbit hfsc,classify $IF_GRN 3:$IF_RED1 - 10mbit hfsc,classify 4:ifb0 - 10mbit hfsc,classify $IF_RED1 5:$IF_RED2 - 10mbit hfsc,classify 6:ifb2 - 10mbit hfsc,classify $IF_RED2 Here we explicitly specify the numbers of the interfaces used (if not specified, Shorewall will number them in the order of the file declaration), associate the IFB with real interfaces, set the maximum outgoing speed (remember, only we adjust it and the ifb interface is in fact line) and set the classification discipline and that we will classify the traffic.
Important! The speed needs to be set slightly lower than the speed given by the provider. If the speed with which we operate is higher than the provider gives us, then the bandwidth limitation will happen on its side, which means all our attempts at classification, etc. (not completely, but largely) will be in vain. It’s not very easy to make QoS channels with variable bandwidth, because of all the working tools you will only have to reorder the packets, in the hope that valuable traffic will crawl through the channel (the sufferers on the radio channels sigh sadly).
We describe those same classes:
tcclasses
# # Shorewall -- /etc/shorewall/tcclasses # # For information about entries in this file, type "man shorewall-tcclasses" # # See http://shorewall.net/traffic_shaping.htm for additional information. # ############################################################################### #INTERFACE:CLASS MARK RATE: CEIL PRIORITY OPTIONS # DMAX:UMAX 1:1:2 - 1mbit 3mbit 2 default 1:1:3 - 256kbit full 1 2:1:2 - 1mbit 3mbit 2 default 2:1:3 - 256kbit full 1 3:1:2 - 1mbit 3mbit 2 default 3:1:3 - 256kbit full 1 4:1:2 - 1mbit 3mbit 2 default 4:1:3 - 256kbit full 1 5:1:2 - 1mbit 3mbit 2 default 5:1:3 - 256kbit full 1 6:1:2 - 1mbit 3mbit 2 default 6:1:3 - 256kbit full 1 For now, we will not do anything complicated (and therefore interesting and useful), while we will tie two classes to each interface (including IFB).
In the first column, we associate an interface with classes. <interface number>: <parent class number>: <class number being described>.
The interface is always a class 1, which we essentially described in tcdevices.
Further, we did not mark the packets, and therefore we will not use the column, then comes the most interesting, the minimum guaranteed bandwidth, and the maximum possible (no more than that of the parent class) for this class.The priority will be given to the order of resolving the dispute (for someone less, he will go first if he has gone beyond the boundaries of the guaranteed lane, and she has already been completely occupied by someone else). Finally, the options go, default says that if nothing is found by the filters (packages are not assigned to classes), then assign them a default class).
Further, historically, the rules for classifying real interfaces are in the file:
mangle
# # Shorewall -- /etc/shorewall/mangle # # For information about entries in this file, type "man shorewall-mangle" # # See http://shorewall.net/traffic_shaping.htm for additional information. # For usage in selecting among multiple ISPs, see # http://shorewall.net/MultiISP.html # # See http://shorewall.net/PacketMarking.html for a detailed description of # the Netfilter/Shorewall packet marking mechanism. # #################################################################################################################################################### #ACTION SOURCE DEST PROTO DEST SOURCE USER TEST LENGTH TOS CONNBYTES HELPER PROBABILITY DSCP # PORT(S) PORT(S) CLASSIFY(1:3) 0.0.0.0/0 0.0.0.0/0 tcp - 80,443 CLASSIFY(3:3) 0.0.0.0/0 0.0.0.0/0 tcp 80,443 And for virtual IFB in:
tcfilters
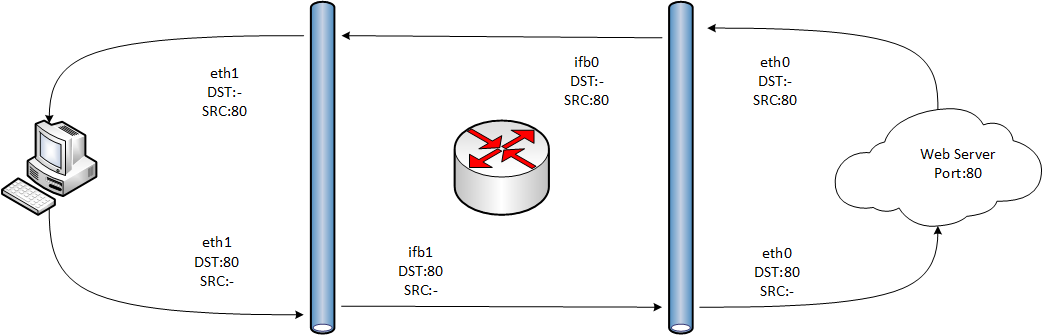
# # Shorewall -- /etc/shorewall/tcfilters # # For information about entries in this file, type "man shorewall-tcfilters" # # See http://shorewall.net/traffic_shaping.htm for additional information. # ######################################################################################################## #INTERFACE: SOURCE DEST PROTO DEST SOURCE TOS LENGTH PRIORITY #CLASS PORT(S) PORT(S) 2:3 0.0.0.0/0 0.0.0.0/0 tcp - 80,443 4:3 0.0.0.0/0 0.0.0.0/0 tcp 80,443 In the example above, I placed the incoming traffic from the HTTP (S) server to class number 3 on the physical interface, and to the virtual one associated with it, and I made the outgoing one in the same way, but “deploying ports”. Be very careful about the fact that connections are often bidirectional, and it is necessary to describe their classification separately for each direction, regardless of who initiated the client or server.
It is here that the roof begins to pop. To understand the picture will help (I ask you not to hit them with your feet, I don’t really know how to work in Visio).
You can cut traffic as a result at different sites, without applying IFB, if you have one provider and the gateway itself does not accept traffic (it is not its recipient). If there are more providers, and the gateway itself actively receives traffic (for example, it serves a VPN), then it’s not easy to get out without an IFB.
PS
In the next article, I plan to elaborate more on QoS, especially in light of the spread of VoIP technologies. The topic is big, and you need to plan everything well. If you are interested in a certain aspect in more detail, write a request in the comments, I will consider the wishes in the next article.
Source: https://habr.com/ru/post/274677/
All Articles