Creating game levels: tips and tricks (part 2)
This is the second part of my article with level design Tips and Tricks that a developer can use to improve the overall quality of their game. This is by no means a step-by-step guide, but only a collection of ideas and useful tips based on my personal experience. The first part of the article was more focused on the visual component of the level design, this time we will talk about even more fundamental things, starting with prototyping and ending with analytics playouts.
It's no secret that taking the time to prototyping now will save you a lot of time and energy later. It is obvious, it is important, and for some reason we often neglect this stage. In my experience, the longer a team works, the more difficult changes and rework are experienced, therefore it is crucial from the very beginning to lay a solid foundation in the form of a prototype of a game, levels, key game mechanics. If we speak in the context of level design, your work is divided into four stages:
')
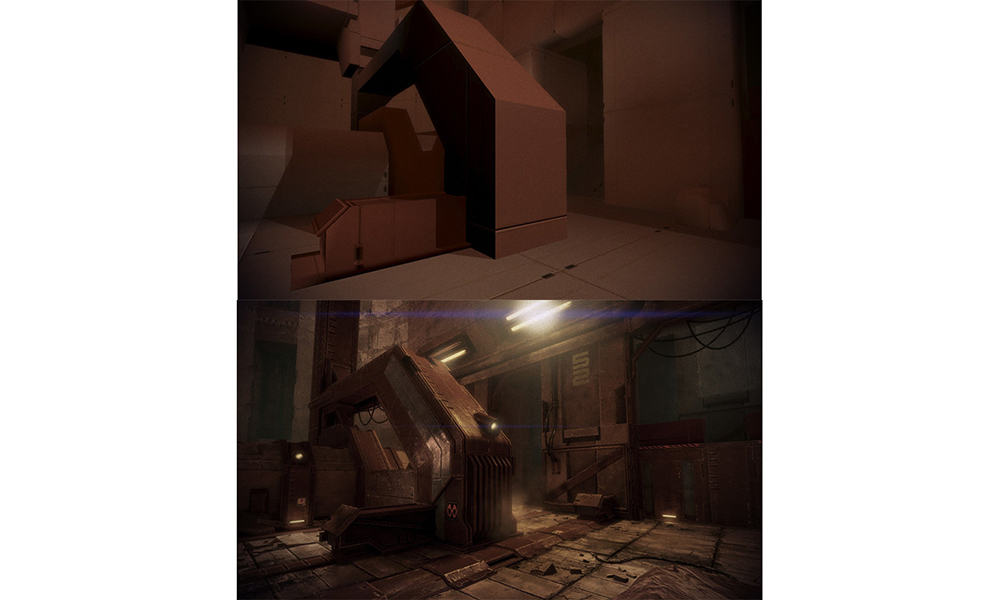
In the picture below you can see a comparison of the “whitebox” stages and the final graphic itself in “Mass Effect 2”.
I also want to add that too early transition to the stage of working with graphics is a serious mistake. You can easily fool yourself and the team by making a level with exciting graphics, but no gameplay, and all because it looks good visually. Look at this one and a half minute video from mod for “Gears of War”, well illustrating the work on the gameplay in the absence of most of the graphical content.
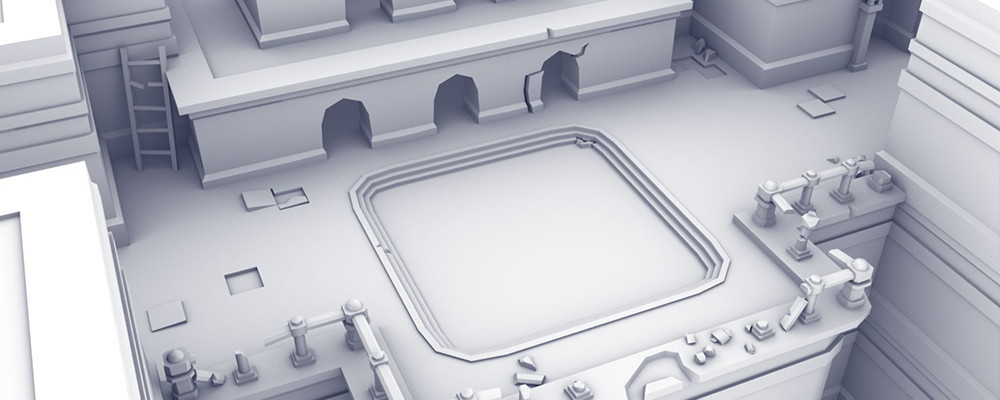
At the prototyping stage in a healthy team or company, it is important to adhere to the “Failure is an Option” rule. You make a prototype, evaluate the result and, if it does not suit you, throw it away. Fast iterations allow you not to become emotionally attached to the work done, so the process is simple and enjoyable. The screenshot below shows a slice of the prototype level from the indie game I'm working on.
During prototyping, it is important to determine and approve the size of the hero, the scale of the environment relative to the hero, as well as the speed of the hero’s run. Details further.
Approve the size of the game character as early as possible. I work in Maya in centimeters, and usually set the average size of the main character: 200cm. in height, 100cm. in width and 100cm. in length. Thus, creating any new content (bush, tank, house), we always know their size relative to the hero. It is assumed that the size of the character's collider will be approximately the same size, respectively, the aisles and doors in buildings must be at least one and a half to two times wider than the collider.
Also, if you have several 3d-artists, it is strongly recommended that everyone follow a single measurement system. In other words, if one person has a hero size set at 200 centimeters, and another - 2 meters, then when importing into the engine, for example, in Unity, you will most likely have to give the models different scale compensation (Scale Factor), since Unity 2 and 200 “May” units of measurement are different sizes. The situation becomes more complicated when you work with programs like 3ds Max, where the coordinate system operates with abstract units of measurement, so you have to experiment to find common dimensions for all three-dimensional graphics packages involved in your team.
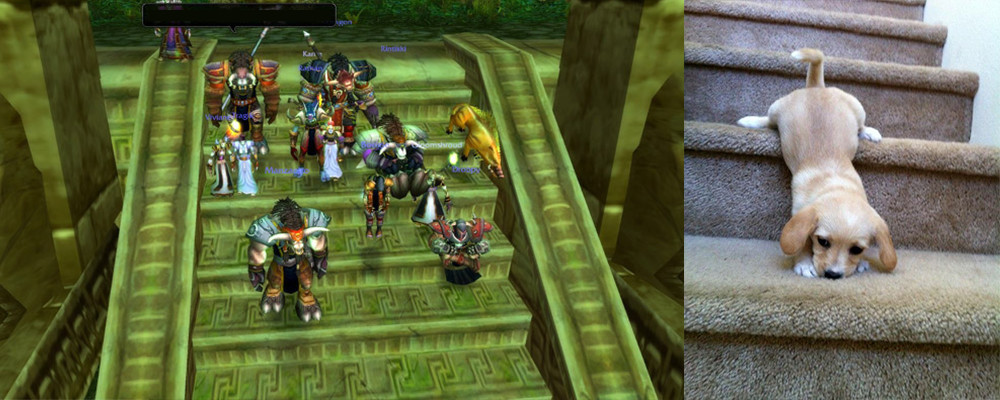
Working with the scale of the environment is an extremely interesting topic. Following the reasoning from the previous paragraph, you need to work on a real scale, starting from the approved 200cm. And at the same time you will have to lie non-drying. The point is that at times the object of a real size feels too large or too small, and you have to adjust its scale, trying to achieve a reliable, albeit an incorrect size. This is well seen in games with stylized graphics, for example, “World of Warcraft”, where you can often see objects like stone stairs with steps that are almost the height of a character. Interestingly, in the context of styling it looks appropriate and does not cause questions, but if you look closely, all this is pretty damn strange.
Nevertheless, we must strive to ensure that, on average, your scene has real dimensions. This is especially important in view of the trend that is currently fashionable for physically correct materials and lighting. It is known that the intensity of light decreases in proportion to the square of the distance. In this case, if in your scene, due to errors on the scale, the reading lamp will have a size of under 5 meters, you will inevitably have to twist the lighting math so that it looks more or less adequate in these conditions. In the end, your scene will consist of many such hacks, which negatively affect both the work of the physically correct render and the quality of the picture as a whole.
The scale of the environment is usually known only in comparison with a person or very familiar objects. Suppose you are a sci-fi shooter, which takes place on a strange alien planet, where even the architecture looks extremely unusual. What is the size of that ... stone (or is it a plant?). Or what size is this building? Not at all clear. And only if people are scattered around the scene, then you will immediately understand the scale of what is happening. In some cases, very familiar objects will work: in the picture, the usual shape of the car sets the starting point for the scale.

There is still a good method that allows you to better display the scale of the scene as a whole. Show some object near, then place a copy of it somewhere far away, then further away. The player understands that these are objects of the same type, and perceives the difference in scale as a difference in the distance to the object. In the image below, the objects are so large that they all together do not fit into one screenshot. As a result, we have an epic range of location. By the way, I will tell you another cool trick: if the size of a distant object is slightly reduced, then it will seem further than it actually is. This is often used to create scenes of enormous size, although in reality it is just a tricky game with scales and fog.

The scale of the environment does not make sense without carefully adjusted the speed of movement of the hero. The faster the hero moves, the more space is compressed. A good example is the introduction of flying mount animals in “World of Warcraft”. Before, the world seemed large enough: it took time to get from one point to another. With the advent of air transport, this has ceased to be a problem, the hero’s speed of movement has radically changed the size of the world, while the locations themselves have remained the same.
Obviously, such a speed affects the gameplay: the passage of quests, enkontery with monsters, hunting for treasure and finding the road somewhere (one thing to climb the mountain, and the other - just take off and land on top). The speed of the environment also depends on the speed. Think about how you would detail the mountain, on which the mountaineer hero will climb to the top, and the mountain, past which the hero-pilot would fly by plane.
Thus, it is important to approve the speed of movement as early as possible during the prototyping stage, otherwise constant alterations await you.
In the era of mobile games, developers began to pay a lot of attention to the duration of the game session. Unlike PCs and consoles, it is critically important to find out how long a player can be involved before he has to return to reality - he waited in line, reached the required station, the change was over.
As a result, you should know exactly how much time a player can spend on passing a separate level, and on the basis of this data it is already working. Otherwise, sooner or later you will have to redraw all levels, adjusting them to the requirements. In “Flappy Bird” with its instant death, the gaming session can be extremely short. At the same time, the open world “Dragon Age: Inquisition” threatens to suck you on the clock, and all the action will take place in one location.
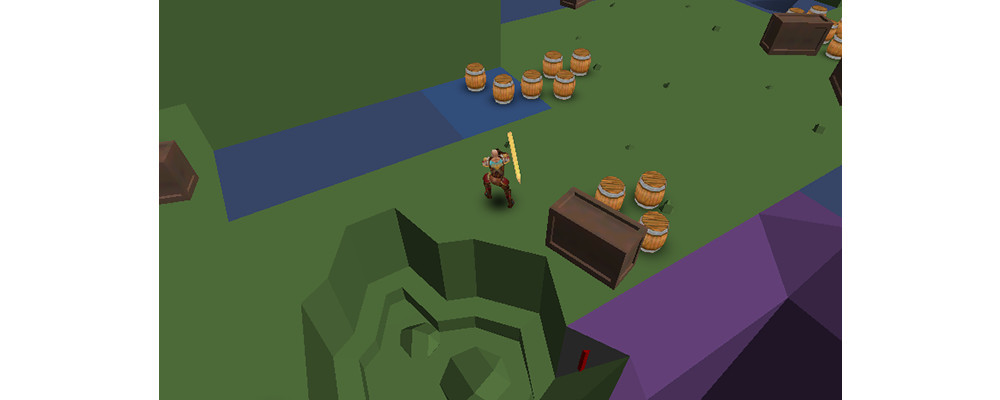
Suppose you have a number of small objects such as boxes and barrels, each has its own collider. If the hero runs straight into the group of objects as in the screenshot below, he will get stuck and stupid due to the randomness of the overall shape of the colliders. Formally, you did everything correctly - the colliders correctly beat the shape of individual objects. However, imagine the situation in a mobile game, where control is much less accurate than on a PC or console. The player will often stick into objects, and it will be more difficult for him to run out of the colliders surrounding him.
Take the same group of objects and give them a common collider. Now the player will not just not stick in the corners, but the character controller will automatically flow around a group of objects. As a result - a pleasant smooth movement of the hero.
For clarity, I made a GIF with a demonstration of smooth motion around a streamlined collider. As always, there is an underwater rock. Shared colliders should not capture a lot of empty space. Invisible walls beat hard on engagement. If I try to run away from hitting a monster and sticking myself into an invisible wall at a key moment, this is very annoying.
One of the most important tasks of the level designer is to create the most enjoyable gaming experience, on which the colliders have a tremendous impact, as can be seen from the previous section. You should think twice before giving the collider to a small object. In the heat of battle, a player can pass through a small object and not pay attention to it at all. However, if he suddenly sticks into an impassable invisible wall created by a tiny object, nestled in a corner, it will inevitably knock him out of a thin state of flow.
I can give an illustrative example from The Witcher: you see a group of boxes from which you can collect loot. You are trying to reach them, but Geralt suddenly begins to get confused in colliders, stick into invisible walls, spin around and generally act like a drowned man on a fire. It completely breaks the sense of involvement in the game, and you involuntarily reach for a cup of coffee, returning to reality.
Just want to remind about this technique. In short, it disables the rendering of objects hidden behind other objects. Unity, for example, allows you to bake Occlusion Culling, which has a significant impact on performance. And both for the better and for the worse, depending on the situation. Two examples:
Any 3d game on the monitor screen is still an array of pixels in the 2d plane of the screen, whatever one may say (VR does not count). But there are a number of tricks to create the illusion of three-dimensional space. In terms of level design, the most useful tool will be a conscious breakdown of the picture into the front, middle and long-range plans. This is most easily realized in games with Top-Down cameras a la “Diablo” and “Path of Exile”, as well as sidescrollers (platformers). The average is your character. The farthest may be an epic view, as in the following screenshot, but more often it’s just distant objects.
The foreground is more interesting. As a rule, it uses shaded objects such as hanging ropes, chains, chandeliers and other junk, creating parallax between backgrounds. Parallax is the difference in the speed of the plans relative to the camera. That is, the foreground is always replaced faster than the distant, generally remaining static due to its remoteness from the browser.

The most difficult to show the foreground in games from the first and from the third person. Developers go for different tricks, here are some examples:
This is a fairly specific case, but worth mentioning. In the indie project where I work, we applied this mechanic: when you enter a certain zone, a magic wall appears behind your back, and monsters begin to appear in front of you. After the death of all the monsters enchanted walls disappear. We did this by analogy with other mobile projects like “Dungeon Hunter”, as well as by analogy with “World of Warcraft”, where in the battle with the bosses behind you, the passage is blocked in the same way.
So, this is a cheap and lazy way to simplify and speed up the work. But the result is the same cheap; the player feels it. Try to get away from this, albeit with the classical method: jump down from the ledge, and never get back. Cliche? Yes, but still better than invisible walls.
There is an even more unforgivable subclass of invisible walls - level boundaries that kill a player. Worse, if the developer builds the gameplay around this horror. A vivid example of “Destiny”: treasure chests are often placed near the very border of the level, so much so that it is often not obvious where the border lies. As a result, a stupid death is inevitable when you jump onto a flat stone two meters below you, and he instantly kills the hero in response. And yes, this is not death from falling in a game where you can jump 10 meters high and land on solid ground without any problems.
As far as is obvious, as often it is ignored. Everything you do should be checked on the target platform. I have repeatedly seen how a person is interested in a task, for example, designing a GUI, and forgets to check his work on a mobile device where the interface will be used.
The same with levels. It is important not to be lazy and regularly test your work on the target platform. If you are creating a game for the console, see how comfortable it is to run and fight using a gamepad. If the level is developed for a mobile device, then the more often you will watch your work on a small screen with extremely inaccurate touch controls, the less headache you will get in the future. However, it is not even a headache, but in the quality of work. Noticing in time that you are moving in the wrong direction, you will be able to correct the vector of work in a timely manner and end up with a decent result.
Playtesting is a completely surreal experience, forgive me for anglicisms. It is difficult to convey in words the sensations of observing a player interacting with your level. In general, seeing a player on your level is a surge of motivation, which is always good for an indie developer who does not receive a monthly cash reward for his work.
However, the main task is to test all of our hypotheses in practice, to see where they have failed and where corrections are required. Like any creator, over time, the eye becomes blurred, and you will inevitably make some mistake or miss something. The sooner there is adequate feedback, the better.
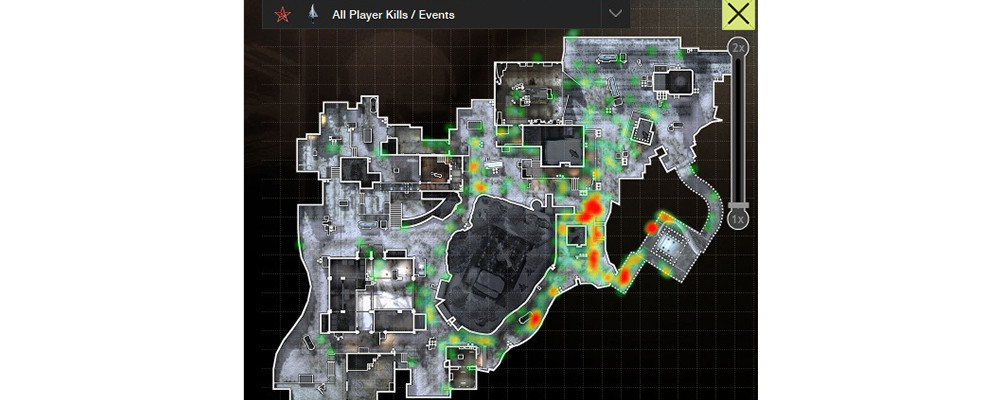
Playtests are good, but observing 5-10 players is not statistics, so it makes sense to track the behavior of hundreds or thousands of players. For example, we collect data with the frequency and coordinates of the point of death of the hero, and we understand where the game is too complicated, we edit the balance and repeat the whole process.
And even if you have not been released yet, but you have several testers, or your demo is available to a limited number of people (for example, “backers” from Kickstarter), it still makes sense to collect and analyze data already at this stage.
Try to leave a little bit of time for polishing, that is, for minor edits and closing small holes, which have never been reached before for one reason or another. For example, one of my recent levels has a task with a list of 29 points. Each of them requires from 5 to 15 minutes of work. Having overcome these problem areas, you are transferring a level from the polishing stage to the status of “final” or “release candidate”. Problems that need to be “polished” will emerge during the playtest and collection of statistics. It’s more effective not to run right away to correct every tiny flaw, but to prepare a separate list, and then fix everything in a crowd. Remember, this stage is inevitable, so leave time for it in advance, even if you are sure that you immediately did everything cool, and you will not have to polish it.
This concludes this article, which consists of two parts. If you missed the first part, here's a link . Also, if you are interested in lighting in Unity, you may be interested in my recent article right there on Habré. Having accumulated more experience, I see some inaccuracies in the article, but in general it is very close to reality. Therefore, if you are just studying the topic of lighting in Unity, the material should be useful to you.
I would welcome any comments and suggestions. In addition, I accept ideas for new articles on level design, as well as lighting and post-effects in Unity :) Thank you for your attention!
Prototyping
It's no secret that taking the time to prototyping now will save you a lot of time and energy later. It is obvious, it is important, and for some reason we often neglect this stage. In my experience, the longer a team works, the more difficult changes and rework are experienced, therefore it is crucial from the very beginning to lay a solid foundation in the form of a prototype of a game, levels, key game mechanics. If we speak in the context of level design, your work is divided into four stages:
')
- “Greybox” . The level is literally made from gray cubes. Here you lay the foundation for all subsequent work and find out the size of the level, the required graphic and audio assets, working on game mechanics and script events.
- “ Whitebox” . The geometry of the level is specified, wherever possible, new game mechanics, dialogues, blue-workpieces, sound, and so on are added. Here you even better grind out existing game mechanics and script events.
- Graphic pass . By the time you work on this stage, you must be convinced that it is interesting to play at the level, and it suits you all. Replacing prototype graphics with final assets is long and expensive. Any changes at this stage are highly undesirable.
- The final pass . Here final touches are put: birds flying in the sky, sounds of bonfires and other pleasant trifles are added.
- Polishing . The inevitable stage, usually occurring after the work on the level has been completed. There will be edits of the little things missed earlier, as well as changes based on the results of the new playtests and the statistics collected.
In the picture below you can see a comparison of the “whitebox” stages and the final graphic itself in “Mass Effect 2”.
I also want to add that too early transition to the stage of working with graphics is a serious mistake. You can easily fool yourself and the team by making a level with exciting graphics, but no gameplay, and all because it looks good visually. Look at this one and a half minute video from mod for “Gears of War”, well illustrating the work on the gameplay in the absence of most of the graphical content.
At the prototyping stage in a healthy team or company, it is important to adhere to the “Failure is an Option” rule. You make a prototype, evaluate the result and, if it does not suit you, throw it away. Fast iterations allow you not to become emotionally attached to the work done, so the process is simple and enjoyable. The screenshot below shows a slice of the prototype level from the indie game I'm working on.
During prototyping, it is important to determine and approve the size of the hero, the scale of the environment relative to the hero, as well as the speed of the hero’s run. Details further.
Hero Scale
Approve the size of the game character as early as possible. I work in Maya in centimeters, and usually set the average size of the main character: 200cm. in height, 100cm. in width and 100cm. in length. Thus, creating any new content (bush, tank, house), we always know their size relative to the hero. It is assumed that the size of the character's collider will be approximately the same size, respectively, the aisles and doors in buildings must be at least one and a half to two times wider than the collider.
Also, if you have several 3d-artists, it is strongly recommended that everyone follow a single measurement system. In other words, if one person has a hero size set at 200 centimeters, and another - 2 meters, then when importing into the engine, for example, in Unity, you will most likely have to give the models different scale compensation (Scale Factor), since Unity 2 and 200 “May” units of measurement are different sizes. The situation becomes more complicated when you work with programs like 3ds Max, where the coordinate system operates with abstract units of measurement, so you have to experiment to find common dimensions for all three-dimensional graphics packages involved in your team.
The scale of the environment
Working with the scale of the environment is an extremely interesting topic. Following the reasoning from the previous paragraph, you need to work on a real scale, starting from the approved 200cm. And at the same time you will have to lie non-drying. The point is that at times the object of a real size feels too large or too small, and you have to adjust its scale, trying to achieve a reliable, albeit an incorrect size. This is well seen in games with stylized graphics, for example, “World of Warcraft”, where you can often see objects like stone stairs with steps that are almost the height of a character. Interestingly, in the context of styling it looks appropriate and does not cause questions, but if you look closely, all this is pretty damn strange.
Nevertheless, we must strive to ensure that, on average, your scene has real dimensions. This is especially important in view of the trend that is currently fashionable for physically correct materials and lighting. It is known that the intensity of light decreases in proportion to the square of the distance. In this case, if in your scene, due to errors on the scale, the reading lamp will have a size of under 5 meters, you will inevitably have to twist the lighting math so that it looks more or less adequate in these conditions. In the end, your scene will consist of many such hacks, which negatively affect both the work of the physically correct render and the quality of the picture as a whole.
The scale of the environment is usually known only in comparison with a person or very familiar objects. Suppose you are a sci-fi shooter, which takes place on a strange alien planet, where even the architecture looks extremely unusual. What is the size of that ... stone (or is it a plant?). Or what size is this building? Not at all clear. And only if people are scattered around the scene, then you will immediately understand the scale of what is happening. In some cases, very familiar objects will work: in the picture, the usual shape of the car sets the starting point for the scale.
There is still a good method that allows you to better display the scale of the scene as a whole. Show some object near, then place a copy of it somewhere far away, then further away. The player understands that these are objects of the same type, and perceives the difference in scale as a difference in the distance to the object. In the image below, the objects are so large that they all together do not fit into one screenshot. As a result, we have an epic range of location. By the way, I will tell you another cool trick: if the size of a distant object is slightly reduced, then it will seem further than it actually is. This is often used to create scenes of enormous size, although in reality it is just a tricky game with scales and fog.
Hero movement speed
The scale of the environment does not make sense without carefully adjusted the speed of movement of the hero. The faster the hero moves, the more space is compressed. A good example is the introduction of flying mount animals in “World of Warcraft”. Before, the world seemed large enough: it took time to get from one point to another. With the advent of air transport, this has ceased to be a problem, the hero’s speed of movement has radically changed the size of the world, while the locations themselves have remained the same.
Obviously, such a speed affects the gameplay: the passage of quests, enkontery with monsters, hunting for treasure and finding the road somewhere (one thing to climb the mountain, and the other - just take off and land on top). The speed of the environment also depends on the speed. Think about how you would detail the mountain, on which the mountaineer hero will climb to the top, and the mountain, past which the hero-pilot would fly by plane.
Thus, it is important to approve the speed of movement as early as possible during the prototyping stage, otherwise constant alterations await you.
Level passing time
In the era of mobile games, developers began to pay a lot of attention to the duration of the game session. Unlike PCs and consoles, it is critically important to find out how long a player can be involved before he has to return to reality - he waited in line, reached the required station, the change was over.
As a result, you should know exactly how much time a player can spend on passing a separate level, and on the basis of this data it is already working. Otherwise, sooner or later you will have to redraw all levels, adjusting them to the requirements. In “Flappy Bird” with its instant death, the gaming session can be extremely short. At the same time, the open world “Dragon Age: Inquisition” threatens to suck you on the clock, and all the action will take place in one location.
Smooth colliders for smooth gameplay
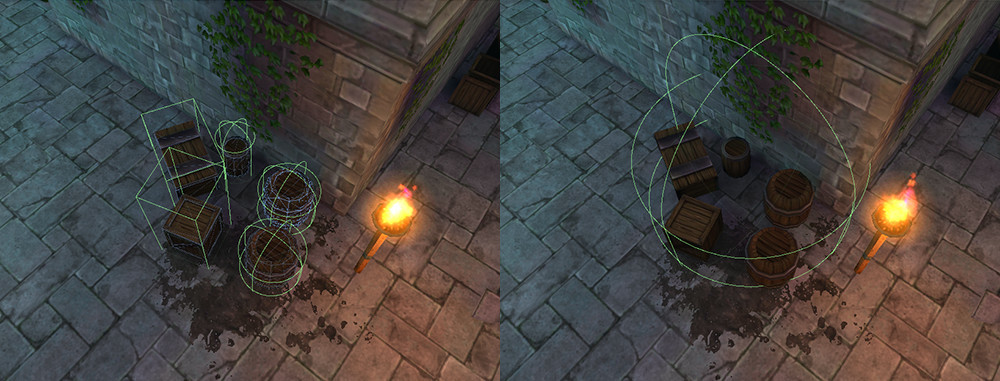
Suppose you have a number of small objects such as boxes and barrels, each has its own collider. If the hero runs straight into the group of objects as in the screenshot below, he will get stuck and stupid due to the randomness of the overall shape of the colliders. Formally, you did everything correctly - the colliders correctly beat the shape of individual objects. However, imagine the situation in a mobile game, where control is much less accurate than on a PC or console. The player will often stick into objects, and it will be more difficult for him to run out of the colliders surrounding him.
Take the same group of objects and give them a common collider. Now the player will not just not stick in the corners, but the character controller will automatically flow around a group of objects. As a result - a pleasant smooth movement of the hero.
For clarity, I made a GIF with a demonstration of smooth motion around a streamlined collider. As always, there is an underwater rock. Shared colliders should not capture a lot of empty space. Invisible walls beat hard on engagement. If I try to run away from hitting a monster and sticking myself into an invisible wall at a key moment, this is very annoying.
Not all colliders are equally useful.
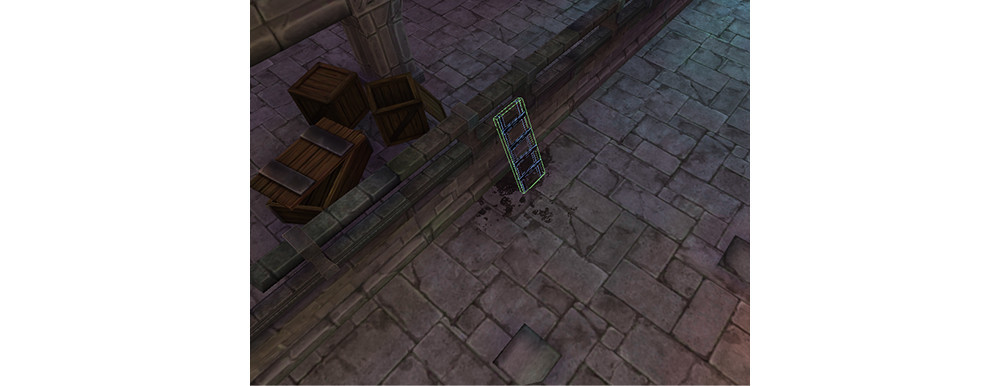
One of the most important tasks of the level designer is to create the most enjoyable gaming experience, on which the colliders have a tremendous impact, as can be seen from the previous section. You should think twice before giving the collider to a small object. In the heat of battle, a player can pass through a small object and not pay attention to it at all. However, if he suddenly sticks into an impassable invisible wall created by a tiny object, nestled in a corner, it will inevitably knock him out of a thin state of flow.
I can give an illustrative example from The Witcher: you see a group of boxes from which you can collect loot. You are trying to reach them, but Geralt suddenly begins to get confused in colliders, stick into invisible walls, spin around and generally act like a drowned man on a fire. It completely breaks the sense of involvement in the game, and you involuntarily reach for a cup of coffee, returning to reality.
Occlusion Culling
Just want to remind about this technique. In short, it disables the rendering of objects hidden behind other objects. Unity, for example, allows you to bake Occlusion Culling, which has a significant impact on performance. And both for the better and for the worse, depending on the situation. Two examples:
- In a mobile game with a Top-Down camera (as in Diablo), activating this feature saves 2-4 Draw Calls (DC). At the same time, 5ms is added to the processor. on frame processing. Absolutely not worth it.
- In a PC game with a First Person camera, where the action takes place in a narrow cave, there is initially 450 DC. Activating Occlusion Culling reduces the amount of DC to 50 at the cost of the same + 5ms. Definitely need to use.
Parallax and pseudo-3d
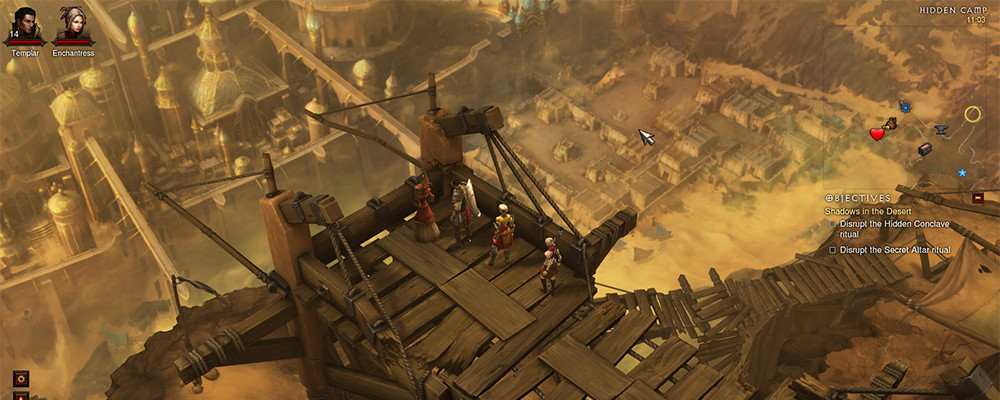
Any 3d game on the monitor screen is still an array of pixels in the 2d plane of the screen, whatever one may say (VR does not count). But there are a number of tricks to create the illusion of three-dimensional space. In terms of level design, the most useful tool will be a conscious breakdown of the picture into the front, middle and long-range plans. This is most easily realized in games with Top-Down cameras a la “Diablo” and “Path of Exile”, as well as sidescrollers (platformers). The average is your character. The farthest may be an epic view, as in the following screenshot, but more often it’s just distant objects.
The foreground is more interesting. As a rule, it uses shaded objects such as hanging ropes, chains, chandeliers and other junk, creating parallax between backgrounds. Parallax is the difference in the speed of the plans relative to the camera. That is, the foreground is always replaced faster than the distant, generally remaining static due to its remoteness from the browser.
The most difficult to show the foreground in games from the first and from the third person. Developers go for different tricks, here are some examples:
- Dirt on the breathing mask glass, as in “Metro 2033”.
- Splashes of blood right in front of the face, when, for the sake of the skin, the hero carves the animal’s carcass in “Far Cry”.
- The hands and sneakers of the character, like Faith's in “Mirror's Edge”.
- Cracked car glass while driving (“GTA”, “Far Cry”).
- The gun in the face, especially in the optical sight mode (any shooter).
- Obstacle (concrete block, corner of the house), behind which you hide from opponents. Games specifically encourage this gameplay. For example, in “Far Cry 4” you can hide behind bushes, and the enemy will not see you.
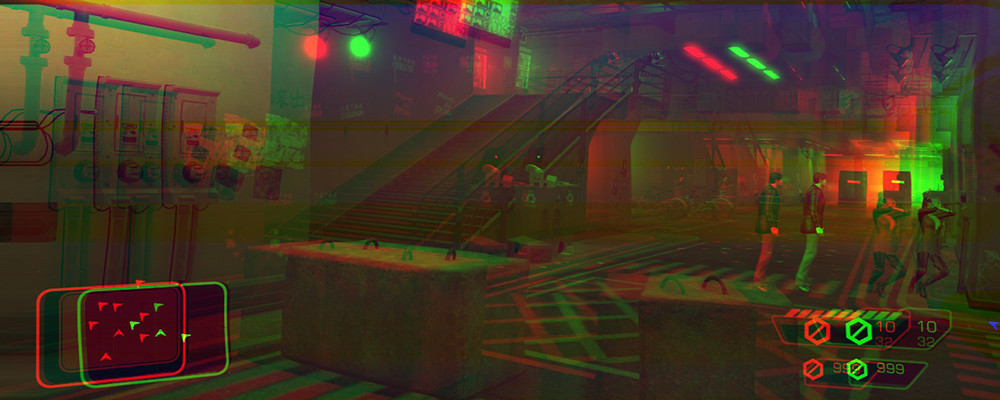
- Interference in the neural interface located on the screen, as in “Black Ops 3” and “Deux Ex: HR”.
Invisible walls
This is a fairly specific case, but worth mentioning. In the indie project where I work, we applied this mechanic: when you enter a certain zone, a magic wall appears behind your back, and monsters begin to appear in front of you. After the death of all the monsters enchanted walls disappear. We did this by analogy with other mobile projects like “Dungeon Hunter”, as well as by analogy with “World of Warcraft”, where in the battle with the bosses behind you, the passage is blocked in the same way.
So, this is a cheap and lazy way to simplify and speed up the work. But the result is the same cheap; the player feels it. Try to get away from this, albeit with the classical method: jump down from the ledge, and never get back. Cliche? Yes, but still better than invisible walls.
There is an even more unforgivable subclass of invisible walls - level boundaries that kill a player. Worse, if the developer builds the gameplay around this horror. A vivid example of “Destiny”: treasure chests are often placed near the very border of the level, so much so that it is often not obvious where the border lies. As a result, a stupid death is inevitable when you jump onto a flat stone two meters below you, and he instantly kills the hero in response. And yes, this is not death from falling in a game where you can jump 10 meters high and land on solid ground without any problems.
Target platform
As far as is obvious, as often it is ignored. Everything you do should be checked on the target platform. I have repeatedly seen how a person is interested in a task, for example, designing a GUI, and forgets to check his work on a mobile device where the interface will be used.
The same with levels. It is important not to be lazy and regularly test your work on the target platform. If you are creating a game for the console, see how comfortable it is to run and fight using a gamepad. If the level is developed for a mobile device, then the more often you will watch your work on a small screen with extremely inaccurate touch controls, the less headache you will get in the future. However, it is not even a headache, but in the quality of work. Noticing in time that you are moving in the wrong direction, you will be able to correct the vector of work in a timely manner and end up with a decent result.
Playtesting
Playtesting is a completely surreal experience, forgive me for anglicisms. It is difficult to convey in words the sensations of observing a player interacting with your level. In general, seeing a player on your level is a surge of motivation, which is always good for an indie developer who does not receive a monthly cash reward for his work.
However, the main task is to test all of our hypotheses in practice, to see where they have failed and where corrections are required. Like any creator, over time, the eye becomes blurred, and you will inevitably make some mistake or miss something. The sooner there is adequate feedback, the better.
Analytics
Playtests are good, but observing 5-10 players is not statistics, so it makes sense to track the behavior of hundreds or thousands of players. For example, we collect data with the frequency and coordinates of the point of death of the hero, and we understand where the game is too complicated, we edit the balance and repeat the whole process.
And even if you have not been released yet, but you have several testers, or your demo is available to a limited number of people (for example, “backers” from Kickstarter), it still makes sense to collect and analyze data already at this stage.
Polishing
Try to leave a little bit of time for polishing, that is, for minor edits and closing small holes, which have never been reached before for one reason or another. For example, one of my recent levels has a task with a list of 29 points. Each of them requires from 5 to 15 minutes of work. Having overcome these problem areas, you are transferring a level from the polishing stage to the status of “final” or “release candidate”. Problems that need to be “polished” will emerge during the playtest and collection of statistics. It’s more effective not to run right away to correct every tiny flaw, but to prepare a separate list, and then fix everything in a crowd. Remember, this stage is inevitable, so leave time for it in advance, even if you are sure that you immediately did everything cool, and you will not have to polish it.
Conclusion
This concludes this article, which consists of two parts. If you missed the first part, here's a link . Also, if you are interested in lighting in Unity, you may be interested in my recent article right there on Habré. Having accumulated more experience, I see some inaccuracies in the article, but in general it is very close to reality. Therefore, if you are just studying the topic of lighting in Unity, the material should be useful to you.
I would welcome any comments and suggestions. In addition, I accept ideas for new articles on level design, as well as lighting and post-effects in Unity :) Thank you for your attention!
Source: https://habr.com/ru/post/274625/
All Articles