The pitfalls of using Excel Power Query and MySQL to automate reporting

Hello.
New 2016 has come, so it's time to update the tools to simplify boring mechanical work. The departments of analytics, marketing, sales often face the following difficulties when updating reports:
1. Data has to be gathered together from several sources.
2. Reports are compiled in Excel, which imposes significant restrictions on the amount of data processed.
3. Making changes to pre-configured unloads by developers is usually not the fastest.
If reports need to be updated weekly or even daily, then this procedure becomes very stressful even for the most patient. Using the Excel Power Query add-in and writing data to MySQL, you can reduce the update of most reports to a simple click on the Update button:
1. Data from any number of sources are imported via SQL queries into regular Excel spreadsheets.
2. Even from a large database, you can only record a small part of the data in Excel (for example, the totals for the desired date range, grouped only by the required columns).
3. Changes to the report can be made simply by changing the SQL query. Next, we form the desired report using standard Excel tools.
In this article, I will show how to set up and automatically fill in simple MySQL databases (using the example of downloading statistics for all keywords from Yandex Metrics), and then updating reports in Excel with one button using the Power Query add-in. Power Query has some very strange features when working out SQL queries (especially dynamic ones), which we will discuss in the second part of the article.
')
The choice of MySQL (or any other popular database) is quite obvious - for free, relatively simple, the ability to work with fairly large databases without technical tricks. As an example, we will use Amazon Web Services: cheap (in most cases, the used instance will be free for you for 12 months).
So, let's begin (if you already have databases with ready data, then you can immediately go to the section with Excel):
1. We register on AWS (if there is no account yet), run the simplest t2.micro instance and go to it via SSH. You can see brief instructions in the last post habrahabr.ru/post/265383 . Please note that we will need the first instance option on the Amazon Linux AMI. It is necessary to set the rules that allow access to the instance by the necessary ports:

For security reasons, it is better to set restrictions on the IP address. If you have a dynamic IP, then this is a problematic option. Also, sometimes restricting access to MYSQL over IP causes an error in Excel. If you set any IP, then everything works.
2. We execute the commands described in the documentation docs.aws.amazon.com/AWSEC2/latest/UserGuide/ec2-ug.pdf . We need the chapter "Tutorial: Installing a LAMP Web Server on Amazon Linux." Remember the password that you enter when executing the “sudo mysql_secure_installation” command. For convenience, install phpMyAdmin as described at the end of this chapter. If you copy-paste the line “sudo sed -i -e 's / 127.0.0.1 / your_ip_address / g' / etc / ht tpd / conf.d / phpMyAdmin.conf” from the documentation, note that sometimes when copying to “httpd »There is an extra space.
After these actions, your page should open the following page:
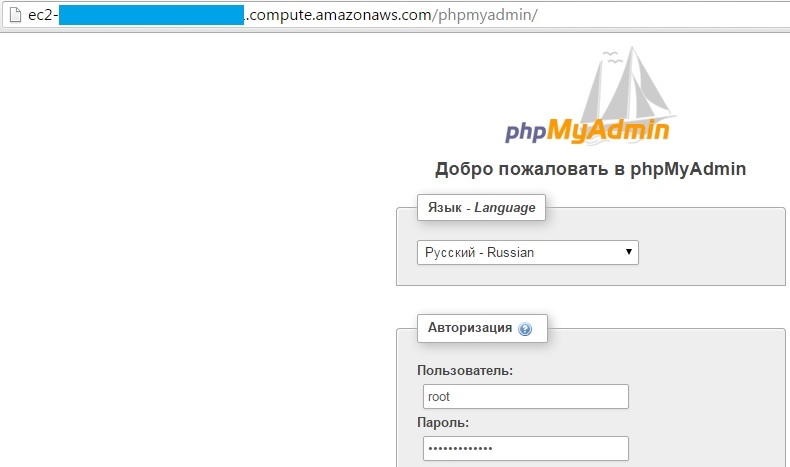
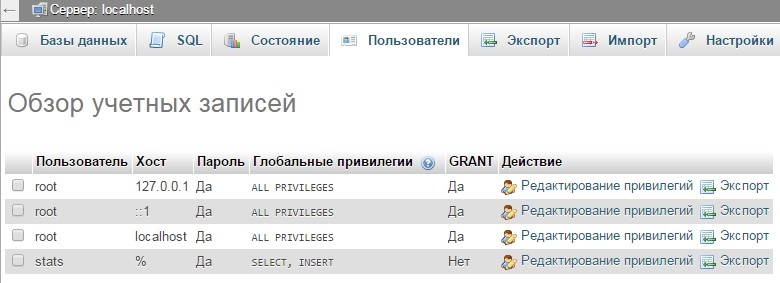
3. We go under the root user and password, which was entered during configuration. To access the database "from outside" (i.e. from Excel), we need a user other than root. We get it in the phpMyAdmin interface in the menu Users -> Add user. Add a stats user, set a password and assign SELECT and INSERT privileges to it. Total we get:
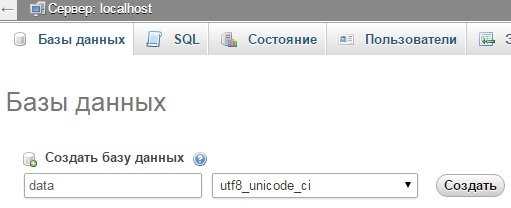
4. Now create the data database:
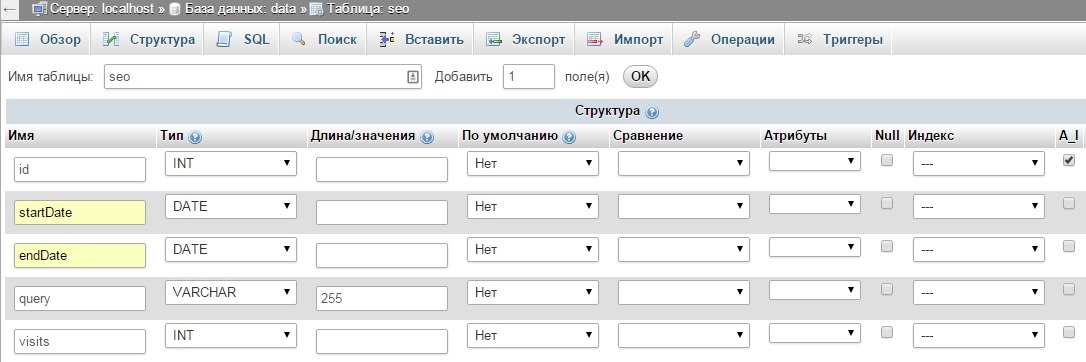
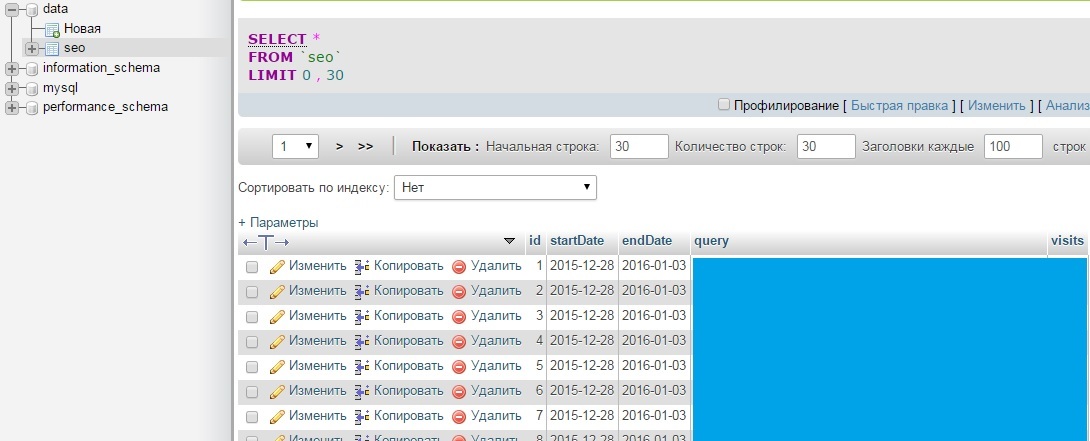
5. In this example, we will fill the database with statistics of visits for keywords from Yandex Metrics. To do this, create a seo table (note that the A_I (auto increment) option should be checked for the id column):
6. To get statistics on keywords from Yandex Metrics, you can use the following script. As parameters, you need to specify the start and end date of the unload (variables $ startDate and $ endDate), authorization token (in the code there is a description of how to get it), the number of the counter from which you need to get statistics, and database parameters: instance ID, login we have “stats”), password and database name (we have “data”). Copy this code into the root folder of the instance and run it with the command "php seo.php".
PHP code for uploading Yandex Metrics data
<?php // $startDate = '2015-10-01'; $endDate = '2015-12-31'; // API // https://oauth.yandex.ru/ // // ID https://oauth.yandex.ru/authorize?response_type=token&client_id= // $atoken = ''; // $project = ''; // $con = mysqli_connect("ec2-....compute.amazonaws.com","stats"," ", "data"); if (mysqli_connect_errno()) { echo "Failed to connect to MySQL: " . mysqli_connect_error(); exit(); } else { echo "Connection successfull \n"; } if ($con->query("SET NAMES 'utf8'")) { echo "Names set \n"; } else { printf("Error: %s\n", $con->error); exit(); } // , ( ) $fname = "data.txt"; $fp = fopen($fname, "w"); fclose($fp); function getBatch($startDate, $endDate, $project, $offset, $limit, $atoken, $fname, $con) { // API // https://tech.yandex.ru/metrika/doc/api2/api_v1/attributes/visitssource_/search-docpage/ $ch = curl_init(); $options = array( CURLOPT_URL => 'https://api-metrika.yandex.ru/stat/v1/data?oauth_token='.$atoken.'&id='.$project.'&accuracy=full&date1='.$startDate.'&date2='.$endDate.'&dimensions=ym:s:<attribution>SearchPhrase&metrics=ym:s:visits&limit='.$limit.'&offset='.$offset, CURLOPT_RETURNTRANSFER => TRUE ); curl_setopt_array($ch, $options); $data = curl_exec($ch); curl_close($ch); // JSON $data = json_decode($data, true); // //var_dump($data); // $data['data'] , for ($i=0; $i < count($data['data']); $i++) { file_put_contents($fname, $startDate."\t".$endDate."\t".$data['data'][$i]['dimensions'][0]['name']."\t".$data['data'][$i]['metrics'][0]."\n", FILE_APPEND); if ($con->query("INSERT INTO seo (startDate, endDate, query, visits) VALUES ('".$startDate."', '".$endDate."', '".mysqli_real_escape_string($con, substr($data['data'][$i]['dimensions'][0]['name'], 0, 255))."', ".$data['data'][$i]['metrics'][0].")")) { //echo "Record done \n"; } else { printf("Error: %s\n", $con->error); exit(); } } if (count($data['data']) == 0) { return 'done'; } else { return 'more'; } } // https://tech.yandex.ru/metrika/doc/api2/api_v1/data-docpage/ // - 10 000 // $limit , $offset $limit $offset = 1; $limit = 10000; $res = 'more'; do { $res = getBatch($startDate, $endDate, $project, $offset, $limit, $atoken, $fname, $con); $offset += $limit; } while ($res == 'more'); mysqli_close($con); If errors occur while connecting to the database, they will be displayed in the console and the execution will be interrupted. In case of successful execution, we will receive keyword statistics for the selected period:
Ok, data received. Let's see how to get them in Excel.
Using Power Query to Upload Data to Excel
Power Query is an add-on that extends Excel's ability to upload data. You can download it here www.microsoft.com/en-us/download/details.aspx?id=39379 . To work with MySQL, you may need MySQL Connector and Visual Studio (offered when installing from the distribution).
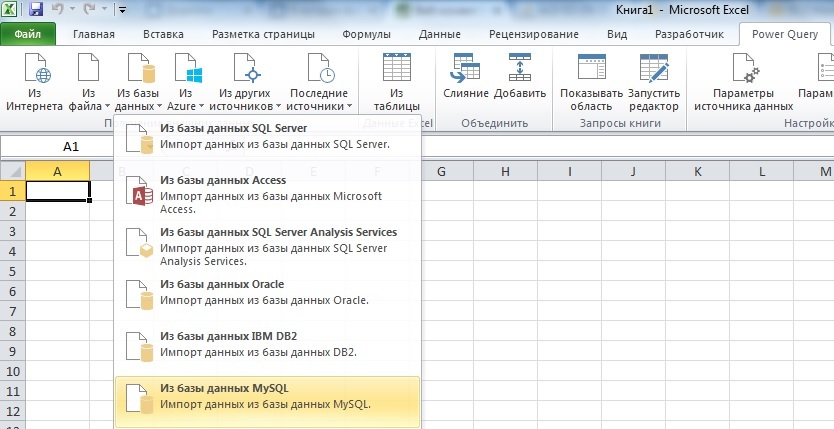
1. After installation, select MySQL:
2. As the base we specify the ID of our instance (as it was in the script) ec2 -.... compute.amazonaws.com. Database data. To enter the login, select "Database":

3. In the window that opens, double click on the seo table and get:

In this window, you can manage queries by changing the columns and the number of lines. When the database is small, it works. However, if the data size exceeds even 20MB, then Excel on most computers will simply hang from such a request. Besides, it would be nice to change the request dates or other parameters.
Dynamic queries in Power Query can be done using the built-in language M msdn.microsoft.com/en-us/library/mt253322.aspx , but queries are extremely unstable in terms of changing any parameters in them. To keep the request "permanent" we will do the following:
1. First, we compile a table in which we specify the parameters we need. In our example, this is the date of upload. It is better to set the format of cells with values as test, because Excel likes to change the format of cells at its discretion:

2. Create a Power Query query “From the table”, which will simply duplicate this table:
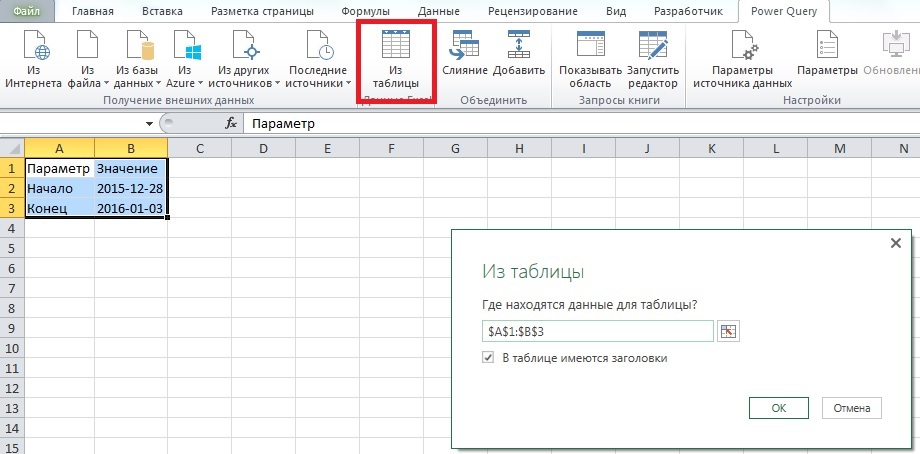
3. In the query options, be sure to specify the format of the second column as Text, otherwise the subsequent SQL query will be incorrect. Next, click "Close and load."

In total, we received a Power Query request for a regular table, from which we will take the value of the beginning and end of the upload.
To make a SQL query, you need to disable one option: go to Settings and Settings -> Query Parameters -> Privacy and select "Ignore privacy levels for possible performance improvements." Click OK.

4. Now we make a query to our database, indicating the values of the table from point 3 as the beginning and end of the period. Again, connect to the database in Power Query and click "Advanced Editor" in the menu.

For example, we want to get the sum of visits that brought keywords containing "2015". In M, the query looks like this:
let
Source = MySQL.Database("ec2-....compute.amazonaws.com", "data", [Query="select sum(visits) from seo where startDate>='"&Text.From(1{0}[])&"' and endDate<='"&Text.From(1{1}[])&"' and query like '%2015%';"])
in
Source
In the startDate and endDate parameters, the values in the table from item 3 are specified. When requesting "To execute this own database query, permissions are required", click "Edit resolution", check that all parameters have been tightened correctly and execute the query. Now, the received response from the SQL query can be processed using the usual Excel formulas in the form you are familiar with.
5. It is important! When you update the upload next time, you have to do it in the following way (others for some reason give an error):
- we change dates in the table from point 1
- go to the menu Data -> Connections and click "Update All":
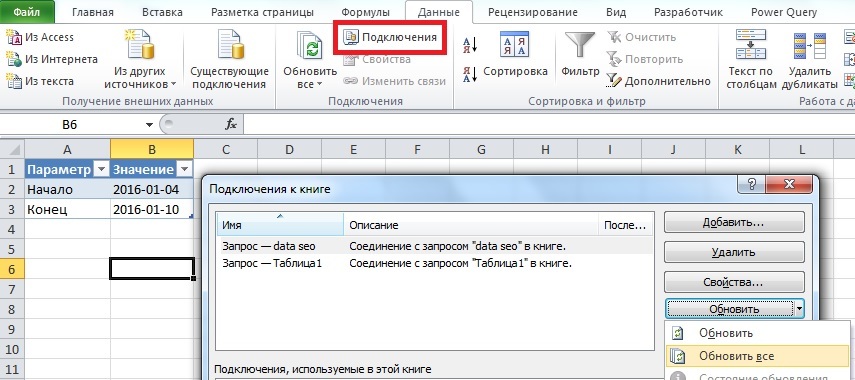
In this case, all requests will be executed correctly and your reports will be updated automatically. In total, to update the report, you only need to change the parameters of the query and click "Update All".
Source: https://habr.com/ru/post/274615/
All Articles