We write in Java in Arduino

The article will tell you how to write in Java for Arduino.
Why java? In short - just for fun!
')
I am a Java programmer and in my spare time I play with Arduino and I wanted to transfer my knowledge of Java into the world of microcontrollers and embedded devices.
At the moment there are several possibilities to run Java on embedded devices. In this article I will review them.
Official JVM
The first is the official JVM for embedded:
www.oracle.com/technetwork/java/embedded/embedded-se/overview/index.html
habrahabr.ru/post/243549 Starting Java Runtime on 256KB of RAM
There is almost a real JVM which executes byte-code. But there are big drawbacks - it only works for the Raspberry Pi and Freescale K64F (maybe I missed something, if so, please add in the comments). Raspberry Pi support is definitely good, but it’s essentially a computer, albeit a single board. You can run a simple JVM on it. Yes, and it costs from 3 tr. K64F is already a dev board with a Cortex M4 on board. But it is also worth from 3 tr. Which is much more expensive than the common Arduino Uno.
JVM with byte code compilation
There are several VMs that allow you to run Java on microcontrollers - this is LeJOS ( www.lejos.org ) and HaikuVM ( haiku-vm.sourceforge.net )
LeJOS - allows you to run Java applications on Lego MindStorm. HaikuVM - on AVR microcomputers. Now LeJOS is divided into two parts:
- for the latter, EV3, this is the real JVM from Oracle ( www.oracle.com/technetwork/java/embedded/downloads/javase/javaseemeddedev3-1982511.html ). I can say nothing more about it - just a JVM.
- For previous versions, NXJ and RCX, TinyVM-based JVM ( tinyvm.sourceforge.net ) is used. Here it is worth to talk about it in more detail.
Since in microcontrollers there is very little memory (in Arduino Uno 28kB Flash and 2kB SRAM), a real JVM with which class files would interpret cannot be run there. But you can convert the byte code of the program and compile it into native code, while cutting out all unnecessary, all not used runtime. Compilation loses some of the Java functionality (for example, reflection). But the program will work!
HaikuVM also works - it takes Java code, compiles it with JRE from LeJOS (an alternative implementation of some standard classes - String, StringBuilder, Integer, etc. - is needed for optimization) instead of JRE from the original JVM (rt.jar in HotSpot), resulting in The class files convert to C ++ code, add the runtime from HaikuVM (it supports threads, GC, exception) and compiles all this with avr-gcc. And thus it is possible to run a Java program up to ATMega8 with 8kB flash memory!
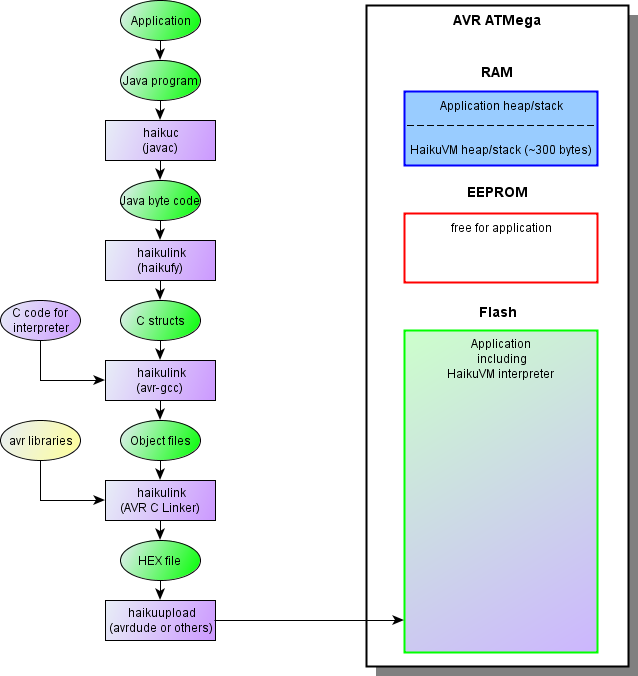
Algorithm work HaikuVM. Picture taken from haiku-vm.sourceforge.net
Code Conversion Example
Java code:
public static void setup() { Serial.begin(57600); while (!Serial.isOpen()) { } } Byte code:
public static setup()V L0 LINENUMBER 140 L0 GETSTATIC processing/hardware/arduino/cores/arduino/Arduino.Serial : Lprocessing/hardware/arduino/cores/arduino/HardwareSerial; LDC 57600 INVOKEVIRTUAL processing/hardware/arduino/cores/arduino/HardwareSerial.begin (J)V L1 LINENUMBER 141 L1 FRAME SAME GETSTATIC processing/hardware/arduino/cores/arduino/Arduino.Serial : Lprocessing/hardware/arduino/cores/arduino/HardwareSerial; INVOKEVIRTUAL processing/hardware/arduino/cores/arduino/HardwareSerial.isOpen ()Z IFNE L2 GOTO L1 L2 LINENUMBER 144 L2 FRAME SAME RETURN MAXSTACK = 3 MAXLOCALS = 0 C generated code:
/** public static void setup() Code(max_stack = 3, max_locals = 0, code_length = 22) */ #undef JMETHOD #define JMETHOD ru_timreset_IrTest_setup_V const ru_timreset_IrTest_setup_V_t JMETHOD PROGMEM ={ 0+(2)+3, 0, 0, // MaxLocals+(lsp+pc)+MaxStack, purLocals, purParams OP_GETSTATIC_L, SADR(processing_hardware_arduino_cores_arduino_Arduino_Serial), // 0: getstatic processing.hardware.arduino.cores.arduino.Arduino.Serial Lprocessing/hardware/arduino/cores/arduino/HardwareSerial; (16) OP_LDC2_W_L, CADR(Const0003), // 3: ldc2_w 57600 (35) OP_INVOKEVIRTUAL, B(2), LB(MSG_begin__J_V), // 6: invokevirtual processing.hardware.arduino.cores.arduino.HardwareSerial.begin (J)V (37) OP_GETSTATIC_L, SADR(processing_hardware_arduino_cores_arduino_Arduino_Serial), // 9: getstatic processing.hardware.arduino.cores.arduino.Arduino.Serial Lprocessing/hardware/arduino/cores/arduino/HardwareSerial; (16) OP_INVOKEVIRTUAL, B(0), LB(MSG_isOpen___Z), // 12: invokevirtual processing.hardware.arduino.cores.arduino.HardwareSerial.isOpen ()Z (38) OP_IFNE, TARGET(21), // 15: ifne #21 OP_GOTO, TARGET(9), // 18: goto #9 OP_RETURN, // 21: return }; As can be seen from the example above - HaikuVM almost one to one transfers the byte code to C.
In addition to Java support, HaikuVM allows you to call C functions directly - using NativeCppFunction / NativeCFunction annotations and contains methods for working with memory and interrupts.
In general, I liked the project - I even tried to translate it to Gradle ( github.com/TimReset/HaikuVMGradle ), but since HaikuVM contains quite complex logic in bat / sh files, this has not yet been completely done.
But there are downsides - since the memory microcontrollers and the processor frequency are few, then even a small overhead in the form of GC (although you can turn off the GC, but it doesn’t help much) and converting the byte code to C introduces noticeable delays. This is expressed, for example, in the inability to work with Serial at high frequencies (more than 57600 kb / s) - data starts to be lost. Therefore, I began to develop my own (with tests and library support) Java launch option in Arduino.
Convert Java Code to Wiring
Whatever overhead is in the form of GC and the native interpreter byte code, you can convert Java code directly into Wiring (programming language in Arduino, the same C ++). I did not find ready implementations, so I decided to write my own ( github.com/TimReset/arduino-java ), since the Java syntax is very similar to C. To do this, use AST analysis from Eclipse ( help.eclipse.org/mars/index.jsp?topic=%2Forg.eclipse.jdt.doc.isv%2Freference%2Fapi%2Forg%2Feclipse%2Fjdt%2Fcore%2Fdom%2FASTNode. )
Conversion algorithm
There is an abstract class with abstract methods loop () and setup () and with utility constants and methods digitalRead (int), analogRead (int), etc. Abstract loop / setup methods are required for mandatory redefinition. Utility methods and constants should emulate the behavior of Wiring - in the sketches for Arduino, you can refer to these methods / constants.
The sketch inherits this base class (I called it BaseArduino) and implements the setup and loop methods.
Next, just write the logic. You can create methods, use variables. To use third-party libraries, you need to create stub classes in Java that contain methods from these libraries and use these classes in your code. Stub classes should be in a package with the name of the library that these classes implement. The libraries themselves must be located in the folder parser / src / main / c in the folder with the name of the library. When compiling already Wring code, these libraries will be used.
Finally, the Java class is converted using Visitor, a successor of the org.eclipse.jdt.internal.core.dom.NaiveASTFlattener class ( www.cs.utep.edu/cheon/download/jml4c/javadocs/org/eclipse/jdt/internal /core/dom/NaiveASTFlattener.html ), in which some methods are redefined:
boolean visit (VariableDeclarationStatement), boolean visit (FieldDeclaration), boolean visit (MethodDeclaration) - to track the use of classes from libraries and remove all modifiers (final, visibility modifiers and static). Perhaps this is unnecessary, but so far it works.
Also replaces the creation of the object:
decode_results results = new decode_results (); converts to decode_results results ();
boolean visit (MethodInvocation) - to track calls to library classes and pass them to methods when passing them to methods (via &):
irrecv.decode (results) converts to irrecv.decode (& results)
If there are experts in C ++, tell me, do you always need to pass objects or are there any other options?
6) All this is wrapped Gradle script that allows you to run the verification and loading the sketch.
Example:
Sketch compilation

Download sketch
As an example, I’ll take a program for converting IR signals for speakers (there is a long history - Microlab Speakers Solo 6C speakers with a remote control, the remote stopped working after a few months, didn’t find the original, had to be replaced with a universal remote, but it was large, eventually made a signal converter on the Arduino from a small chipster.ru/catalog/arduino-and-modules/control-modules/2077.html remote in signals for speakers).
Java code:
public class IrReceiverLib extends BaseArduino { public static final long REMOTE_CONTROL_POWER = 0xFF906F; public static final long REMOTE_CONTROL_VOL_UP = 0xFFA857; public static final long REMOTE_CONTROL_VOL_DOWN = 0xFFE01F; public static final long REMOTE_CONTROL_REPEAT = 0xFFFFFFFF; public static final long SPEAKER_IR_POWER = 2155823295L; public static final long SPEAKER_IR_VOL_DOWN = 2155809015L; public static final long SPEAKER_IR_VOL_UP = 2155841655L; public static final long SPEAKER_IR_BASS_UP = 2155843695L; public static final long SPEAKER_IR_BASS_DOWN = 2155851855L; public static final long SPEAKER_IR_TONE_UP = 2155827375L; public static final long SPEAKER_IR_TONE_DOWN = 2155835535L; public static final long SPEAKER_IR_AUX_PC = 2155815135L; public static final long SPEAKER_IR_REPEAT = 4294967295L; public static final int IR_PIN = A0; public final IRrecv irrecv = new IRrecv(IR_PIN); public final IRsend irsend = new IRsend(); long last_value = 0; @Override public void setup() { irrecv.enableIRIn(); } @Override public void loop() { decode_results results = new decode_results(); if (irrecv.decode(results) != 0) { final long value = results.value; if (value == REMOTE_CONTROL_POWER) { last_value = SPEAKER_IR_POWER; irsend.sendNEC(SPEAKER_IR_POWER, 32); irrecv.enableIRIn(); } else if (value == REMOTE_CONTROL_VOL_DOWN) { last_value = SPEAKER_IR_VOL_DOWN; irsend.sendNEC(SPEAKER_IR_VOL_DOWN, 32); irrecv.enableIRIn(); } else if (value == REMOTE_CONTROL_VOL_UP) { last_value = SPEAKER_IR_VOL_UP; irsend.sendNEC(SPEAKER_IR_VOL_UP, 32); irrecv.enableIRIn(); } else if (value == REMOTE_CONTROL_REPEAT) { if (last_value != 0) { irsend.sendNEC(last_value, 32); irrecv.enableIRIn(); } else { } } else { last_value = 0; } } } } Converted to this code:
#include <IRremote.h> public static long REMOTE_CONTROL_POWER=0xFF906F; public static long REMOTE_CONTROL_VOL_UP=0xFFA857; public static long REMOTE_CONTROL_VOL_DOWN=0xFFE01F; public static long REMOTE_CONTROL_REPEAT=0xFFFFFFFF; public static long SPEAKER_IR_POWER=2155823295L; public static long SPEAKER_IR_VOL_DOWN=2155809015L; public static long SPEAKER_IR_VOL_UP=2155841655L; public static long SPEAKER_IR_BASS_UP=2155843695L; public static long SPEAKER_IR_BASS_DOWN=2155851855L; public static long SPEAKER_IR_TONE_UP=2155827375L; public static long SPEAKER_IR_TONE_DOWN=2155835535L; public static long SPEAKER_IR_AUX_PC=2155815135L; public static long SPEAKER_IR_REPEAT=4294967295L; public static int IR_PIN=A0; IRrecv irrecv(IR_PIN); IRsend irsend; long last_value=0; void setup(){ Serial.begin(256000); irrecv.enableIRIn(); } void loop(){ decode_results results; if (irrecv.decode(&results) != 0) { long value=results.value; if (value == REMOTE_CONTROL_POWER) { last_value=SPEAKER_IR_POWER; irsend.sendNEC(SPEAKER_IR_POWER,32); irrecv.enableIRIn(); } else if (value == REMOTE_CONTROL_VOL_DOWN) { last_value=SPEAKER_IR_VOL_DOWN; irsend.sendNEC(SPEAKER_IR_VOL_DOWN,32); irrecv.enableIRIn(); } else if (value == REMOTE_CONTROL_VOL_UP) { last_value=SPEAKER_IR_VOL_UP; irsend.sendNEC(SPEAKER_IR_VOL_UP,32); irrecv.enableIRIn(); } else if (value == REMOTE_CONTROL_REPEAT) { if (last_value != 0) { irsend.sendNEC(last_value,32); irrecv.enableIRIn(); } else { } } else { last_value=0; } } } The code is simple - we get a signal and if it is a supported signal from the console, then we transform it into the corresponding signal for the speakers.
And the signal conversion test:
@RunWith(Parameterized.class) public class IRReceiverTest { @Parameterized.Parameters(name = "{index}: Type={0}") public static Iterable<Object[]> data() { return Arrays.asList(new Object[][]{ {"Power", IrReceiverLib.REMOTE_CONTROL_POWER, IrReceiverLib.SPEAKER_IR_POWER}, {"Vol down", IrReceiverLib.REMOTE_CONTROL_VOL_DOWN, IrReceiverLib.SPEAKER_IR_VOL_DOWN}, {"Vol up", IrReceiverLib.REMOTE_CONTROL_VOL_UP, IrReceiverLib.SPEAKER_IR_VOL_UP} }); } private final long remoteSignal; private final long speakerSignal; public IRReceiverTest(String type, long remoteSignal, long speakerSignal) { this.remoteSignal = remoteSignal; this.speakerSignal = speakerSignal; } @Test public void test() { IrReceiverLib irReceiverLib = new IrReceiverLib(); irReceiverLib.setup(); Assert.assertTrue(irReceiverLib.irrecv.isEnabled()); irReceiverLib.irrecv.receive(remoteSignal); irReceiverLib.loop(); Assert.assertEquals(speakerSignal, irReceiverLib.irsend.getLastSignal()); } } For the test, I added methods to the stub classes of the IRremote library, so that we could emulate the reception and transmission of the signal. In the test, I initialize and transmit the signal to the sketch, then check that the signal sent from the sketch is as expected.
The conversion is still very raw, but so far it performs the functions necessary for me. Plus, I used TDD there and all the modest conversion possibilities are covered with tests, which will allow to change it without further loss of functionality (already tested - the code has already been rewritten once when adding support for libraries).
In general, while for myself I stopped at my version of the conversion of Java to C.
Remark about converting Java code to other languages. Java code can be converted to JS. Now there are several working options: GWT ( www.gwtproject.org ) and TeaVM ( github.com/konsoletyper/teavm ). And they also use two different approaches - GWT converts the source code to JS, TeaVM - byte code.
useful links
It describes how to work Eclipse AST: habrahabr.ru/post/269129 Parse Java program using java program
Convert Groovy code into shaders: habrahabr.ru/en/post/269591 Debugging Shaders in Java + Groovy
AST analysis: habrahabr.ru/post/270173 AST analysis using patterns
Source: https://habr.com/ru/post/274571/
All Articles