We write DXE-driver for taking screenshots from BIOS Setup and other UEFI-applications
 In the last article about SecureBoot, I really missed the opportunity to take a screenshot when setting up UEFI via BIOS Setup, but then I was redirected to a text console to the serial port. This is an excellent solution, but it is available on a few server motherboards, and through it you can only get pseudographics, but I would like to get a real one - it looks nicer, and you don’t need to cut it out every time from the terminal window.
That’s exactly what we’ll do in this article, and at the same time I’ll tell you what a DXE driver is and how to write, build and test it yourself, how keyboard input and screen output in UEFI work, how to find among connected storage devices where you can write files, how to save something to a file from UEFI and how to adapt some external C code to work as part of the firmware.
If you're still interested, I'm waiting for you under the cut.
Denial of responsibility
Before we talk about writing and debugging drivers for UEFI, we should immediately say that experiments with firmware are dangerous, they can lead to a “brick”, and in the most unfortunate rare cases - to failure of equipment, so I warn you in advance: Everything that you read here, you use at your own risk and risk, I do not bear and I will not be responsible for the loss of the performance of your firmware or board. Before starting any experiments with the firmware, it is necessary to make a complete copy of the entire contents of the SPI flash using the programmer. This is the only way you can guarantee successful recovery of the firmware after any software failure.
If you do not have a programmer, but you really want to try to write and debug a DXE driver, use OVMF , VmWare Workstation 12 or any other virtualization systems with UEFI support of your choice.
What is needed and why is it a DX driver?
Our task is to take a screenshot from the entire screen while running a UEFI application, for example BIOS Setup, pressing a certain key combination, find a file system with write access and save the resulting screenshot to it. It would also be nice to get some indication of the status. Since to take a screenshot, you need to interrupt the work of UEFI applications, the program itself cannot be removed by the application, because there is no preemptive multitasking in UEFI yet, so we need a DXE driver.
The scheme of his work is planned approximately as follows:
0 We load only after the appearance of text input (to handle keystrokes) and graphic output (so that there was something to take screenshots with).
1 . We hang up the handler for pressing the LCtrl + LAlt + F12 combination (or whatever you like) on all available text input consoles.
2 In the handler, we find all the output graphic consoles, take a screenshot from them and re-encode it into PNG format (since UEFI applications usually do not use millions of colors, in this format, the screenshots are tens of kilobytes in size instead of several megabytes in BMP).
3 In the same handler, we find the first FS that is found with the ability to write to the root and save the resulting files there.
You can expand the functionality by choosing not the first available file system, but, for example, only USB-devices or only ESP partitions, let's leave it to the reader for independent work.
')
Choosing an SDK
For writing new code to work in UEFI, there are two different SDKs - the newer EDK2 from the UEFI Forum and the third-party GNU-EFI , based on the old Intel code. Both solutions imply that you will write code in C and / or assembler, in our case we will try to do with pure C.
It's not for me to judge which SDK is better, but I suggest using EDK2, since It is official and cross-platform, and new features (along with fixing old bugs) appear in it much faster due to its proximity to the source of changes, plus it is used by all IBVs I know to write my code.
EDK2 is in the process of continuous development, and its trunk is steadily added by 2-3 commits per day, but since we are not pursuing the latest trends here (they still don't work for anyone), so we will use the latter for this moment stable cut EDK2, which is called UDK2015 .
To provide cross-platform and buildability with different compilers, EDK2 generates makefiles for each platform using TXT (environment configuration), DEC, DSC, and FDF (package configuration) and INF (component configuration) configuration files, I’ll tell you more about them story, and now you need to get EDK2 and build HelloWorld, which we will do, but if you can’t wait to find out more details right now, go to the documentation .
Customize the build environment
It is understood that the necessary to build the code in C and assembler software is already installed on your machine. If not, I suggest Windows users install Visual Studio 2013 Express for Windows Desktop, Linux and OSX users will need GCC 4.4-4.9 and NASM.
If all this is already installed, it remains only to download UDK2015 , unpack the entire contents of UDK2015.MyWorkSpace.zip where you have the right to create files (yes, even directly to the desktop or into your home directory), and then unpack the contents of BaseTools (Windows) .zip or BaseTools (Unix.zip) into the MyWorkSpace directory that was created in the previous step, which you then rename to something decent, for example, UDK2015 .
Now open the terminal, go to the newly created directory UDK2015 and execute the edksetup.bat (or .sh ) script there , which will copy a set of text files to the Conf subdirectory, we will be interested in tools_def.txt and target.txt .
The first file is quite large; it contains definitions of environment variables with paths to the C and ASL compilers required for the build environment, assemblers, linkers, etc. If you need, you can fix the paths specified there or add your own set of utilities (so-called ToolChain ), but if you listened to my advice, then either VS2013 (if you have 32-bit Windows) or VS2013x86 (in case of 64-bit Windows), or GCC44 | ... | GCC49 (depending on your version of GCC, which he kindly shows in response to gcc --version ).
The second file contains the default build settings, I recommend setting the following values in it:
ACTIVE_PLATFROM = MdeModulePkg/MdeModulePkg.dsc # TARGET = RELEASE # TARGET_ARCH = X64 # DXE 64-, TOOL_CHAN_TAG = VS2013x86 # | VS2013 | GCC44 | ... | GCC49 | YOUR_FANCY_TOOLCHAIN, . edksetup.sh BaseTools In the case of Windows, the usual edksetup.bat without parameters is sufficient.Now let's test the build environment with the build command, if everything was done correctly, then after a certain time, it will end up with a message like
- Done - Build end time: ... Build total time: ... If instead of Done you see Failed , then something is wrong with your settings. I checked the above on VS2013x86 on Windows and GCC48 on Xubuntu 04/14/3 - MWRD .Project structure
Applications and drivers in EDK2 are not assembled separately, but as part of a so-called Package , i.e. package. In addition to the applications themselves, the package also includes libraries, sets of header files and files describing the configuration of the package and its contents. This is done in order to allow different drivers and applications to use different implementations of libraries, to have access to different header files and GUIDs. We will use MdeModulePkg, this is a very general package without any dependencies on architecture and hardware, and if our driver can be assembled in it, it will almost certainly work on any implementations of UEFI 2.1 and newer. The disadvantage of this approach is that most of the libraries in it (for example, DebugLib, used to get debugging output) are just stubs, and you have to write them yourself if the need arises.
To build our driver, you will need an .inf file with information about which libraries, protocols and files it needs for assembly, as well as adding the path to this .inf file to the DSC package file so that the build system knows that such an INF file there is a file.
Let's start from the end: open the UDK2015 / MdeModulePkg / MdeModulePkg.dsc file and scroll it to the [Components] section (you can find it by searching - this is faster). The section lists in order all the files belonging to the package, looks like the beginning of the section like this:
[Components] MdeModulePkg/Application/HelloWorld/HelloWorld.inf MdeModulePkg/Application/MemoryProfileInfo/MemoryProfileInfo.inf ... Add there your future .inf file along with the path to it relative to UDK2015 . I propose to create for it directly in MdeModulePkg the folder CrScreenshotDxe , and the INF file to call CrScreenshotDxe.inf . As you may have guessed, Cr is from CodeRush, and the author of this article is modesty itself. The result is something like this: [Components] MdeModulePkg/CrScreenshotDxe/CrScreenshotDxe.inf MdeModulePkg/Application/HelloWorld/HelloWorld.inf MdeModulePkg/Application/MemoryProfileInfo/MemoryProfileInfo.inf ... We save the changes and close the DSC-file, we will not change it again, if we don’t want to set up a debug output, but this is a completely different story.Now you need to fill in the INF file itself:
It will look like this
It remains to create the above mentioned file CrScreenshotDxe.c : [Defines] # INF_VERSION = 0x00010005 # , 1.5 BASE_NAME = CrScreenshotDxe # FILE_GUID = cab058df-e938-4f85-8978-1f7e6aabdb96 # GUID MODULE_TYPE = DXE_DRIVER # VERSION_STRING = 1.0 # ENTRY_POINT = CrScreenshotDxeEntry # [Sources.common] # , common - CrScreenshotDxe.c # #... # , - , PNG, [Packages] # MdePkg/MdePkg.dec # , UEFI MdeModulePkg/MdeModulePkg.dec # , [LibraryClasses] # UefiBootServicesTableLib # UEFI Boot Services gBS UefiRuntimeServicesTableLib # UEFI Runtime services gRT UefiDriverEntryPoint # UEFI-, , DebugLib # DEBUG PrintLib # UnicodeSPrint, snprintf [Protocols] # gEfiGraphicsOutputProtocolGuid # gEfiSimpleTextInputExProtocolGuid # gEfiSimpleFileSystemProtocolGuid # [Depex] # , , gEfiGraphicsOutputProtocolGuid AND # , gEfiSimpleTextInputExProtocolGuid # With this content
If you now repeat the build command, it must be successful, otherwise you did something wrong. #include <Uefi.h> #include <Library/DebugLib.h> #include <Library/PrintLib.h> #include <Library/UefiDriverEntryPoint.h> #include <Library/UefiBootServicesTableLib.h> #include <Library/UefiRuntimeServicesTableLib.h> #include <Protocol/GraphicsOutput.h> #include <Protocol/SimpleTextInEx.h> #include <Protocol/SimpleFileSystem.h> EFI_STATUS EFIAPI CrScreenshotDxeEntry ( IN EFI_HANDLE ImageHandle, IN EFI_SYSTEM_TABLE *SystemTable ) { return EFI_SUCCESS; } Now we finally have a blank for our driver, and you can go directly to writing code. It is absolutely clear that such an assembly system is no good, and working with it through editing text files is not very pleasant, so each IBV has its own solution for integrating the EDK2 assembly system into some modern IDE, for example, AMI Visual eBIOS so hung with Eclipse plugins, and Phoenix and Insyde weighed them by Visual Studio.
There is also a wonderful project VisualUefi for authorship of well-known computer security specialist Alex Ionescu, and if you also like Visual Studio, I suggest we try it, and for the time being we continue to frighten hardcore, maintain the spirit of the old school and all that.
We respond to keystrokes
Everything is quite simple here: when loading the driver, we search through all instances of the SimpleTextInputEx protocol, which is published by the keyboard driver and most often exactly one, even in the case when several keyboards are connected to the system — the buffer is common, unless something is specifically changed. However, just in case, we will sort through all the available instances, calling each function RegisterKeyNotify , which takes as a parameter a key combination to which we intend to react, and a pointer to the callback function that will be called after pressing the combination you need, and already and will be carried out all the main work.
Translate from Russian to C
For successful compilation, there are not enough features of TakeScreenshot and ShowStatus , which are described below. EFI_STATUS EFIAPI CrScreenshotDxeEntry ( IN EFI_HANDLE ImageHandle, IN EFI_SYSTEM_TABLE *SystemTable ) { EFI_STATUS Status; EFI_KEY_DATA KeyStroke; UINTN HandleCount; EFI_HANDLE *HandleBuffer = NULL; UINTN i; // Set keystroke to be LCtrl+LAlt+F12 KeyStroke.Key.ScanCode = SCAN_F12; KeyStroke.Key.UnicodeChar = 0; KeyStroke.KeyState.KeyShiftState = EFI_SHIFT_STATE_VALID | EFI_LEFT_CONTROL_PRESSED | EFI_LEFT_ALT_PRESSED; KeyStroke.KeyState.KeyToggleState = 0; // Locate all SimpleTextInEx protocols Status = gBS->LocateHandleBuffer(ByProtocol, &gEfiSimpleTextInputExProtocolGuid, NULL, &HandleCount, &HandleBuffer); if (EFI_ERROR (Status)) { DEBUG((-1, "CrScreenshotDxeEntry: gBS->LocateHandleBuffer returned %r\n", Status)); return EFI_UNSUPPORTED; } // For each instance for (i = 0; i < HandleCount; i++) { EFI_HANDLE Handle; EFI_SIMPLE_TEXT_INPUT_EX_PROTOCOL *SimpleTextInEx; // Get protocol handle Status = gBS->HandleProtocol (HandleBuffer[i], &gEfiSimpleTextInputExProtocolGuid, (VOID **) &SimpleTextInEx); if (EFI_ERROR (Status)) { DEBUG((-1, "CrScreenshotDxeEntry: gBS->HandleProtocol[%d] returned %r\n", i, Status)); continue; } // Register key notification function Status = SimpleTextInEx->RegisterKeyNotify( SimpleTextInEx, &KeyStroke, TakeScreenshot, &Handle); if (EFI_ERROR (Status)) { DEBUG((-1, "CrScreenshotDxeEntry: SimpleTextInEx->RegisterKeyNotify[%d] returned %r\n", i, Status)); } } // Free memory used for handle buffer if (HandleBuffer) gBS->FreePool(HandleBuffer); // Show driver loaded ShowStatus(0xFF, 0xFF, 0xFF); // White return EFI_SUCCESS; } We are looking for FS with write access, write data to a file
Before looking for available graphic consoles and taking screenshots of them, you need to find out if these same screenshots can be saved somewhere. To do this, find all instances of the SimpleFileSystem protocol, which is published by the PartitionDxe driver for each detected volume, the FS of which is known to the firmware. Most often, the only known FSs are the FAT12 / 16/32 family (sometimes only FAT32), which, according to the UEFI standard, can be used for ESP. Next you need to check that you can write to the found file system, you can do it in different ways, the easiest way is to try to create a file on it and open it for reading and writing, if you can, you can write to this file system. The solution, of course, is not the most optimal, but I suggest that readers work as a good implementation as an exercise.
Again translate from Russian to C
This code doesn't need anything else, it works as it is. EFI_STATUS EFIAPI FindWritableFs ( OUT EFI_FILE_PROTOCOL **WritableFs ) { EFI_HANDLE *HandleBuffer = NULL; UINTN HandleCount; UINTN i; // Locate all the simple file system devices in the system EFI_STATUS Status = gBS->LocateHandleBuffer(ByProtocol, &gEfiSimpleFileSystemProtocolGuid, NULL, &HandleCount, &HandleBuffer); if (!EFI_ERROR (Status)) { EFI_FILE_PROTOCOL *Fs = NULL; // For each located volume for (i = 0; i < HandleCount; i++) { EFI_SIMPLE_FILE_SYSTEM_PROTOCOL *SimpleFs = NULL; EFI_FILE_PROTOCOL *File = NULL; // Get protocol pointer for current volume Status = gBS->HandleProtocol(HandleBuffer[i], &gEfiSimpleFileSystemProtocolGuid, (VOID **) &SimpleFs); if (EFI_ERROR (Status)) { DEBUG((-1, "FindWritableFs: gBS->HandleProtocol[%d] returned %r\n", i, Status)); continue; } // Open the volume Status = SimpleFs->OpenVolume(SimpleFs, &Fs); if (EFI_ERROR (Status)) { DEBUG((-1, "FindWritableFs: SimpleFs->OpenVolume[%d] returned %r\n", i, Status)); continue; } // Try opening a file for writing Status = Fs->Open(Fs, &File, L"crsdtest.fil", EFI_FILE_MODE_CREATE | EFI_FILE_MODE_READ | EFI_FILE_MODE_WRITE, 0); if (EFI_ERROR (Status)) { DEBUG((-1, "FindWritableFs: Fs->Open[%d] returned %r\n", i, Status)); continue; } // Writable FS found Fs->Delete(File); *WritableFs = Fs; Status = EFI_SUCCESS; break; } } // Free memory if (HandleBuffer) { gBS->FreePool(HandleBuffer); } return Status; } We are looking for a graphical console and take a picture of its screen.
Checking what screenshots to save is what, let's take them down. To do this, you need to go through all instances of the GOP protocol, which is published by GOP drivers and VideoBIOSs (more precisely, not VBIOS itself, which knows nothing about any protocols, but the ConSplitter driver, which implements the layer between the old VBIOS and UEFI) for each output device with graphics. This protocol has the Blt function for copying an image from and to the framebuffer until we need only the first one. Using the Mode object of the same protocol, you can get the current screen resolution, which is needed to highlight the buffer of the desired size and take a screenshot from the entire screen, and not from some part of it. Having received a screenshot, it is worth checking that it is not completely black, for saving such data is a waste of time and space on the file system, a black rectangle of the desired size can be drawn in Paint. Then you need to convert the image from BGR (in which Blt gives it) to RGB (which the PNG encoder needs), otherwise the colors on the screenshots will be incorrect. We encode the image obtained after the conversion and save it to a file on the file system that we found in the previous step. We will collect the file name in 8.3 format from the current date and time, so there is less chance that one screenshot will overwrite another.
Again translate from Russian to C
To work is not enough lodepng_encode32 and the above-mentioned ShowStatus , we continue. EFI_STATUS EFIAPI TakeScreenshot ( IN EFI_KEY_DATA *KeyData ) { EFI_FILE_PROTOCOL *Fs = NULL; EFI_FILE_PROTOCOL *File = NULL; EFI_GRAPHICS_OUTPUT_PROTOCOL *GraphicsOutput = NULL; EFI_GRAPHICS_OUTPUT_BLT_PIXEL *Image = NULL; UINTN ImageSize; // Size in pixels UINT8 *PngFile = NULL; UINTN PngFileSize; // Size in bytes EFI_STATUS Status; UINTN HandleCount; EFI_HANDLE *HandleBuffer = NULL; UINT32 ScreenWidth; UINT32 ScreenHeight; CHAR16 FileName[8+1+3+1]; // 0-terminated 8.3 file name EFI_TIME Time; UINTN i, j; // Find writable FS Status = FindWritableFs(&Fs); if (EFI_ERROR (Status)) { DEBUG((-1, "TakeScreenshot: Can't find writable FS\n")); ShowStatus(0xFF, 0xFF, 0x00); // Yellow return EFI_SUCCESS; } // Locate all instances of GOP Status = gBS->LocateHandleBuffer(ByProtocol, &gEfiGraphicsOutputProtocolGuid, NULL, &HandleCount, &HandleBuffer); if (EFI_ERROR (Status)) { DEBUG((-1, "ShowStatus: Graphics output protocol not found\n")); return EFI_SUCCESS; } // For each GOP instance for (i = 0; i < HandleCount; i++) { do { // Break from do used instead of "goto error" // Handle protocol Status = gBS->HandleProtocol(HandleBuffer[i], &gEfiGraphicsOutputProtocolGuid, (VOID **) &GraphicsOutput); if (EFI_ERROR (Status)) { DEBUG((-1, "ShowStatus: gBS->HandleProtocol[%d] returned %r\n", i, Status)); break; } // Set screen width, height and image size in pixels ScreenWidth = GraphicsOutput->Mode->Info->HorizontalResolution; ScreenHeight = GraphicsOutput->Mode->Info->VerticalResolution; ImageSize = ScreenWidth * ScreenHeight; // Get current time Status = gRT->GetTime(&Time, NULL); if (!EFI_ERROR(Status)) { // Set file name to current day and time UnicodeSPrint(FileName, 26, L"%02d%02d%02d%02d.png", Time.Day, Time.Hour, Time.Minute, Time.Second); } else { // Set file name to scrnshot.png UnicodeSPrint(FileName, 26, L"scrnshot.png"); } // Allocate memory for screenshot Status = gBS->AllocatePool(EfiBootServicesData, ImageSize * sizeof(EFI_GRAPHICS_OUTPUT_BLT_PIXEL), (VOID **)&Image); if (EFI_ERROR(Status)) { DEBUG((-1, "TakeScreenshot: gBS->AllocatePool returned %r\n", Status)); break; } // Take screenshot Status = GraphicsOutput->Blt(GraphicsOutput, Image, EfiBltVideoToBltBuffer, 0, 0, 0, 0, ScreenWidth, ScreenHeight, 0); if (EFI_ERROR(Status)) { DEBUG((-1, "TakeScreenshot: GraphicsOutput->Blt returned %r\n", Status)); break; } // Check for pitch black image (it means we are using a wrong GOP) for (j = 0; j < ImageSize; j++) { if (Image[j].Red != 0x00 || Image[j].Green != 0x00 || Image[j].Blue != 0x00) break; } if (j == ImageSize) { DEBUG((-1, "TakeScreenshot: GraphicsOutput->Blt returned pitch black image, skipped\n")); ShowStatus(0x00, 0x00, 0xFF); // Blue break; } // Open or create output file Status = Fs->Open(Fs, &File, FileName, EFI_FILE_MODE_CREATE | EFI_FILE_MODE_READ | EFI_FILE_MODE_WRITE, 0); if (EFI_ERROR (Status)) { DEBUG((-1, "TakeScreenshot: Fs->Open of %s returned %r\n", FileName, Status)); break; } // Convert BGR to RGBA with Alpha set to 0xFF for (j = 0; j < ImageSize; j++) { UINT8 Temp = Image[j].Blue; Image[j].Blue = Image[j].Red; Image[j].Red = Temp; Image[j].Reserved = 0xFF; } // Encode raw RGB image to PNG format j = lodepng_encode32(&PngFile, &PngFileSize, (CONST UINT8*)Image, ScreenWidth, ScreenHeight); if (j) { DEBUG((-1, "TakeScreenshot: lodepng_encode32 returned %d\n", j)); break; } // Write PNG image into the file and close it Status = File->Write(File, &PngFileSize, PngFile); File->Close(File); if (EFI_ERROR(Status)) { DEBUG((-1, "TakeScreenshot: File->Write returned %r\n", Status)); break; } // Show success ShowStatus(0x00, 0xFF, 0x00); // Green } while(0); // Free memory if (Image) gBS->FreePool(Image); if (PngFile) gBS->FreePool(PngFile); Image = NULL; PngFile = NULL; } // Show error if (EFI_ERROR(Status)) ShowStatus(0xFF, 0x00, 0x00); // Red return EFI_SUCCESS; } We encode the image in PNG format
The best way to write code is not to write it, so let's take a ready-made library for encoding and decoding a PNG called lodepng . Download, put next to our C-file, add our lo line to the INF file in the [Sources.common] section, lodepng.h and lodepng.c , include the header file, and ... nothing compiles, because lodepng does not expect A standard C language library can take it entirely without it. Nothing, finish, not the first time.
Add the following to the beginning of lodepng.h :
#include <Uefi.h> // UEFI #define LODEPNG_NO_COMPILE_DECODER // PNG #define LODEPNG_NO_COMPILE_DISK // , .. fopen/fwrite #define LODEPNG_NO_COMPILE_ALLOCATORS // malloc/realloc/free, .. #define LODEPNG_NO_COMPILE_ERROR_TEXT // #define LODEPNG_NO_COMPILE_ANCILLARY_CHUNKS // PNG, .. #if !defined(_MSC_VER) // size_t GCC, MS #define size_t UINTN #endif And comment out the line with #include <string.h> , which we don't have either. You can, of course, create a local file with the same name, defining the type size_t there, but since we started to change it, we will change it.With lodepng.c it is a little more difficult, because from the standard library, besides size_t, it also needs memset, memcpy, malloc, realloc, free, qsort, and also it uses floating point calculations. The implementation of qsort can be dragged off from Apple , the memory management functions can be wrapped on gBS-> CopyMem , gBS-> SetMem , gBS-> AllocatePool and gBS-> FreePool, respectively, and in order to signal the operation of FPU, you must define the constant CONST INT32 _fltused = 0; otherwise the linker will swear at her absence. I’m not even talking about commenting files with standard #includes - everything is clear.
Similarly, qsort.c is also included in the normal combat, just remember to add it to the INF file.
Display status
It remains to write the ShowStatus function and our driver is ready. This very status can be obtained in various ways, for example, output numbers from 0x00 to 0xFF to a CPU IO-port 80h, which is connected to the POST-coder, but not everyone has it, and it doesn’t occur on laptops. You can squeak the speaker, but this is, firstly, platform-dependent, and secondly - wildly enrages after a couple of screenshots. You can blink lights on the keyboard, this is an additional task for the reader, and we will show the status of work with the graphic console directly through this graphic console - displaying a small square of the desired color in the upper left corner of the screen. At the same time, a white square will mean “the driver is successfully loaded,” yellow - “FS cannot be found,” blue - “Screenshot of the current console is completely black, there is no sense to save”, red - “an error has occurred” and, finally, green - “ screenshot taken and saved. It is necessary to display this square on all consoles, and after a short time to restore that piece of the image that they have been erased.
Last time we translate from Russian to C
Now everything is ready and successfully assembled, if not, saw until it is ready , or download my ready-made driver from GitHub and compare it with yours, maybe I forgot to describe any changes. EFI_STATUS EFIAPI ShowStatus ( IN UINT8 Red, IN UINT8 Green, IN UINT8 Blue ) { // Determines the size of status square #define STATUS_SQUARE_SIDE 5 UINTN HandleCount; EFI_HANDLE *HandleBuffer = NULL; EFI_GRAPHICS_OUTPUT_PROTOCOL *GraphicsOutput = NULL; EFI_GRAPHICS_OUTPUT_BLT_PIXEL Square[STATUS_SQUARE_SIDE * STATUS_SQUARE_SIDE]; EFI_GRAPHICS_OUTPUT_BLT_PIXEL Backup[STATUS_SQUARE_SIDE * STATUS_SQUARE_SIDE]; UINTN i; // Locate all instances of GOP EFI_STATUS Status = gBS->LocateHandleBuffer(ByProtocol, &gEfiGraphicsOutputProtocolGuid, NULL, &HandleCount, &HandleBuffer); if (EFI_ERROR (Status)) { DEBUG((-1, "ShowStatus: Graphics output protocol not found\n")); return EFI_UNSUPPORTED; } // Set square color for (i = 0 ; i < STATUS_SQUARE_SIDE * STATUS_SQUARE_SIDE; i++) { Square[i].Blue = Blue; Square[i].Green = Green; Square[i].Red = Red; Square[i].Reserved = 0x00; } // For each GOP instance for (i = 0; i < HandleCount; i ++) { // Handle protocol Status = gBS->HandleProtocol(HandleBuffer[i], &gEfiGraphicsOutputProtocolGuid, (VOID **) &GraphicsOutput); if (EFI_ERROR (Status)) { DEBUG((-1, "ShowStatus: gBS->HandleProtocol[%d] returned %r\n", i, Status)); continue; } // Backup current image GraphicsOutput->Blt(GraphicsOutput, Backup, EfiBltVideoToBltBuffer, 0, 0, 0, 0, STATUS_SQUARE_SIDE, STATUS_SQUARE_SIDE, 0); // Draw the status square GraphicsOutput->Blt(GraphicsOutput, Square, EfiBltBufferToVideo, 0, 0, 0, 0, STATUS_SQUARE_SIDE, STATUS_SQUARE_SIDE, 0); // Wait 500ms gBS->Stall(500*1000); // Restore the backup GraphicsOutput->Blt(GraphicsOutput, Backup, EfiBltBufferToVideo, 0, 0, 0, 0, STATUS_SQUARE_SIDE, STATUS_SQUARE_SIDE, 0); } return EFI_SUCCESS; } We test the result in UEFI Shell
Taking our driver collected from UDK2015 / Build / MdeModulePkg / RELEASE / X64 / MdeModulePkg / CrScreenshotDxe / CrScreenshotDxe / OUTPUT, will be needed there only two files - CrScreenshotDxe.efi driver itself and the section dependencies for him CrScreenshotDxe.depex
First, let's test the driver from the UEFI Shell. Copy the file CrScreenshotDxe.efi to a USB flash drive from the UEFI Shell, boot into it, go to the root of the flash drive with the command fs0: (the number may change depending on the number of disks connected to your system) and execute the load command CrScreenshotDxe.efi . If you see a success message and a white square flashed in the upper corner of the screen, then the driver is loaded and working. It looks like this to me:
UEFI Shell
This screenshot, like all subsequent ones, was taken by our driver, so the square in the corner is not visible on it.
Then feel free to click LCtrl + LAlt + F12 and watch the status. On my systems with AMI, the graphical console is one, and therefore I see a flashed green square and get one screenshot for one press of the combination. On my systems with Phoenix and Insyde, there were two graphic consoles, one of which is empty, so I see first a blue square and then a green one, while the screenshot is also only one. The test result from UEFI Shell for them looks the same, only the resolution there is no longer 800x600, but 1366x768.This screenshot, like all subsequent ones, was taken by our driver, so the square in the corner is not visible on it.
Well, from the shell everything works and you can take screenshots from UEFI applications, these are:
RU.efi
We test the result in a modified firmware
Unfortunately, the screenshot from BIOS Setup cannot be removed in this way - the driver loads too late. , — DXE- UEFITool , — OptionROM - PCIe-, . , , . , , , , BIOS Setup, LCtrl + LAlt + F12 — , , . :

Information
Main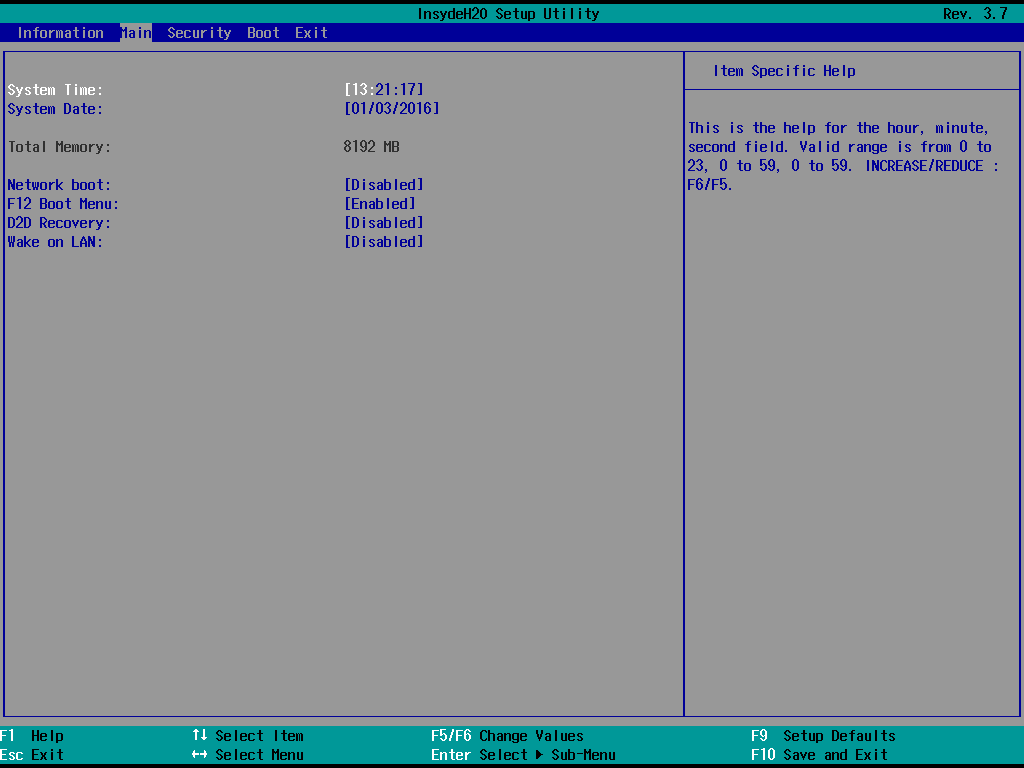
Security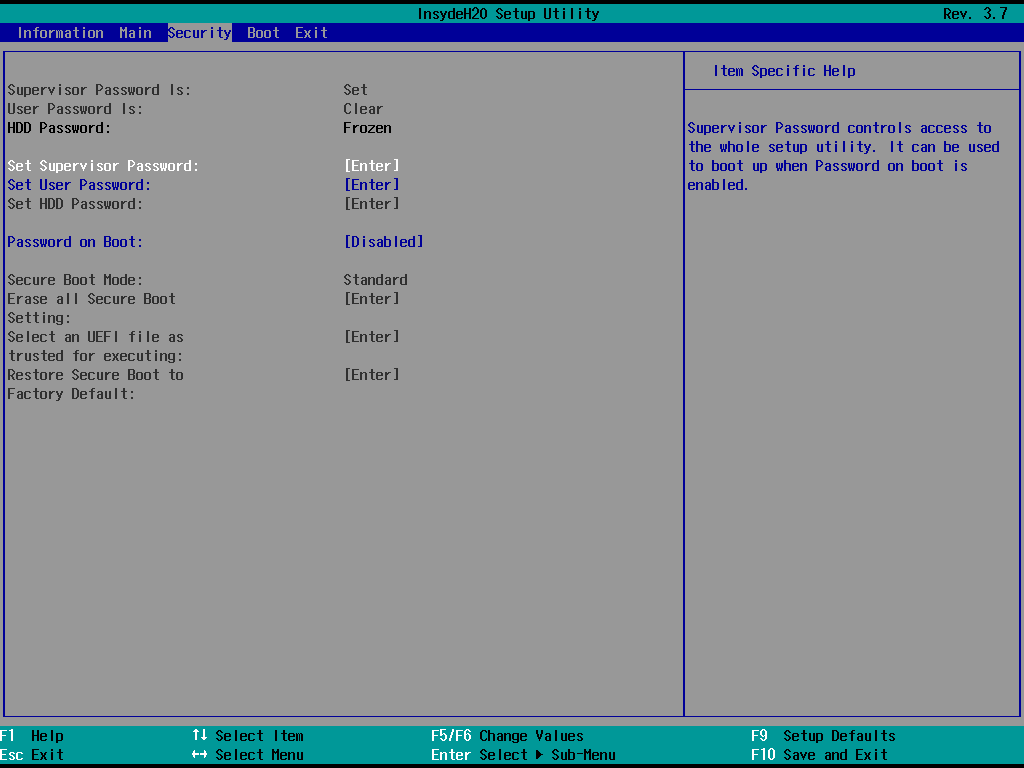
Boot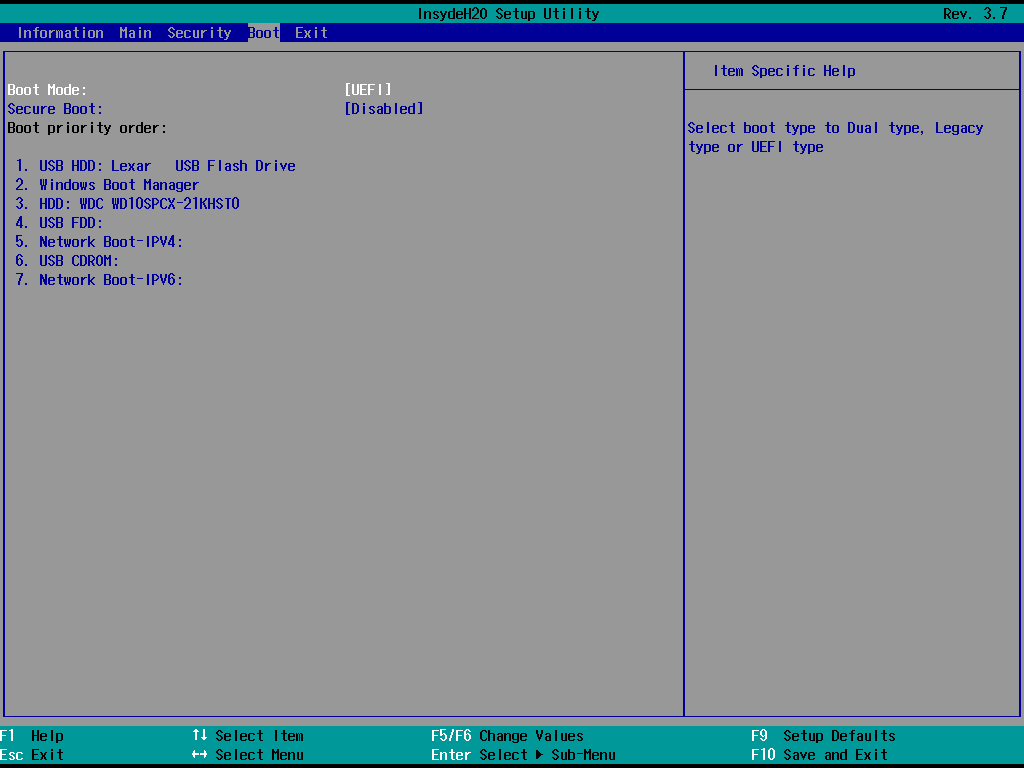
Exit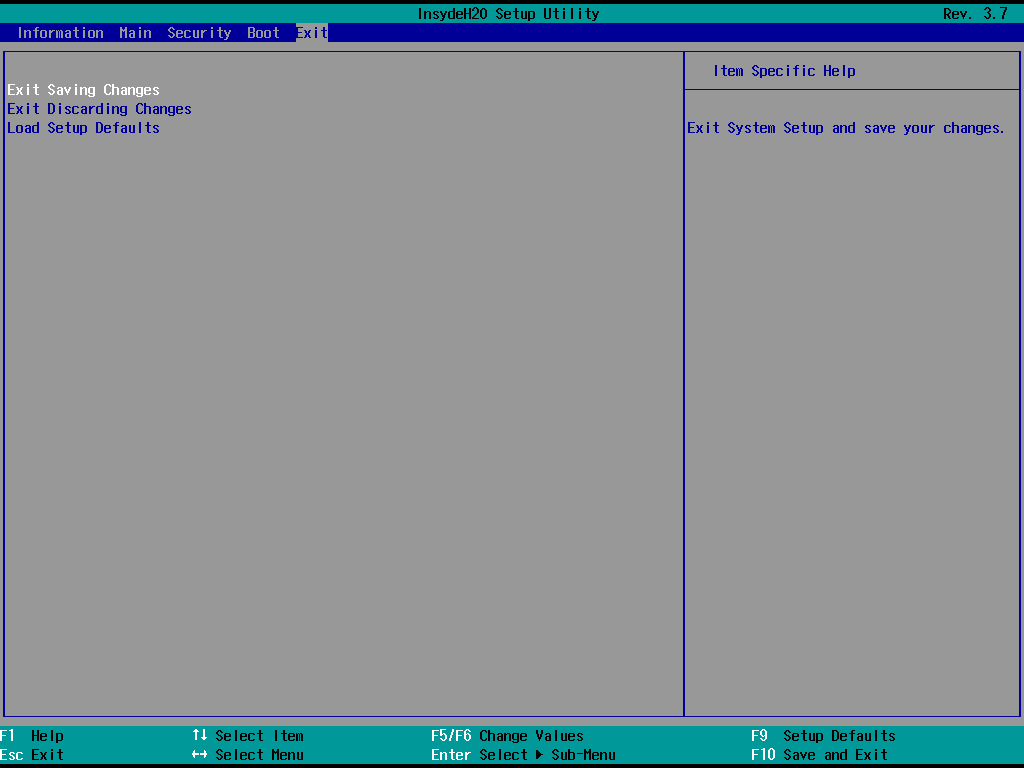
, .Conclusion
, GitHub , OptionROM, , , .
, , , , , UEFI , legacy BIOS — .
, DXE-.
Source: https://habr.com/ru/post/274463/
All Articles