An example of the implementation of methods for processing and recognition of images on Android
Being engaged in the development of applications for the Android OS, interesting ideas arise that you want to try, or there is some kind of theoretical knowledge and you want to put it into practice, from the combination of these factors and the idea of the described project emerged.
There are many articles about text recognition, computer vision, and individual recognition algorithms. The same publication demonstrates an attempt to implement a task related to finding a keyword in a text image, which may allow, for example, finding the necessary place to read any text in DjVu without recognizing the text itself.
An example of implementation is presented as an Android application, and the source image is a screenshot of the text, with the keyword entered, to solve the problem, various algorithms for image processing and recognition are used.
Suppose we have an image of some text, it can be a photo, a scanned image or a screenshot, and in this image you need to find some phrase or word as soon as possible in order to quickly extract the necessary part of the information, algorithms come to our aid image processing and recognition.
')
Details of the stages of creating Android applications will not be described here, as well as a detailed theoretical description of the algorithms will not be presented. With a minimal application test interface, the main objectives of the following are:
To obtain the image under study, we create an Activity in which there will be only three elements:
1. EditText - to enter a keyword;
2. TextView - to display the text in which you need to find this word;
3. Button to take a screenshot and go to another screen.
! All code is only demonstrative in nature and is not a correct instruction for action.
It looks like this:

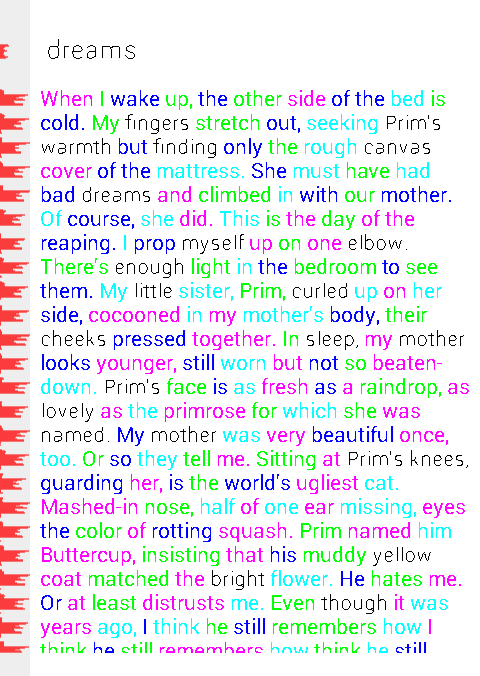
To search, for example, we introduce the word "dreams":
This way we get a single keyword, followed by the text below. It is worth paying attention to the fact that the keyword and the text itself have a different font size (to complicate the task, let's say so).
Click on the button and get a screenshot of the area with the keyword and text.
The resulting screenshot opens in a new Activity, where the functions of sequential actions are collected in NavigationDrawer. In a real application, some of the operations can be combined into one to eliminate unnecessary passes through the image.
First you need to translate the resulting color image into a grayscale.
For translation, the RGB to YUV scheme is used.
In our case, only the intensity (brightness) is necessary, and you can get it by the forum:
Y = 0.299 * R + 0.587 * G + 0.114 * B, where R, G, B are red, green and blue channels, respectively.
Strangely enough, the Color class is useful for working with colors and, in particular, its red, green and blue static methods, in which bit-shifted operations are implemented to highlight the desired color channel from the pixel's color value.
Sample code to convert a color pixel to brightness:
It is not much easier to perform segmentation on a halftone image than on a color one, so the next step is to convert the halftone image into a binary one (the brightness values of the pixels have only two values 0 and 1).
In this problem, for binarization of a rather elementary threshold method, with a default threshold of 128.
In the future, to adjust the results, the threshold can be selected experimentally (the application has the ability to set the threshold by the user).
To obtain a binary brightness value, a check of the previously obtained gray tone brightness is performed:
Where threshold is a threshold, Color.WHITE and Color.BLACK are constants for convenience, so as not to be confused with 0 and 1.
After the translation into halftone and further binarization, we get the following result:
Since these two image processing methods are very close, they are combined into one method.
To find a keyword, it is necessary after binarization to perform several segmentation stages, which consist in searching for lines in text, searching for words in lines and assigning the found words to the words of applicants by the number of letters (to narrow the range of words for recognition).
To determine the lines of text, it is necessary to find the parts of the histogram with the number of black pixels greater than zero, which are between the parts of the histogram with zero number of pixels. For this, a histogram of the number of black pixels in each one-pixel line of the image is compiled, after which it is processed to obtain the vertical coordinates of the lines (essentially the line numbers in the histogram). Knowing this coordinate and the overall size of the image, you can select the area containing the string with words.
"Inline" histogram for clarity (left) looks, for example, like this:
For ease of display, the histogram is normalized.
When you know the location of the lines on the image, you can proceed to search for words.
In order to understand where the words and where are just neighboring characters, it is necessary to determine which distances between characters to be considered as distances between words, and which distances between characters within a single word. Here the mod method comes to the rescue, or rather its adapted version, because most often this method is found in binarization, but its essence can also be applied in this situation.
For a start, as for the lines, we similarly construct a histogram inside the line (in fact, it was vertical, now horizontal), it is necessary to understand where the characters are, and where the white gaps are.
An example of obtaining such a histogram below is similar to the previous one.
Processing this histogram, you can get a new histogram - the intervals between black pixels, i.e., its first gradation will be the number of “gaps” 1 pixel wide, the second gradation is the number of “gaps” 2 pixels wide, and so on.
Get something like this:
Based on the logic of the mode method, we find two pronounced peaks (in the image above they are obvious), and all that is near one peak - the distance between the characters inside the word, and the second - the distance between the words.
Having such information about the "spaces" and the histogram of the line, you can select the image areas where the words are located, as well as count how many characters are contained in these words.
The full code of this process, see the source.
For a visual assessment of the work of the above set of algorithms, words in the text are colored in alternating colors, and the words applicants (remember, those whose number of characters matches the number of characters in the keyword) remain black:
And so, at this stage there are pieces of images (more precisely, the coordinates of these pieces), which contain the keyword and the words applicants based on the number of characters, you can try to find the keyword among the applicants.
I draw your attention to the fact that here recognition means the recognition of a keyword among the applicants, while recognizing which characters they consist of is out of the question.
For recognition, a set of informative features is selected: it can be the number of end points, anchor points, as well as the number of pixels with 3, 4 and 5 black pixels-neighbors, and others. It has been experimentally established that a large number of signs lose their meaning, since they “overlap” each other.
At this stage we will focus on the number of end points, taking into account their location (at the top and bottom of the image - for each part, the signs are considered separately).
For each word, the number of features is counted, after which the nearest neighbors method is searched based on the Euclidean distance.
All characteristic numbers such as A4, A8, etc. You can find additional information.
Given the repeatability of words and errors, as a result, you can get 2-3 closest neighbors, among which will be found a keyword (in the figure highlighted in red).
Also in the picture you can see that among the red words there is a search word “dreams”.
To improve the quality of recognition, you can try to pick up a different binarization threshold, as well as select other informative features, adding, for example, probes to them.
The goals were achieved, some methods of processing and recognition of images were tested, while their implementation under Android does not impose any additional difficulties, you just need to take into account the memory consumption and not to store several large Bitmap at the same time.
I hope the information will be useful for beginners on their way to solving problems of working with images for Android.
A description of all algorithms used, counting characteristic numbers, etc. can be easily found in the public domain both at habrahabr and in numerous textbooks and online resources.
Fully available project on github
PS: The given implementation of the algorithms is not optimal, and requires further development and optimization, serves only as the minimum necessary example for familiarizing, visualizing and evaluating the work of the above methods on Android.
There are many articles about text recognition, computer vision, and individual recognition algorithms. The same publication demonstrates an attempt to implement a task related to finding a keyword in a text image, which may allow, for example, finding the necessary place to read any text in DjVu without recognizing the text itself.
An example of implementation is presented as an Android application, and the source image is a screenshot of the text, with the keyword entered, to solve the problem, various algorithms for image processing and recognition are used.
Task
Suppose we have an image of some text, it can be a photo, a scanned image or a screenshot, and in this image you need to find some phrase or word as soon as possible in order to quickly extract the necessary part of the information, algorithms come to our aid image processing and recognition.
')
Details of the stages of creating Android applications will not be described here, as well as a detailed theoretical description of the algorithms will not be presented. With a minimal application test interface, the main objectives of the following are:
- Acquaintance with some methods of image processing and pattern recognition;
- Acquaintance with the possibilities and complexity of the implementation of these methods for Android.
Image acquisition
To obtain the image under study, we create an Activity in which there will be only three elements:
1. EditText - to enter a keyword;
2. TextView - to display the text in which you need to find this word;
3. Button to take a screenshot and go to another screen.
! All code is only demonstrative in nature and is not a correct instruction for action.
XML code for 1 and 2 points
<?xml version="1.0" encoding="utf-8"?> <LinearLayout xmlns:android="http://schemas.android.com/apk/res/android" xmlns:app="http://schemas.android.com/apk/res-auto" xmlns:tools="http://schemas.android.com/tools" android:id="@+id/main_content_layout" android:layout_width="match_parent" android:layout_height="match_parent" android:background="#ddd" android:orientation="vertical" android:paddingBottom="@dimen/activity_vertical_margin" android:paddingLeft="@dimen/activity_horizontal_margin" android:paddingRight="@dimen/activity_horizontal_margin" android:paddingTop="@dimen/activity_vertical_margin" app:layout_behavior="@string/appbar_scrolling_view_behavior" tools:context=".MainActivity" tools:showIn="@layout/activity_main"> <EditText android:layout_width="fill_parent" android:layout_height="40dp" android:singleLine="true" android:textColor="#000" /> <TextView android:layout_width="wrap_content" android:layout_height="wrap_content" android:text="@string/main_text" android:textColor="#000" android:ellipsize="end"/> </LinearLayout> Layout with a button that includes a link to the above layout
<?xml version="1.0" encoding="utf-8"?> <android.support.design.widget.CoordinatorLayout xmlns:android="http://schemas.android.com/apk/res/android" xmlns:app="http://schemas.android.com/apk/res-auto" xmlns:tools="http://schemas.android.com/tools" android:layout_width="match_parent" android:layout_height="match_parent" android:fitsSystemWindows="true" tools:context=".MainActivity"> <android.support.design.widget.AppBarLayout android:layout_width="match_parent" android:layout_height="wrap_content" android:theme="@style/AppTheme.AppBarOverlay"> <android.support.v7.widget.Toolbar android:id="@+id/toolbar" android:layout_width="match_parent" android:layout_height="?attr/actionBarSize" android:background="?attr/colorPrimary" app:popupTheme="@style/AppTheme.PopupOverlay" /> </android.support.design.widget.AppBarLayout> <include layout="@layout/content_main" /> <android.support.design.widget.FloatingActionButton android:id="@+id/fab" android:layout_width="wrap_content" android:layout_height="wrap_content" android:layout_gravity="bottom|end" android:layout_margin="@dimen/fab_margin" android:src="@android:drawable/ic_menu_camera" /> </android.support.design.widget.CoordinatorLayout> It looks like this:
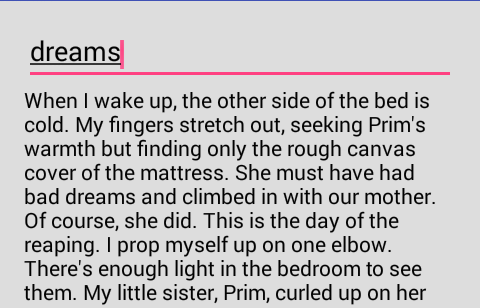
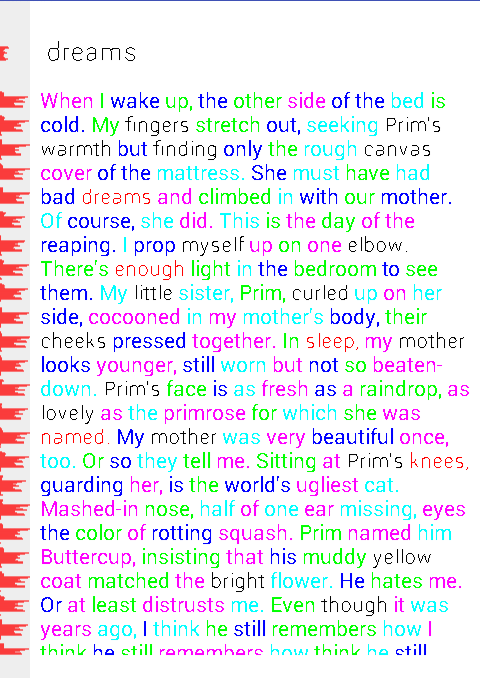
To search, for example, we introduce the word "dreams":
This way we get a single keyword, followed by the text below. It is worth paying attention to the fact that the keyword and the text itself have a different font size (to complicate the task, let's say so).
Click on the button and get a screenshot of the area with the keyword and text.
Method for taking a screenshot, called by clicking on the button
private void takeScreenshot() { // Date now = new Date(); // / android.text.format.DateFormat.format("yyyy-MM-dd_hh:mm:ss", now); try { // String path = Environment.getExternalStorageDirectory().toString() + "/" + now + ".jpg"; File imageFile = new File(path); // layout'a, View v1 = findViewById(R.id.main_content_layout); // v1.setDrawingCacheEnabled(true); Bitmap bitmap = Bitmap.createBitmap(v1.getDrawingCache()); v1.setDrawingCacheEnabled(false); // FileOutputStream outputStream = new FileOutputStream(imageFile); int quality = 100; bitmap.compress(Bitmap.CompressFormat.PNG, quality, outputStream); outputStream.flush(); outputStream.close(); // Activity openScreenshotActivity(now); } catch (Throwable e) { e.printStackTrace(); } } The resulting screenshot opens in a new Activity, where the functions of sequential actions are collected in NavigationDrawer. In a real application, some of the operations can be combined into one to eliminate unnecessary passes through the image.
Pre-processing the resulting image
First you need to translate the resulting color image into a grayscale.
Image transfer from color to halftone
For translation, the RGB to YUV scheme is used.
In our case, only the intensity (brightness) is necessary, and you can get it by the forum:
Y = 0.299 * R + 0.587 * G + 0.114 * B, where R, G, B are red, green and blue channels, respectively.
Strangely enough, the Color class is useful for working with colors and, in particular, its red, green and blue static methods, in which bit-shifted operations are implemented to highlight the desired color channel from the pixel's color value.
Sample code to convert a color pixel to brightness:
// pixels (size = = width*height ) for (int i = 0; i < size; i++) { int color = pixels[i]; // int r = Color.red(color); // int g = Color.green(color); // int b = Color.blue(color); // RGB to YUV double luminance = (0.299 * r + 0.0f + 0.587 * g + 0.0f + 0.114 * b + 0.0f); } It is not much easier to perform segmentation on a halftone image than on a color one, so the next step is to convert the halftone image into a binary one (the brightness values of the pixels have only two values 0 and 1).
Halftone binarization
In this problem, for binarization of a rather elementary threshold method, with a default threshold of 128.
In the future, to adjust the results, the threshold can be selected experimentally (the application has the ability to set the threshold by the user).
To obtain a binary brightness value, a check of the previously obtained gray tone brightness is performed:
pixels[i] = luminance > threshold ? Color.WHITE : Color.BLACK; Where threshold is a threshold, Color.WHITE and Color.BLACK are constants for convenience, so as not to be confused with 0 and 1.
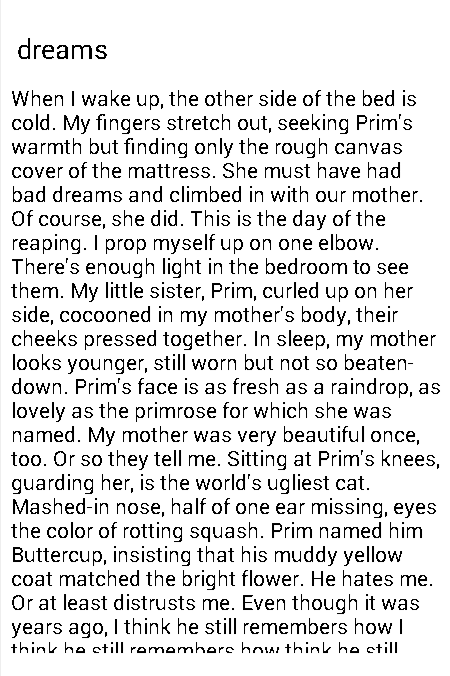
After the translation into halftone and further binarization, we get the following result:
Since these two image processing methods are very close, they are combined into one method.
An example of a method that translates into a halftone and binarization of an image
/** * imagePath - * threshold - */ public void binarizeByThreshold(String imagePath, int threshold) { // Bitmap bitmap = BitmapFactory.decodeFile(imagePath); // int width = bitmap.getWidth(); int height = bitmap.getHeight(); int size = width * height; // int[] pixels = new int[size]; bitmap.getPixels(pixels, 0, width, 0, 0, width, height); bitmap.recycle(); // , for (int i = 0; i < size; i++) { int color = pixels[i]; int r = Color.red(color); int g = Color.green(color); int b = Color.blue(color); double luminance = (0.299 * r + 0.0f + 0.587 * g + 0.0f + 0.114 * b + 0.0f); pixels[i] = luminance > threshold ? Color.WHITE : Color.BLACK; } Utils.saveBitmap(imagePath, width, height, pixels); } Segmentation
To find a keyword, it is necessary after binarization to perform several segmentation stages, which consist in searching for lines in text, searching for words in lines and assigning the found words to the words of applicants by the number of letters (to narrow the range of words for recognition).
String segmentation
To determine the lines of text, it is necessary to find the parts of the histogram with the number of black pixels greater than zero, which are between the parts of the histogram with zero number of pixels. For this, a histogram of the number of black pixels in each one-pixel line of the image is compiled, after which it is processed to obtain the vertical coordinates of the lines (essentially the line numbers in the histogram). Knowing this coordinate and the overall size of the image, you can select the area containing the string with words.
"Inline" histogram for clarity (left) looks, for example, like this:
Method to get row histogram
public ArrayList<GystMember> getRowsGystogram(String imagePath) { // , Bitmap bitmap = BitmapFactory.decodeFile(imagePath); int width = bitmap.getWidth(); int height = bitmap.getHeight(); int size = width * height; int[] pixels = new int[size]; bitmap.getPixels(pixels, 0, width, 0, 0, width, height); bitmap.recycle(); ArrayList<GystMember> gystogram = new ArrayList<>(); // for (int x = 0; x < height; x++) { gystogram.add(new GystMember(x)); for (int y = 0; y < width; y++) { int color = pixels[y + x * width]; if (color == Color.BLACK) { gystogram.get(x).add(); } } } return gystogram; } /*, */ public class GystMember implements Serializable { public int grayValue; public int count; public GystMember(int grayValue) { this.grayValue = grayValue; this.count = 0; } public void add() { count++; } } For ease of display, the histogram is normalized.
An example of normalization of the histogram in onDraw custom View
if (mGystogram != null) { float max = Integer.MIN_VALUE; for (GystMember gystMember : mGystogram) { if (gystMember.count > max) { max = gystMember.count; } } int pixelSize = getWidth(); int coef = (int) (max / pixelSize); if (coef == 0){ coef = 1; } int y = 0; for (GystMember gystMember : mGystogram) { int value = gystMember.count; canvas.drawLine(0, y, value / coef, y, mPaint); y++; } } When you know the location of the lines on the image, you can proceed to search for words.
Word segmentation
In order to understand where the words and where are just neighboring characters, it is necessary to determine which distances between characters to be considered as distances between words, and which distances between characters within a single word. Here the mod method comes to the rescue, or rather its adapted version, because most often this method is found in binarization, but its essence can also be applied in this situation.
For a start, as for the lines, we similarly construct a histogram inside the line (in fact, it was vertical, now horizontal), it is necessary to understand where the characters are, and where the white gaps are.
An example of obtaining such a histogram below is similar to the previous one.
Processing this histogram, you can get a new histogram - the intervals between black pixels, i.e., its first gradation will be the number of “gaps” 1 pixel wide, the second gradation is the number of “gaps” 2 pixels wide, and so on.
An example of obtaining the histogram of the intervals
public ArrayList<GystMember> getSpacesInRowsGystogram(String imagePath, ArrayList<GystMember> rowsGystogram) { // , Bitmap bitmap = BitmapFactory.decodeFile(imagePath); int width = bitmap.getWidth(); int height = bitmap.getHeight(); int size = width * height; int[] pixels = new int[size]; bitmap.getPixels(pixels, 0, width, 0, 0, width, height); bitmap.recycle(); // GystMember, . ArrayList<GystMember> oneRowGystogram = new ArrayList<>(); ArrayList<Integer> spaces = new ArrayList<>(); ArrayList<GystMember> spacesInRowsGystogram = new ArrayList<>(); int yStart = 0, yEnd = 0, yIter = -1; boolean inLine = false; // for (GystMember gystMember : rowsGystogram) { yIter++; // ( ), " " if (gystMember.count > 0 && !inLine) { inLine = true; yStart = yIter; } else if (gystMember.count == 0 && inLine) { // ( ), " " inLine = false; yEnd = yIter; // , for (int x = 0; x < width; x++) { GystMember member = new GystMember(x); for (int y = yStart; y < yEnd; y++) { int color = pixels[x + y * width]; if (color == Color.BLACK) { member.add(); } } oneRowGystogram.add(member); } int xStart = 0, xEnd = 0, xIter = -1; boolean inRow = false; // for (GystMember oneRowMember : oneRowGystogram) { xIter++; // if (oneRowMember.count == 0 && !inRow) { inRow = true; xStart = xIter; } else if ((oneRowMember.count > 0 || xIter == oneRowGystogram.size()-1) && inRow) { inRow = false; xEnd = xIter; // int xValue = xEnd - xStart; spaces.add(xValue); } } } } // Collections.sort(spaces); int lastSpace = -1; GystMember gystMember = null; for (Integer space : spaces) { if (space > lastSpace) { if (gystMember != null) { spacesInRowsGystogram.add(gystMember); } gystMember = new GystMember(space); } gystMember.add(); lastSpace = space; } return spacesInRowsGystogram; } Get something like this:
Based on the logic of the mode method, we find two pronounced peaks (in the image above they are obvious), and all that is near one peak - the distance between the characters inside the word, and the second - the distance between the words.
Having such information about the "spaces" and the histogram of the line, you can select the image areas where the words are located, as well as count how many characters are contained in these words.
The full code of this process, see the source.
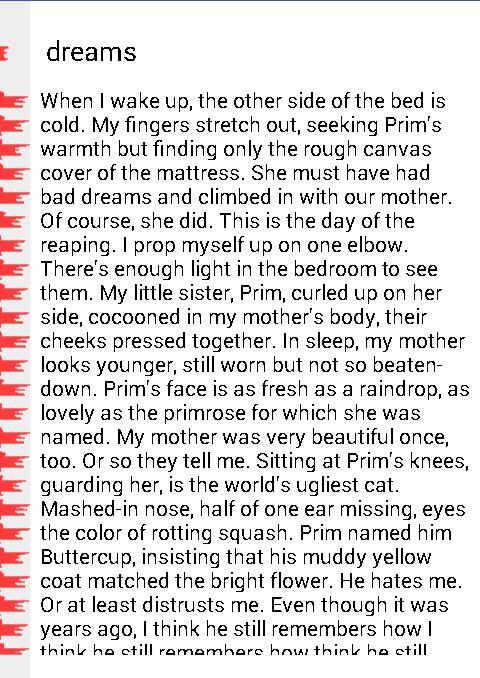
For a visual assessment of the work of the above set of algorithms, words in the text are colored in alternating colors, and the words applicants (remember, those whose number of characters matches the number of characters in the keyword) remain black:
And so, at this stage there are pieces of images (more precisely, the coordinates of these pieces), which contain the keyword and the words applicants based on the number of characters, you can try to find the keyword among the applicants.
Recognition
I draw your attention to the fact that here recognition means the recognition of a keyword among the applicants, while recognizing which characters they consist of is out of the question.
For recognition, a set of informative features is selected: it can be the number of end points, anchor points, as well as the number of pixels with 3, 4 and 5 black pixels-neighbors, and others. It has been experimentally established that a large number of signs lose their meaning, since they “overlap” each other.
At this stage we will focus on the number of end points, taking into account their location (at the top and bottom of the image - for each part, the signs are considered separately).
For each word, the number of features is counted, after which the nearest neighbors method is searched based on the Euclidean distance.
An example of the formation of a structure with counted signs
private void generateRecognizeMembers() { mRecognizeMembers.clear(); for (PartImageMember pretendent : mPretendents) { RecognizeMember recognizeMember = new RecognizeMember(pretendent); int pretendentWidth = pretendent.endX - pretendent.startX; int pretendentHeight = pretendent.endY - pretendent.startY; int[][] workPixels = new int[pretendentWidth][pretendentHeight]; // for (int pY = pretendent.startY, py1 = 0; pY < pretendent.endY; pY++, py1++) for (int pX = pretendent.startX, px1 = 0; pX < pretendent.endX; pX++, px1++) { workPixels[px1][py1] = mImagePixels[pX + pY * mImageWidth]; } int half = pretendentHeight / 2; // for (int ly = 0; ly < pretendentHeight; ly++) { // for (int lx = 0; lx < pretendentWidth; lx++) { int currentColor = workPixels[lx][ly]; // . if (currentColor != Color.WHITE) { // 33 int[][] pixelNeibours = Utils.fill3x3Matrix(pretendentWidth, pretendentHeight, workPixels, ly, lx); int[] pixelsLine = Utils.getLineFromMatrixByCircle(pixelNeibours); // , int A4 = getA4(pixelsLine); int A8 = getA8(pixelsLine); int B8 = getB8(pixelsLine); int C8 = getC8(pixelsLine); int Nc4 = A4 - C8; int CN = A8 - B8; recognizeMember.A4.add(A4); recognizeMember.A8.add(A8); recognizeMember.Cn.add(CN); // if (A8 == 1 && Nc4 == 1 && CN == 1) { if (ly < half) { recognizeMember.endsCount++; } else { recognizeMember.endsCount2++; } } } } } mRecognizeMembers.add(recognizeMember); } } private int getA4(int[] pixelsLine) { int result = 0; for (int k = 1; k < 5; k++) { result += pixelsLine[2 * k - 2]; } return result; } private int getA8(int[] pixelsLine) { int result = 0; for (int k = 1; k < 9; k++) { result += pixelsLine[k - 1]; } return result; } private int getB8(int[] pixelsLine) { int result = 0; for (int k = 1; k < 9; k++) { result += pixelsLine[k - 1] * pixelsLine[k]; } return result; } private int getC8(int[] pixelsLine) { int result = 0; for (int k = 1; k < 5; k++) { result += pixelsLine[2 * k - 2] * pixelsLine[2 * k - 1] * pixelsLine[2 * k]; } return result; } All characteristic numbers such as A4, A8, etc. You can find additional information.
Direct recognition code based on Euclidean distance
private void recognize() { // ( ) generateRecognizeMembers(); mResultPartImageMembers.clear(); ArrayList<Double> keys = new ArrayList<>(); // RecognizeMember firstMember = mRecognizeMembers.get(0); mRecognizeMembers.remove(firstMember); for (RecognizeMember recognizeMember : mRecognizeMembers) { if (recognizeMember.getPretendent() != firstMember.getPretendent()) { double keyR = firstMember.equalsR(recognizeMember); recognizeMember.R = keyR; keys.add(keyR); } } // Collections.sort(mRecognizeMembers, new Comparator<RecognizeMember>() { @Override public int compare(RecognizeMember lhs, RecognizeMember rhs) { return (int) Math.round(lhs.R - rhs.R); } }); // , ( ) double firstKey = -1; double secondKey = -1; for (RecognizeMember member : mRecognizeMembers) { double key = member.R; if (firstKey == -1) { firstKey = key; mResultPartImageMembers.add(member.getPretendent()); } else if (key == firstKey) { mResultPartImageMembers.add(member.getPretendent()); } else if (secondKey == -1) { secondKey = key; mResultPartImageMembers.add(member.getPretendent()); } else if (secondKey == key) { mResultPartImageMembers.add(member.getPretendent()); } } } <...> // (2) public double equalsR(RecognizeMember o) { return Math.sqrt(Math.pow(this.endsCount - o.endsCount, 2) + Math.pow(this.endsCount2 - o.endsCount2, 2)); } <...> Given the repeatability of words and errors, as a result, you can get 2-3 closest neighbors, among which will be found a keyword (in the figure highlighted in red).
Also in the picture you can see that among the red words there is a search word “dreams”.
To improve the quality of recognition, you can try to pick up a different binarization threshold, as well as select other informative features, adding, for example, probes to them.
Conclusion
The goals were achieved, some methods of processing and recognition of images were tested, while their implementation under Android does not impose any additional difficulties, you just need to take into account the memory consumption and not to store several large Bitmap at the same time.
I hope the information will be useful for beginners on their way to solving problems of working with images for Android.
A description of all algorithms used, counting characteristic numbers, etc. can be easily found in the public domain both at habrahabr and in numerous textbooks and online resources.
Fully available project on github
PS: The given implementation of the algorithms is not optimal, and requires further development and optimization, serves only as the minimum necessary example for familiarizing, visualizing and evaluating the work of the above methods on Android.
Source: https://habr.com/ru/post/274323/
All Articles