Automated NuGet Package Creation

Kohl wanted you to pass the assembly
And with them fiery greetings
Nugget do not forget to pack
In the package!
Immediately make a reservation that this article focuses on the stack of technologies Microsoft. NET.
It often happens that a subset of projects begins to be used in different solutions.
')
As a rule, programmers, having seen something useful in the next project, do not bother at first - they create the lib folder (dll, assemblies, etc.) and put the compiled assemblies from the original solution there. Over time, it becomes clear that this is not the most convenient option, and here's why:
- the original solution begins to develop in its own direction, without taking into account "consumers": new dependencies are added, .net versions are updated, etc. "Jokes";
- if they even think about “consumers”, they forget to update their builds, when a critical update or just a new version comes out, and then everything gets even worse when the builds become more than one and some dependencies arise between them - updating one build results time of execution, because another build may be the wrong version;
- the original solution ceases to be developed further.
The answer to all these troubles can be the removal of projects into a separate decision and the creation of a NuGet-package, including general assemblies, and a change in the development paradigm of these assemblies. By and large, all this can be done without NuGet, but the pleasure is much less. How to make the NuGet package automatically build itself together with the project compilation on the build server and include all the necessary whistles and beeps - this story.
Making NuGet-packages
The process of making NuGet packages is fairly simple. All the general theoretical part is available and, in general, is understandable. You can pack various content into packages, not only compiled assemblies, but also debugging symbols, images, etc. resources, and even source code.
In this description, we limit ourselves to the most pressing issue of packaging compiled assemblies.
Preparing the first NuGet package
In order to organize the automated creation of NuGet-packages on the build server, you must "concoct" the first version of the package. The easiest and most understandable way to create a package is to use a NuSpec file that describes what it will be for the package. There are several ways to get this NuSpec file:
- Take someone else's example and fix it.
- Generate with NuGet.exe utility (command “NuGet.exe spec”).
- Create a new package or open an existing alien package with the GUI-utility NuGet Package Explorer , fix and save with the “Save Metadata As ...” command.
In principle, you can completely do all the creation of a NuSpec file in the GUI, but it will still be useful to understand how the NuSpec works.
For example, one of our NuSpec files with abbreviations looks something like this:
NuSpec content
<?xml version="1.0" encoding="utf-8"?> <package xmlns="http://schemas.microsoft.com/packaging/2012/06/nuspec.xsd"> <metadata> <id>NewPlatform.Flexberry.ORM</id> <version>2.1.0-alpha1</version> <title>Flexberry ORM</title> <authors>New Platform Ltd</authors> <!-- ... --> <description>Flexberry ORM package.</description> <releaseNotes> ... </releaseNotes> <copyright>Copyright New Platform Ltd 2015</copyright> <tags>Flexberry ORM</tags> <dependencies> <dependency id="NewPlatform.Flexberry.LogService" version="1.0.2" /> <!-- ... --> <dependency id="SharpZipLib" version="0.86.0" /> </dependencies> </metadata> <files> <!-- ... --> <file src="Debug-Net45\ICSSoft.STORMNET.DataObject.dll" target="lib\net45\ICSSoft.STORMNET.DataObject.dll" /> <file src="Debug-Net45\ICSSoft.STORMNET.DataObject.xml" target="lib\net45\ICSSoft.STORMNET.DataObject.xml" /> <!-- ... --> </files> </package> Here are some explanations regarding some sections:
- Id must be unique within the common namespace of all packages in order to avoid collisions. Someone indicates in the name of the package the name of the company , then the name of the project and the specific product, but someone does not bother .
- Regarding the versions: it is considered good practice to use the principles of semantic versioning . A small rule that we developed in our team is that all prerelease versions (which, in addition to 3 numbers, have something else at the end, for example, alpha1) are published with the assemblies compiled in the Debug configuration, and the releases, respectively, in Release.
- Release notes (releaseNotes) - a very useful thing, be sure to write there that has changed from the previous version. Users need to understand what they get with each update.
- Dependencies (dependencies). When describing dependencies, you need to think about how your package will be installed: if the user only has enough of your package and nothing else, then there are no dependencies. If your assemblies work only if there is another package, for example, SharpZipLib, then you should definitely write this dependency. It is important to understand that SharpZipLib, in turn, may have its own dependencies, and they will also “fly” to the user during installation, even if you do not specify them.
Installation takes place recursively, so that the user in one of the hypothetical situations can begin to install one package, and he will install more than a hundred - just through the dependencies. During the installation of packages, the choice of the version of the dependent package is very tricky . If the version number is not specified, then the latest release version will be installed, otherwise, the one that is clearly indicated depending on. By the way, if you use several unrelated packages from time to time, then you can create an empty package with dependencies on the packages you need and install this package of your own - the rest will be installed after it yourself. - Description of files may include an indication of specific names or masks. It is highly recommended to follow the correct package structure when the content type, version of the .net framework and other things are written to the target, in accordance with the agreement . It is important to understand that in the src attribute, when specifying the path to the file, you must build on the current directory, in the context of which the command for packing the package will be executed.
After the NuSpec file is ready, you can proceed to the trial package creation. A simple NuGet.exe utility command is executed for this: nuget pack MyAssembly.nuspec.
Thus, we need to get the coveted “first package”, or “prototype package”, that is, a nupkg file that can be used for installation in projects via the NuGet Package Manager or via NuGet.exe .
Exhibition of finished packages
So, we have a package that needs to be somehow delivered to users through some kind of “package distribution channel”. We believe that most users will install packages through Visual Studio. The built-in NuGet Package Manager understands two options for placing packages:
- Package Gallery, accessible via the network;
- Windows folder (local or network).
In the settings, you can add your own sources of packages, they will be moved one by one when installing or restoring packages, until the desired id is found. The option when the same identical (!) Package is in several sources is quite acceptable.
The easiest way to distribute packages is to create a network folder and add the packages there.
It is worth noting that NuGet allows you to work not only with the general package gallery https://nuget.org , but also create your own galleries, for this you can deploy somewhere in the same engine that is used at https://nuget.org . Our team prefers this option, because in this case it is possible to track download statistics, managing permissions through the site, in the end, it's just beautiful.

Installing the gallery may require small dances with a tambourine, at least in the question of authorization, but there is nothing difficult about it. Packages are published in the same way as on NuGet.org. It is important when updating the gallery site not to lose the archive with already loaded packages — they are stored in the site directory. Setting up the NuGet Package Manager for users in this case will look something like this:
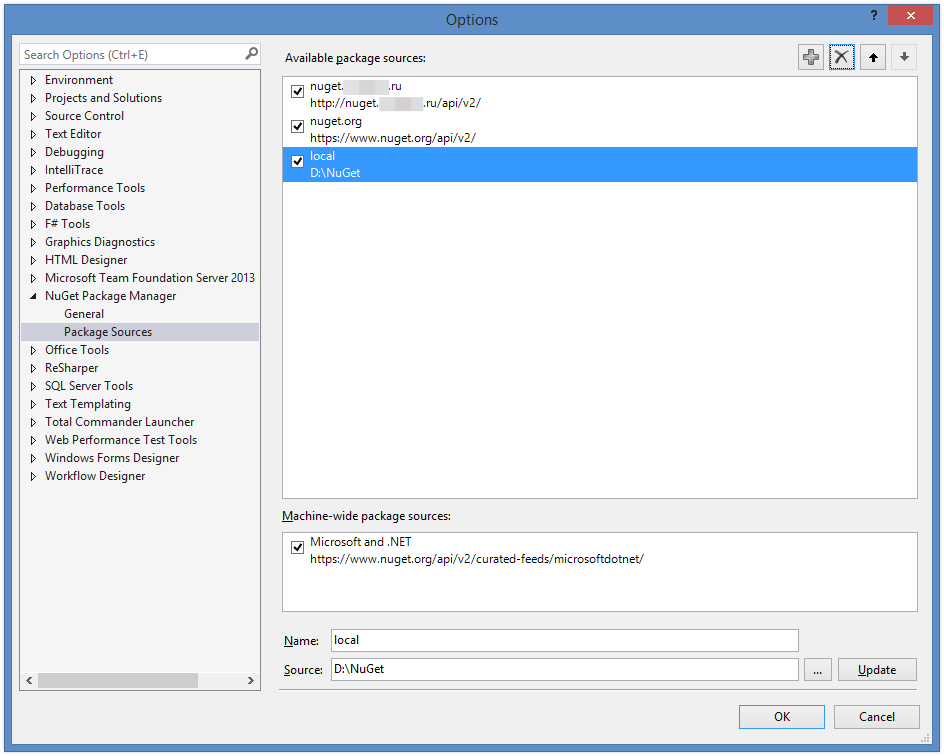
If a local source of packages is located somewhere near users, for example, on the same local network, then it is recommended to download all packages with dependencies into it - this will reduce the time for downloading packages for new users. It is very easy to find nupkg-files from dependent packages - they are always in the packages folder where these packages are installed (usually in the directory with the sln-file). Also in the package source settings window, the order is important - the studio will go through the sources if the packages are restored in the order specified in the settings. Therefore, if your package is available only locally, then first put your source so that there are no unnecessary requests to nuget.org.
Factory for the production of NuGet-packages
After the “prototype package” has been made and the “distribution channel for packages” has been set up, you can start automating the assembly of packages so that at the first mouse click we can get the hottest and freshest NuGet package.
Consider how this is done in the case of Team Foundation Server 2013/2015. For other similar CI systems, the process will be similar.
In the properties of Build Definition (XAML), you can specify a PowerShell script that will run if the build is successful. It is in this script that we will call our “packer”, passing the path to the NuSpec file as a parameter.
There are several points that should be clarified for yourself: where will NuGet.exe itself be located and all the files it needs (at least, the configuration file), where will the NuSpec file be located? On the one hand, you can rely on the fact that NuGet.exe is located in a certain place on the construction server, but if there are several servers and there is no desire to administer them, then the easiest way is to put NuGet.exe in Source Control and add the directory with its location in the Workspace to build with. As for NuSpec, it is convenient to keep it next to the sln-file and even include it in the Solution Items for quick access to it through the Solution Explorer.
If there are several solutions and you plan to create several packages, then it is recommended to implement one common PowerShell script that will receive the path to the NuSpec file as a parameter.
Below are excerpts from this script:
Excerpts from the PowerShell script
# Create NuGet Package after successfully server build. # Enable -Verbose option for this script call. [CmdletBinding()] Param( # Disable parameter. # Convenience option so you can debug this script or disable it in # your build definition without having to remove it from # the 'Post-build script path' build process parameter. [switch] $Disable, # This script used NuGet.exe from current directory by default. # You can change this path to meet your needs. [String] $NuGetExecutablePath = (Get-Item -Path ".\" -Verbose).FullName + "\NuGet.exe", $BinariesDirectoryPostfixes = @("\Debug", "\Release"), # Path to the nuspec file. Path relative TFS project root directory. [Parameter(Mandatory=$True)] [String] $NuspecFilePath, # Disable Doxygen. [switch] $NoDoxygen # ... # Go, go, go! $nugetOutputLines = & $NuGetExecutablePath pack $realNuspecFilePath -BasePath $basePath -OutputDirectory $outputDirectory -NonInteractive; ForEach ($outputLine in $nugetOutputLines) { Write-Verbose $outputLine; } # ... The script performs operations to convert relative paths to absolute (you can easily find a description of the available variables, which are indicated by the CI system when the script is run). In some cases, a NuSpec file needs to be modified in this script. For example, thus it is possible to handle the creation of packages for different configurations (Any CPU, x86).
This, in fact, the setting of the automatic mechanism for creating NuGet-packages ends. Run the build on the build server, check that everything worked. To get debug information, if something went wrong, do not forget to write –Verbose in the script parameters in the build definition settings. Ready packages are poured into a shared resource or gallery and invite first users.
Process subtleties
As the saying goes, “the main task of the programmer is to kill the perfectionist in himself”. If the internal perfectionist has not yet surrendered, then the following points should be useful to him.
In addition to the possibilities for creating NuGet-packages, the script for the build server for each of the packages can run the utility for generating auto-documentation based on XML comments in the code. This feature is convenient in the sense that for each version of the package we have our own version of the autodocumentation, it is convenient if users use different versions of NuGet-packages. We use Doxygen to generate auto- documentation . Here is the autodocument section of the script:
Extracts from the PowerShell script for generating autodocumentation
if($NoDoxygen) { Write-Verbose "Doxygen option is disabled. Skip generation of the project documentation."; } else { Write-Verbose "Doxygen option is enabled. Start documentation generation."; # Copy doxygen config file. $doxyConfigSourcePath = Join-Path -Path $toolsFolderPath -ChildPath "DoxyConfig" -Resolve; $doxyConfigDestinationPath = Join-Path -Path $Env:TF_BUILD_BINARIESDIRECTORY -ChildPath "DoxyConfig"; # Modify doxigen config file according with given nuspec. $nuspecXml = [xml](Get-Content $NuspecFilePath); $doxyConfig = Get-Content -Path $doxyConfigSourcePath; $projectName = $nuspecXml.GetElementsByTagName("title").Item(0).InnerText + " " + $nuspecXml.GetElementsByTagName("version").Item(0).InnerText; $doxyConfig = $doxyConfig -replace "FlexberryProjectName", $projectName; $projectLogoPath = Join-Path -Path $toolsFolderPath -ChildPath "logo.png" -Resolve; $doxyConfig = $doxyConfig -replace "FlexberryProjectLogo", $projectLogoPath -replace "\\", "/"; $doxyConfig = $doxyConfig -replace "FlexberryOutputDirectory", $Env:TF_BUILD_BINARIESDIRECTORY -replace "\\", "/"; $doxyConfig = $doxyConfig -replace "FlexberryInputDirectory", $Env:TF_BUILD_SOURCESDIRECTORY -replace "\\", "/"; $doxyWarnLogFilePath = Join-Path -Path $Env:TF_BUILD_BINARIESDIRECTORY -ChildPath "doxygen_log.txt"; $doxyConfig = $doxyConfig -replace "FlexberryWarnLogFile", $doxyWarnLogFilePath -replace "\\", "/"; $doxyConfig | Out-File $doxyConfigDestinationPath default; # Run doxygen. $doxygenExecutablePath = Join-Path -Path $toolsFolderPath -ChildPath "doxygen.exe" -Resolve; $doxygenOutputLines = & $doxygenExecutablePath $doxyConfigDestinationPath ForEach ($outputLine in $doxygenOutputLines) { Write-Verbose $outputLine; } Write-Verbose "Documentation generation done. Packing to the archive."; # Do archive. $archiveSourceFolder = Join-Path -Path $Env:TF_BUILD_BINARIESDIRECTORY -ChildPath "html" -Resolve; $archiveFileName = $nuspecXml.GetElementsByTagName("id").Item(0).InnerText + "." + $nuspecXml.GetElementsByTagName("version").Item(0).InnerText; $archiveDestinationFolder = Join-Path -Path $Env:TF_BUILD_BINARIESDIRECTORY -ChildPath ($archiveFileName + ".zip"); Add-Type -assembly "system.io.compression.filesystem"; [io.compression.zipfile]::CreateFromDirectory($archiveSourceFolder, $archiveDestinationFolder); # Remove html documentation files. Remove-Item $archiveSourceFolder -recurse; Write-Verbose "Done."; } The second point will concern the project build, if different versions of assemblies are packed into one package for different versions of the .net framework.
The tricks start with forcing the build server to build assemblies for different versions of the .net framework. Consider the projects that will be collected in the csproj format, and not the new json-format of the project file (ASP.NET5). Visual Studio supports an assembly configuration mechanism. Usually, 2 configurations are used - Debug and Release, but the same mechanism allows you to configure the .net version switch.
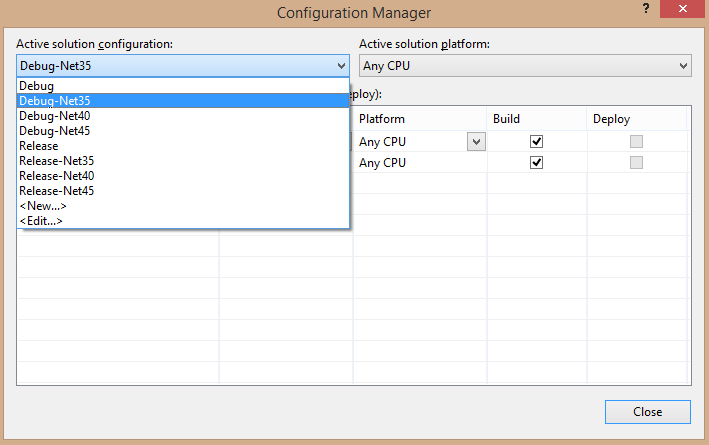
You can create your own configurations, which we do. Unfortunately, to perform the “fine-tuning” of all the necessary parameters, you will have to open the csproj-file and, at a minimum, register TargetFrameworkVersion in each of the configuration sections.
Excerpts from .csproj file
<PropertyGroup Condition=" '$(Configuration)|$(Platform)' == 'Debug-Net35|AnyCPU' "> <DebugSymbols>true</DebugSymbols> <DebugType>full</DebugType> <Optimize>false</Optimize> <OutputPath>bin\Debug-Net35\</OutputPath> <DefineConstants>DEBUG;TRACE</DefineConstants> <TargetFrameworkVersion>v3.5</TargetFrameworkVersion> <PlatformTarget>AnyCPU</PlatformTarget> <ErrorReport>prompt</ErrorReport> <WarningLevel>4</WarningLevel> <CodeAnalysisRuleSet>AllRules.ruleset</CodeAnalysisRuleSet> <DocumentationFile>bin\Debug-Net35\LogService.XML</DocumentationFile> </PropertyGroup> <PropertyGroup Condition=" '$(Configuration)|$(Platform)' == 'Release-Net35|AnyCPU' "> <DebugType>pdbonly</DebugType> <Optimize>true</Optimize> <OutputPath>bin\Release-Net35\</OutputPath> <DefineConstants>TRACE</DefineConstants> <TargetFrameworkVersion>v3.5</TargetFrameworkVersion> <PlatformTarget>AnyCPU</PlatformTarget> <ErrorReport>prompt</ErrorReport> <WarningLevel>4</WarningLevel> <DocumentationFile>bin\Release-Net35\LogService.XML</DocumentationFile> <CodeAnalysisRuleSet>AllRules.ruleset</CodeAnalysisRuleSet> </PropertyGroup> <PropertyGroup Condition="'$(Configuration)|$(Platform)' == 'Debug-Net40|AnyCPU'"> <DebugSymbols>true</DebugSymbols> <OutputPath>bin\Debug-Net40\</OutputPath> <DefineConstants>DEBUG;TRACE</DefineConstants> <DocumentationFile>bin\Debug-Net40\LogService.XML</DocumentationFile> <DebugType>full</DebugType> <TargetFrameworkVersion>v4.0</TargetFrameworkVersion> <PlatformTarget>AnyCPU</PlatformTarget> <ErrorReport>prompt</ErrorReport> <CodeAnalysisRuleSet>AllRules.ruleset</CodeAnalysisRuleSet> </PropertyGroup> <PropertyGroup Condition="'$(Configuration)|$(Platform)' == 'Debug-Net45|AnyCPU'"> <DebugSymbols>true</DebugSymbols> <OutputPath>bin\Debug-Net45\</OutputPath> <DefineConstants>DEBUG;TRACE</DefineConstants> <DocumentationFile>bin\Debug-Net45\LogService.XML</DocumentationFile> <DebugType>full</DebugType> <TargetFrameworkVersion>v4.5</TargetFrameworkVersion> <PlatformTarget>AnyCPU</PlatformTarget> <ErrorReport>prompt</ErrorReport> <CodeAnalysisRuleSet>AllRules.ruleset</CodeAnalysisRuleSet> </PropertyGroup> <PropertyGroup Condition="'$(Configuration)|$(Platform)' == 'Release-Net40|AnyCPU'"> <OutputPath>bin\Release-Net40\</OutputPath> <DefineConstants>TRACE</DefineConstants> <DocumentationFile>bin\Release-Net40\LogService.XML</DocumentationFile> <Optimize>true</Optimize> <DebugType>pdbonly</DebugType> <TargetFrameworkVersion>v4.0</TargetFrameworkVersion> <PlatformTarget>AnyCPU</PlatformTarget> <ErrorReport>prompt</ErrorReport> <CodeAnalysisRuleSet>AllRules.ruleset</CodeAnalysisRuleSet> </PropertyGroup> <PropertyGroup Condition="'$(Configuration)|$(Platform)' == 'Release-Net45|AnyCPU'"> <OutputPath>bin\Release-Net45\</OutputPath> <DefineConstants>TRACE</DefineConstants> <DocumentationFile>bin\Release-Net45\LogService.XML</DocumentationFile> <Optimize>true</Optimize> <DebugType>pdbonly</DebugType> <TargetFrameworkVersion>v4.5</TargetFrameworkVersion> <PlatformTarget>AnyCPU</PlatformTarget> <ErrorReport>prompt</ErrorReport> <CodeAnalysisRuleSet>AllRules.ruleset</CodeAnalysisRuleSet> </PropertyGroup> Configurations in Visual Studio are switched in the main toolbar; in the build definition on the server, you can select several configurations at once, which will be compiled sequentially.
It should be noted that if your code for different versions of the .net framework starts to differ, then this can be processed using directives:
#if NETFX_35 for (int i = 0; i < resValueLength; i++) #else System.Threading.Tasks.Parallel.For(0, resValueLength, i => #endif In this case, the constants must be defined in the corresponding section of the csproj file:
<DefineConstants>DEBUG;TRACE;NETFX_35</DefineConstants> When we have ready-made compiled builds, let's see how to properly configure nuspec. In nuspec, special directories are defined for specific versions of the .net framework.
Example of the files section in the NuSpec file:
<files> <file src="Debug-Net35\LogService.dll" target="lib\net35\LogService.dll" /> <file src="Debug-Net35\LogService.XML" target="lib\net35\LogService.XML" /> <file src="Debug-Net40\LogService.dll" target="lib\net40\LogService.dll" /> <file src="Debug-Net40\LogService.XML" target="lib\net40\LogService.XML" /> <file src="Debug-Net45\LogService.dll" target="lib\net45\LogService.dll" /> <file src="Debug-Net45\LogService.XML" target="lib\net45\LogService.XML" /> </files> Another problem that can often be encountered when using (not even creating) NuGet packages is the problem of connecting one project in several solutions. The fact is that in a csproj-file, links to assemblies are put down to specific dlls, which by default are restored by Visual Studio to the packages folder next to the sln-file. Hence the problem arises when the same project is included in several solutions located in different folders. To solve this problem, you can use the NuGet-package, which includes a special Target, which rewrites the links before the build: https://www.nuget.org/packages/NuGetReferenceHintPathRewrite .
Another feature of the use of NuGet-packages is the theme package recovery during assembly. The fact is that until some time Visual Studio did not have built-in package recovery tools, so a special Target was added to csproj, which was responsible for the restoration. In modern Visual Studio (2013+), this is no longer relevant; monitor the purity of your csproj files; no more Targets are needed to restore NuGet packages.
And finally, you can tell that when using TFS, the packages folder by default climbs into Source Control and someone can periodically blink and still check out all the builds in TFS. To prevent this from happening (we are sure that for those who checkout assemblies in TFS in hell there should be a separate boiler), you can use the .tfignore file, which should save from this scourge.
Result
So, having completed all that is described in the instruction offered by us, you can get a ready-made package packing mechanism that works without human intervention. Our packages are assembled that way. Unless, the publication itself requires some attention.
Useful links:
- What is NuGet ;
- Nuspec file specification ;
- NuGet.exe utility ;
- NuGet Package Explorer ;
- Top 10 NuGet (Anti-) Patterns ;
- Distribution of the package gallery engine ;
- Doxygen autodocument generator ;
- Solution of the problem with the project in several solutions ;
- Solving the problem with the packages folder, which falls into Pending changes .
Source: https://habr.com/ru/post/274283/
All Articles