How I got my first experience developing an Android game

In this article I want to share my experience of creating the first game for the Android platform, to tell all the way from the birth of the idea to the publication.
Prehistory
Since 2012, I have become closely involved in programming, in particular the development of programs for Windows in C #. For all the time I got a lot of experience in developing .NET applications, participated in various projects, including team ones. So it turned out that I wanted to start developing for Android. I had a choice of C # (Xamarin) or Java. Since I have been programming in C # for the last 3 years and I wanted to start developing as soon as possible, and not to understand the new IDE and nuances of Java programming, the choice was obvious.
The idea of “what to develop?” Was born quickly and consisted in developing an application for listening and downloading music in VK. The application was almost complete, but was not published due to some problems. After half a year, I had a lot of “free” time and I decided to return to developing applications for Android. Acquainted with one programmer and talking with him about the advantages and disadvantages of Java (Android) and C # (Xamarin), I began, under his leadership, to study books on Java and learn IDE IntelliJ IDEA.
')
Idea or how it all started
After two weeks of familiarization with the principles of development (which were given to me quite easily), the familiar designer suggested instead of reading books and repeating examples to start developing the game right away, and to solve possible problems related to programming, as they become available. That's exactly what I did, it remained only to come up with an idea for the game, but after 5 minutes it came up with the designer himself.
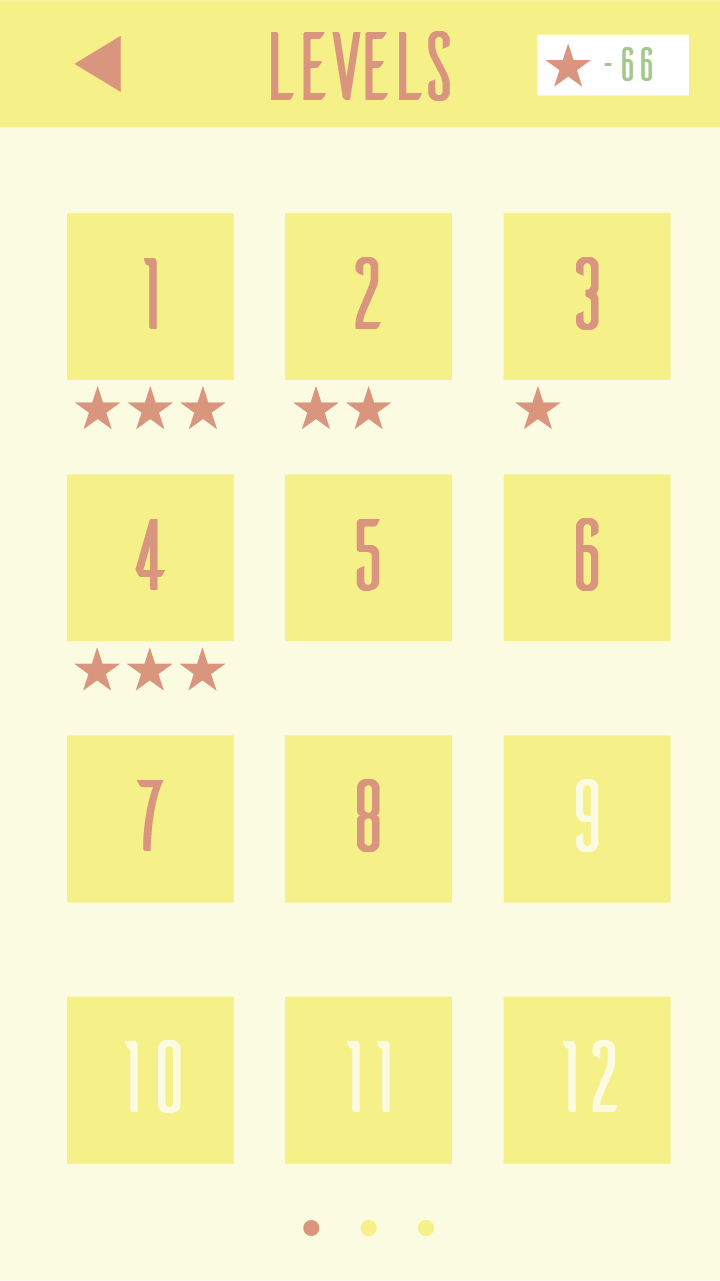
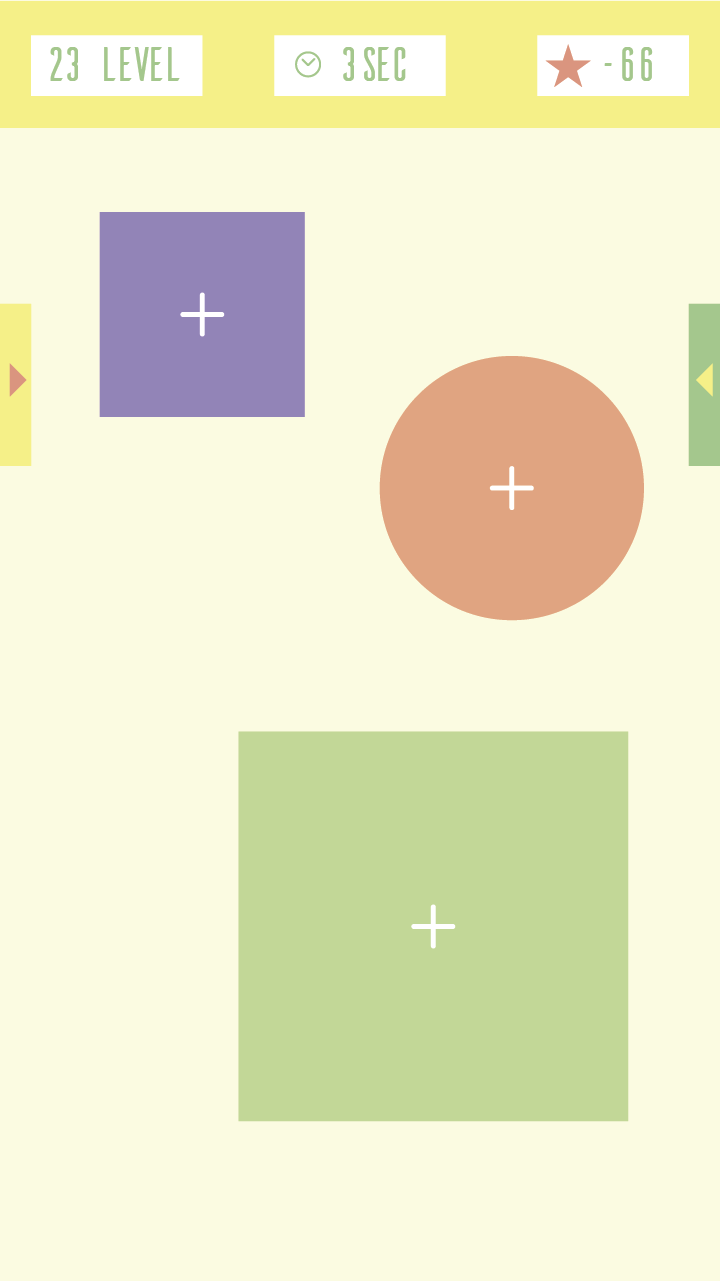
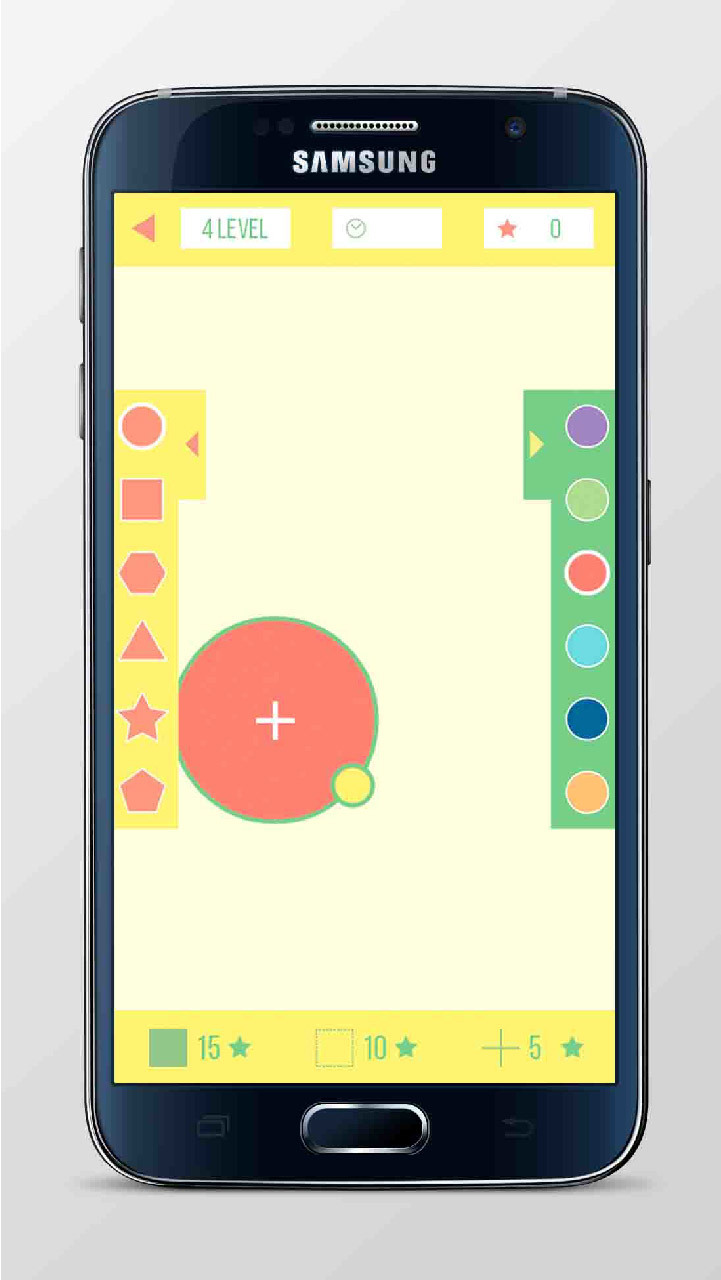
The game is aimed at the development of memory and its essence is as follows: the player is shown an image with several figures of different shapes, colors, sizes and positions for a few seconds, which he must have time to remember, and then repeat. For each completed level, the player receives "stars", which allow you to open new, more complex levels.
To determine the assessment (the number of asterisks obtained) of the passed level, it was decided to use 3 parameters: the color of the figure, its location and the radius. To add complexity to the gameplay, the condition was introduced that the player must repeat the shapes of all the figures presented, taking into account their location on the screen, otherwise the level will be considered unclassified.
Design
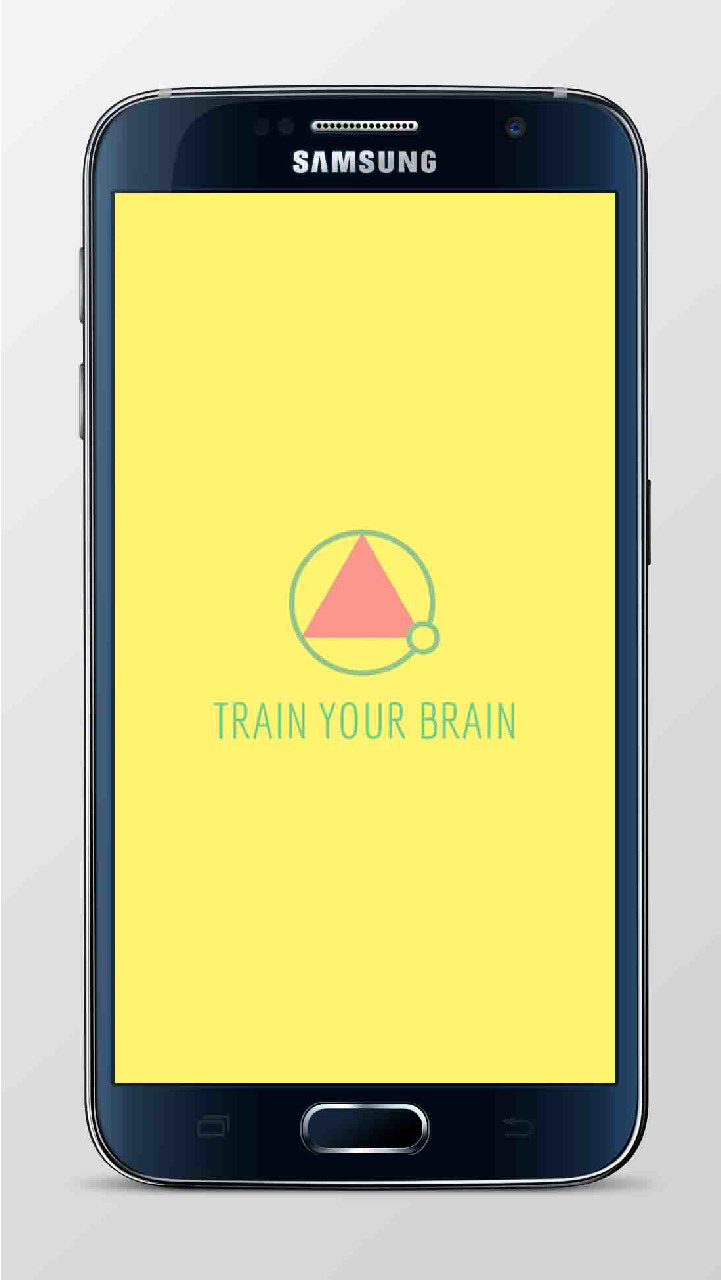
With the development of the graphical interface, I was helped by the same designer, who was not the first time participating in the development of UI / UX design for mobile applications. He developed a logo, an icon, chose primary colors, fonts, button sizes, etc. Then he presented a ready-made interface solution drawn in a vector. Prepared materials for the release ("thumbnails", promotional images, etc.).
The results of the work can be seen in the screenshots:
Development
After receiving the finished design of the game, I immediately began to develop. The difficulties encountered were associated only with the implementation of drawing figures. In total, it was necessary to implement 6 methods for drawing shapes (circle, square, triangle, pentagon, star, hexagon), two of which have already been implemented in Java. Also one of the conditions was that the figure should be drawn from the center in all directions, and should be inscribed in a circle with a radius, the size of which was determined by the user himself. Since this was my first project of this kind, I decided to independently implement methods for drawing the remaining four figures, rather than using ready-made libraries. The canvas.drawPath () (line drawing method ) was used for drawing the figures, it only remained for me to determine the points through which the lines should pass. In this regard, I had to remember the school curriculum and open a textbook on geometry.
The next nuance was that the figure can be drawn in several ways: with a designated center, with a frame, without a frame and center, with a frame and center, while the frame can be solid or dashed. To solve this problem, an interface with three methods was created (drawing a figure, a frame, drawing a figure with a frame). This interface was used to implement drawing classes for shapes.
Figure drawing interface
public interface DrawFigure { public void draw(Canvas canvas, PointF startPoint, PointF finishPoint, Paint mPaint); public void drawWithBorder(Canvas canvas, PointF startPoint, PointF finishPoint, Paint mPaint, Paint borderPaint); public void drawBorder(Canvas canvas, PointF startPoint, PointF finishPoint, Paint mPaint, Paint borderPaint); } Triangle drawing class
public class DrawThreeAngle implements DrawFigure { private float mRadius; private int[] angles = new int[]{30, 150, 270, 30}; private float[] xValues = new float[4]; private float[] yValues = new float[4]; @Override public void draw(Canvas canvas, PointF startPoint, PointF finishPoint, Paint mPaint) { mRadius = Tools.getRadius(startPoint, finishPoint); Path threeanglePath = new Path(); for (int i = 0; i < angles.length; i++) { xValues[i] = startPoint.x + (float) (mRadius * Math.cos(Math.toRadians(angles[i]))); yValues[i] = startPoint.y + (float) (mRadius * Math.sin(Math.toRadians(angles[i]))); if (i==0){ threeanglePath.moveTo(xValues[i], yValues[i]); } else { threeanglePath.lineTo(xValues[i], yValues[i]); } } threeanglePath.close(); canvas.drawPath(threeanglePath, mPaint); } @Override public void drawWithBorder(Canvas canvas, PointF startPoint, PointF finishPoint, Paint mPaint, Paint borderPaint) { draw(canvas, startPoint, finishPoint, mPaint); drawBorder(canvas, startPoint, finishPoint, mPaint, borderPaint); } @Override public void drawBorder(Canvas canvas, PointF startPoint, PointF finishPoint, Paint mPaint, Paint borderPaint) { for (int i = 0; i < angles.length - 1; i++) { canvas.drawLine(xValues[i], yValues[i], xValues[i + 1], yValues[i + 1], borderPaint); } } } Star drawing class
public class DrawStar implements DrawFigure { private float mRadius; private int[] angles = new int[]{-18, -54, 270, 234, 198, 162, 126, 90, 54, 18, -18}; private float[] xValues = new float[11]; private float[] yValues = new float[11]; @Override public void draw(Canvas canvas, PointF startPoint, PointF finishPoint, Paint mPaint) { mRadius = Tools.getRadius(startPoint, finishPoint); Path starPath = new Path(); for (int i = 0; i < angles.length; i++) { if (i % 2 == 0) { xValues[i] = startPoint.x + (float) (mRadius * Math.cos(Math.toRadians(angles[i]))); yValues[i] = startPoint.y + (float) (mRadius * Math.sin(Math.toRadians(angles[i]))); } else { xValues[i] = startPoint.x + (float) (mRadius / 2 * Math.cos(Math.toRadians(angles[i]))); yValues[i] = startPoint.y + (float) (mRadius / 2 * Math.sin(Math.toRadians(angles[i]))); } if (i==0){ starPath.moveTo(xValues[i], yValues[i]); } else { starPath.lineTo(xValues[i], yValues[i]); } } starPath.close(); canvas.drawPath(starPath, mPaint); } @Override public void drawWithBorder(Canvas canvas, PointF startPoint, PointF finishPoint, Paint mPaint, Paint borderPaint) { draw(canvas, startPoint, finishPoint, mPaint); drawBorder(canvas, startPoint, finishPoint, mPaint, borderPaint); } @Override public void drawBorder(Canvas canvas, PointF startPoint, PointF finishPoint, Paint mPaint, Paint borderPaint) { for (int i = 0; i < angles.length - 1; i++) { canvas.drawLine(xValues[i], yValues[i], xValues[i + 1], yValues[i + 1], borderPaint); } } } Implementation levels
After implementing the entire gameplay, I set about implementing the levels. A total of 60 levels of varying difficulty were created. The complexity of the levels depends on the number of figures, their size and location. Also, the complexity of the levels increased due to the possibility of drawing intersecting figures.
A database consisting of two tables with a list was created to store all levels. Since the figures in the database are given by coordinates (the center of the figure and a point on its radius), they will be displayed on different screens at different scales or generally go beyond the limits. Therefore, there is a need to solve the problem of rendering the level at the same scale for different screens. To solve this problem, the coordinates of the figures were determined at the so-called reference resolution. And the display in the desired scale is carried out by determining the ratio of the reference resolution to the current resolution and multiplying the coordinates of all the figures by the calculated coefficient.
Database structure
public class LevelsDatabaseHelper extends SQLiteOpenHelper { private static final String DB_NAME = "levels.sqlite"; private static final int VERSION = 1; private static final String TABLE_LEVELS = "levels"; private static final String COLUMN_LEVELS_STARS = "stars"; private static final String COLUMN_LEVELS_TIME = "time"; private static final String COLUMN_LEVELS_NUMBER = "number"; private static final String TABLE_FIGURE = "figure"; private static final String COLUMN_FIGURE_TYPE = "type"; private static final String COLUMN_FIGURE_NUMBER = "number"; private static final String COLUMN_FIGURE_CENTER_X = "center_x"; private static final String COLUMN_FIGURE_CENTER_Y = "center_y"; private static final String COLUMN_FIGURE_FINISH_X = "finish_x"; private static final String COLUMN_FIGURE_FINISH_Y = "finish_y"; private static final String COLUMN_FIGURE_COLOR = "color"; private static final String COLUMN_FIGURE_LAYER_INDEX = "layer_index"; private Context mContext; private SQLiteDatabase mDataBase; public LevelsDatabaseHelper(Context context) { super(context, DB_NAME, null, 2); } @Override public void onCreate(SQLiteDatabase db) { mDataBase = db; db.execSQL("create table " + TABLE_LEVELS + " (_id integer primary key autoincrement, " + COLUMN_LEVELS_NUMBER + " integer, " + COLUMN_LEVELS_STARS + " integer, " + " string, " + COLUMN_LEVELS_TIME + " integer)"); db.execSQL("create table " + TABLE_FIGURE + " (_id integer primary key autoincrement, " + COLUMN_FIGURE_NUMBER + " integer, " + COLUMN_FIGURE_TYPE + " string, " + COLUMN_FIGURE_CENTER_X + " real, " + COLUMN_FIGURE_CENTER_Y + " real, " + COLUMN_FIGURE_FINISH_X + " real, " + COLUMN_FIGURE_FINISH_Y + " real, " + COLUMN_FIGURE_COLOR + " integer, " + COLUMN_FIGURE_LAYER_INDEX + " string)"); } } Scam
When testing levels, a loophole was found when passing levels in which there are intersecting figures. The loophole was that when checking the level the layer on which the figure is located is not taken into account. As a result, you can draw the upper figure first, and then the lower one and the level would still be considered as passed. To eliminate this loophole, a variable was added to the shape class that defines the number of the layer on which it is located. The following conditions were also taken into account:
- The figure does not intersect with others, i. the layer level is not important to it, in this case the entered variable takes the value “-1”;
- On one layer there is more than one shape, in this case, the variable takes the numbers of the layers in terms of “/”, on which it can be located (“2/3/4”).
More clearly the solution to the problem is presented in the image: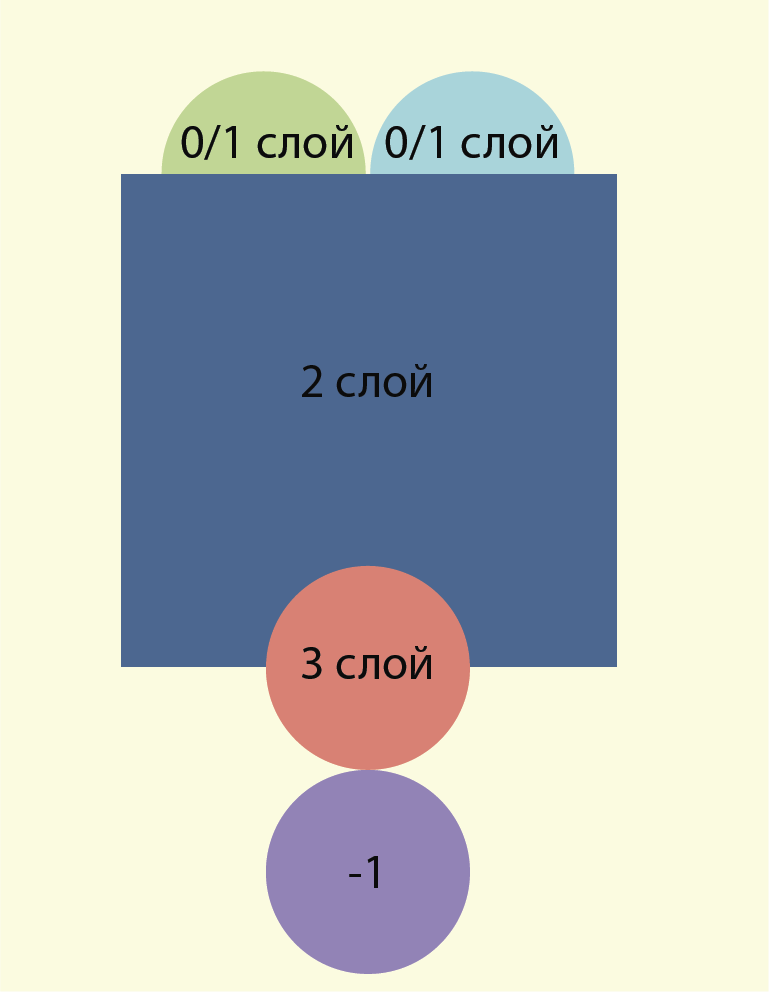
When checking the level, we first performed a check of the figures independent of the layer, and then the numbers of the layers of the remaining figures were compared in the order in which they were drawn.
Custom view
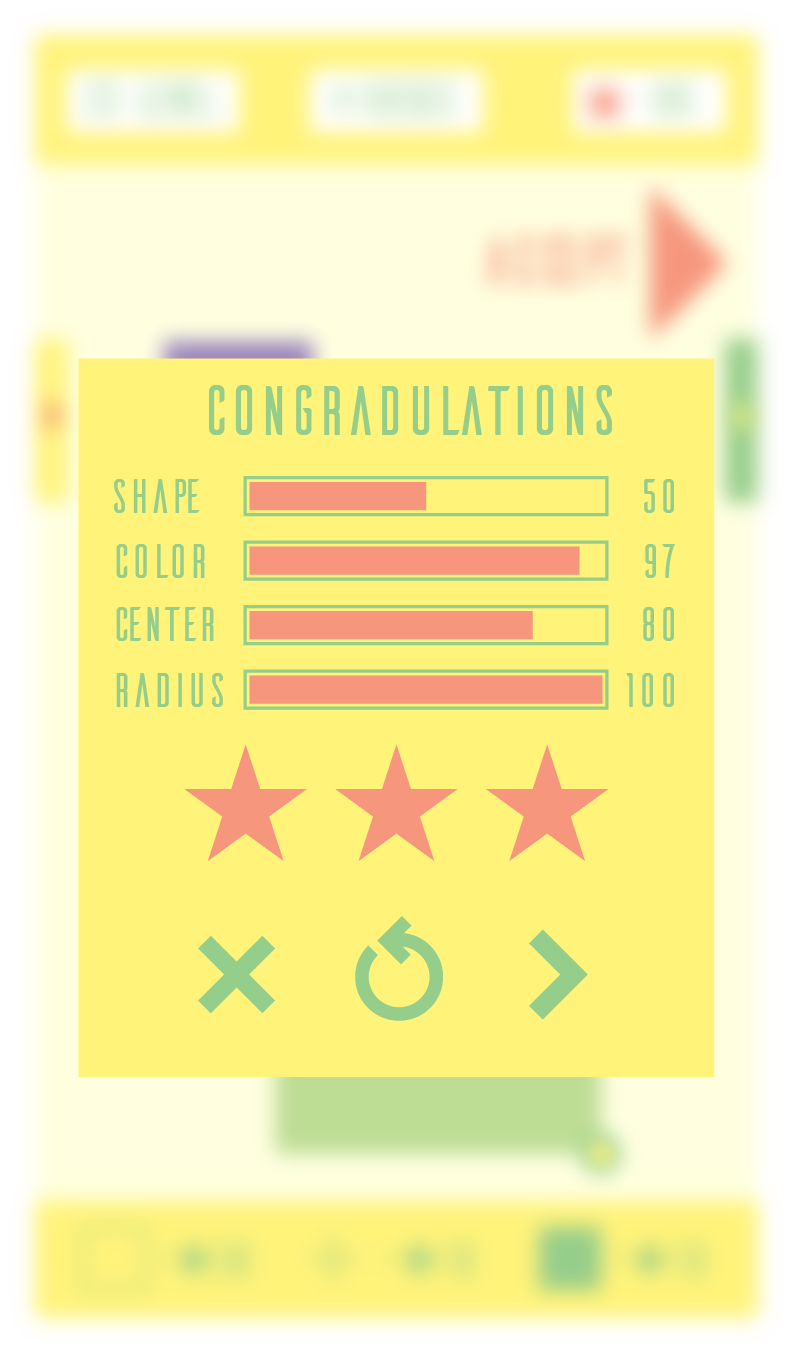
Given the non-trivial design, most of the View had to be implemented independently, for example, the progress bar in the result level window. The progress bar has a non-standard appearance, two headers on the left (the name of the parameter used for the evaluation) and on the right (the result obtained for this parameter). Also one of the conditions was the ability to support animated filling.
Appearance Progress Bar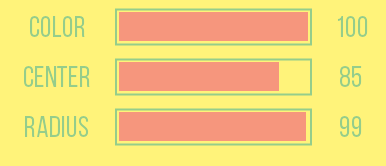
ProgressBarSuccessView code
public class ProgressBarSuccessView extends View { float mPercentValue = 0; String mLeftTitleText = "title"; int mWidth, mHeight; final float mLeftTitleSize = 0.3f, mProgressBarSize = 0.5f, mRightTitleSize = 0.2f; float mBorderMargin, mProgressMargin; RectF mProgressBarBorder = new RectF(), mProgressBarRectangle = new RectF(); int mLeftTitleX, mLeftTitleY, mRightTitleX, mRightTitleY; Paint mTitlePaint, mProgressPaint, mBorderProgressBarPaint; private Rect mTitleTextBounds = new Rect(); public ProgressBarSuccessView(Context context) { super(context); init(null); } public ProgressBarSuccessView(Context context, AttributeSet attrs) { super(context, attrs); init(attrs); } public ProgressBarSuccessView(Context context, AttributeSet attrs, int defStyle) { super(context, attrs, defStyle); init(attrs); } @Override protected void onSizeChanged(int w, int h, int oldw, int oldh) { super.onSizeChanged(w, h, oldw, oldh); mWidth = w; mHeight = h; mTitlePaint.getTextBounds(mLeftTitleText, 0, mLeftTitleText.length(), mTitleTextBounds); mLeftTitleX = (int) ((w * mLeftTitleSize - mTitleTextBounds.width()) / 2 - mTitleTextBounds.left); mLeftTitleY = (h - mTitleTextBounds.height()) / 2 - mTitleTextBounds.top; mProgressBarBorder.set(w * mLeftTitleSize, 0 + mBorderMargin, w * (mLeftTitleSize + mProgressBarSize), h - mBorderMargin); } private void init(AttributeSet attrs) { TypedArray a = getContext().obtainStyledAttributes(attrs, R.styleable.ProgressBarTitle); mLeftTitleText = a.getString(R.styleable.ProgressBarTitle_progress_bar_title); mBorderMargin = getResources().getDimension(R.dimen.border_progress_bar_margin); mProgressMargin = getResources().getDimension(R.dimen.progress_bar_margin); mTitlePaint = new Paint(Paint.ANTI_ALIAS_FLAG); mTitlePaint.setColor(getResources().getColor(R.color.title_level_success_view)); mTitlePaint.setStyle(Paint.Style.STROKE); mTitlePaint.setTextSize(getResources().getDimension(R.dimen.progress_bar_title_text_size)); mTitlePaint.setTypeface(FontManager.BEBAS_REGULAR); mBorderProgressBarPaint = new Paint(Paint.ANTI_ALIAS_FLAG); mBorderProgressBarPaint.setColor(getResources().getColor(R.color.title_level_success_view)); mBorderProgressBarPaint.setStyle(Paint.Style.STROKE); mBorderProgressBarPaint.setStrokeWidth(2); mProgressPaint = new Paint(Paint.ANTI_ALIAS_FLAG); mProgressPaint.setColor(getResources().getColor(R.color.progress_bar_level_success_view)); mProgressPaint.setStyle(Paint.Style.FILL); setWillNotDraw(false); } public void setPercent(float percent) { mPercentValue = Math.round(percent * 100f) / 100f; invalidate(); } @Override protected void onDraw(Canvas canvas) { super.onDraw(canvas); float left, top, right, bottom; left = mWidth * mLeftTitleSize + mProgressMargin - mBorderMargin; top = 0 + mProgressMargin; right = mPercentValue > 0 ? left + mWidth * mProgressBarSize * mPercentValue - mProgressMargin - mBorderMargin : left; bottom = mHeight - mProgressMargin; mProgressBarRectangle.set(left, top, right, bottom); canvas.drawText(mLeftTitleText, mLeftTitleX, mLeftTitleY, mTitlePaint); canvas.drawRect(mProgressBarBorder, mBorderProgressBarPaint); canvas.drawRect(mProgressBarRectangle, mProgressPaint); mTitlePaint.getTextBounds(String.valueOf((int) (mPercentValue * 100)), 0, String.valueOf((int) (mPercentValue * 100)).length(), mTitleTextBounds); mRightTitleX = (int) (mWidth - mTitleTextBounds.width() / 2 - mWidth * mRightTitleSize / 2); mRightTitleY = (mHeight - mTitleTextBounds.height()) / 2 - mTitleTextBounds.top; canvas.drawText(String.valueOf((int) (mPercentValue * 100)), mRightTitleX, mRightTitleY, mTitlePaint); } } Animation filling progress bar
public static AnimatorSet createProgressAnimationSet(ArrayList<View> views, float[] percentValues) { AnimatorSet animatorSet = new AnimatorSet(); List<Animator> animatorList = new ArrayList<>(views.size()); for (int i = 0; i < views.size(); i++){ float value = percentValues[i]; View view = views.get(i); animatorList.add(createProgressAnimation(view, value)); } animatorSet.playTogether(animatorList); return animatorSet; } private static ObjectAnimator createProgressAnimation(View view, float progressValue){ ObjectAnimator shapeProgressAnimator = ObjectAnimator.ofFloat(view, "percent", 0, progressValue); shapeProgressAnimator.setDuration((long) (1000 * progressValue)); shapeProgressAnimator.setInterpolator(new DecelerateInterpolator()); return shapeProgressAnimator; } Tips
To facilitate the life of the player, tips have been added, which can be obtained for points. Points, in turn, are awarded for completing levels, the number of points depends on the stars received per level. The player can spend the received points on any of the 3 available tips: to show the figure, its center or the circumference of the figure's radius.
Work results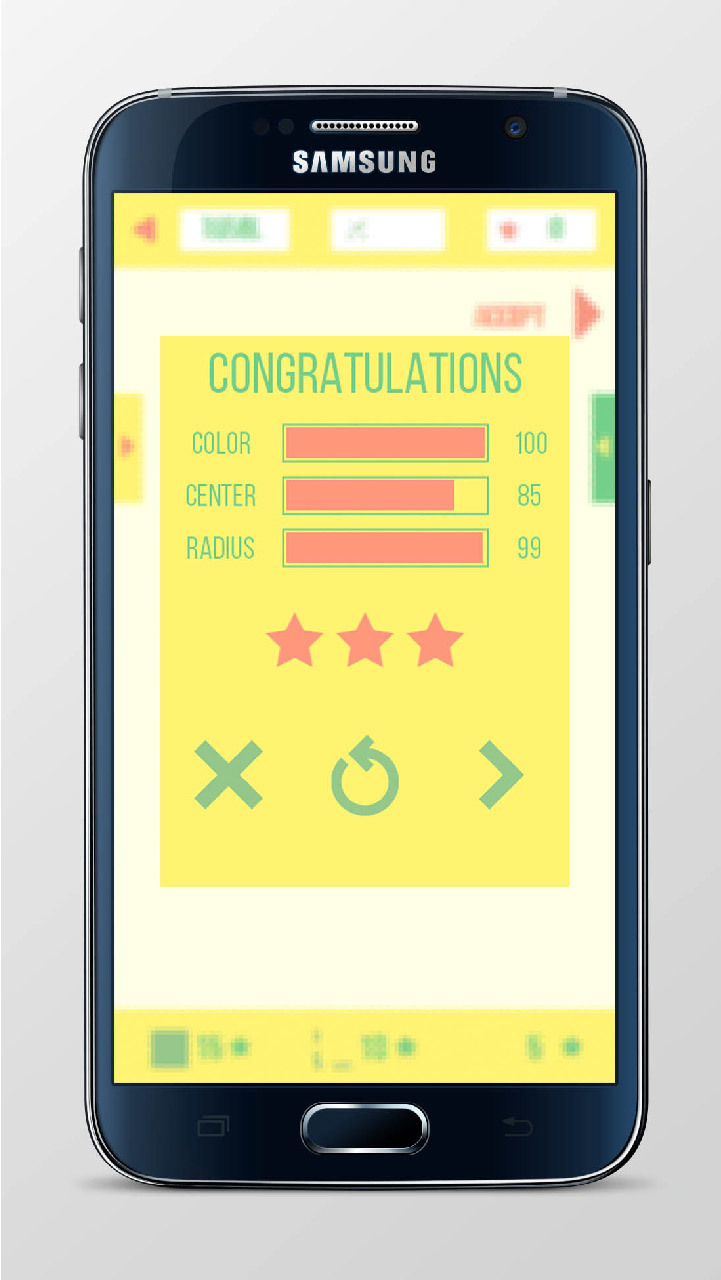

Total
Conclusions about the popularity of the application do not yet, because it was posted recently. For some reason, I had no time to come to grips with the promotion of the game. The only thing that was done - published links to the game in the social. networks.
I spent very little time learning Java. And it is better not to be wasted reading literature, since There are no new books, and existing books often contain implementations that are no longer relevant in the modern development of mobile applications.
It is not known whether this game will be a hit or be a failure. Having made this game, I got a good experience in developing applications for Android devices, which will be useful to me in the future, as well as finally engaged in what I have wanted for a long time. Currently, I am developing my next application, approaching the process more thoroughly in view of my previous mistakes. In addition, I still have a lot of mobile application ideas that the world will soon see.
Source: https://habr.com/ru/post/274277/
All Articles