Erlang for web development (1) -> Introduction;

The continuation of the database and Deploy in the second article .
I am starting to publish a series of articles on web development on Erlang. Many people want to try Erlang, but they face the problem that introductory courses mainly concern Erlang as a functional language and are far from real projects ( Learn a good and detailed book). On the other hand, all web development training materials imply that the reader already knows Erlang well.
This series of articles is designed for developers who have experience in web development (PHP, Ruby, Java), but do not have experience developing on Erlang.
')
The task will be to make a blog. The code from the articles https://github.com/denys-potapov/n2o-blog-example , the finished project can be viewed at http://46.101.118.21:8001/ . Features of the project:
- update comments in real time;
- Facebook authorization;
- data stored in mnesia.
At the heart of the project is the n2o framework . The choice is rather subjective, but from living Erlang frameworks , n2o seemed to me the most “erlang-like”, at the same time ChicagoBoss is more like MVC frameworks in other languages.
Customize the environment
I will configure the environment in Ubuntu, but it should work in other ways in a similar way. Download and install the current version of Erlang www.erlang-solutions.com/resources/download.html .
Dependency manager
The standard dependency manager in Erlang is rebar . But, in this article we will use mad from the creators of n2o, which is compatible with the rebar configuration, works faster and allows you to track changes in the templates.
curl -fsSL https://raw.github.com/synrc/mad/master/mad > mad chmod +x mad sudo cp mad /usr/local/bin/ To track changes to mad files, you need to install inotify-tools:
sudo apt-get install inotify-tools We generate the backbone of the application and run it:
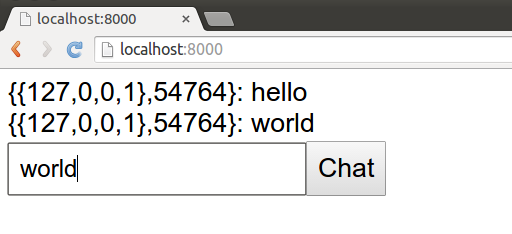
mad app "blog" cd blog mad deps compile plan repl At http: // localhost: 8001 /, a chat opens, which is updated via a web socket in real time, and you can correspond with yourself from different windows.
The mad parameters are responsible for getting dependencies and running the application:
- deps - get dependencies;
- compile - compile the application;
- plan - create a launch plan;
- repl - start the console.
Project structure
The file structure of our project is standard for Erlang applications:
 Apps── apps
     Re── rebar.config
     Sample── sample
         E── ebin
         │ ├── ...
         Priv── priv
         │ ├── static
         │ │ ...
         │ └── templates
         │ └── index.html
         Re── rebar.config
         S── src
             Index── index.erl
             Routes── routes.erl
             Sample── sample.app.src
             Sample── sample.erl
 De── deps
 Re── rebar.config
 S── sys.config
Details on the structure can be read in the official documentation .
Later we will get acquainted with almost all the files and folders, but for now we need to know that the Erlang application usually consists of several applications that lie in the apps folder. We have one sample application in which:
- src - source code;
- ebin - compiled files;
- priv - the rest of the project files, in this case templates and statics;
- index.erl - the title page.
First code
Delete unnecessary files:
rm -r apps/sample/priv/static/ For templates, we use ErlyDTL, the implementation of the Django Template Language in Erlang. Therefore, the syntax will be clear to those familiar with Django-like templating systems (Django, Twig, Mustache).
apps / sample / priv / templates / base.html
<!DOCTYPE html> <html lang="en"> <head> <meta charset="utf-8"> <meta http-equiv="X-UA-Compatible" content="IE=edge"> <meta name="viewport" content="width=device-width, initial-scale=1"> <title>{% block title %}Erlang blog example{% endblock %}</title> <!-- Bootstrap --> <link href="https://maxcdn.bootstrapcdn.com/bootstrap/3.3.5/css/bootstrap.min.css" rel="stylesheet"> <!-- HTML5 shim and Respond.js for IE8 support of HTML5 elements and media queries --> <!-- WARNING: Respond.js doesn't work if you view the page via file:// --> <!--[if lt IE 9]> <script src="//oss.maxcdn.com/html5shiv/3.7.2/html5shiv.min.js"></script> <script src="//oss.maxcdn.com/respond/1.4.2/respond.min.js"></script> <![endif]--> <style> .container { max-width: 40em; } </style> </head> <body> <div class="container"> {% block content %}{% endblock %} </div> <script src="//ajax.googleapis.com/ajax/libs/jquery/1.11.3/jquery.min.js"></script> <script src="https://maxcdn.bootstrapcdn.com/bootstrap/3.3.5/js/bootstrap.min.js"></script> </body> </html> apps / sample / priv / templates / index.html
{% extends "base.html" %} {% block title %}Latest posts{% endblock %} {% block content %} <h1>Latest posts</h1> {{ posts }} {% endblock %} Now open index.erl and replace the code with this:
-module(index). -compile(export_all). -include_lib("n2o/include/wf.hrl"). -include_lib("nitro/include/nitro.hrl"). main() -> #dtl{file="index"}. In the header of the file, we declare the module, indicate that we export all the functions from this module, and include two header files.
The function main / 1 is called when the main page is opened. Functions can return either immediately HTML or DSL Erlang records, which we will discuss later. For now, we simply return the rendered index template. In the Erlang documentation, functions are always written as a name / multiplicity , where multiplicity is the number of arguments .
Meet the syntax
Now is the time to get acquainted with the basics of syntax, it is the quickest to do at www.tryerlang.org . We will display on the main page all posts. While we will not use the database, and we will store the posts directly in the code.
In the header file /apps/sample/include/records.hrl we describe an entry for storing posts:
-record(post, {id, title, text, author}). Create a module /apps/sample/src/posts.erl to store posts. The module exports two functions: get / 0 - returns all posts, and get / 1 - returns post by Id:
-module(posts). -export([get/0, get/1]). -include("records.hrl"). get() -> [ #post{id=1, title="first post", text="interesting text"}, #post{id=2, title="second post", text="not interesting text"}, #post{id=3, title="third post", text="very interesting text"} ]. get(Id) -> lists:keyfind(Id, #post.id, ?MODULE:get()). Entries in Erlang are syntactic sugar, the compiler replaces entries with tuples, and fields with indices. For example, # post.id will be replaced with 0.
DSL
I wrote above that functions can return Erlang entries that are converted to HTML. Change our index.erl so that the list of all posts is displayed on the page:
-module(index). -compile(export_all). -include_lib("n2o/include/wf.hrl"). -include_lib("nitro/include/nitro.hrl"). -include_lib("records.hrl"). posts() -> [ #panel{body=[ #h2{body = #link{body = P#post.title, url = "/post?id=" ++ wf:to_list(P#post.id)}}, #p{body = P#post.text} ]} || P <- posts:get()]. main() -> #dtl{file="index", bindings=[{posts, posts()}]}. To create a post page, we in /apps/sample/src/routes.erl specify which module will handle our path:
route(<<"post">>) -> post; The apps / sample / src / post.erl module simply displays a template with post data:
module
-module(post). -compile(export_all). -include_lib("n2o/include/wf.hrl"). -include_lib("records.hrl"). main() -> {Id, _} = string:to_integer(binary_to_list(wf:q(<<"id">>))), Post = posts:get(Id), #dtl{file="post", bindings=[{title, Post#post.title}, {text, Post#post.text}]}. Template:
{% extends "base.html" %} {% block title %}{{ title }}{% endblock %} {% block content %} <h1>{{ title }}<br /> <small>by {{ author }}</small> <p>{{ text }}</p> <h3>Comments</h3> {{ comments }} {% endblock %} Web sockets
Now we come to the most interesting, namely, the connection of the browser with the server via a web socket. We will make comments to the post, which will be updated in real time. To do this, add the n2o initialization library to the base template:
<script>{{script}}</script> <script src='/n2o/protocols/bert.js'></script> <script src='/n2o/protocols/client.js'></script> <script src='/n2o/protocols/nitrogen.js'></script> <script src='/n2o/validation.js'></script> <script src='/n2o/bullet.js'></script> <script src='/n2o/utf8.js'></script> <script src='/n2o/template.js'></script> <script src='/n2o/n2o.js'></script> <script>protos = [ $bert, $client ]; N2O_start();</script> And in the post.erl module, add an event handler and code to display comments:
main() -> Id = wf:to_integer(wf:q(<<"id">>)), Post = posts:get(Id), #dtl{file="post", bindings=[{title, Post#post.title}, {text, Post#post.text}, {comments, comments()}]}. comments() -> [#textarea{id=comment, class=["form-control"], rows=3}, #button{id=send, class=["btn", "btn-default"], body="Post comment",postback=comment,source=[comment]} ]. event(comment) -> wf:insert_bottom(comments, #blockquote{body = #p{body = wf:html_encode(wf:q(comment))}}). When displaying the button, we indicate which event will be triggered (postback) and which parameters should be transmitted to the server (source). In the event (comment) function, we send the client code to add a comment at the bottom of the list. While this comment does not reach other customers, but now we will fix it:
event(init) -> wf:reg({post, post_id()}); event(comment) -> wf:send({post, post_id()}, {client, wf:q(comment)}); event({client, Text}) -> wf:insert_bottom(comments, #blockquote{body = #p{body = wf:html_encode(Text)}}). The init event is triggered when the page is loaded, and we register our process that it will receive messages from the {post, post_id ()} pool.
Instead of displaying a comment in the event event (comment), we send a message with a new comment to the pool. And we do output the comment in the event handler ({client, Text}). Now we can have fun chatting in the chat under the post, and almost repeat the code that generated mad as the backbone of the application.
In the next article, we will store posts and comments in the database, and add authorization through Facebook.
Source: https://habr.com/ru/post/273979/
All Articles