Configuring Grandstream UCM 61xx series and its integration with 1C
Our partner Simplit made 1C integration with the popular IP PBX Grandstream 61xx series. Under the cut a report on the overall configuration, and in the second part - in fact, about integration with 1C.
')
Make sure you are using the latest firmware. When writing the article used firmware 1.0.9.26
In the firmware below version 1.0.9.26, the CDR-API does not work correctly
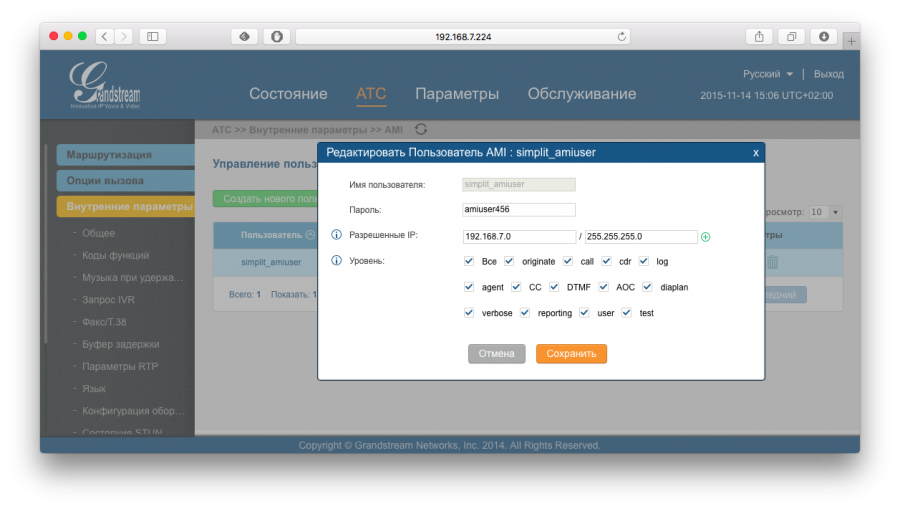
Go to the menu item Internal Settings - AMI
Click “Create New AMI User”

Set AMI username and password
Mark all event classes as shown.
Specify the subnets allowed access to AMI
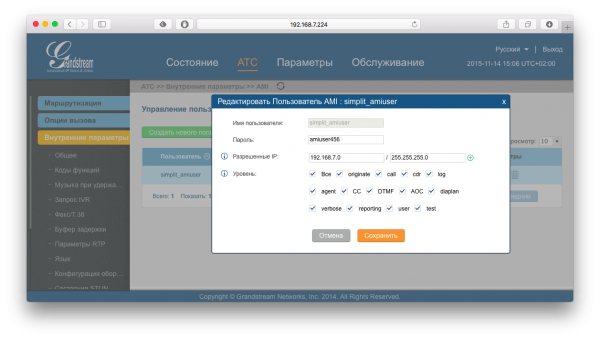
Example:
0.0.0.0/0.0.0.0 - all subnets are allowed
192.168.7.0/255.255.255.0 - only the subnet 192.168.7.0 is allowed
Go to the menu item "CDR" - "API Configuration"

Storage setting is performed on the tab:
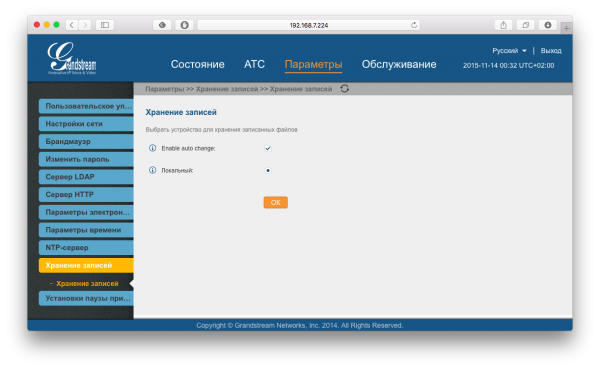
Grandstream supports SD cards and USB devices.
By default, when creating an extension number, the status tracking flag is cleared. In order for the phone status to display correctly in the Telephony Panel, it must be set manually, on the Environment tab
In the web interface, the flag is called "Allow activity check". In terms of Asterisk, this is the option qualify = yes

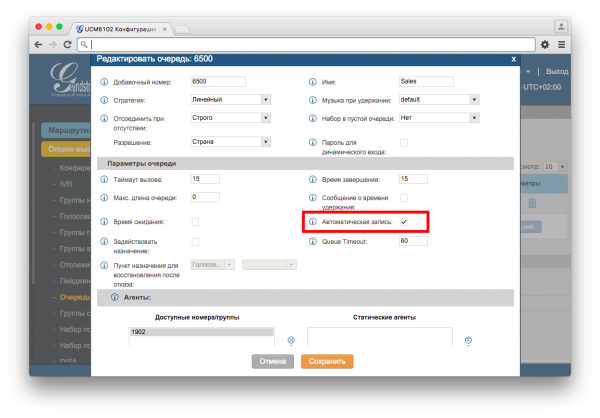
Setting up automatic recording of conversations for an internal number, performed on the Features tab

To record calls in the queue, you need to set a similar option.
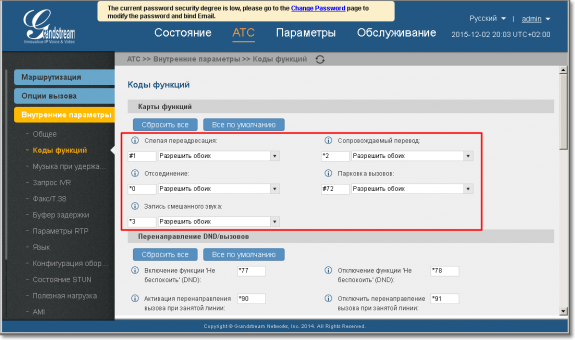
The conditional and unconditional translation feature is disabled by default. You can activate functions on the Function Codes page.
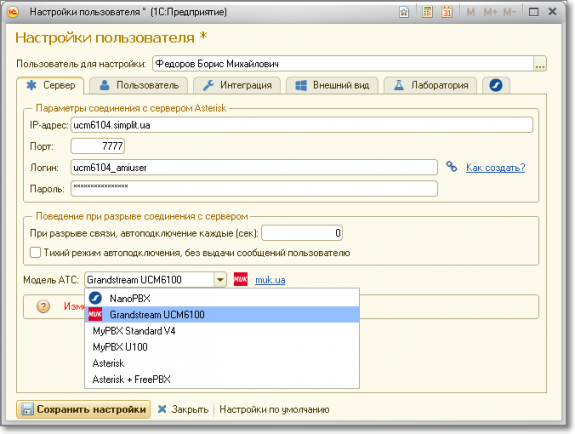
In the settings of the Telephony Panel user, in the “IP PBX Model” field, select the value Grandstream UCM6100
In terms of price / quality / performance, the UCM 6102 is one of the best IP PBX in its class.
Even in the younger model, a good level hardware platform, which is able to provide 30-40 simultaneous calls.
A similar figure for competing models: 10-15 simultaneous calls.
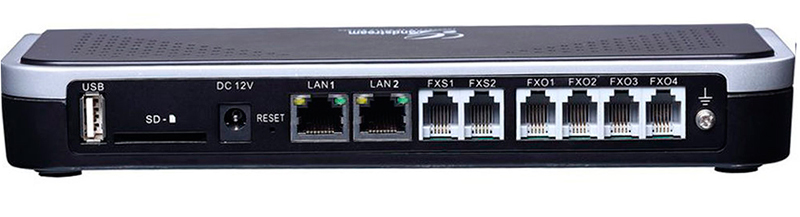
It is also important that the UCM 61xx equipment is complete, without any “pitfalls”. This favorably distinguishes the UCM 61xx from some competitors who resort to marketing tricks and exclude part of the hardware modules from the basic supply.
A vivid example of such a trick, when there are FXO / FXS connectors themselves, and there are no hardware modules, they need to be bought separately. Something like an outlet without electricity :)
Simple, clear and well documented. There is a Russian-language localization, the translation is of sufficient quality, it is not Google Translate.
Below, a screenshot as an example.

Setup took about 10-15 minutes. Difficulties did not arise.
The recording function is available immediately, no need to buy any modules or licenses. It supports recording to internal memory, to an SD card, to a USB device — there is a USB 2.0 port.
If you first used the internal storage, and only then connected an SD card or USB flash drive, the UCM 61xx itself will offer you to perform synchronization. In our case, that was the case.
This is what interests us in the first place. So, interfaces for accessing external applications:
AMI (Asterisk Management Interface)
CDR API (access to statistics)
Setting up both APIs is very simple and comes down to a simple login / password indication.
The 1C telephony panel gives the maximum level of integration. Almost all functions available in Asterisk 1.8 are supported.
Setting up on the side of 1C: Enterprise 8.x is also very simple and comes down to entering the IP, login, password and indicating that it is UCM 6100 that is used.

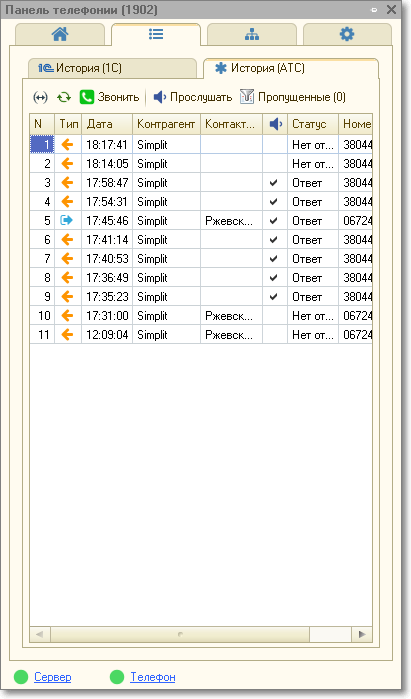
The 1C telephony panel immediately picks up the call history using the CDR API
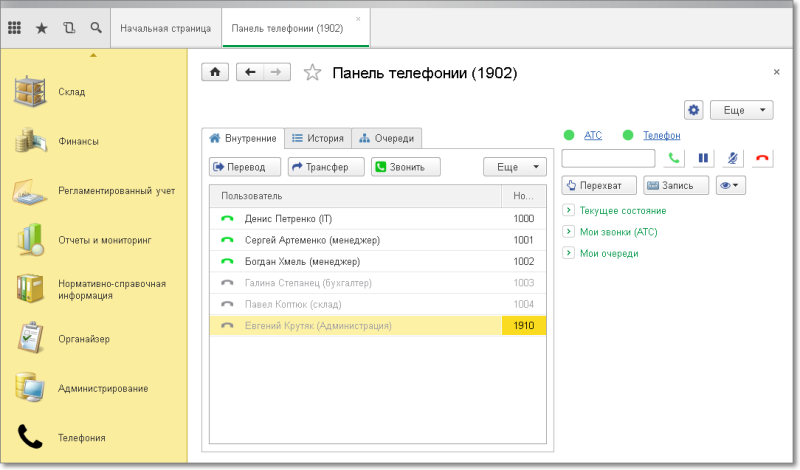
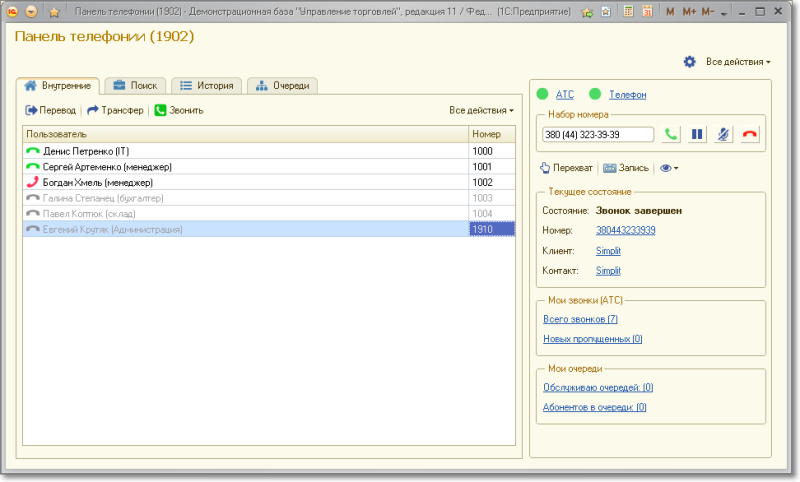
The 1C telephony panel supports integration with the UCM 61xx for both configurations using conventional forms and managed forms.
Normal form:

For the managed form, besides the standard form, the Taxi interface is also supported.
To all this, the form can be changed without programming, “on the fly” - it is adaptive. By default, the “wide” form is enabled.
To change the shape, specify the appearance in the settings panel.
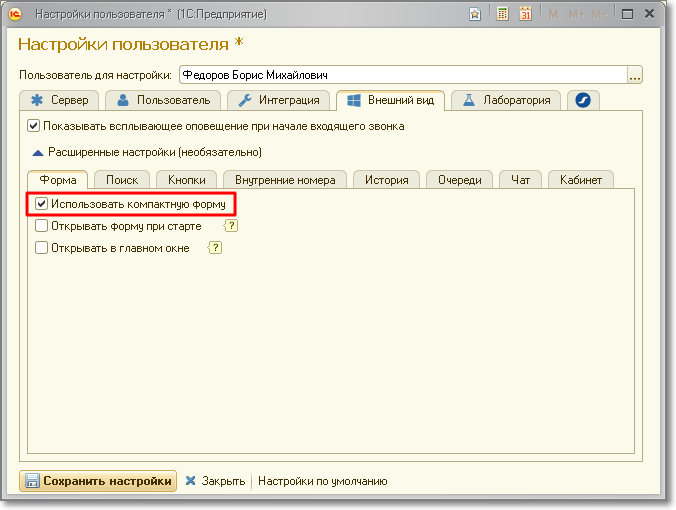
The form is transformed into a compact mode.
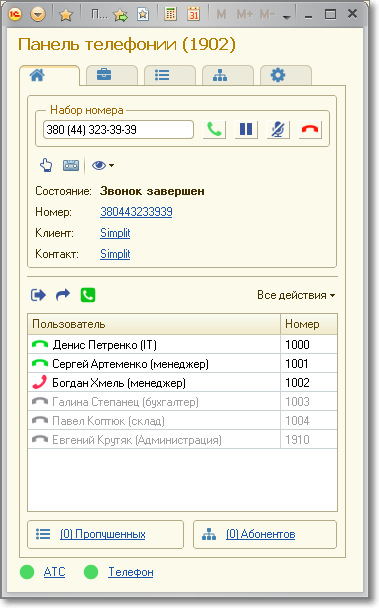
The form can be placed on the start page.

Supported configurations 1C:
UT, UTP, UPP (usual forms)
UT, ERP (managed forms)
Download firmware, manuals
Description of IP PBX UCM61XX series
For all questions: Grandstream@muk.ua
Distribution of Grandstream solutions in Ukraine, Georgia, Kazakhstan, CIS countries .
MUK-Service - all types of IT repair: warranty, non-warranty repair, sale of spare parts, contract service
Configure Grandstream to integrate with Telephony Panel
')
Make sure you are using the latest firmware. When writing the article used firmware 1.0.9.26
In the firmware below version 1.0.9.26, the CDR-API does not work correctly
AMI Access Setup
Go to the menu item Internal Settings - AMI
Click “Create New AMI User”
Set AMI username and password
Mark all event classes as shown.
Specify the subnets allowed access to AMI
Example:
0.0.0.0/0.0.0.0 - all subnets are allowed
192.168.7.0/255.255.255.0 - only the subnet 192.168.7.0 is allowed
Setting access to the call log
Go to the menu item "CDR" - "API Configuration"
Configuring the storage of call recording files
Storage setting is performed on the tab:
Grandstream supports SD cards and USB devices.
Features of setting up extensions
By default, when creating an extension number, the status tracking flag is cleared. In order for the phone status to display correctly in the Telephony Panel, it must be set manually, on the Environment tab
In the web interface, the flag is called "Allow activity check". In terms of Asterisk, this is the option qualify = yes
Setting up automatic recording of conversations for an internal number, performed on the Features tab
To record calls in the queue, you need to set a similar option.
Setting up call transfer
The conditional and unconditional translation feature is disabled by default. You can activate functions on the Function Codes page.
Settings on the side of the Telephony Panel
In the settings of the Telephony Panel user, in the “IP PBX Model” field, select the value Grandstream UCM6100
Integration of 1C and Grandstream UCM
In terms of price / quality / performance, the UCM 6102 is one of the best IP PBX in its class.
Even in the younger model, a good level hardware platform, which is able to provide 30-40 simultaneous calls.
A similar figure for competing models: 10-15 simultaneous calls.
It is also important that the UCM 61xx equipment is complete, without any “pitfalls”. This favorably distinguishes the UCM 61xx from some competitors who resort to marketing tricks and exclude part of the hardware modules from the basic supply.
A vivid example of such a trick, when there are FXO / FXS connectors themselves, and there are no hardware modules, they need to be bought separately. Something like an outlet without electricity :)
Interface
Simple, clear and well documented. There is a Russian-language localization, the translation is of sufficient quality, it is not Google Translate.
Below, a screenshot as an example.
Setup took about 10-15 minutes. Difficulties did not arise.
Record
The recording function is available immediately, no need to buy any modules or licenses. It supports recording to internal memory, to an SD card, to a USB device — there is a USB 2.0 port.
If you first used the internal storage, and only then connected an SD card or USB flash drive, the UCM 61xx itself will offer you to perform synchronization. In our case, that was the case.
Integration with the outside world
This is what interests us in the first place. So, interfaces for accessing external applications:
AMI (Asterisk Management Interface)
CDR API (access to statistics)
Setting up both APIs is very simple and comes down to a simple login / password indication.
Level of integration with 1C
The 1C telephony panel gives the maximum level of integration. Almost all functions available in Asterisk 1.8 are supported.
Setting up on the side of 1C: Enterprise 8.x is also very simple and comes down to entering the IP, login, password and indicating that it is UCM 6100 that is used.
The 1C telephony panel immediately picks up the call history using the CDR API
The 1C telephony panel supports integration with the UCM 61xx for both configurations using conventional forms and managed forms.
Normal form:
For the managed form, besides the standard form, the Taxi interface is also supported.
To all this, the form can be changed without programming, “on the fly” - it is adaptive. By default, the “wide” form is enabled.
To change the shape, specify the appearance in the settings panel.
The form is transformed into a compact mode.
The form can be placed on the start page.
Supported configurations 1C:
UT, UTP, UPP (usual forms)
UT, ERP (managed forms)
Download firmware, manuals
Description of IP PBX UCM61XX series
For all questions: Grandstream@muk.ua
Distribution of Grandstream solutions in Ukraine, Georgia, Kazakhstan, CIS countries .
MUK-Service - all types of IT repair: warranty, non-warranty repair, sale of spare parts, contract service
Source: https://habr.com/ru/post/273971/
All Articles