Implement the “Onboarding Experience” in your application
Hello to all the guests of Habr!
In this article I would like to talk about the implementation of "Onboarding Experience" in the application on which you are working or are going to work.
“Onboarding Experience” is a small presentation inside the application that shows the capabilities of your application in the form of such a slideshow. This practice of demonstrating application functionality is used by many companies, such as, for example, Google.
')
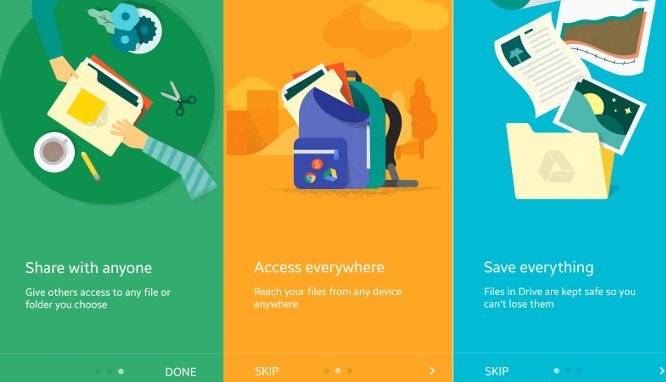
Example “Onboarding Experience” in the Google Drive application:
Also, “Onboarding Experience” is called “App Intro” or “Product Tour”. You can call it what you want, because its essence does not change.
So, my story about the introduction of this feature began after one of the customers of the mobile application asked to implement such a thing, because he really liked how it looks in other applications. I’ll say right away that in its application I have not yet implemented the App Intro, but already figured out how to do it quickly and painlessly.
I started looking for a library on GitHub, implying that someone implemented it exactly and did something similar and I need to change the graphics in a few clicks, add a few slides and just podshamanit a little under my requirements.
Having spent not so much time as I expected - I found what I need here .
After reading a bit of “about” I found the most optimal way to implement this library. You can go deep and customize everything to fit your needs. For example, you can use this library with Fragments or just with an Activity, change the type of animation, set the vibration during a swipe and much more. I will tell and show the most minimal implementation.
So, I will highlight the implementation in seven points, for convenient and understandable readability, and also highlight the main aspects in bold:
1) Add the dependencies to the build.grade (lower level) of your project:
2) Create a snippet of SampleSlide.java :
3) Create a class CustomIntro.java :
4) In the layout folder, create as many layouts for Intro as necessary (if there are three, then intro_1.xml, intro_2.xml, intro_3.xml)
Where and what to change for different layouts I think you figure it out, I gave an example of one of the intro.xml
5) In MainActivity.java, we write the following code in the OnCreate method to display the Intro once at the first launch. We do this with the help of "thread":
5) In Manifest we declare our Activity :
6) In styles.xml, do not forget to make your custom theme for Intro display in full screen without Toolbar:
7) And the very last action, in the drawable folder we put those images that will be used on the screens .
Here you can experiment, for example, with vector graphics or make it more elegant, as Google does. I put the usual .png files with a resolution of 256x256.
That's what happened with me:
PS I hope this article will be useful to you. In it, I did not pursue any personal goals. I just tried to explain what I myself understood after working with a good library.
In this article I would like to talk about the implementation of "Onboarding Experience" in the application on which you are working or are going to work.
“Onboarding Experience” is a small presentation inside the application that shows the capabilities of your application in the form of such a slideshow. This practice of demonstrating application functionality is used by many companies, such as, for example, Google.
')
Example “Onboarding Experience” in the Google Drive application:
Also, “Onboarding Experience” is called “App Intro” or “Product Tour”. You can call it what you want, because its essence does not change.
So, my story about the introduction of this feature began after one of the customers of the mobile application asked to implement such a thing, because he really liked how it looks in other applications. I’ll say right away that in its application I have not yet implemented the App Intro, but already figured out how to do it quickly and painlessly.
I started looking for a library on GitHub, implying that someone implemented it exactly and did something similar and I need to change the graphics in a few clicks, add a few slides and just podshamanit a little under my requirements.
Having spent not so much time as I expected - I found what I need here .
After reading a bit of “about” I found the most optimal way to implement this library. You can go deep and customize everything to fit your needs. For example, you can use this library with Fragments or just with an Activity, change the type of animation, set the vibration during a swipe and much more. I will tell and show the most minimal implementation.
So, I will highlight the implementation in seven points, for convenient and understandable readability, and also highlight the main aspects in bold:
1) Add the dependencies to the build.grade (lower level) of your project:
repositories {
mavenCentral()
}

dependencies {
compile 'com.github.paolorotolo:appintro:3.3.0'
}
2) Create a snippet of SampleSlide.java :
public class SampleSlide extends Fragment { private static final String ARG_LAYOUT_RES_ID = "layoutResId"; public static SampleSlide newInstance(int layoutResId) { SampleSlide sampleSlide = new SampleSlide(); Bundle args = new Bundle(); args.putInt(ARG_LAYOUT_RES_ID, layoutResId); sampleSlide.setArguments(args); return sampleSlide; } private int layoutResId; public SampleSlide() {} @Override public void onCreate(@Nullable Bundle savedInstanceState) { super.onCreate(savedInstanceState); if(getArguments() != null && getArguments().containsKey(ARG_LAYOUT_RES_ID)) layoutResId = getArguments().getInt(ARG_LAYOUT_RES_ID); } @Nullable @Override public View onCreateView(LayoutInflater inflater, @Nullable ViewGroup container, @Nullable Bundle savedInstanceState) { return inflater.inflate(layoutResId, container, false); } } 3) Create a class CustomIntro.java :
public class CustomIntro extends AppIntro2 { @Override public void init(Bundle savedInstanceState) { // , 3 addSlide(SampleSlide.newInstance(R.layout.intro_1)); // addSlide(SampleSlide.newInstance(R.layout.intro_2)); addSlide(SampleSlide.newInstance(R.layout.intro_3)); } private void loadMainActivity(){ Intent intent = new Intent(this, MainActivity.class); startActivity(intent); } @Override public void onNextPressed() { // Do something here } @Override public void onDonePressed() { finish(); } @Override public void onSlideChanged() { // Do something here } } 4) In the layout folder, create as many layouts for Intro as necessary (if there are three, then intro_1.xml, intro_2.xml, intro_3.xml)
Where and what to change for different layouts I think you figure it out, I gave an example of one of the intro.xml
<?xml version="1.0" encoding="utf-8"?> <LinearLayout xmlns:android="http://schemas.android.com/apk/res/android" android:orientation="vertical" android:layout_width="match_parent" android:layout_height="match_parent" android:background="#2196F3" android:layout_weight="10" android:id="@+id/main"> <TextView android:layout_width="wrap_content" android:layout_height="0dp" android:layout_gravity="center" android:gravity="center" android:paddingLeft="32dp" android:layout_weight="3" android:fontFamily="sans-serif-thin" android:textColor="#ffffff" android:paddingRight="32dp" android:textSize="28sp" android:text=" "/> <LinearLayout android:layout_width="fill_parent" android:layout_height="0dp" android:orientation="vertical" android:gravity="center" android:layout_weight="5"> <ImageView android:layout_width="wrap_content" android:layout_height="wrap_content" android:layout_gravity="center" android:paddingLeft="16dp" android:paddingRight="16dp" android:src="@drawable/welcome_intro"/> </LinearLayout> <TextView android:layout_width="wrap_content" android:layout_height="0dp" android:layout_weight="3" android:layout_gravity="center" android:gravity="center" android:textColor="#ffffff" android:paddingLeft="64dp" android:paddingRight="64dp" android:textSize="16sp" android:text=" "/> <TextView android:layout_width="fill_parent" android:layout_height="64dp" /> </LinearLayout> 5) In MainActivity.java, we write the following code in the OnCreate method to display the Intro once at the first launch. We do this with the help of "thread":
// Declare a new thread to do a preference check Thread t = new Thread(new Runnable() { @Override public void run() { SharedPreferences getPrefs = PreferenceManager .getDefaultSharedPreferences(getBaseContext()); boolean isFirstStart = getPrefs.getBoolean(FIRST_START, true); if (isFirstStart) { Intent i = new Intent(MainActivity.this, CustomIntro.class); startActivity(i); SharedPreferences.Editor e = getPrefs.edit(); e.putBoolean(FIRST_START, false); e.apply(); } } }); // Start the thread t.start(); } 5) In Manifest we declare our Activity :
<activity android:name=".CustomIntro" android:label="@string/app_name" android:theme="@style/FullscreenTheme"/> 6) In styles.xml, do not forget to make your custom theme for Intro display in full screen without Toolbar:
<!-- Fullscreen application theme. --> <style name="FullscreenTheme" parent="Theme.AppCompat.Light.NoActionBar"> <!-- Customize your theme here. --> <item name="colorPrimary">@color/colorPrimary</item> <item name="colorPrimaryDark">@color/colorPrimaryDark</item> <item name="colorAccent">@color/colorAccent</item> <item name="android:windowTranslucentStatus">true</item> </style> 7) And the very last action, in the drawable folder we put those images that will be used on the screens .
Here you can experiment, for example, with vector graphics or make it more elegant, as Google does. I put the usual .png files with a resolution of 256x256.
That's what happened with me:
PS I hope this article will be useful to you. In it, I did not pursue any personal goals. I just tried to explain what I myself understood after working with a good library.
Source: https://habr.com/ru/post/273893/
All Articles