Embedded Hyper-V Virtualization - First Step
Article author - Mikhail Komarov, MVP - Cloud and Datacenter Management
Good day! The goal of today's article is to talk about the implementation of embedded virtualization on the Hyper-V platform. It's no secret that Hyper-V did not support nested virtualization, unlike other manufacturers. With the release of Windows Server 2016 Technical Preview 4 (TP4), which is designed for those who want to try the new functionality, the situation has changed. You can see demonstrations of embedded virtualization in the “ One Report, One Laptop, One Data Center ” report at the Microsoft TechDay 2015 event.
All demonstrations were held on HP Blade Gen 8, with a basic Intel Xeon E5 2670 processor and 32 GB of RAM.
The choice of this system was due to the desire to show how low the threshold of entry into virtualization technology can be. In general, the usual system by today's standards, when most homes have Intel Core i3 and above, and the amount of RAM starts at 8GB. This means that you can use nested virtualization if necessary.
')
Architecture
Recall the classic version of virtualization. If we have a physical host with support for virtualization at the chipset and processor level and the necessary options included in the BIOS, we get the following picture:

At the zero level there is a physical host, and at the first level there is a thin layer of software called the hypervisor. Also on the first level is the partition with the root operating system and partitions for virtual machines. Let's illustrate with the use of the CoreInfo utility from Mark Russinovich the behavior of the processor parameters associated with virtualization. The table shows the first few lines of the CoreInfo utility.

Prior to enabling the Hyper-V role, the processor parameter associated with virtualization was transferred to the operating system. This can be seen in two lines on the left side of the table. The first parameter is the absence of a hypervisor, the second is the flag responsible for virtualization. After turning on the role of the hypervisor, we look again at the properties of the processor in the root partition and see the following: the hypervisor is turned on, and the flag associated with virtualization is not translated into the root section of the operating system. Also pay attention to the value of Microprocessor signature, which in our case is 0000710 and is associated with a physical processor.
Let's move to nested virtualization.

The figure shows that it is necessary to forward the flag associated with virtualization to the guest OS. That is, in general, we need to tell the hypervisor at the first level that it is necessary to enable virtualization support in a shared processor for the virtual machine. To do this, you need to run a script that changes some properties of the virtual machine. One of the main properties that the script modifies is the behavior of the virtual machine processor. // Set-VMProcessor -VMName $ vmName -ExposeVirtualizationExtensions $ true //. We will talk about the remaining parameters a bit later. We illustrate the behavior of processor parameters associated with virtualization on a virtual machine. The table displays the first few lines of the CoreInfo utility.

From the table it is clear that the virtual machine "understands" what is working from under the hypervisor. But before running the script, the flag associated with virtualization is not passed. Then the script that changed the properties of our virtual machine and its processor and the flag associated with virtualization appeared. Next, we turned on the Hyper-V role, after that a thin layer of virtualization appeared and our operating system moved to its root partition, the virtualization flag disappeared. Also pay attention to the value of Microprocessor signature, which in our case was FFFFFFFF, which indicates processor virtualization. Next, we created a virtual machine inside the virtual machine and for the purity of the experiment, we launched the utility CoreInfo.

In general, the expected result is the presence of the hypervisor and the absence of the virtualization flag in the first stage and the presence of the virtualization flag in the second. As a result, we have this solution.
Settings and restrictions
Now let's talk about some of the limitations of this technology in TP4 for enabled embedded virtualization at the first level of the virtual machine:
- Support has been implemented so far only for Intel processors with EPT support (SLAT).
- Dynamic memory must be disabled.
- Changing the size of the memory leads to errors.
- Snapshots on a running virtual machine are not allowed.
- Live migration leads to errors.
- Saving, restoring may lead to errors.
- You need to enable MAC spoofing in the properties of the network adapter.
Step by step instruction looks like this:
- Install the assembly on a physical host with virtualization options enabled.
- Create a virtual machine in which we will enable virtualization. It is advisable to allocate this machine at least 4GB of RAM, otherwise you need to tweak the script. The virtual machine must be turned off!
- Run the script on the physical host, specifying the name of the previously created virtual machine. The link to the script is at the end of the article.
- We include the Hyper-V role in the virtual machine.
- Create a new virtual machine using the Hyper-V manager in the previously created virtual machine.
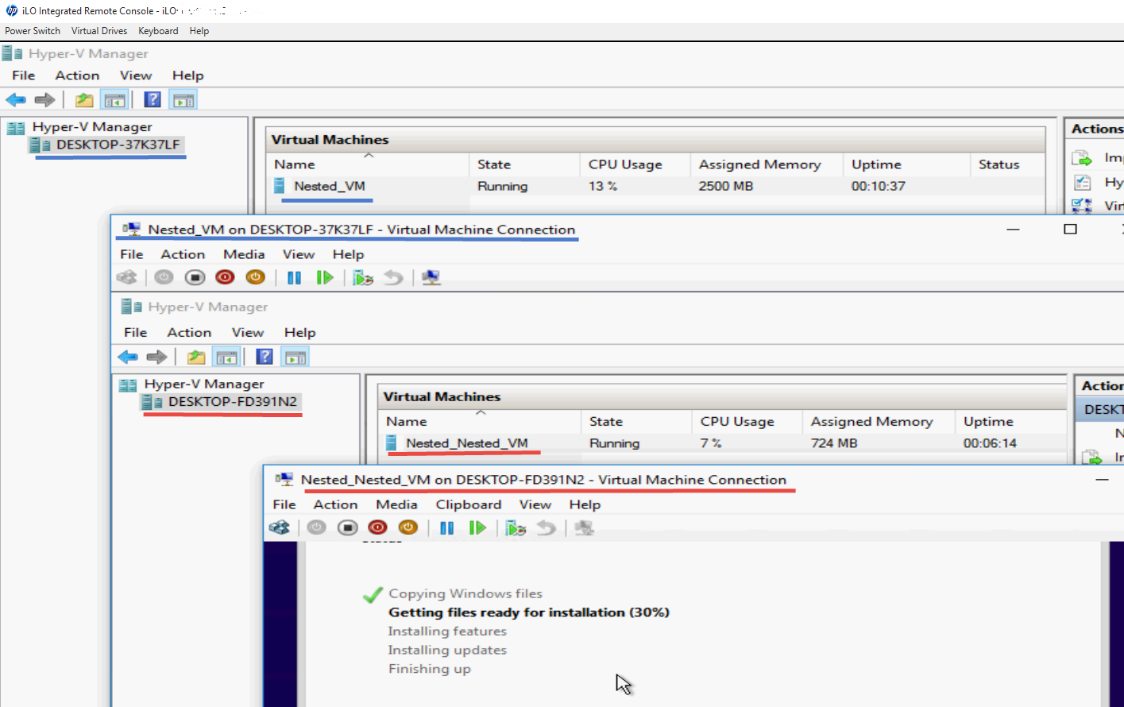
As a result, we have a solution that will allow you to do many things on one physical host. For example, a cluster assembled from Hyper-V hosts, which will reduce the amount of equipment used, both at home and in classrooms.
Resources
Windows Server Technical Preview
Announcement of support for nested virtualization from the product group (eng.)
Link to CoreInfo utility
Link to the script on GitHub
Thanks for attention,
Mikhail Komarov
MVP - Cloud and Datacenter Management
Source: https://habr.com/ru/post/273791/
All Articles