A little bit about building a mobile application

I remember that wonderful time when the assembly of the release version of the mobile application was reduced to the fact that it was necessary to set debug = false and start exporting the apk-file. It takes 2 minutes while the IDE puffs and you're done. All efforts have focused on the need to specify the signature certificate data. It was just recently. Now the build process of that application has grown so much that if I suddenly need to do all the operations myself, and even if I remember and do everything correctly (which I don’t believe), it will not take an hour, which today seems to be unacceptably long , and, most likely, a day, after which the therapist will be obliged to prescribe me a sick leave due to tiredness for two weeks.
So, the process of assembling a mobile application. I will try to tell you what it is with us - not because it has recently become fashionable to roll posts about the CI of a particular mobile team (with poker, mermaids, and other essential attributes), but because it is a great experience that I got , working on Mail.Ru Mail for Android, and because this opportunity most likely would not have been, I worked in another team, on another project or in another company.
For any process, an important decision is the choice of the system on the basis of which the entire assembly will be built. Builds should be build server. This is logical. But which one to choose?
')
The question is ambiguous, each one chooses one or another solution, based on his experience, on the tasks that the system faces and on the resources that it has. Some people like free solutions, because they don’t need to explain to their supervisor what you needed $ N000 a year for and why you shouldn’t do without it. Someone is motivated by the presence of a community or the experience of a huge number of teams that have already taken advantage of these decisions and are satisfied with the result. The number of points of view tends to the number of people who asked this question. I cannot say that someone’s argument is correct, or someone’s objection is irrelevant. But no matter what views a developer who has faced such a problem adheres to, the majority will agree that by and large all popular solutions presented on the market are distinguished only by the convenience of customization, integration with adjacent systems, expansion options and support from the community or system developers.
In general, the choice of the build server is a topic for a separate holivar. Let me just say that we chose the Atlassian solution of the Bamboo Build Server. There are several main reasons, one of them is the simplicity of integration with the issue tracker that we use in the project, as well as with code review systems and hosting of repositories. Well done guys here: everything is convenient, everything is at hand, and, most importantly, almost all the provided solutions and options fit perfectly into the development process of our team
Bamboo
Bamboo is a very common solution, it is used by a huge number of teams all over the world. Details of the scheme of work of this CI / CD Tool can be found on the official documentation website, but I will allow myself the free translation of a small part of this document in order to avoid discrepancies in terminology.
The task of Continuous Integration Server is to do all the work of building, testing, deploying to the test environment of the project. The CI server communicates with the repository, receives a specific revision of the project, performs all the necessary actions, and provides the finished build result to the project team.

| Project |
|
| Build plan (Plan) |
|
| Stage (Stage) |
|
| Job (Job) |
|
| Task (Task) |
|
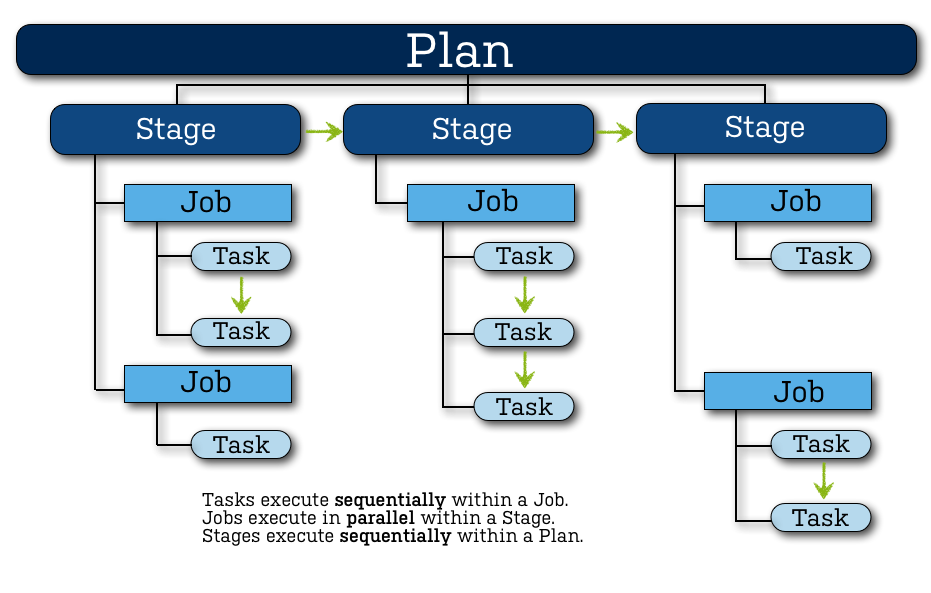
More or less similar separation is available in any build system, it provides the necessary flexibility in building the entire process. At first glance it seems that this is an excessive complication. So it was with our project, when we first started using Bamboo, but gradually everything settled down, a clear understanding of how much of the entire assembly process should be scaled, which should remain isolated, appeared, and a fairly well-formed structure formed within the framework of the proposed concepts.
In general, you need to be well aware that a build server or a CI server is an important part of automating the software development process. By assigning to this module all the tasks and work that needs to be done at different stages and levels of preparation of an application for release to the market, we get a kind of Application Release Pipeline. He, in turn, makes it possible to easily determine which tasks were included in this or that build, at what stage the release is now, what problems arise when integrating the new functionality, at what stage of hotfix preparation we are now and much more.
So, we smoothly approached the description of how this was done in our team.
Tasks
Our assembly project is divided into several stages, reflecting the main tasks at the moment:
- Assembly - includes all the assembly options that may be needed during the Release pipeline: alpha, beta, release. Yes, yes, we have precisely the project assembly, and not just their status. Product differences: various resources, presence or absence of settings, etc.
- Verification is the most capacious and technically difficult part of the entire application assembly stage: static code analysis, unit testing, functional UI testing, and localization testing.
- Depla. At the moment, abstracted from the entire assembly, it is as if on the side. Thus, if necessary, we can plug into any medium (alpha, beta, release) any revision / branch / type of application.
On this, in principle, it is possible to finish the story, but I, perhaps, will show intrusiveness and provide details.
Assembly
Now we are developing three projects at once with a single code base, let's call them Project 1, Project 2 and Project 3. Of course, the differences between them are not as radical as between chess and a video player, since all three products fall into the category of mail clients. However, they have a different design, there are differences in functionality, they interact with the server in different ways. All this dictates its own requirements for the assembly, testing and product development.
Feature Branch Workflow
Any build begins with a project revision check checkout from a version control system. It would seem, why focus on this - because everyone can make a checkout? Really. But which branch is it worth doing?
We use Feature Branch Workflow to work on the product. This approach can be read separately. Its main advantage for me is the isolation of changes. With this approach, each developer can turn over the whole project, give it to testing, and if QA gives an appr, then the verified and functioning code will fall into a common thread. This approach minimizes the risks of a defect in the release, due to the fact that a sequence of actions is defined: first check, then merge to the main branch of the project.
To test these isolated changes, we must have an assembly on which we can run autotests, and which we will give to manual testing for approval from the QA team. Bamboo provides out of the box the necessary solution. It is called the Branch Plan and consists in the fact that the build has a main branch (for example, alpha), and all the branches that match the specified template are considered as a feature branch. For them, a clone of the build plan is created, but with the difference that the checkout will come from this branch, and not from the main branch of the build plan. It looks like this.
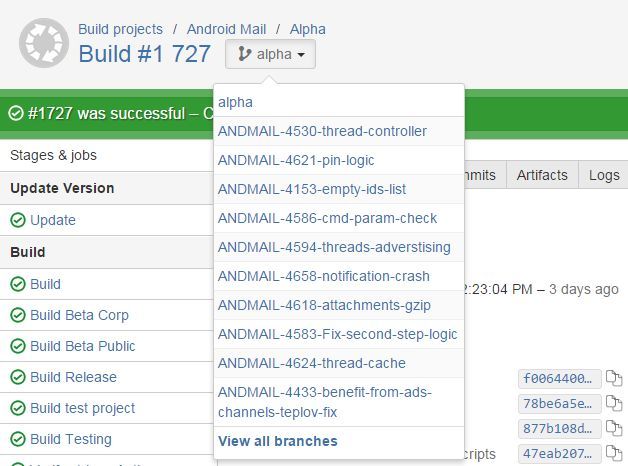
In the viewing of the build plan, we can switch between the main branch and the existing branch by viewing the results of all local statuses.
The branch plan itself looks the same, except that it has a link to the task.

With such a flow, the branch inevitably begins to become obsolete from the moment it was created. For early detection of conflicts with the main branch, in order to test the updated code, you need to constantly update your branch during development. Bamboo can do this automatically before it starts to build a project. In the event of a conflict, the build will not be baked, and the developer will have to first upgrade their branch and then push the changes. Then there will be no conflict before assembling, and everything will go on as usual.
Product Flavors
Suppose we have a project that needs to be assembled in several variations, changing resources, code, and configs. There are several options for how to implement this. We were guided by the fact that all assembly conditions, all configurations and other descriptive part should be in the assembly script. In our case, Gradle is ideally suited for this task. For it, there is a good Android plugin that allows you to flexibly configure most standard and non-standard parameters for building a complex project.
Let's see how many build options we actively use and support.


Let's start with the fact that we have three main Product Flavors: Project 1, Project 2 and Project 3.
Product Flavor is a representation of the product branch. In most cases, these are different applications that have different packages, different signing certificates, different sources and resources. For each application, we have several build options, namely:
- debug - signed with debug key, can be debugged, not obfuscated;
- alpha / branch alpha - obfuscated assembly, different configurations for analytics, assemblies kreshy, resources, debazhnymi settings available in the application;
- beta corp - beta version, which has enabled logs, debug mode available;
- beta - as close as possible to the release of the assembly, which is different analytics, assembly kreshyh, has disabled logs, debug mode, and has no debugging settings;
- release - production-version of the application, almost all additional options are disabled, analytics and statistics collection are set up for combat projects in these systems, etc .;
- unit / UI testing - assemblies that have rewritten manifests, which allows, for example, to enable permissions to read SMS required for automated testing of input (authorization, registration, two-factor authorization) using an SMS code.
Total:
8 Build Types * 3 Product Flavors = 24 Application Variants
Why so much? I'll try to answer. One of the typical tasks that one has to solve, having three different products that are published in different environments, is to share analytics. And it is necessary to do this, otherwise statistics from the alpha version of the application will distort the picture existing in production. To collect statistics on kresham we use HockeyApp . In it we have separate projects for different versions of the assembly. This makes it easy to separate, for example, the crashes of Project 1 from those of Project 2, the beta version from the release version, etc.
In the build.gradle of our project, this config looks like this.
productFlavors { project1 { ... android.buildTypes { alpha { hockeyApp { [appId: 'b45-------1b', note: project.issues, releaseType: '2'] } } beta { hockeyApp { [appId: 'c9d-------86', note: {''}, releaseType: '0'] } } publicBeta { ... } release { ... } } } project2 { ... android.buildTypes { alpha { hockeyApp { [appId: '1ac-------73', note: project.issues, releaseType: '2'] } } ... } } project3 { ... android.buildTypes { alpha { hockeyApp { [appId: 'dcd-------3c', note: project.issues, releaseType: '2'] } } ... } } Thus, we can configure different values for any build options. As for resources and source codes, the same principle is used here, with the exception of one feature: it is possible to merge resources from different options. Our project has resources that are the same for all applications — for example, the screen layout for writing a letter. If such files had to be copied to each resource bundle and kept separate, then if you change the layout of the screen for writing the letter, you would need to change as many as three files. Fortunately, gradle + android plugin can do merge resources.
I'll tell you a little more about how this happens - perhaps someone will be able to solve their everyday tasks using the same approach.
We have identified several folders with resources (they all lie in the root of the project).
- res - shared resources for all variants of the application: here are general selectors, markup, themes, styles, etc .;
- res_project1 - resources that are unique to Project 1: almost all graphics that are used in the application, lines that contain the name of the project, specific logos or markup - in general, everything that applies only to Project 1;
- res_project23 - here is a slightly different picture: all the resources that do not overlap with the Project but are the same for Project 2 and Project 3 fall into the res _ project23 package. Such a grouping of resources helps to solve the problem when Product 2 and 3 are very similar to each other. This is quite different from Project 1. Otherwise, you would have to copy the same resources into the res_project2 and res_project3 folders;
- res_project2 - resources unique to Project 2: currently they are colors, graphics, and texts. Everything else lies in the general packages;
- res_project3 - Likewise for Project 3, only a unique selection of resources for this application remains in this package.
As a result, for each build option, we merge several packages to get a common set of resources for the application:
- Project 1 = res + res_project1;
- Project 2 = res + res_project23 + res_ project2;
- Project 3 = res + res_project23 + res_project3.
This is the basis. For deeper customization, you can, for example, add specific resources, code for a test build, etc. The whole closure with the source code looks like this:
sourceSets { main { manifest.srcFile 'AndroidManifest.xml' java { srcDir 'src' exclude '**/instrumentTest/**' } resources.srcDirs = ['src'] aidl.srcDirs = ['src'] renderscript.srcDirs = ['src'] res.srcDirs = ['res'] assets.srcDirs = ['assets'] } androidTest { manifest.srcFile 'src/instrumentTest/AndroidManifest.xml' java.srcDir 'src/instrumentTest/Java' } project2 { res.srcDirs = ['res_project2', 'res_project23'] java.srcDirs = ['src_common'] assets.srcDirs=['assets_ project2] manifest.srcFile 'res_ project23/AndroidManifest.xml' } project3 { res.srcDirs = ['res_project3', 'res_ project23] assets.srcDirs=['assets_project3'] java.srcDirs = ['src_project3'] manifest.srcFile 'res_ project23/AndroidManifest.xml' } project1 { res.srcDirs = ['res_project1'] java.srcDirs = ['src_common'] assets.srcDirs=['assets_project1'] manifest.srcFile 'res_project1/AndroidManifest.xml' } testingUi { manifest.srcFile 'ui_testing/AndroidManifest.xml' } } It remains the case for small. In the build project, you need to run the correct task in order to get the desired .apk, for example, gradle assembleProject1PublicBeta. Naturally, in the presence of such a large number of assembly options, we decided not to assemble them all consecutively, but to parallelize this process. In total, we received 6 parallel works that are performed as part of the assembly stage. Each work publishes 3 artifacts for each product.
I suppose that those who read up to this point have a question: why collect the beta and release with each build of the project? The question is really very interesting. We came to this decision not immediately, but after a lot of time. Historically, beta and release builds were built separately, using the same revision or contract stating that the code is the same there. Then we realized that this approach is fraught with many problems, and the most unpleasant is that you will learn the status of the assembly after you decided to publish the beta. By law, Murphy, naturally, the build turns out to be red. For any reason. The more changes, the more likely that they will negatively affect the assembly, and we can not do anything about it. You can only shorten the time interval between the time the error was introduced and the time it was detected. And in the ideal case, also to do it in isolation from the general branch. If to abstract from the project and build exactly the beta or release version and look at the automation process, then one of the main indicators of the quality of the whole approach to build automation is what I see as an opportunity to learn about the problems as quickly as possible, and most importantly, find out BEFORE how these changes fell into a common thread.
Check
Automatic quality check in mobile applications is definitely the trend of the last year. In my experience, for many it remains something unreal. Everyone talks about it, but almost nobody has seen it. We have been dealing with such tasks within our project for 2 years already, and during this time a fairly clear understanding of most of the subtleties that any developer has to face has already been established. All these problems and solutions are a fairly new and untapped segment for mobile applications, although the web has long gone this way and has a sufficient number of standardized solutions.
The first question that arises from the majority: what are we going to automate? The developer will answer: we will test the code, the manager will immediately start arguing that the functionality needs to be tested. I believe that you need to test both.
In general, if we talk about our application, then all the checks are divided into several categories:
- Static analysis : I do not know why so little attention is paid to this approach, it is a very powerful tool that allows you to apply formalized rules to the whole project, and not to individual classes;
- UnitTesting : good old unit tests that allow you to make sure that a class works exactly as the developer or user of this class expects;
- UiTesting : functional / end-to-end tests that check the final result: what the user sees and how he will work with it.
Static analysis
As a static analyzer, we use ready-made solutions. For Android, it is Lint, which has recently become a very effective tool for monitoring the quality of android-specific code, markup resources, graphics, etc. In addition, it allows you to add your checks specific to the contract within the project. One of these contracts is that no layout-related parameters should be in styles. For example, the properties layout_margin \ layout_alignParentTop or something like that. From the point of view of syntax, no one forbids putting these properties into styles, but in this case, the style itself is not used to determine the visual component of a UI component, but to store some values that you can then not write in the markup file. In other words, a style is used as an attribute container. We decided that these are different things that should be separated, because, firstly, LayoutParams still relate to markup, and secondly, they relate not to the control, in the tag of which these attributes are written, but to its parent in which he lies.
If you look into it, then in any more or less completed project, in which there are guides on writing code, markup resources, there are templates for solving typical problems of this application, there are quite a lot of such things. They can be monitored at the code review stage, documented, reminded about them each time at the beginning of the working day, or rely on the fact that, once familiarized with these wishes, everyone will continue to fulfill them. As they say, blessed is he who believes, but personally I’m much calmer to work, knowing that I myself will not forget about it and will not miss anything, hurrying to close the annoying task sooner. It is necessary to formalize such checks, add them to the build process with convenient reports, and not worry that, having taken on a new task, you suddenly find a code that has run through all the checks, from which hair stands on end.
Writing your checks is easy enough, even fascinating. In the course of adding any static checks, a bunch of ideas immediately appear on how to statically detect any other problems. For Lint, guides and official documentation will help. You can develop rules directly in Android Studio.
tools.android.com/tips/lint-custom-rules
tools.android.com/tips/lint/writing-a-lint-check
For java-code, there are also invented static analyzers. I will not list everything, I will tell only that we use FindBugs. When we chose a tool, we wanted to get a convenient format, a sufficient amount of rules that will be checked, and the ability to add our own rules. At the moment, we have written the necessary checks, such as checking the closed cursors, checking that the AccountManager instance is always obtained with the application context, checking that the onEventComplete method is required to be called during the template use of the event class, and others. Adding your own rules, which will determine the teamwork arrangements, prevent common mistakes due to carelessness - this is an excellent practice, which reduces the time for code review and testing, and also ensures that such errors will not at least fall into the production version of the application in the future. . We used the FindBugs, Part 2 article : Writing custom detectors as a guide for writing checks. It clearly shows how to create your own plugin, add detectors and use it in the verification process. The report is provided either in a formatted HTML document, or in the form of an XML report, where it is written briefly and in the case, in which class / method an error was found, an error code, a string, etc. This is usually enough to understand where you just did not clean up after you :-).
Great, isn't it? A huge set of rules and common mistakes are ready, there is an opportunity to supplement it, it remains only to find the courage to start and use it.
Once I noticed that our project uses SNAPSHOT versions of libraries. Obviously, this is permissible only in the brunch for the task, when these changes are made to the library used. After the code is poured into the main branch, there should be no SNAPSHOTs in the project. In this case, the reason is quite prosaic and characterizes the majority of such errors. After the task was tested and it was decided that this version reached all the definition of done, the developer was so happy that he forgot to merge the library into the main branch, determine the new version of this library and change the version in the main project. The problem is that neither Lint nor FindBugs can check the build script. Moreover, even if these checks are added to build.gradle itself, it is necessary to know where it is permissible and where not. Obviously, this is permissible in brunch, in which the library is now changing, but unacceptable after it falls into a common branch. This is how we started using git pre-receive hooks in order to monitor what is happening in the project at the repository level.
I know that many teams do not consider it necessary to spend time setting up rules that are suitable for a project at the version control system level, since “we have no fools, no one will delete all branches in the repository”, or for some other reasons, for example, due to lack of time. For us, this is a past stage: we came to the decision that it is better to spend a little more time, but to be confident in the safety and quality of the product. For these purposes, pre-receive hooks are very good: we can determine that changes are added to the common branch, and check that the HEAD of this common branch does not contain unwanted code. At best, no one will ever know about the existence of such a check, but, as practice shows, a random error is enough to make it possible to pierce notably. Pre-receive hook is perfect for checking all the corrected TODO and FIXME, which the developer willingly arranges, but forgets to fix. It also perfectly copes with typical logging problems - adding new Throwable () output to all functions of interest to the developer, because there was a very complex and demanding set of details bug in the branch. For us, the ability to track the errors committed is automatically important for understanding that we will not step on the same rake again. Errors make everything, it is only what conclusions you draw after that. Our conclusion is that, in addition to the correction, it is necessary to make efforts to ensure that these errors do not continue to be made.
Unit testing
Here, by and large, everything is ordinary. For some classes, checks are written to make sure that the class works exactly as intended, and at the same time show the class client an example of how to use it. Currently, unit tests are run on real devices but do not establish a real connection, if necessary. By the way, the need to establish a connection: when a developer thinks about how to test a particular module, most often he first thinks about how to replace class dependencies in order to isolate testing from the current environment. In the case of a network connection, this may seem like a daunting task, because network interaction is not replaced by a call to a single method; a whole layer of logic needs to be wet. For some time we resisted using the hook in the application code to substitute the server response and perform all subsequent actions with it. The fact is that such an approach increases the risk that the wrong code that works in the combat application will be tested. Every time when the question arises whether to change the class interface for convenience of testing, whether it is worth adding additional conditions to the function execution process, I try to stick to the following position: first of all, all the written code should be safe in terms of application functions. If the additional conditions added to the code require a separate check, then for tests there is no need to do this. This is the main reason why the usual setter did not suit us, who would simply replace the answer, take it from another source.
As a result, we came to a different decision, in my opinion, more honest. This is how one of the tests looks like, which checks that with a certain answer the command issues the status “error_folder_not_exist”
@AcquireCookie @LargeTest public void testDeleteNonExistingFolder() { DeleteFolder delete = runDeleteFolder(999); assertERROR_FOLDER_NOT_EXIST(delete); } In this test, we make an honest request to the server, that is, the team works exactly the same as in the application. The problem is that the unit test depends on how the network is configured on the device on which it runs. And below is the second test, which checks exactly the same thing, but already substituting the desired answer, not fulfilling the actual request and not interacting with the server.
@MockMethod(response = RESPONSE_NOT_EXISTS) public void testDeleteNonExistingFolderMock() { testDeleteNonExistingFolder(); } Thus, we have the ability to control the execution of tests - this is necessary, for example, so that the build status does not take into account the response of the server. We rely on the fact that the interaction protocol is described, and, having made sure that the request is correct (using unit tests, of course), we can be sure that the server will give the correct answer. And with the correct answer, it remains only to make sure that the application interprets it accordingly. However, for example, for the nightly assembly, it would be nice to make sure that the contract of interaction with the server is not broken. To do this, all tests will be run, including those that actually interact with it. This will give us an additional airbag in case if due to some bug the contract with the server is broken. We will learn about this from the test results, not from user reviews in the market. If it is so important for us to check the functionality from start to finish, then you can make these tests basic and run them for each application build.
The fact is that we do not want to constantly depend on the service, but at the same time we need to monitor the situation and in the form of daily reports receive information that everything is fine, or that some part of the application is not in order. Here I prefer to share our application and third-party services that are critical for its full-fledged work, but are not our area of responsibility. We can detect in our application a problem related to the work of a third-party service, but we cannot fix it. Our task is to report a problem, wait for a fix, and run tests for working with this service to make sure that the problem has been fixed.
UI Testing
From the user's point of view, these are the most honest tests. From the point of view of the developer - the most complex. The most honest, because they are testing the final product, and not some part of it. Putting the blame on someone else will not work: any bug is an application bug, and it doesn't matter what the reason is, Android’s imperfection in the hands of another developer or something else. In any case, the error needs to be corrected. The advantages of such black-box testing include the fact that for us, in fact, there is no difference how the functionality is implemented, what is the architecture of the application, etc. If two bugs in the application overlap each other, and eventually the user saw the right result - it suits us. — .
- , , , UI- , .
. , , — . , . ( , - , - ) , . , , , . . , , , . , , , .
, , . : , . , , , , - , 99% . , , , , , , , , . , , , . , Android iOS. , , , . , , , , , , .
Robotium. , , . , . , , . , , . Espresso! , . . , . Robotium 2 , , , . . Robotium, , Sleep Pattern'. , , sleep(N * 1000) , . : , (UI Thread). , , Sleep(), . : 10 , . Instrumentation-based , , UI Thread , . android.app.Instrumentation :
/** * Synchronously wait for the application to be idle. Can not be called * from the main application thread -- use {@link #start} to execute * instrumentation in its own thread. */ public void waitForIdleSync() { validateNotAppThread(); Idler idler = new Idler(null); mMessageQueue.addIdleHandler(idler); mThread.getHandler().post(new EmptyRunnable()); idler.waitForIdle(); } , , , View , , , , View , ..
, , Espresso , . ; Google , , Espresso . Lead developer' , Robotium Espresso TestRunner. , . , , Espresso. . .
Espresso , . ~26 , . 4%. , . , , waitForIdleSync : , — , , . CustomIdlingResource Espresso Robotium. , , — idle , custom idling resource . , , , idle , , .
, Espresso — . , , , .
, , , — , . , , Sharing ( ) - . , . Robotium/Espresso- , . , , cross-app functional UI tests, UI Automator. , , Testing Support Library, Google I/O 2015, , . , , , :
- , .
- , , , .
- push- .
- , .
- back-., , .
, , , .., 3 4 uiAutomator framework, , , , . API Espresso, . , .
, . — , .
, , , product flavors , , - .. adb, usb, VirtualBox . , , , .
PS Android- . — .
Source: https://habr.com/ru/post/273781/
All Articles