Weather Station on Arduino with data visualization

Introduction
About the weather stations on the Arduino and wrote more than once. In my defense, I will say that there was a hackathon - and our team (as part of me and the ViArt habrauser) wanted to try working with Arduino. In addition, data visualization is bolted to our weather station. If you want to know which database can receive data on the com-port without intermediate links in the form of a web server, files or any other tricks, welcome to cat.
Work with devices
In InterSystems Caché, you can work directly with a large number of physical and logical device types. Here they are:
- Discs
- Magnetic tapes
- Files
- Terminals
- TCP ports
- COM ports
- other
The work takes place in 5 stages:
- First, using the OPEN command registers the fact that the current process is accessing the device.
- Then, when you need to work with the device, it is made current with the help of the USE command.
- Work with the device. Receiving data from the device with the READ command, sending data to the device with the WRITE command
- Switching to another I / O device (again USE)
- Closing the device with the CLOSE command
How does it look in practice?
')
Blink light from Caché
So, let's collect on Arduino a circuit that reads data from the COM port and turns on the LED for the specified number of milliseconds.
Scheme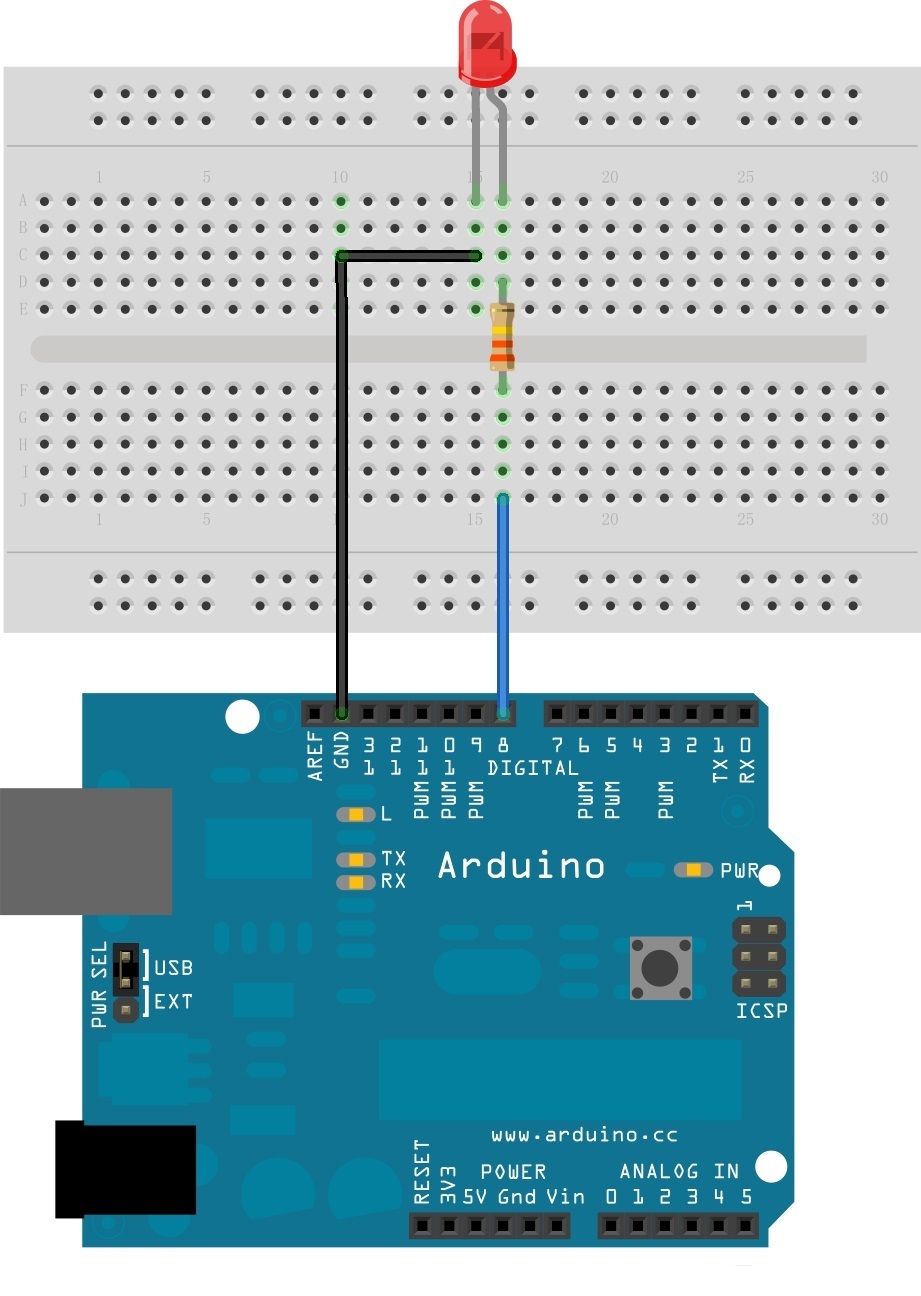
C code
/* Led.ino * * COM * ledPin * */ // () #define ledpin 8 // "" String inString = ""; void setup() { Serial.begin(9600); pinMode(ledpin, OUTPUT); digitalWrite(ledpin, LOW); } void loop() { // COM while (Serial.available() > 0) { int inChar = Serial.read(); if (isDigit(inChar)) { // 1 , // inString += (char)inChar; } // if (inChar == '\n') { // digitalWrite(ledpin, HIGH); int time = inString.toInt(); delay(time); digitalWrite(ledpin, LOW); // inString = ""; } } } In Caché, we write a method that connects to the com port and sends the string 1000 \ n:
/// 1000\n ClassMethod SendSerial() { set port = "COM1" open port:(:::" 0801n0":/BAUD=9600) // set old = $IO // - use port // com write $Char(10) // hang 1 write 1000 _ $Char(10) // 1000\n use old // close port // } The string “0801n0” is a list of parameters for connecting to the Com port, described in detail in the documentation . A / BAUD = 9600 is the baud connection speed.
As a result, if you call this method in the terminal:
do ##class(Arduino.Habr).SendSerial() Then it will not output anything, but the LED will light up for a second.
Get the data in Caché
Now connect the keyboard (keypad) to Caché and transfer the data. This can be used as, for example, additional user authentication with the help of delegation of authorization and routine ZAUTHENTICATE.mac
Scheme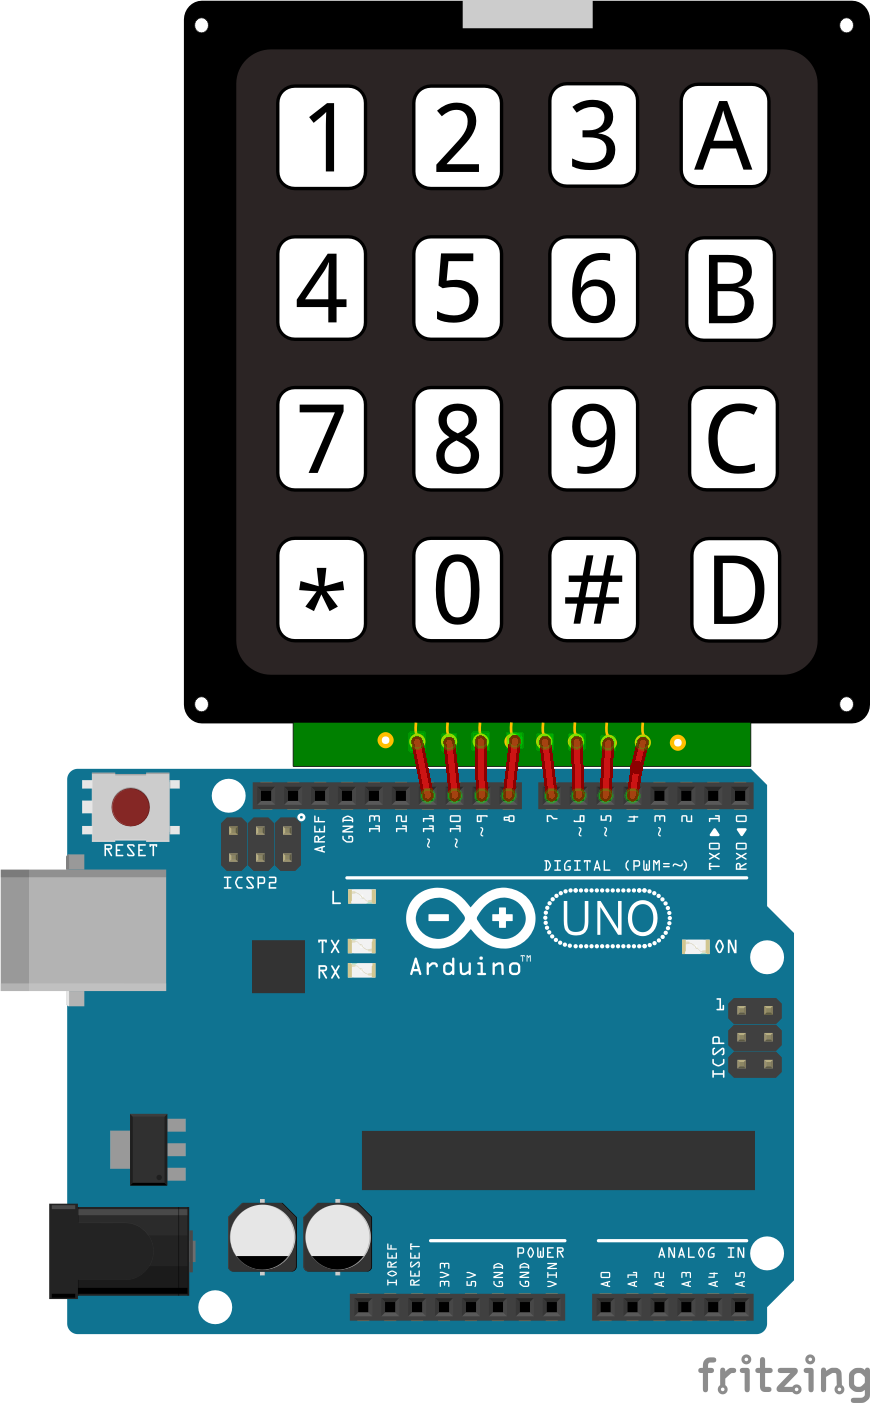
C code
/* Keypadtest.ino * * Keypad * Keypad Arduino * rowPins[] and colPins[]. * */ // : // https://github.com/Chris--A/Keypad #include <Keypad.h> const byte ROWS = 4; // const byte COLS = 4; // // char keys[ROWS][COLS] = { {'1','2','3','A'}, {'4','5','6','B'}, {'7','8','9','C'}, {'*','0','#','D'} }; // keypad 1-8 (-) Arduino 11-4. 1->11, 2->10, ... , 8->4 // keypad ROW0, ROW1, ROW2 ROW3 Arduino byte rowPins[ROWS] = { 7, 6, 5, 4 }; // keypad COL0, COL1 and COL2 Arduino byte colPins[COLS] = { 8, 9, 10, 11 }; // Keypad Keypad kpd = Keypad( makeKeymap(keys), rowPins, colPins, ROWS, COLS ); #define ledpin 13 void setup() { Serial.begin(9600); } void loop() { char key = kpd.getKey(); // if(key) { switch (key) { case '#': Serial.println(); default: Serial.print(key); } } } In Caché, we write a method that connects to the com port and receives the data string:
/// ( ) ClassMethod ReceiveOneLine() As %String { port = "COM1" set str="" try { open port:(:::" 0801n0":/BAUD=9600) set old = $io // - use port read str // , use old close port } catch ex { close port } return str } In the terminal we will execute:
write ##class(Arduino.Habr).ReceiveOneLine() And it will go into standby mode until we press "#" on the keypad (by clicking on which the end of the line will be transmitted), after which the entered line will be displayed in the terminal.
So, these were the basics of interaction with the device, now let's move on to the weather station.
Weather station
A photoresistor and a DHT11 sensor (temperature and humidity) were used to assemble the meteorological station. Connection diagram:
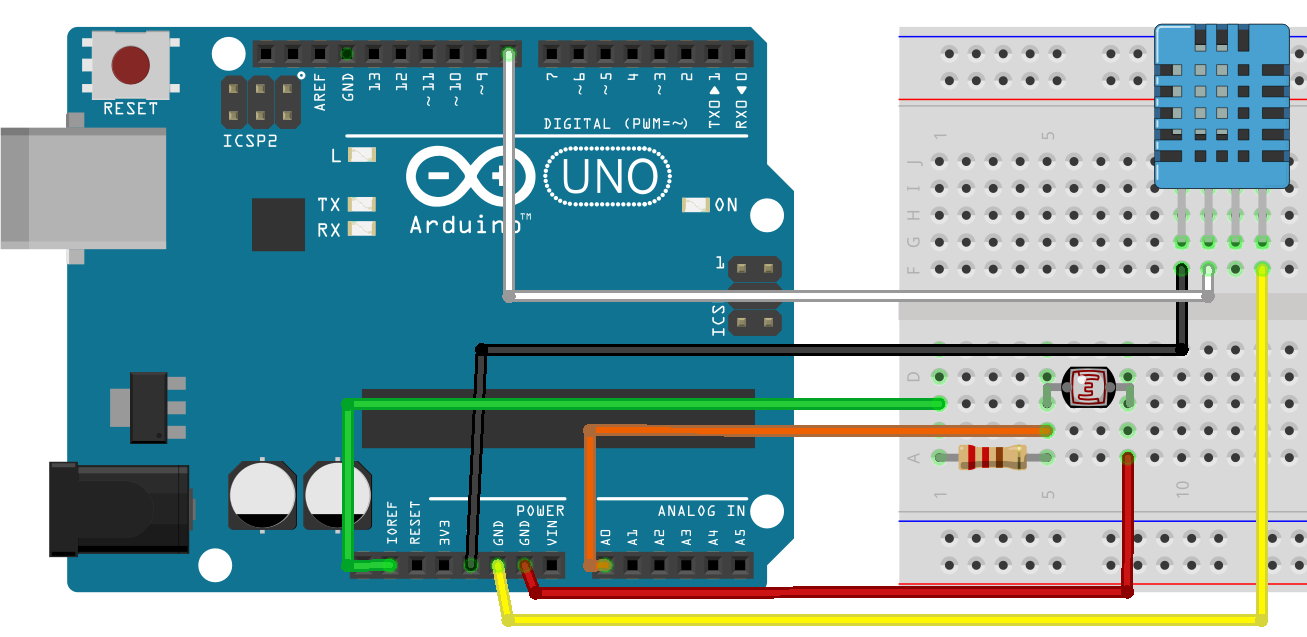
C code
/* Meteo.ino * * , , * COM port * : H=1.0;T=1.0;LL=1; */ // () int lightPin = 0; // DHT-11 () int DHpin = 8; // , DHT-11 byte dat[5]; // void setup() { Serial.begin(9600); pinMode(DHpin,OUTPUT); } /* * setup() * */ void loop() { delay(1000); // 1 int lightLevel = analogRead(lightPin); // temp_hum(); // dat // Serial.print("H="); Serial.print(dat[0], DEC); Serial.print('.'); Serial.print(dat[1],DEC); Serial.print(";T="); Serial.print(dat[2], DEC); Serial.print('.'); Serial.print(dat[3],DEC); Serial.print(";LL="); Serial.print(lightLevel); Serial.println(";"); } // DHT-11 dat void temp_hum() { digitalWrite(DHpin,LOW); delay(30); digitalWrite(DHpin,HIGH); delayMicroseconds(40); pinMode(DHpin,INPUT); while(digitalRead(DHpin) == HIGH); delayMicroseconds(80); if(digitalRead(DHpin) == LOW); delayMicroseconds(80); for(int i=0;i<4;i++) { dat[i] = read_data(); } pinMode(DHpin,OUTPUT); digitalWrite(DHpin,HIGH); } // DHT-11 byte read_data() { byte data; for(int i=0; i<8; i++) { if(digitalRead(DHpin) == LOW) { while(digitalRead(DHpin) == LOW); delayMicroseconds(30); if(digitalRead(DHpin) == HIGH) { data |= (1<<(7-i)); } while(digitalRead(DHpin) == HIGH); } } return data; } After downloading the code to the Arduino, it starts sending data to the COM port in the following format:
H = 34.0; T = 24.0; LL = 605;
Where:
- H - humidity (0 to 100 percent)
- T - temperature in degrees Celsius
- LL - illumination (from 0 to 1023)
We need to somehow store it in Caché. To do this, we write the stored class Arduino.Info:
Arduino.Info
Class Arduino.Info Extends %Persistent { Parameter SerialPort As %String = "com1"; Property DateTime As %DateTime; Property Temperature As %Double; Property Humidity As %Double(MAXVAL = 100, MINVAL = 0); Property Brightness As %Double(MAXVAL = 100, MINVAL = 0); Property Volume As %Double(MAXVAL = 100, MINVAL = 0); ClassMethod AddNew(Temperature = 0, Humidity = 0, Brightness = 0, Volume = 0) { set obj = ..%New() set obj.DateTime=$ZDT($H,3,1) set obj.Temperature=Temperature set obj.Humidity=Humidity set obj.Brightness=Brightness/1023*100 set obj.Volume=Volume write $SYSTEM.Status.DisplayError(obj.%Save()) } And add there a method that will accept data in the Arduino format, and convert them to objects of the Arduino.Info class:
/// H=34.0;T=24.0;LL=605;\n /// Arduino.Info ClassMethod ReceiveSerial(port = {..#SerialPort}) { try { open port:(:::" 0801n0":/BAUD=9600) set old = $IO use port for { read x // set Humidity = $Piece($Piece(x,";",1),"=",2) set Temperature = $Piece($Piece(x,";",2),"=",2) set Brightness = $Piece($Piece(x,";",3),"=",2) if (x '= "") { do ..AddNew(Temperature,Humidity,Brightness) // } } } catch anyError { close port } } After that, we need to run Arduino and execute the ReceiveSerial method in the terminal:
write ##class(Arduino.Info).ReceiveSerial() This method in an infinite loop will collect and save data coming from Arduino.
Data visualization
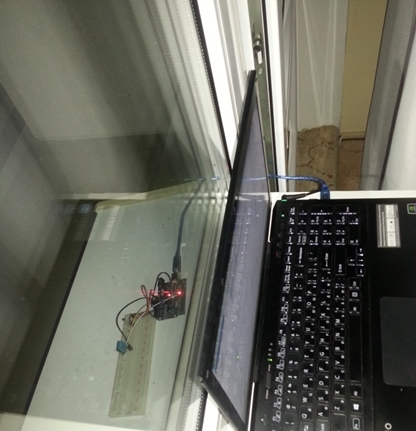
After the weather station was collected, our team launched it on the street (it was already night) and left to collect data until the morning.
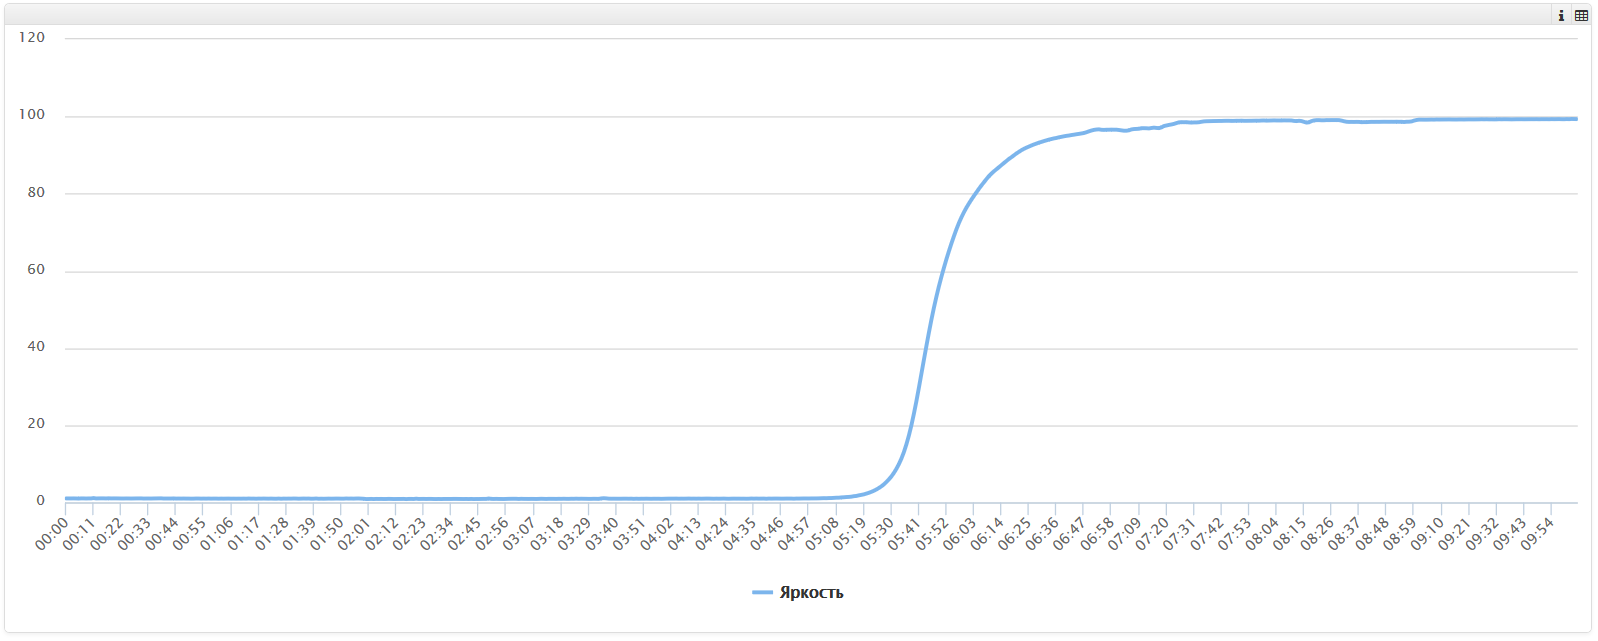
By morning, the data accumulated (~ 36000 records) and we visualized them in BI DeepSee , that's what happened.
Brightness graph. Clear dawn is visible around 5:50:
Temperature and humidity graphs.
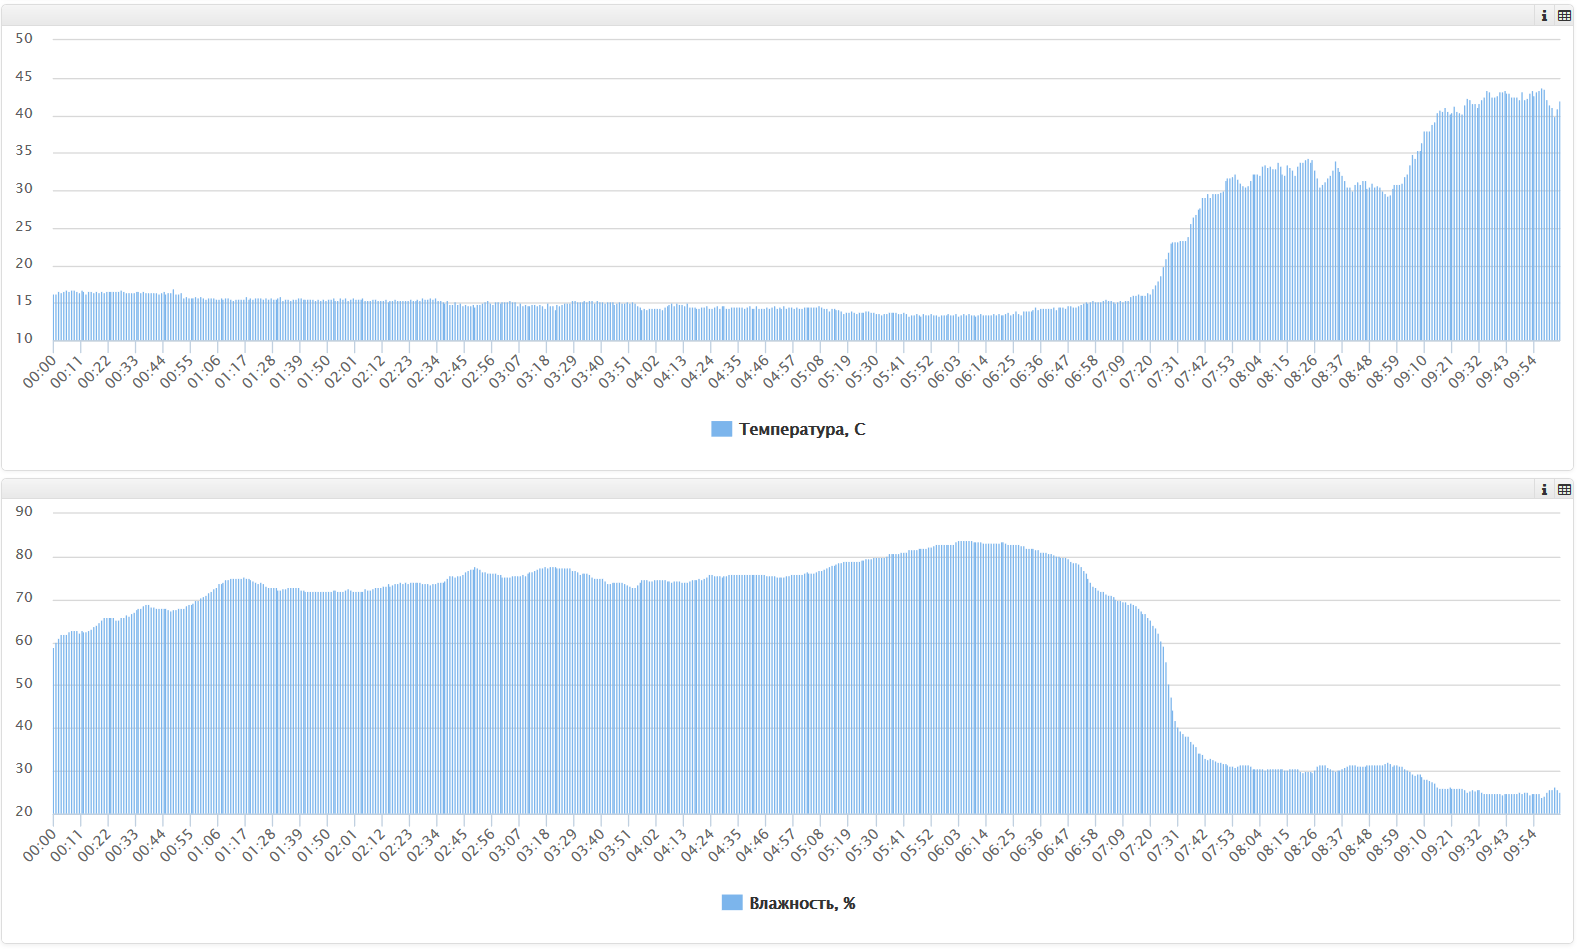
It was not worth putting the temperature sensor under direct sunlight, but nevertheless, the relationship between temperature and humidity is clearly visible.
Demo
Available here .
findings
InterSystems Caché allows you to organize interaction with a large number of devices directly. Possible rapid development of solutions for the collection and visualization of data.
Links
» Documentation
» Repository with code
Source: https://habr.com/ru/post/273749/
All Articles