WebGL for everyone

The idea of this article was born after several hard weeks of studying WebGL. On a personal example, it turned out that people who have not been confronted with 3D graphics before, have mostly mistaken ideas about the operation of this technology. In addition, there was a problem with finding information on the Internet.
WebGL, unlike Javascript, has a high threshold of entry, few people still use it, and even fewer of those who write about it. Most manuals or articles jump right away to use a library. But we all know that large universal tools are not always suitable for our tasks, or perhaps they do it at an unacceptable level: they lose speed, come with unnecessary baggage, etc.
')
This article wants to ease the threshold for entering a clean WebGL, give an initial idea and tell you where to go next.
Technology WebGL allows you to draw graphics in the browser, using the capabilities of the video card, whereas previously we could only use the processor. If you do not understand what it gives, I advise you to watch this small demonstration.
WebGL is based on OpenGL ES 2.0, which, in turn, is a special version for working on mobile devices. The WebGL specification was released in 2011 and is developed and maintained by the non-profit organization Kronos Group, whose site often lies, which further complicates the study. It is known that the specification version 2.0 is currently being developed.
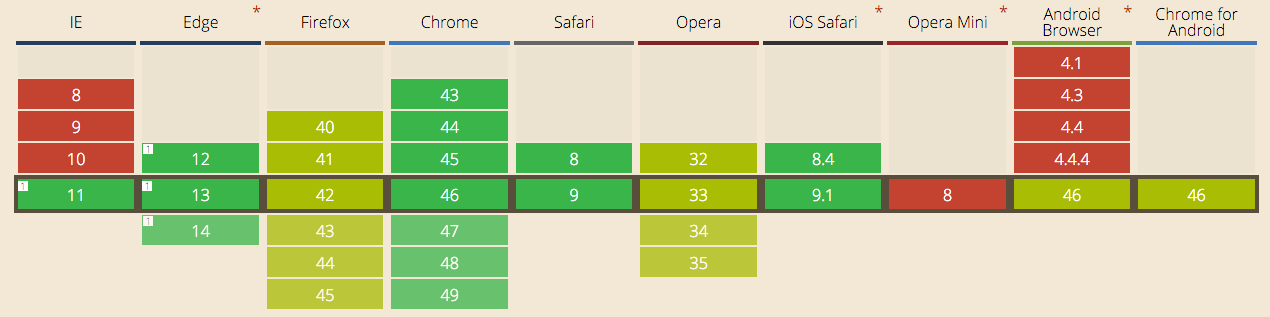
WebGL support statistics with different browsers from caniuse.com
WebGL is available in most modern browsers and is supported by 83% of users. A nice bonus to developing on WebGL is that you will only support modern browsers and forget about ECMAScript 3 nightmares.
If you think that WebGL draws 3D, you are mistaken. WebGL knows nothing about 3D, it’s rather a low-level 2D API, and all it can do is draw triangles. But he can draw a lot of them and very quickly.
Want to draw a square? Please connect two triangles. Need a line? No problem, just a few triangles connected in series.
How to draw a triangle
Since all the figures in WebGL are made up of triangles, let us analyze in stages how to display one triangle.
Unlike OpenGL, in WebGL, only shaders are used for drawing. Shaders are not connected in any way, as you might think, with shadows or shadows. Perhaps, they thought precisely for this, but now they are used to draw anything and everything everywhere.
A shader is a program running on a video card and using the GLSL language. This language is quite simple, and learning it is not a problem.
In total there are two types of shaders: vertex and fragment, and for drawing absolutely any shape both are always used. We will deal with each in turn.
To understand the essence of the vertex shader, we abstract from the task with a triangle and suppose that you want to draw a cube or any other shape with many vertices. To do this, you need to specify its geometry, and the geometry, in turn, is specified by specifying the coordinates of the vertices. Each time it would be unprofitable to calculate the new coordinates of all the vertices when the position of the cube changes in space. It is better to shift such work from the processor to the video card, for this purpose there is a vertex shader.
The coordinates of the vertices of the figure and the position of the local coordinate system in which these vertices are given are transferred to it. The vertex shader is called for each of the vertices, it calculates their position in the global coordinate system and passes it on for the fragment shader to work.
The vertex shader always calculates the position of the vertices, but at the same time it can do other work, for example, calculating the angle of incidence of light. Enthusiasts do amazing things using the capabilities of the vertex shaders.
Knowledge of the position of the figure is not enough to draw it. Information is also needed on how the figure should be painted; for this, a fragmentary shader serves. It is called for each point of the figure's surface and, based on the information transferred, calculates the color of the pixel on the screen.

If the vertex shader determines the shape geometry, then the fragment shader determines its color.
As mentioned above, the shader code is written in the GLSL language. Consider the shader code for a triangle:
Example of a vertex shader:
attribute vec3 a_position; attribute vec3 a_color; uniform vec3 u_position; varying vec3 v_color; void main(void) { v_color = a_color; gl_Position = vec4(u_position + a_position, 1.0); } Fragment shader example:
precision mediump float; varying vec3 v_olor; void main(void) { gl_FragColor = vec4(v_color.rgb, 1.0); } The code consists of variables and the main function that returns the main result of the shader: gl_Position passes the coordinates, and gl_FragColor sets the color.
Shaders have three types of variables that are transferred from the main program:
- attributes - available only in the vertex shader, different for each of the vertices;
- uniforms - available in both shaders and the same for all shader calls;
- varying - used to transfer information from the vertex shader to the fragment shader.
When calling a fragmentary shader for a specific point, the values of varying variables are linearly interpolated between the vertices of the triangle to which this point belongs.

The values of varying variables inside the triangle are calculated
based on the values of these variables at the vertices
Let's try to initialize these shaders. First, get the WebGL context:
var gl = canvas.getContext('webgl'); The shader code is represented by a regular string and you need to compile it to use it:
var vertexShader = gl.createShader(gl.VERTEX_SHADER); gl.shaderSource(vertexShader, document.getElementById('vertexShader').text); gl.compileShader(vertexShader); var fragmentShader = gl.createShader(gl.FRAGMENT_SHADER); gl.shaderSource(fragmentShader, document.getElementById('fragmentShader').text); gl.compileShader(fragmentShader); To bind two types of shaders together, a shader program is used:
var program = gl.createProgram(); gl.attachShader(program, vertexShader); gl.attachShader(program, fragmentShader); gl.linkProgram(program); If uniform variables are directly linked to variables from js, then for attributes you need to use another entity - buffers. Buffer data is stored in the video card memory, which gives a significant increase in rendering speed.
In our case, we will need:
- a vertex buffer that stores all the information about the location of the vertices of the geometry;
- color buffer with vertex color information.
Set the vertex buffer:

The geometry of our triangle
Vertices have coordinates:
- (0, 0, 0);
- (0.5, 1, 0);
- (100).
It should be noted that when working with buffers, several features should be considered:
- the data is transferred to the buffer in one array without nesting; in the case of our triangle, the data will be as follows: [0, 0, 0, 0.5, 1, 0, 1, 0, 0];
- only typed arrays should be transmitted;
- Before you transfer data, you must specify which buffer will be used by the gl.bindBuffer method.
How it will look like in the program:
var vertexBuffer = gl.createBuffer(); var vertices = [0, 0, 0, 0.5, 1, 0, 1, 0, 0]; gl.bindBuffer(gl.ARRAY_BUFFER, vertexBuffer); gl.bufferData(gl.ARRAY_BUFFER, new Float32Array(vertices), gl.STATIC_DRAW); Create a similarly color buffer. Specify the color for each of the vertices in the RGB format, where each component of the color is from 0 to 1:
var colorBuffer = gl.createBuffer(); var colors = [1, 0, 0, 0, 1, 0, 0, 0, 1]; gl.bindBuffer(gl.ARRAY_BUFFER, colorBuffer); gl.bufferData(gl.ARRAY_BUFFER, new Float32Array(colors), gl.STATIC_DRAW); All that is left for us to draw a triangle is to associate the data with the variables of the shader program and call the rendering methods. For this:
// var uPosition = gl.getUniformLocation(program, 'u_position'); var aPosition = gl.getAttribLocation(program, 'a_position'); var aColor = gl.getAttribLocation(program, 'a_color'); // gl.useProgram(program); // uniform- gl.uniform3fv(uPosition, [0, 0, 0]); // gl.bindBuffer(gl.ARRAY_BUFFER, colorBuffer); gl.enableVertexAttribArray(aColor); // , RGB 3 gl.vertexAttribPointer(aColor, 3, gl.FLOAT, false, 0, 0); // gl.bindBuffer(gl.ARRAY_BUFFER, vertexBuffer); gl.enableVertexAttribArray(aPosition); gl.vertexAttribPointer(aPosition, 3, gl.FLOAT, false, 0, 0); // , gl.clearColor(1.0, 1.0, 1.0, 1.0); gl.clear(gl.COLOR_BUFFER_BIT); // // gl.drawArrays(gl.TRIANGLES, 0, 3); Our triangle is ready:

Full sample code can be
look here
As I said, the color of the pixels inside the triangle is linearly interpolated between the multicolored vertices. We were able to draw the simplest shape using WebGL and got acquainted with shaders and buffers. Let's move on to the next stage.
How to draw a cube and make it rotate
Let's try to complicate the task and draw a three-dimensional rotating cube. The cube will consist of six faces, each with two triangles:

We will have to register each vertex of each triangle. There are ways to use a shorter entry, but first we will do it in a simple way:
It's simple
var vertexBuffer = gl.createBuffer(); var vertices = [ // -1, -1, -1, 1, -1, -1, -1, -1, 1, 1, -1, 1, -1, -1, 1, 1, -1, -1, // -1, 1, -1, -1, 1, 1, 1, 1, -1, 1, 1, 1, 1, 1, -1, -1, 1, 1, // -1, -1, -1, -1, 1, -1, 1, -1, -1, 1, 1, -1, 1, -1, -1, -1, 1, -1, // -1, -1, 1, 1, -1, 1, -1, 1, 1, 1, 1, 1, -1, 1, 1, 1, -1, 1, // -1, -1, -1, -1, -1, 1, -1, 1, -1, -1, 1, 1, -1, 1, -1, -1, -1, 1, // 1, -1, -1, 1, 1, -1, 1, -1, 1, 1, 1, 1, 1, -1, 1, 1, 1, -1 ]; gl.bindBuffer(gl.ARRAY_BUFFER, vertexBuffer); gl.bufferData(gl.ARRAY_BUFFER, new Float32Array(vertices), gl.STATIC_DRAW); Similarly, we write the color buffer by coloring the faces of the cube in three colors:
- (1, 0.5, 0.5)
- (0.5, 0.7, 1)
- (0.3, 1, 0.3)
Also a simple example
var colorBuffer = gl.createBuffer(); var colors = [ // 1, 0.5, 0.5, 1, 0.5, 0.5, 1, 0.5, 0.5, 1, 0.5, 0.5, 1, 0.5, 0.5, 1, 0.5, 0.5, // 1, 0.5, 0.5, 1, 0.5, 0.5, 1, 0.5, 0.5, 1, 0.5, 0.5, 1, 0.5, 0.5, 1, 0.5, 0.5, // 0.5, 0.7, 1, 0.5, 0.7, 1, 0.5, 0.7, 1, 0.5, 0.7, 1, 0.5, 0.7, 1, 0.5, 0.7, 1, // 0.5, 0.7, 1, 0.5, 0.7, 1, 0.5, 0.7, 1, 0.5, 0.7, 1, 0.5, 0.7, 1, 0.5, 0.7, 1, // 0.3, 1, 0.3, 0.3, 1, 0.3, 0.3, 1, 0.3, 0.3, 1, 0.3, 0.3, 1, 0.3, 0.3, 1, 0.3, // 0.3, 1, 0.3, 0.3, 1, 0.3, 0.3, 1, 0.3, 0.3, 1, 0.3, 0.3, 1, 0.3, 0.3, 1, 0.3 ]; gl.bindBuffer(gl.ARRAY_BUFFER, colorBuffer); gl.bufferData(gl.ARRAY_BUFFER, new Float32Array(colors), gl.STATIC_DRAW); The position of the triangle in space was set using a vector of dimension three. But the figure can not only change position, it can still rotate and scale. Therefore, in three-dimensional graphics are used not a position vector, but a matrix.
It is known that the rotation matrix in three-dimensional space is defined using a 3 × 3 matrix. A position vector is added to this matrix, so a 4 × 4 matrix is ultimately used.
WebGL does not help us work with matrices in any way, so in order not to spend a lot of time on them, we will use the fairly well-known library glMatrix . Let's create with it the unit position matrix:
var cubeMatrix = mat4.create(); To draw a three-dimensional object, we need to introduce the concept of a camera. The camera, like any object, has its position in space. It also determines which objects will be visible on the screen, and is responsible for transforming the shapes so that we have the illusion of 3D on the screen.

Cube perspective on screen
The perspective matrix is responsible for this transformation. With glMatrix, it is created in two lines:
var cameraMatrix = mat4.create(); mat4.perspective(cameraMatrix, 0.785, window.innerWidth / window.innerHeight, 0.1, 1000); The mat4.perspective method (matrix, fov, aspect, near, far) takes five parameters:
- matrix - the matrix to be changed;
- fov - viewing angle in radians;
- aspect - aspect ratio of the screen;
- near - the minimum distance to objects that will be visible;
- far - the maximum distance to objects that will be visible.
To make the cube image fall into the camera, move the camera along the Z axis:
mat4.translate(cameraMatrix, cameraMatrix, [0, 0, -5]); Unlike the triangle, the shaders for the cube additionally use a position matrix and a camera matrix:
Vertex shader:
attribute vec3 a_position; attribute vec3 a_color; uniform mat4 u_cube; uniform mat4 u_camera; varying vec3 v_color; void main(void) { v_color = a_color; gl_Position = u_camera * u_cube * vec4(a_position, 1.0); } Fragment Shader:
precision mediump float; varying vec3 v_color; void main(void) { gl_FragColor = vec4(v_color.rgb, 1.0); } Shaders are initialized in the same way as in the case of a triangle:
var vertexShader = gl.createShader(gl.VERTEX_SHADER); gl.shaderSource(vertexShader, document.getElementById('vertexShader').text); gl.compileShader(vertexShader); var fragmentShader = gl.createShader(gl.FRAGMENT_SHADER); gl.shaderSource(fragmentShader, document.getElementById('fragmentShader').text); gl.compileShader(fragmentShader); var program = gl.createProgram(); gl.attachShader(program, vertexShader); gl.attachShader(program, fragmentShader); gl.linkProgram(program); var uCube = gl.getUniformLocation(program, 'u_cube'); var uCamera = gl.getUniformLocation(program, 'u_camera'); var aPosition = gl.getAttribLocation(program, 'a_position'); var aColor = gl.getAttribLocation(program, 'a_color'); So that the cube does not stand still, but rotates, it is necessary to constantly change its position and update the frame. Updating occurs by means of calling the built-in function requestAnimationFrame.
Unlike other similar methods, requestAnimationFrame calls the transferred function only when the video card is free and ready to draw the next frame.
// var cubeMatrix = mat4.create(); // var lastRenderTime = Date.now(); function render() { // requestAnimationFrame(render); // var time = Date.now(); var dt = lastRenderTime - time; // Y mat4.rotateY(cubeMatrix, cubeMatrix, dt / 1000); // Z mat4.rotateZ(cubeMatrix, cubeMatrix, dt / 1000); // , gl.clearColor(1.0, 1.0, 1.0, 1.0); gl.clear(gl.COLOR_BUFFER_BIT | gl.DEPTH_BUFFER_BIT); // gl.enable(gl.DEPTH_TEST); gl.useProgram(program); gl.bindBuffer(gl.ARRAY_BUFFER, vertexBuffer); gl.enableVertexAttribArray(aPosition); gl.vertexAttribPointer(aPosition, 3, gl.FLOAT, false, 0, 0); gl.bindBuffer(gl.ARRAY_BUFFER, colorBuffer); gl.enableVertexAttribArray(aColor); gl.vertexAttribPointer(aColor, 3, gl.FLOAT, false, 0, 0); gl.uniformMatrix4fv(uCube, false, cubeMatrix); gl.uniformMatrix4fv(uCamera, false, cameraMatrix); gl.drawArrays(gl.TRIANGLES, 0, 36); lastRenderTime = time; } render(); We get a rotating cube:

Full sample code can be
look here
We learned how to draw a simple cube, understood how to make it rotate, and became acquainted with the concepts of the position matrix and the camera.
How to debug
Since the part of the program is executed on the video card side when working with WebGL, the debugging process becomes much more complicated. There are no familiar tools in the form of DevTools and even console.log. On the Internet there are many articles and reports on this topic, here are just a few basic ways.
To understand that the shader code was written with an error, after compiling the shaders, you can use the following method:
if (!gl.getShaderParameter(vertexShader, gl.COMPILE_STATUS)) { console.log(gl.getShaderInfoLog(vertexShader)); } if (!gl.getShaderParameter(fragmentShader, gl.COMPILE_STATUS)) { console.log(gl.getShaderInfoLog(fragmentShader)); } if (!gl.getProgramParameter(program, gl.LINK_STATUS)) { console.log('Could not initialize shaders'); } There is also a special browser extension for WebGL-Inspector . It allows you to track loaded shaders, buffers, textures in a video card, and calls to WebGL methods.
There is also the Shader Editor, in Firefox DevTools this functionality is already built in, and for Chrome there is an extension that allows editing the shader code right while the application is running.
Where to go next
In the article I tried to highlight the main points that can cause difficulties while studying WebGL. Despite the fact that the work requires the use of different vectors, matrices and projections, it is not necessary to know how everything is arranged inside. WebGL is a great tool for solving a variety of tasks, and it can be used not only in game dev. Do not be afraid to try something new, discover new technologies and experiment.
Finally - a list of useful resources where you can continue to explore WebGL.
- Full code examples with a triangle and a cube .
- A brief summary of WebGL from the Kronos Group site.
- For more detailed study I recommend to go through a series of WebGL Learning lessons.
- Free course on Udacity in 3D basics. Although the course uses the three.js library, it will be useful to everyone.
- Report of Vladimir Agafonkin about WebGL and Mapbox with Frontend Dev Conf.
- Report Slides Debugging and Optimizing WebGL Applications.
Source: https://habr.com/ru/post/273735/
All Articles