Script for quick assessment of the status of Linux systems
The duty of the system administrator is to monitor the workload of the system, users, create a backup and bla-bla-bla. For the most repetitive tasks, there are various scenarios that allow you to keep fingers on your hands and make constantly recurring tasks easier. Here is a script that does not seek to automate the tasks of a typical system administrator, but it can be useful for those newbies who want to get some necessary information about their system, network, users, load, RAM, owners, internal and external IP, etc.
The script does not have any malicious content and it can be run using normal user accounts. In fact, it is recommended to run a script from under a user with limited rights and not a super-user.
You are free to use, modify, distribute the following code snippets. The script is optimized to the maximum to display only the necessary data and access only the necessary directories - nothing superfluous.
All you need is a working Linux.
')
In this case, the script is conscientious with all standard Linux distributions. In addition, it does not require root permission to perform. But when installing from a non-root user, you will need to enter a root password.
For installation and use do not require any additional packages that are not listed in this post. No need to have superuser rights to run. The code was released under the Apache License 2.0 and this means that you can edit, modify and redistribute it.
To install the script, use the
We get the following:
Download the file without problems, now you need to set the appropriate permissions.
Set permissions.
It is strongly recommended to install the script from a user with limited rights, and not as a superuser. In this case, you will be prompted for a password and you will need to install the components in certain places.
To install the
We will receive such a password request:
Enter the root password. If everything goes well, you will receive a message about a successful installation.
A safer option would be to add a user to sudoers. In such cases, the installation command will look like this.
After installation, you can run the script by calling the
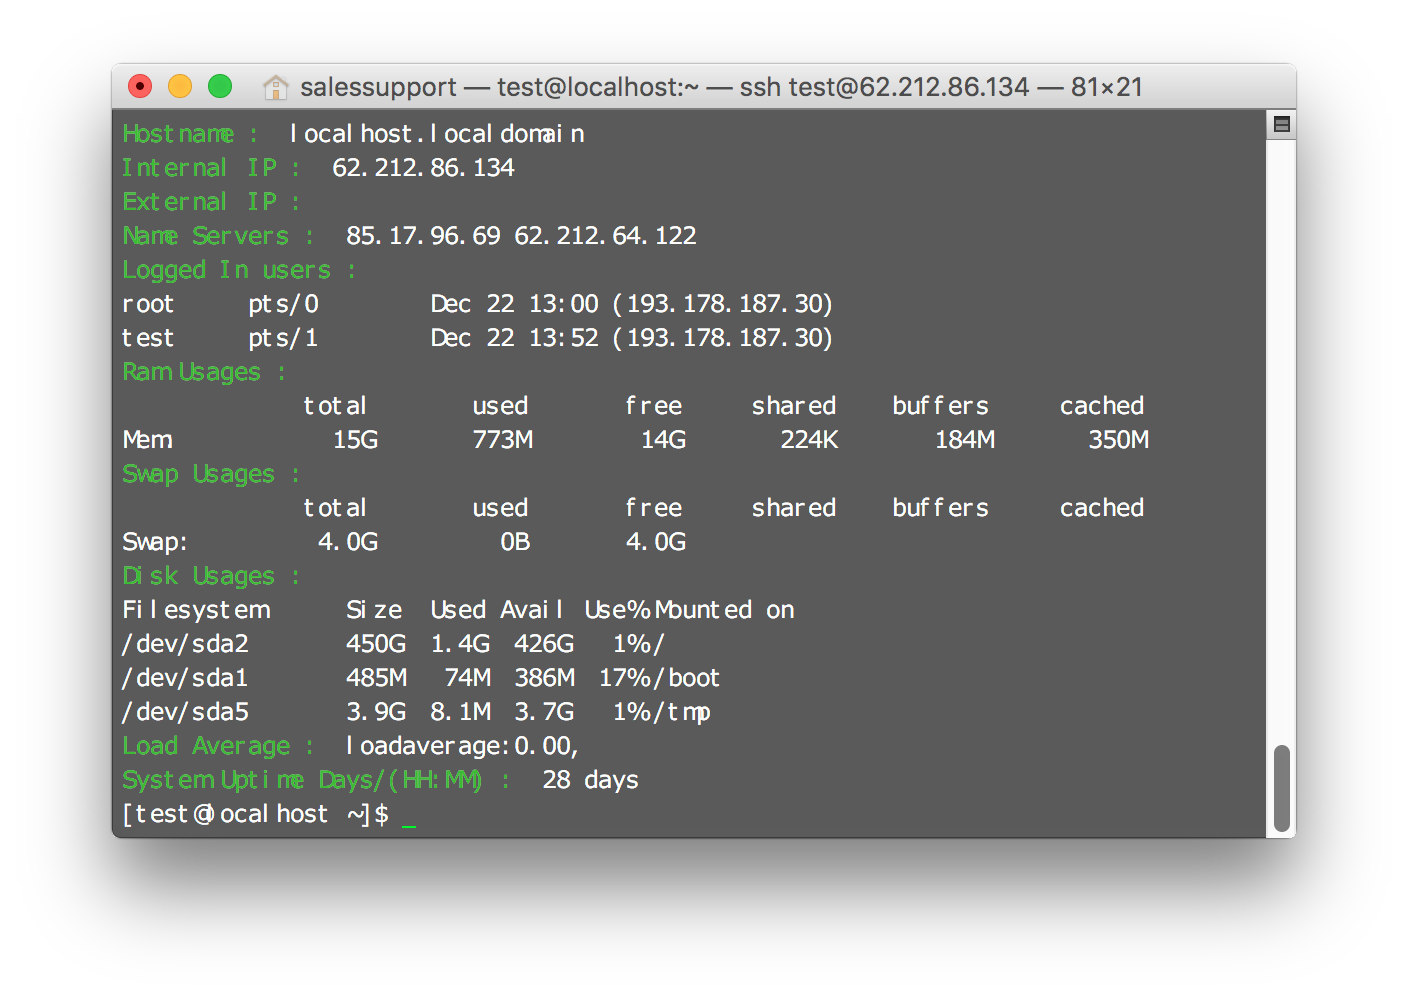
As soon as the command is executed, you receive various information about the system:
You can check the installed version of the script using
Get this kind of result:
This is a ready-made solution out of the box, which does not require special skills or knowledge of working with SSH. Such a solution is clearly not the best for experienced admins, but it is perfect for beginners, just starting to master the work with the server. If you know more optimal scripts for a quick assessment of the state of Linux systems that do not require super-knowledge and will be more useful, give your opinion and leave recommendations in the comments. I, like other readers, will be glad to see the opinion of professional administrators working with Linux systems. Everyone will be able to emphasize something for themselves.
UPD
At installation it is better to use sudo, from the point of view of safety.
The script does not have any malicious content and it can be run using normal user accounts. In fact, it is recommended to run a script from under a user with limited rights and not a super-user.
You are free to use, modify, distribute the following code snippets. The script is optimized to the maximum to display only the necessary data and access only the necessary directories - nothing superfluous.
Minimum system requirements
All you need is a working Linux.
')
Compatibility
In this case, the script is conscientious with all standard Linux distributions. In addition, it does not require root permission to perform. But when installing from a non-root user, you will need to enter a root password.
Security
For installation and use do not require any additional packages that are not listed in this post. No need to have superuser rights to run. The code was released under the Apache License 2.0 and this means that you can edit, modify and redistribute it.
Install script
To install the script, use the
wget command to load the script tecmint_monitor.sh . You will also need to make it executable by setting the appropriate permissions. $ wget http://tecmint.com/wp-content/scripts/tecmint_monitor.sh We get the following:
[test@localhost ~]$ wget http://tecmint.com/wp-content/scripts/tecmint_monitor.sh --2015-12-22 13:52:21-- http://tecmint.com/wp-content/scripts/tecmint_monitor.sh Resolving tecmint.com... 212.71.234.61 Connecting to tecmint.com|212.71.234.61|:80... connected. HTTP request sent, awaiting response... 301 Moved Permanently Location: http://www.tecmint.com/wp-content/scripts/tecmint_monitor.sh [following] --2015-12-22 13:52:21-- http://www.tecmint.com/wp-content/scripts/tecmint_monitor.sh Resolving www.tecmint.com... 212.71.234.61 Reusing existing connection to tecmint.com:80. HTTP request sent, awaiting response... 200 OK Length: 4015 (3.9K) [application/x-sh] Saving to: `tecmint_monitor.sh' 100%[=============================================>] 4,015 --.-K/s in 0s 2015-12-22 13:52:21 (290 MB/s) - `tecmint_monitor.sh' saved [4015/4015] [test@localhost ~]$ Download the file without problems, now you need to set the appropriate permissions.
Set permissions.
# chmod 755 tecmint_monitor.sh It is strongly recommended to install the script from a user with limited rights, and not as a superuser. In this case, you will be prompted for a password and you will need to install the components in certain places.
To install the
tecmint_monitor.sh script, use -i, as shown below. $ ./tecmint_monitor.sh -i We will receive such a password request:
[test@localhost ~]$ ./tecmint_monitor.sh -i ./tecmint_monitor.sh: line 30: /tmp/scriptname: Permission denied Password: Enter the root password. If everything goes well, you will receive a message about a successful installation.
Congratulations! Script Installed, now run monitor Command [test@localhost ~]$ A safer option would be to add a user to sudoers. In such cases, the installation command will look like this.
$ $ sudo ./tecmint_monitor.sh -i After installation, you can run the script by calling the
monitor command from under any user. $ monitor As soon as the command is executed, you receive various information about the system:
- Internet connection
- OS type
- OS name
- OS version
- Architecture
- Kernel version
- Hostname
- Internal IP
- External ip
- Server Name
- Authorized Users
- RAM used
- SWAP used
- How much disk space is used
- System time
You can check the installed version of the script using
monitor -v . $ monitor -v Get this kind of result:
tecmint_monitor version 0.1 Designed by Tecmint.com Released Under Apache 2.0 License [test@localhost ~]$ Conclusion
This is a ready-made solution out of the box, which does not require special skills or knowledge of working with SSH. Such a solution is clearly not the best for experienced admins, but it is perfect for beginners, just starting to master the work with the server. If you know more optimal scripts for a quick assessment of the state of Linux systems that do not require super-knowledge and will be more useful, give your opinion and leave recommendations in the comments. I, like other readers, will be glad to see the opinion of professional administrators working with Linux systems. Everyone will be able to emphasize something for themselves.
UPD
At installation it is better to use sudo, from the point of view of safety.
Add user to sudoers
Add user to wheel group
Adding user test to group wheel
edit sudoers file
uncomment the line, or add our user according to the syntax
Now from under the user it is possible to use sudo.
$ gpasswd -a username wheel Adding user test to group wheel
edit sudoers file
$ visudo $$ Allows people in group wheel to run all commands $ %wheel ALL=(ALL) ALL uncomment the line, or add our user according to the syntax
$ username ALL=(ALL) ALL Now from under the user it is possible to use sudo.
Source: https://habr.com/ru/post/273723/
All Articles