Using smartctl to test Adaptec RAID controllers for Linux
The "smartctl -d ata -a / dev / sdb" command can be used to check the hard disk and the current state of its connection to the system. But how can I use smartctl commands to check SAS or SCSI disks hidden behind an Adaptec RAID controller on Linux systems? To do this, use the SAS or SATA sequential check syntax. As a rule, these are logical disks for each array of physical drives in the operating system. The / dev / sgX command can be used as a transition through I / O controllers, which provide direct access to each physical disk connected to an Adaptec RAID controller.

For verification you can use the following command:
')
As a result of the command, get the following:
Adaptec Storage Manager must be installed according to the assembled disk array.
The command to scan the drive looks pretty simple:
As a result, you should have the following:
Thus, / dev / sda is one device that was defined as a SCSI device. It turns out that we have SCSI compiled from 4 disks located in / dev / sg {1,2,3,4}. Enter the following smartclt command to check the disk behind the / dev / sda array:
The controller should report the status of the drive and notify about errors (if any):
For SAS disk use the following syntax:
As a result, we get something similar to:
And here is the command to check the next disk with the SAS interface, named / dev / sg2:
The disk number is replaced in / dev / sg1. For example, if it is a RAID10 of 4 disks, it will look like this:
You can check the hard disk using the following commands:
Where,
Other simple commands to check the baseline are as follows:
Example result:
Please note that the newer version of arcconf is located in the / usr / Adaptec_Event_Monitor archive. Thus, the whole path should look like this:
Where,
You can independently check the status of the Adaptec RAID array on Linux by entering a simple command:
# / usr / Adaptec_Event_Monitor / arcconf getconfig 1
Or (later):
Approximate result on the photo:
According to tradition, a little advertising in the basement, where it does not hurt anyone. We remind you that due to the fact that the total network capacity of the Dutch data center where we provide services has reached 5 Tbit / s (58 points of presence, including 36 points of exchange, in more than 20 countries and 4213 peering inclusions ), we offer dedicated servers for rent at incredibly low prices, just a week! .
Does Linux recognize the Adaptec RAID controller?
For verification you can use the following command:
')
# lspci | egrep -i 'raid|adaptec' As a result of the command, get the following:
81:00.0 RAID bus controller: Adaptec AAC-RAID (rev 09) Download and Install Adaptec Storage Manager for Linux
Adaptec Storage Manager must be installed according to the assembled disk array.
Checking the status of SATA disk
The command to scan the drive looks pretty simple:
# smartctl --scan As a result, you should have the following:
/dev/sda -d scsi # /dev/sda, SCSI device Thus, / dev / sda is one device that was defined as a SCSI device. It turns out that we have SCSI compiled from 4 disks located in / dev / sg {1,2,3,4}. Enter the following smartclt command to check the disk behind the / dev / sda array:
# smartctl -d sat --all /dev/sgX # smartctl -d sat --all /dev/sg1 The controller should report the status of the drive and notify about errors (if any):
# smartctl -d sat --all /dev/sg1 -H For SAS disk use the following syntax:
# smartctl -d scsi --all /dev/sgX # smartctl -d scsi --all /dev/sg1 ### Ask the device to report its SMART health status or pending TapeAlert message ### # smartctl -d scsi --all /dev/sg1 -H As a result, we get something similar to:
smartctl version 5.38 [x86_64-redhat-linux-gnu] Copyright (C) 2002-8 Bruce Allen Home page is http://smartmontools.sourceforge.net/ Device: SEAGATE ST3146855SS Version: 0002 Serial number: xxxxxxxxxxxxxxx Device type: disk Transport protocol: SAS Local Time is: Wed Jul 7 04:34:30 2010 CDT Device supports SMART and is Enabled Temperature Warning Enabled SMART Health Status: OK Current Drive Temperature: 24 C Drive Trip Temperature: 68 C Elements in grown defect list: 0 Vendor (Seagate) cache information Blocks sent to initiator = 1857385803 Blocks received from initiator = 1967221471 Blocks read from cache and sent to initiator = 804439119 Number of read and write commands whose size <= segment size = 312098925 Number of read and write commands whose size > segment size = 45998 Vendor (Seagate/Hitachi) factory information number of hours powered up = 13224.42 number of minutes until next internal SMART test = 42 Error counter log: Errors Corrected by Total Correction Gigabytes Total ECC rereads/ errors algorithm processed uncorrected fast | delayed rewrites corrected invocations [10^9 bytes] errors read: 58984049 1 0 58984050 58984050 3151.730 0 write: 0 0 0 0 0 9921230881.600 0 verify: 1308 0 0 1308 1308 0.000 0 Non-medium error count: 0 No self-tests have been logged Long (extended) Self Test duration: 1367 seconds [22.8 minutes] And here is the command to check the next disk with the SAS interface, named / dev / sg2:
# smartctl -d scsi --all /dev/sg2 -H The disk number is replaced in / dev / sg1. For example, if it is a RAID10 of 4 disks, it will look like this:
/dev/sg0 - RAID 10 . /dev/sg1 - RAID 10. /dev/sg2 - RAID 10. /dev/sg3 - RAID 10. /dev/sg4 - RAID 10. You can check the hard disk using the following commands:
# smartctl -t short -d scsi /dev/sg2 # smartctl -t long -d scsi /dev/sg2 Where,
-t short : . -t long : . -d scsi : scsi, . --all : SMART . Using Adaptec Storage Manager
Other simple commands to check the baseline are as follows:
# /usr/StorMan/arcconf getconfig 1 | more # /usr/StorMan/arcconf getconfig 1 | grep State # /usr/StorMan/arcconf getconfig 1 | grep -B 3 State Example result:
Device #0 Device is a Hard drive State : Online -- SMART : No Device #1 Device is a Hard drive State : Online -- SMART : No Device #2 Device is a Hard drive State : Online -- SMART : No Device #3 Device is a Hard drive State : Online Please note that the newer version of arcconf is located in the / usr / Adaptec_Event_Monitor archive. Thus, the whole path should look like this:
# /usr/Adaptec_Event_Monitor/arcconf getconfig [AD | LD [LD#] | PD | MC | [AL]] [nologs] Where,
Prints controller configuration information. Option AD : Adapter LD : LD# : PD : MC : Maxcache 3.0 AL : You can independently check the status of the Adaptec RAID array on Linux by entering a simple command:
# / usr / Adaptec_Event_Monitor / arcconf getconfig 1
Or (later):
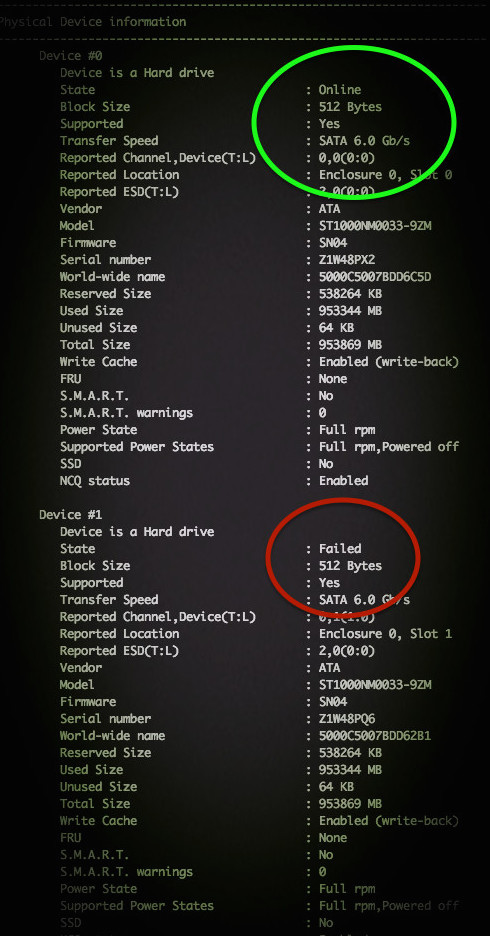
# /usr/StorMan/arcconf getconfig 1 Approximate result on the photo:
According to tradition, a little advertising in the basement, where it does not hurt anyone. We remind you that due to the fact that the total network capacity of the Dutch data center where we provide services has reached 5 Tbit / s (58 points of presence, including 36 points of exchange, in more than 20 countries and 4213 peering inclusions ), we offer dedicated servers for rent at incredibly low prices, just a week! .
Source: https://habr.com/ru/post/273715/
All Articles