Immersion in ASP.NET 5 Runtime
Introduction from the translator
This article is a translation of ASP.NET 5 - A Deep Dive into the ASP.NET 5 Runtime - an introduction to the architecture of DNX and built on it ASP.NET 5. Since the original article was written in March 2015, at the time when ASP. NET 5 was still under active development (roughly beta 3), much of it is outdated. Therefore, when translating all the information was updated to the current version of ASP.NET 5 (RC1), links to related resources were also added (mainly to docs.asp.net) and the source code on GitHub (see only in cases if you are interested in the implementation ). Have a nice dive!
.NET Runtime Environment (DNX)
ASP.NET 5 is based on a flexible, cross-platform runtime that can work with different .NET CLRs (.NET Core CLR, Mono CLR, .NET Framework CLR). You can run ASP.NET 5 using the full .NET Framework, or you can run it using the new .NET Core docs , which allows you to simply copy all the necessary libraries along with the application to the existing environment, without changing anything else on your machine. Using .NET Core you can also run ASP.NET 5 cross-platform on Linux docs and Mac OS docs .
The infrastructure to run and execute ASP.NET 5 applications is called .NET Runtime Environment docs or DNX for short. DNX provides everything you need to run .NET applications: host process, CLR hosting logic, detection of Entry Point, etc.
')
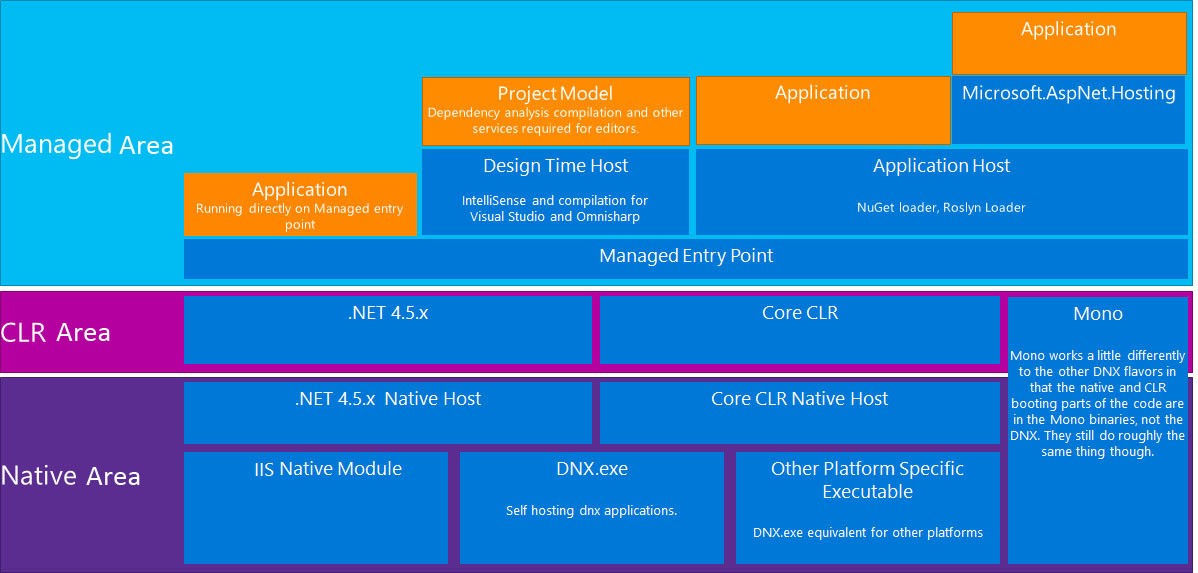
Logically, the DNX architecture has five layers. I will describe each of these layers along with their responsibilities.
Image taken from DNX-structure wiki article
Layer One: Native Process
A native process (meaning the operating system process) is a very thin layer with the obligation to find and call the native CLR host, passing in the arguments passed to the process itself. On Windows, this is dnx.exe (located in% YOUR_PROFILE% /. Dnx / runtimes /% CHOOSEN_RUNTIME%). On Mac and Linux, this is a running bash script (also called dnx).
Starting on IIS docs takes place using the native HTTP module installed on IIS: HTTPPlatformHandler (which eventually also runs dnx.exe). Using HTTPPlatformHandler allows you to run a web application on IIS without any dependencies on the .NET Framework (of course, when launching web applications aimed at .NET Core, and not on the full .NET Framework).
Note: DNX applications (both ASP.NET 5 console and web applications) run in the address space of this native process. From now on, by "native process", I will mean dnx.exe and its analogues in other operating systems.

Layer two and three: Native CLR host and CLR
Have three main responsibilities:
- Run CLR. The ways to achieve this differ depending on the CLR version used, but the result will be the same.
- Start executing the fourth layer code (Managed Entry Point) in the CLR.
- When the native CLR host returns control, it will "clean up after itself" and turn off the CLR.
Layer Four: Entry Point Driven
Note: In general, the logic of this layer is in the Microsoft.DNX.Host github assembly. Entry Point of this layer can be considered as RuntimeBootstrapper github .
This is the first layer in which the work of the DNX application proceeds to the execution of the managed code (hence its name). He is responsible:
- For the creation of LoaderContainer github , a container for ILoaders. ILoaders are responsible for loading assemblies. When the CLR asks the LoaderContainer to provide an assembly, it will do it using its ILoaders.
- Creating github root ILoader , which will load the required assemblies from the bin folder of the selected dnx runtime:% YOUR_PROFILE% /. Dnx / runtimes /% CHOOSEN_RUNTIME% / bin / and additional paths provided during the launch of the native process using the
--libparameter :dnx --lib <LIB_PATHS>). - Configure github IApplicationEnvironment and the core infrastructure of the Dependency Injection system.
- Call entry point github of a specific application or Microsoft.DNX.ApplicationHost github , depending on the parameters passed to the native process during the launch of the application.
Layer Five: Application Host
Microsoft.DNX.ApplicationHost github is the application host that comes with DNX. His duties include:
- Adding github additional assembly loaders (ILoaders) to the LoaderContainer, which can download assemblies from various sources, such as installed NuGet packages and sources compiled at runtime using Roslyn, etc.
- View the dependencies specified in project.json and download them. The dependency bypass logic is described in more detail in the Dependency-Resolution article wiki .
- Call the entry point github of your assembly, in the case of a console application or the entry point of Microsoft.AspNet.Hosting github in the case of a web application. An assembly can be anything with an entry point, which ApplicationHost knows how to call github . Coming along with DNX, ApplicationHost knows how to find the github
public static void Mainmethod.
Cross-platform SDK Tools
DNX comes with an SDK containing everything you need to build cross-platform .NET applications.
DNVM - DNX Version Manager wiki . Allows you to view the DNX installed on your computer, install new ones and select the one you will use.
After installing docs, you can use DNVM from the command line, just type
dnvm .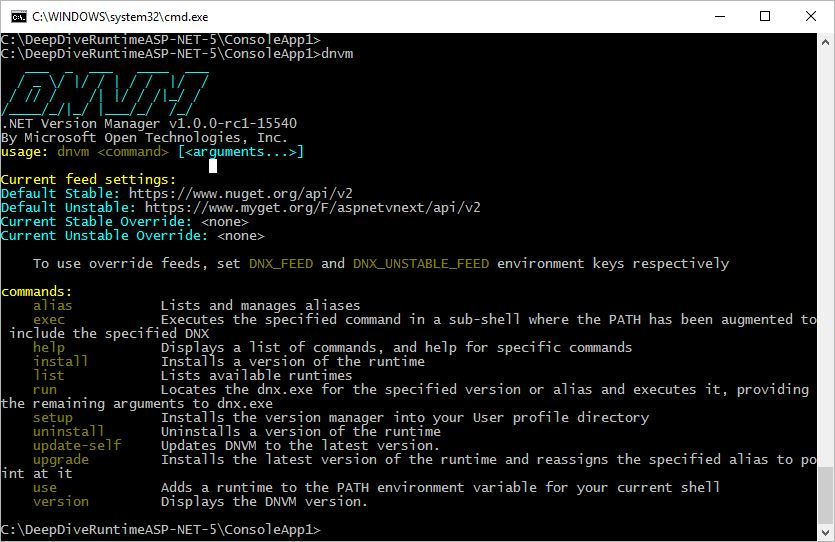
DNVM sets DNXs from NuGet feed configured to use the DNX_FEED environment variable. DNXs are not NuGet packages in the traditional sense - packages that you can refer to as dependencies. NuGet is a convenient way to deliver and manage DNX versions. By default, DNX is set by copying and unpacking the archive with DNX to "% USERPROFILE% /. Dnx".
DNU - DNX Utility wiki . A tool for installing, restoring and creating NuGet packages. By default, packages are installed in "% USERPROFILE% /. Dnx / packages", but you can change this by setting a different path in your global.json file (located in the Solution Items folder of your project).
To use DNU, type
dnu on the command line.
Cross-platform console application on .NET
Now I will show you how, using DNX, to create a simple cross-platform console application on .NET.
We need to create a DLL with an entry point and we can do this using the "Console Application (Package)" template in Visual Studio 2015.
Our application code:
namespace ConsoleApp { public class Program { public static void Main(string[] args) { Console.WriteLine("Hello World"); Console.ReadLine(); } } } The code looks absolutely identical to a regular console application.
You can run this application from Visual Studio or from the command line by typing
dnx run on the command line, being in the folder with the project.json file (project root) of the application being launched.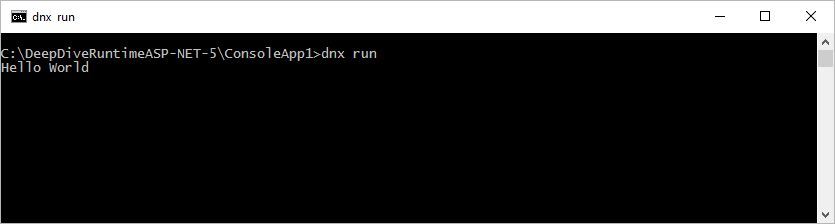
dnx run is just an abbreviation, the native process, in fact, will expand it into a command: dnx.exe --appbase . Microsoft.DNX.ApplicationHost run 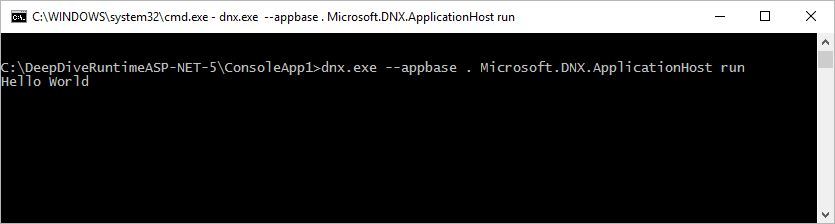
What will fit the pattern:
dnx.exe --appbase < > <, entry point> <, > Let's analyze the expanded command:
dnx.exeis a native process.--appbase .- Sets the path to the folder of the project being launched. Its value "." - indicates the current directory.Microsoft.DNX.ApplicationHost- Any assembly having an entry point. The default is Microsoft.DNX.ApplicationHost, it is his entry point that will cause the fourth layer (Layer Four: Managed Entry Point, fourth responsibility ). The fourth layer has no special knowledge of Microsoft.DNX.ApplicationHost. It simply searches for the entry point in the assembly provided to it and calls it, passing parameters to it (in our example, "run" will be passed as a parameter).run- Parameter passed to the assembly having an entry point. Microsoft.DNX.ApplicationHost interprets therunas a command that tells the project to find the entry point of the path provided via the--appbaseparameter and call it. Instead of theruncommand, you can pass the name of any assembly with an entry point and ApplicationHost will call it. Below in the Web Application Hosting section, we will look at this example.
If you do not want to use ApplicationHost. You can call the native layer by passing it your application directly. To do this:
- Generate a DLL by running the build of your application (make sure that you check the box "Produce outputs on build" in the "Build" section of the properties of your project). You can find the results in the artifacts directory in the root of your solution folder (you can also use the
dnu buildcommanddnu buildthan Visual Studio, typing it in the folder with the project.json file of your project). - Type the command:
dnx <_______>.
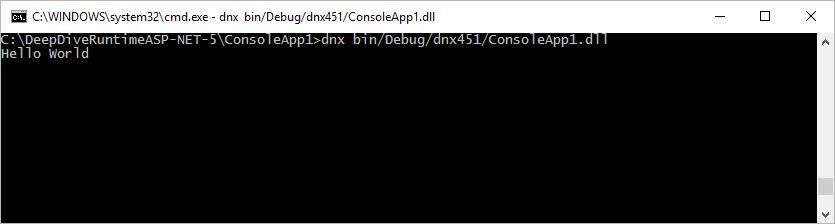
Calling a DLL directly is a rather low-level approach to writing applications. You do not use Microsoft.DNX.ApplicationHost, so you also refuse to use the project.json file and the improved NuGet-based dependency management mechanism. Instead, any libraries you depend on will be loaded from the directories specified during the launch of the native process using the
--lib parameter. Before the end of this article, I will use Microsoft.DNX.ApplicationHost.Microsoft.DNX.ApplicationHost is the last DNX layer, everything above can be considered ASP.NET 5.
ASP.NET 5
Web application hosting
In ASP.NET 5 web applications, the docs hosting layer runs on top of Microsoft.DNX.ApplicationHost. It is represented by the Microsoft.AspNet.Hosting github assembly. This layer is responsible for finding the web server, running the web application on it and "cleaning up after itself" when the web application is turned off. It also provides the github application with some additional services related to the hosting layer.
To run the Microsoft.DNX.ApplicationHost web application, you must call the entry point github Microsoft.AspNet.Hosting method .
The web server used by the hosting server can be selected by specifying the
--server option or using other hosting configuration methods, such as the hosting.json file or environment variables. The hosting layer loads the selected web server and starts it. A commonly used web server should be listed in a list of dependencies in the project.json file so that it can be downloaded.Typically, a web application is started from the command line
dnx web command.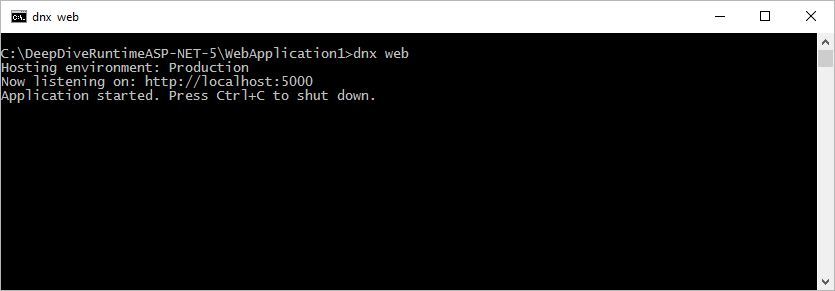
The ASP.NET 5 web application template includes a set of docs commands defined in the project.json file and the
web command is one of them: "commands": { "web": "Microsoft.AspNet.Server.Kestrel", "ef": "EntityFramework.Commands" }, Commands, in fact, only set additional arguments for
dnx.exe and when you type dnx web to launch a web application, in reality this translates into: dnx.exe --appbase . Microsoft.DNX.ApplicationHost Microsoft.AspNet.Server.Kestrel 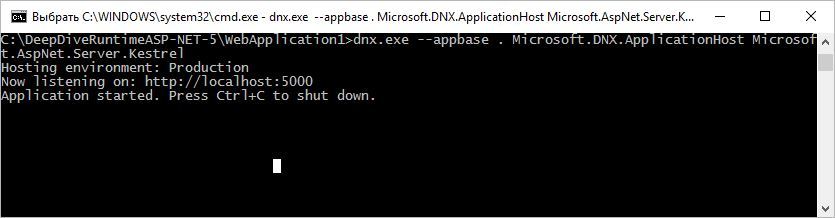
In turn, the entry point call Microsoft.AspNet.Server.Kestrel github is converted into a call:
Microsoft.AspNet.Hosting --server Microsoft.AspNet.Server.Kestrel So the final team will be:
dnx.exe --appbase . Microsoft.DNX.ApplicationHost Microsoft.AspNet.Hosting --server Microsoft.AspNet.Server.Kestrel 
As a result of which, Microsoft.DNX.ApplicationHost will call the entry point method Microsoft.AspNet.Hosting (remember in the section about the cross-platform console application I said that if you pass the name of the assembly instead of run, then ApplicationHost will call its entry point?).
While the article about hosting in the docs.asp.net documentation is not ready, you can read about the keys used to configure the hosting here .
Web application start logic
The hosting layer is also responsible for running the github of the starting logic of the web application docs . It used to be in the Global.asax file, now by default it is in the Startup class and consists of the Configure method used to build the query processing pipeline and the ConfigureServices method used to configure the services of the web application.
namespace WebApplication1 { public class Startup { public void ConfigureService(IServiceCollection services) { // } public void Configure(IApplicationBuilder app) { // } } } The IApplicationBuilder github interface is used to build the request processing pipeline in the Configure method. IApplicationBuilder allows you to register the request delegate ("Use" method) and register the middleware ("UseMiddleware" method) in the request processing pipeline.
Request delegate is the core concept of ASP.NET 5. Request delegate is an incoming request handler, it accepts HttpContext and asynchronously does something useful with it:
public delegate Task RequestDelegate(HttpContext context); Processing a request in ASP.NET 5 is a call through a chain of registered request delegate. But the decision to call the next request delegate in the chain remains for the author, so each request delegate can stop processing the request and return a response to the user.
To simplify the registration in the request delegate request processing pipeline that does not call the following request delegate, you can use the IAAPlicationBuilder Run extension method.
public void Configure(IApplicationBuilder app) { app.Run(async context => await context.Response.WriteAsync("Hello, world!")); } The same can be achieved using the Use extension method and without calling the following request delegate:
public void Configure(IApplicationBuilder app) { app.Use(next => async context => await context.Response.WriteAsync("Hello, world!")); } And an example with calling the following in the request delegate chain:
public void Configure(IApplicationBuilder app) { app.Use(next => async context => { await context.Response.WriteAsync("Hello, world!"); await next.Invoke(context); }); } To make the request delegate convenient to reuse, you can arrange it in the form of ASP.NET 5 middleware docs .
Middleware
Middleware ASP.NET 5 is a regular class following a specific convention:
- The next request delegate in the chain (as well as the necessary services and additional parameters) is passed to the middleware constructor.
- The HttpContext processing logic must be implemented in the asynchronous Invoke method.
Example middleware:
using Microsoft.AspNet.Builder; using Microsoft.AspNet.Http; using System.Threading.Tasks; public class XHttpHeaderOverrideMiddleware { private readonly RequestDelegate _next; public XHttpHeaderOverrideMiddleware(RequestDelegate next) { _next = next; } public Task Invoke(HttpContext httpContext) { var headerValue = httpContext.Request.Headers["X-HTTP-Method-Override"]; var queryValue = httpContext.Request.Query["X-HTTP-Method-Override"]; if (!string.IsNullOrEmpty(headerValue)) { httpContext.Request.Method = headerValue; } else if (!string.IsNullOrEmpty(queryValue)) { httpContext.Request.Method = queryValue; } return _next.Invoke(httpContext); } } Calling the next (if you want to call the next) in the request delegate chain must be made inside the Invoke method. If you put any logic below the call to the next request delegate, it will be executed after all the incoming request handlers following your request have completed.
In the query processing pipeline, you can include the following middleware with this agreement using the
UseMiddleware<T> extension method IApplicationBuilder: public void Configure(IApplicationBuilder app) { app.UseMiddleware<XHttpHeaderOverrideMiddleware>(); } Any parameters passed to this method will be embedded in the middleware constructor after
RequestDelegate next and the requested services.A middleware constructor that additionally accepts services and parameters:
public XHttpHeaderOverrideMiddleware(RequestDelegate next, SomeServise1 service1, SomeServise2 service2, string param1, bool param2) { _next = next; } Inclusion of middleware in the request processing pipeline and passing parameters to it:
public void Configure(IApplicationBuilder app) { app.UseMiddleware<XHttpHeaderOverrideMiddleware>(param1, param2); } By convention, the inclusion of middleware in the call chain should be framed in the "Use ..." extension method of the IApplicationBuilder:
public static class BuilderExtensions { public static IApplicationBuilder UseXHttpHeaderOverride( this IApplicationBuilder builder) { return builder.UseMiddleware<XHttpHeaderOverrideMiddleware>(); } } To enable this middleware in the request processing pipeline, you need to call this extension method in the Configure method:
public void Configure(IApplicationBuilder app) { app.UseXHttpHeaderOverride(); } ASP.NET 5 comes with a large set of embedded middleware. There are middleware for working with files docs , routing docs , error handling, diagnostics docs and security. Middleware are delivered as NuGet packages via nuget.org.
Services
ASP.NET 5 introduces the concept of Services - "common" components, access to which may be required in several places in an application. Services are available to the application through a dependency injection system. ASP.NET 5 comes with a simple IoC container docs that supports dependency injection in the designer, but you can easily replace the docs with another container.
The Startup class also supports dependency injection; all you need to do is to query them as constructor parameters.
public Startup(IApplicationEnvironment appEnv) { } By default, the following services are available to you:
Microsoft.Extensions.PlatformAbstractions.IApplicationEnvironment - information about the application (physical path to the application folder, its name, version, configuration (Release, Debug), used by the Runtime framework).
Microsoft.Extensions.PlatformAbstractions.IRuntimeEnvironment - information on the DNX runtime and OS.
Microsoft.AspNet.Hosting.IHostingEnvironment - access to your application's web root (usually the wwwroot folder), as well as information about the current environment (dev, stage, prod).
Microsoft.Extensions.Logging.ILoggerFactory - factory for creating docs loggers .
Microsoft.AspNet.Hosting.Builder.IApplicationBuilderFactory is the factory for creating the IApplicationBuilder (used to build the request pipeline).
Microsoft.AspNet.Http.IHttpContextFactory is a factory for creating an Http context.
Microsoft.AspNet.Http.IHttpContextAccessor - provides access to the current Http context.
You can add services to an application in the ConfigureServices method of the Startup class using the IServiceCollection github interface. Typically, frameworks and libraries provide the "Add ..." extension method of an IServiceCollection to add their services to an IoC container. For example, adding services used by ASP.NET MVC 6 is as follows:
public void ConfigureServices(IServiceCollection services) { // MVC services.AddMvc(); } You can add your own services to the IoC container. Services to be added can be one of three types: transient (AddTransient method IServiceCollection), scoped (AddScoped method IServiceCollection) or singleton (AddSingleton method IServiceCollection).
public void ConfigureServices(IServiceCollection services) { services.AddTransient<CustomService1>(); services.AddScoped<CustomService2>(); services.AddSingleton<CustomService3>(); } Transient services are created each time they request from the container. Scoped services are created only if they have not yet been created in the current scope. In web applications, a scope container is created for each request, so you can think of them as services created for each http request. Singleton services are created only once per application life cycle.
In the console application, where access to dependency injection is not available, to access the services: IApplicationEnvironment and IRuntimeEnvironment, you must use the staticMicrosoft.Extensions.PlatformAbstractions.PlatformServices.Defaultobject.
Application configuration
Web.config and app.config files are no longer supported. Instead, ASP.NET 5 uses the new, simplified Configuration API docs . It allows you to receive data from different sources. The default configuration providers support JSON, XML, INI, command line arguments, environment variables, and setting parameters directly from the code (in-memory collection). You can specify several sources, and they will be used in the order of their addition (the ones added last will override the settings added earlier). You can also have different settings for each environment docs : test, stage, prod. Which makes it easy to publish applications in different environments.
Sample appsettings.json file:
{ "Name": "Stas", "Surname": "Boyarincev" } An example of getting the application configuration using the Configuration API:
var builder = new ConfigurationBuilder() .AddJsonFile("appsettings.json") .AddJsonFile($"appsettings.{env.EnvironmentName}.json", optional: true) .AddEnvironmentVariables(); var Configuration = builder.Build(); You can request data using the GetSection method and the key name:
var name = Configuration.GetSection("name"); var surname = Configuration.GetSection("surname"); Or by contacting the index:
var name = Configuration["name"]; var surname = Configuration["surname"]; It is recommended to work with the Configuration API in the Startup class, and further divide the settings into small data sets corresponding to some functionality and transfer to other parts of the application using the Options docs mechanism.
The Options mechanism allows you to use the Plain Old CLR Object (POCO) classes as objects with settings. You can add it to your application by calling the AddOptions extension-method of the IServiceCollection in the ConfigureServices method:
public void ConfigureServices(IServiceCollection services) { // Options services.AddOptions(); } In fact, the AddOptions call adds
IOptions<TOption> to the dependency injection system. This service can be used to get Options of various types wherever dependency injection is available (just request from it IOption<TOption> , where TOption POCO is the class with the settings you need).To register your options, you can use the
Configure<TOption> extension IServiceCollection method: public void ConfigureServices(IServiceCollection services) { services.Configure<MvcOptions>(options => options.Filters.Add( new MyGlobalFilter())); } In the example above, MvcOptions github is a class that the MVC framework uses to get its settings from the user.
You can also easily transfer some configuration settings to options:
public void ConfigureServices(IServiceCollection services) { //Configuration - services.Configure<MyOptions>(Configuration); } In this case, the settings keys from the configuration will be mapped to the names of the POCO properties of the settings class.
And in order to get MyOptions with the settings installed inside the application, it is enough to request from the deployment system
IOption<MyOptions> dependencies, for example, through the controller's constructor. public HomeController(IOptions<MyOptions> appOptions) { } The internal Options mechanism works by adding
IConfigureOptions<TOptions> to the service container, where TOptions is the class with the settings. The standard implementation of IOptions<TOption> will collect all IConfigureOptions<TOptions> same type and "summarize their properties" and then provide the final instance — this happens because you can add an object with the same type of settings to the service container many times overriding settings.Web server
As soon as the web server starts, it starts to expect incoming requests and start processing for each of them. The web server level raises the request for the hosting level by sending it a set of feature interfaces. There are feature interfaces for sending files, web sockets, session support, client certificates and many other docs .
For example, feature interface for Http-request:
namespace Microsoft.AspNet.Http.Features { public interface IHttpRequestFeature { string Protocol { get; set; } string Scheme { get; set; } string Method { get; set; } string PathBase { get; set; } string Path { get; set; } string QueryString { get; set; } IHeaderDictionary Headers { get; set; } Stream Body { get; set; } } } The web server uses feature interfaces to expose low-level functionality to the hosting level. And he, in turn, makes them available to the entire application via
HttpContext . This allows you to break the close links between the level of the web server and hosting and place the application on different web servers. ASP.NET 5 comes with a wrapper over HTTP.SYS ( Microsoft.AspNet.Server.WebListener ) and a new cross-platform web server called Kestrel github .Open Web Interface for .NET (OWIN) standard that shares the same goals. OWIN standardizes how .NET servers and applications must communicate with each other. ASP.NET 5 supports OWIN docs using the Microsoft.AspNet.Owin github package. You can host github ASP.NET 5 applications on OWIN-based web servers and you can use OWIN middleware github in ASP.NET 5 pipeline.
Katana Project Microsoft OWIN ASP.NET ASP.NET 5. Katana pipeline middleware -. , Katana, OWIN , ASP.NET 5 . Katana middleware ASP.NET 5 OWIN github
Results
ASP.NET 5 runtime -. ASP.NET 5 , , .NET Framework, .NET Core Mono. , middleware, -, .
Links
github.com/aspnet — ASP.NET 5.
docs.asp.net — ASP.NET 5.
github.com/aspnet/Home/wiki — DNX Runtime.
Source: https://habr.com/ru/post/273509/
All Articles