Taming UEFI SecureBoot
 These promises must be fulfilled, especially if they are made first in the final part of the security opus on UEFI , and then repeated from the ZeroNights 2015 scene , so today we will talk about how to make UEFI SecureBoot work not for the good of Microsoft, as is most often configured default, but for the good of us with you.
If you are interested in how to generate your own keys for SecureBoot, how to install them instead of the standard ones (or with them), how to sign your favorite EFI-downloader, how to prevent the downloading of unsigned or other people's keys from the code, what the interface looks like to configure SecureBoot from AMI , Insyde and Phoenix, and why this, by and large, does not matter at all - welcome under the cat, but beware of a large number of images and long console commands.
Introduction
I already told you about how SecureBoot works and works at the beginning of the fifth part of the above-mentioned opus . I don’t see any reason to repeat. If you don’t know what the whole UEFI SecureBoot is all about, who are PK , KEK , db and dbx , and why, from the point of view of SecureBoot, the default owner of your system is the UEFI manufacturer, and the only authorized user is Microsoft, go ahead we will wait here for you.
With the educational program finished, now to the point. In spite of the fact that about the last three years about ten excellent articles (links to some of which are given in the Literature section) were written about creating your keys and setting up SecureBoot, it's still there. The main problem with information about configuring SecureBoot even in the English segment of the network (not to mention runet) - most of the articles, texts and posts breaks to “we now have keys in the EFI Signature List format, add them in a way dependent on your vendor’s firmware and done. " At the same time, the vendors themselves do not rush to describe the SecureBoot settings menu either in the documentation on their OEM platforms or in manuals on the end systems, as a result, the user is lost in unfamiliar areas and either disables SecureBoot, which prevents his favorite OpenBSD from loading (or whatever it), or leaves it on the default settings (and then, Windows loads the same). It is this last step that I will try to describe in more detail, but not to the detriment of the other necessary steps.
Test configuration
Especially for this article, I took out a couple of not the latest laptops with firmware on the Phoenix SCT and Insyde H2O platforms, as well as a brand new congatec board (developing the firmware for which I am currently working) on the AMI AptioV platform. Meet our test benches:

1 . AMI , they are also " triangular ": congatec conga-TR3 @ conga-TEVAL , AMD RX-216GD (Merlin Falcon), AMI AptioV (UEFI 2.4)

2 Insyde , they are also " square ": Acer Aspire R14 R3-471T (Quanta ZQX) , Intel Core i3-4030U (Ivy Bridge), Insyde H2O (UEFI 2.3.1C)

3 Phoenix , they are also " semicircular ": Dell Vostro 3360 (Quanta V07) , Intel Core i7-3537U (Ivy Bridge), Phoenix SCT (UEFI 2.3.1C)
')
About interfaces for configuring SecureBoot
On all of the above systems, the manufacturer claims support for UEFI SecureBoot technology, but the interface for setting it up is very different between systems. Fortunately, this is not a very big problem, because for configuring SecureBoot on UEFI 2.3.1C (and newer) compatible firmware, there is no interface in Setup except for the ability to delete the current PK (ie, transfer SecureBoot into so-called Setup Mode) is not required , and after that, you can use any EFI application that can call the gRS-> SetVariable UEFI service with user-supplied data, including the KeyTool.efi utility from the efitools package, which is designed specifically for key management and it remains only to learn it to enjoy.
However, if a convenient interface for configuration is present (for AMI, in my opinion, it is even more convenient for KeyTool a), you can use it, so you still have to talk about these interfaces.
A few words about UEFI screenshots
Thanks to the versatility of GOP , ConIn / ConOut and DevicePath, it was possible to sit down and write for half an hour a simple DXE driver that would take wonderful screenshots in BMP format from everything that happens in the graphics console after its (driver) load by pressing a hot key, after which I would save them on the first USB flash drive with FAT32 FS ... But first you need to write it, then debug it, then integrate it into the firmware so that it doesn’t collapse (and you will have to insert a microchip with firmware on the laptops if what something goes wrong), plus you can take screenshots from AptioV controlled by me just using the terminal and console serial redirection, and the rest of the settings there are literally two or three screens that can be photographed from the monitor, so I ask you, dear readers, to forgive your humble servant for these crooked photographs and for the fact that he is a lazy ass.
Cooking bridgehead
Let's start with a lyrical digression about the availability of the necessary software for different operating systems. Despite the fact that Microsoft is one of the developers of the technology, there is still no normal means available for working with it from Windows (keys can be generated by the MakeCert utility from the Windows SDK, and for everything else, it’s suggested to use third-party HSM for a lot of money) . I thought at first to take and write the necessary utility on Qt, but therefore I decided that it was not necessary to generate keys and signatures every day, and existing solutions would be enough for a couple of times. You can try to convince me in the comments, if you want.
In general, for all of the following, you will need Linux (which can be run from LiveUSB, if you do not have it installed). For it, there are two sets of utilities for working with SecureBoot: efitools / sbsigntool and EFIKeyGen / pesign . I have a positive experience with the first set, so it will be about him.
As a result, besides Linux, we need a few things:
1. The openssl package and the utility of the same name from it to generate key pairs and convert certificates from DER to PEM.
2. Package efitools , or rather cert-to-efi-sig-list , sign-efi-sig-list utilities for converting certificates into ESL format and signing files in this format, and KeyTool.efi for managing the keys of the system found in SetupMode .
3. The sbsigntool package, or rather the sbsign utility for signing UEFI executable files (ie, bootloaders, DXE drivers, OptionROMs and applications for UEFI Shell) with your key.
Download Linux, install the above packages, open a terminal in your home directory and go to the next step.
We generate our own keys for SecureBoot
As usual, there are several ways to do something, and the more powerful the tool used, the more such methods. OpenSSL as a tool is so advanced that it seems that he can do everything at all, and if you read man to him, then absolutely everything else. Therefore, in this article I will confine myself to the direct generation of key files, and leave the dances around creating my own CA for independent study .
We generate key pairs
The keys will need to generate three pieces: PK, KEK and ISK .Let's start with PK, to generate which you need to do the following
openssl req -new -x509 -newkey rsa:2048 -sha256 -days 365 -subj "/CN=Platform Key" -keyout PK.key -out PK.pem With the command above, we ask OpenSSL to generate us a key pair of RSA2048 / SHA256 with a validity of one year, called Platform Key, with the output of the private key in the PK.key file, and the open one in the PK.pem file. If you add -nodes , then to sign this key pair you will not need a password, but here we will not do this - with a password at least slightly, but safer.
In the same way, we generate key pairs for KEK and ISK, while I advise you to enter different passwords:
openssl req -new -x509 -newkey rsa:2048 -sha256 -days 365 -subj "/CN=Key Exchange Key" -keyout KEK.key -out KEK.pem openssl req -new -x509 -newkey rsa:2048 -sha256 -days 365 -subj "/CN=Image Signing Key" -keyout ISK.key -out ISK.pem Convert public keys to ESL format
Now you need to convert the public keys from the PEM format into the UEFI SecureBoot clear ESL format. This binary format is described in the UEFI specification (section 30.4.1 in the current version 2.5) and is interesting in that the files in it can be connected to each other by concatenation, and this fact is still useful to us. cert-to-efi-sig-list -g "$(uuidgen)" PK.pem PK.esl cert-to-efi-sig-list -g "$(uuidgen)" KEK.pem KEK.esl cert-to-efi-sig-list -g "$(uuidgen)" ISK.pem ISK.esl The -g switch adds a GUID to the generated ESL file, in our case a random one, obtained by running the uuidgen utility and using its output. If you do not have this utility, invent GUIDs yourself or leave the default value.Signing ESL files
For SecureBoot to work correctly, PK must be signed by itself, KEK is signed by PK, and db and dbx storages must be signed by KEK. At the same time, PK cannot be several, but the situation with several KEKs can be found in the wild, but I still strongly recommend that you remove the pre-installed Microsoft key from KEK for a simple reason - db and dbx can be signed with any key from the KEK store, t . if the MS key is not deleted from there, then MS will be able to control the contents of the db and dbx, i.e. add any new keys or hashes to the list of trusted downloads and delete existing ones from it. In my opinion, this is a bit too much, and if we take control of the keys in our hands, then we need to do it to the end.If you think differently
On the other hand, if you don’t want to lose the ability to load Windows and Microsoft-signed executable components (for example, GOP drivers for external video cards and PXE drivers for external network cards), then our key ISK.esl will need to be added Microsoft Windows Production CA 2011 , with which MS signs its own loaders and the Microsoft UEFI driver signing signing key, which third-party components sign (by the way, they signed the Shim loader, which now starts various Linux distributions that support SecureBoot out of the box).Well, then you have a direct path here , there at the very end of section 1.3.4.3 there is a link to the Microsoft Corporation KEK CA 2011 certificate in the DER format, from which you first need to get the PEM team
openssl x509 -in MicCorKEKCA2011_2011-06-24.crt -inform DER -out MsKEK.pem -outform PEM then convert the resulting PEM to ESL with the command cert-to-efi-sig-list -g "$(uuidgen)" MsKEK.pem MsKEK.esl then add the resulting file to our KEK.esl file with the command cat KEK.esl MsKEK.esl > NewKEK.esl mv -f NewKEK.esl KEK.esl Now Microsoft is the same authorized user of your platform, as you are, with which I congratulate you.The sequence is the same as under the spoiler above. Convert from DER to PEM, then from PEM to ESL, then add to db.esl, which you will eventually need to sign with any key from KEK:
openssl x509 -in MicWinProPCA2011_2011-10-19.crt -inform DER -out MsWin.pem -outform PEM openssl x509 -in MicCorUEFCA2011_2011-06-27.crt -inform DER -out UEFI.pem -outform PEM cert-to-efi-sig-list -g "$(uuidgen)" MsWin.pem MsWin.esl cert-to-efi-sig-list -g "$(uuidgen)" UEFI.pem UEFI.esl cat ISK.esl MsWin.esl UEFI.esl > db.esl Now sign the PK with yourself:
sign-efi-sig-list -k PK.key -c PK.pem PK PK.esl PK.auth We sign KEK.esl with the PK key: sign-efi-sig-list -k PK.key -c PK.pem KEK KEK.esl KEK.auth Sign the db.esl with the KEK key: sign-efi-sig-list -k KEK.key -c KEK.pem db db.esl db.auth If you are not tired yet, you can add something else to the db or create a dbx repository, you now know the necessary commands, everything further is up to you.
Sign the loader
It remains to sign an executable file with the ISK key to verify the operation of SecureBoot after adding your keys. For tests, I advise you to sign the utility RU.efi , it is graphic and bright, and even from afar you can see whether it started up or not. In fact, this utility is extremely powerful and you can do a lot of good and not so much business, so after the tests it would be best to remove it, and only sign loaders in the future.In any case, executable files are signed with this command:
sbsign --key ISK.key --cert ISK.pem --output bootx64.efi RU.efi Here, at the same time, I renamed the executable file to bootx64.efi , which should be placed in the / EFI / BOOT directory of the USB test drive with FAT32 FS. For 32-bit UEFI (save you randomly from working with them) use bootia32.efi and RU32.efi .As a result of this, all you got are three .auth files that will need to be written “as is” in the NVRAM variables db , KEK and PK , and in exactly this order. Copy all three files to the root of another USB-based FAT32 file system with /usr/share/efitools/efi/KeyTool.efi as ( /EFI/BOOT/bootx64.efi) (copy it also to the root, just in case ) and your "SecureBoot handler set" is ready.
The Taming of the Shrew
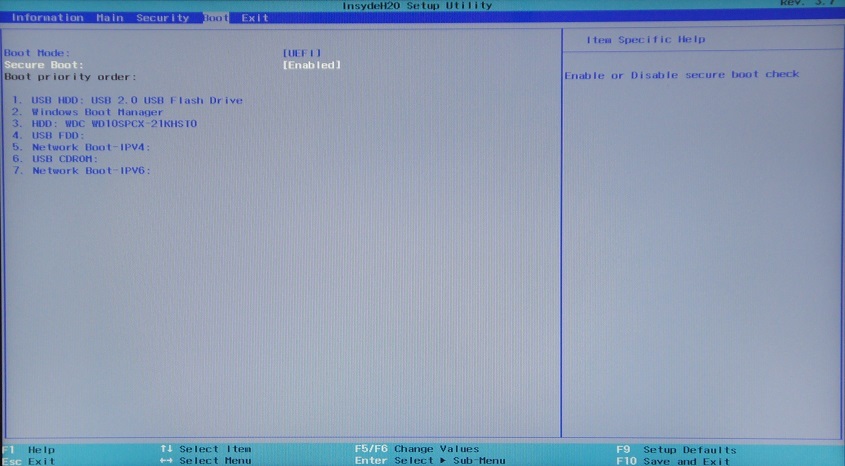
It all starts the same way: we insert our USB flash drive with keys and KeyTool in a free USB port, turn on the machine, go to BIOS Setup. Here, before you configure SecureBoot, you need to disable CSM , and with it, legacy downloads, with which our technology is not compatible. Also, be sure to set the password to the BIOS Setup entrance longer, otherwise you can bypass SecureBoot simply by disabling it, for which on some systems with IPMI and / or AMT even a physical presence is not required.
AMI AptioV
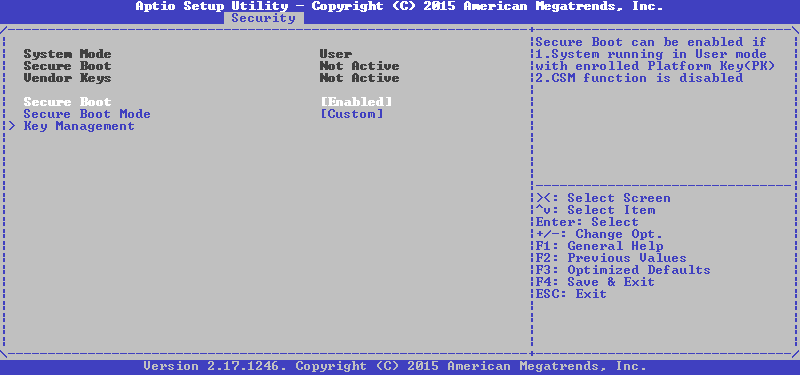
Most of the firmware based on the AMI code, the management of the SecureBoot technology is on the Security tab, I have this control looks like this: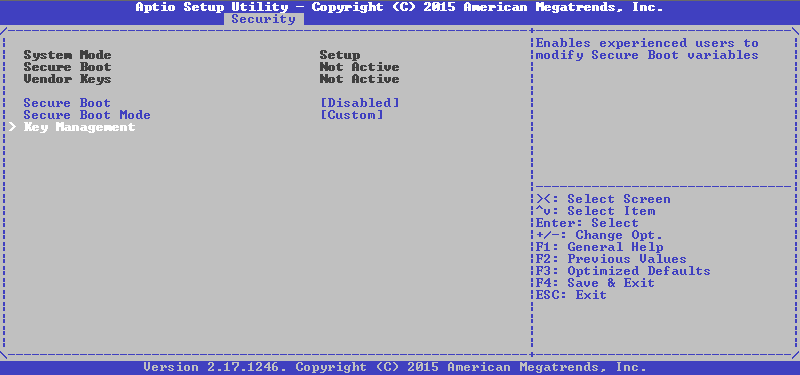
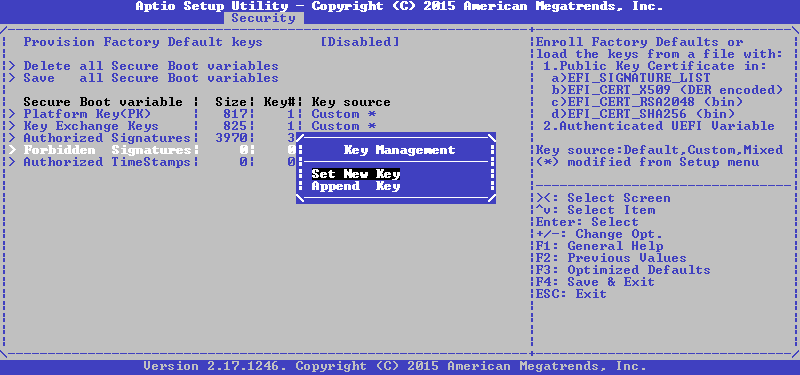
Go to the Key Management menu (it used to be on the same tab, now it is highlighted) and we see the following there:

We select the variable we need, and then we first propose to choose between installing a new key and adding it to the existing ones, select the first one:
Now it is proposed to either set the default value, or load your own from the file, choose the latter:
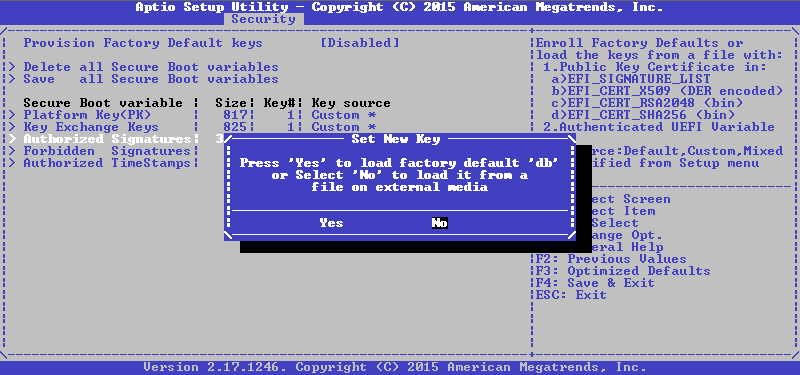
Next, you need a device and a file on it, and then select the format of this file, in our case it is the Authenticated Variable:

Then you need to confirm the update of the file, and if everything went well before, we will get a concise message as a result:
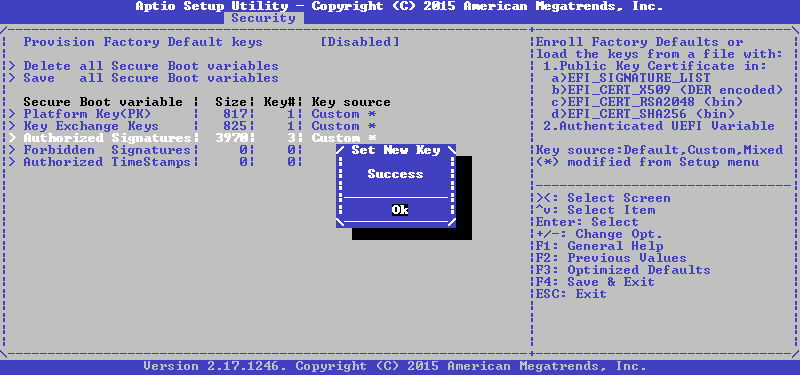
Repeat the same for KEK and PK, and we get the following state at the output:
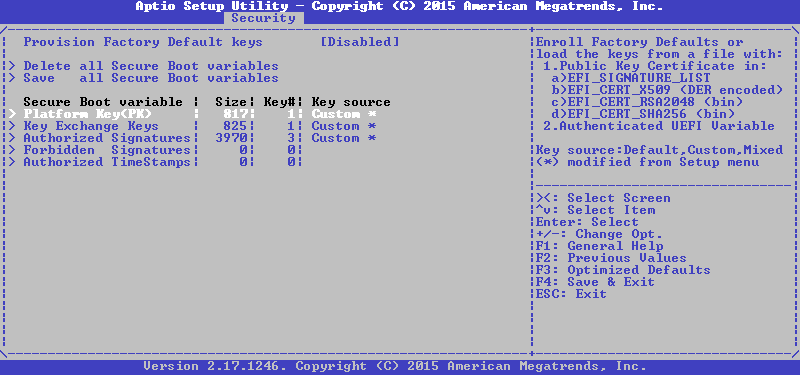
That's right, we have a single PK, just one key in KEK and three keys in db, return to the previous menu with the Esc button and turn on SecureBoot:
Done, save the settings and exit with a reboot, after which we try to boot from our flash drive and see the following picture:

Ok, unsigned boot loaders go to the forest, it remains to check the signed. We insert another flash drive, reboot and see something like this:
Now we can say that SecureBoot works as it should.
If your AMI UEFI does not have such an interface for adding keys, then another way is suitable for you, which is further on.
Insyde H2O
Here everything is somewhat worse than in the previous case. There are no three interfaces to add your own keys, and there are only three options for configuring SecureBoot: either delete all variables at once by translating SecureBoot into Setup Mode, or select an executable file that hash will be added to db, and you can run it even if if it is not signed at all, or return to the standard keys, which are the Acer PK on this machine, the key from Acer and MS in KEK, and a whole bunch from Acer and MS in db.However, there is no interface - well, to hell with it, we have KeyTool for this, the main thing is that you can go to Setup Mode. Interestingly, BIOS Setup does not enable SecureBoot if the Supervisor Password is not set, so install it first, then erase the keys:
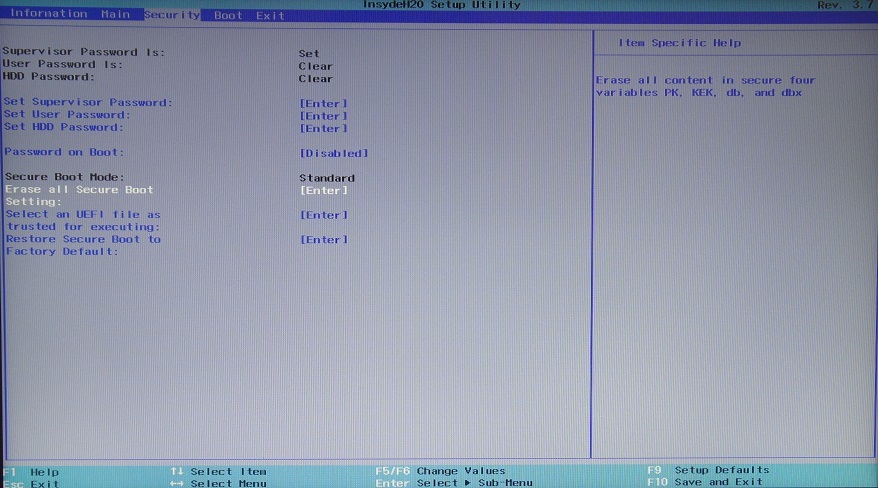
After that, on the next Boot tab, select the UEFI boot mode and enable SecureBoot:
Since my photos in the middle of the night are unbearably disgusting, then KeyTool's screenshots and I will do it on the previous system, and you will have to believe that everything looks exactly the same on this (mom swear!).
Boot from our carrier into KeyTool , and see something like the following:
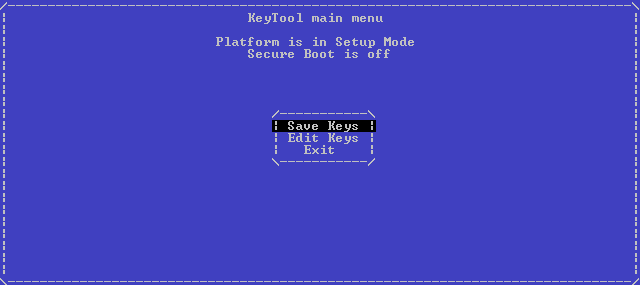
Select Edit Keys, get into the storage selection menu:

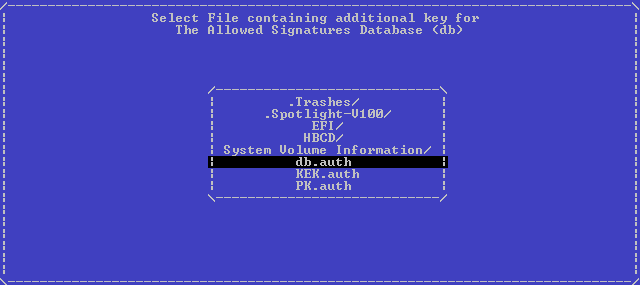
There, first choose db , then Replace Keys, then our USB device, and then the file:
Press Enter and without any success messages, we are again shown the storage selection menu. Repeat the same for KEK first, and then for PK, after which we exit to the main menu by double pressing Esc. Turn off the machine, turn it on again, try to load the KeyTool again and see such a picture (which I dragged from the firmware dump, her photo on the glossy screen is even worse than the previous ones):
Well, one part of SecureBoot works, the other is checked by launching the signed RU.efi and it also works. I have Windows 8 installed on this system in UEFI mode, and so it works, Microsoft did not let down with the certificate.
Phoenix SCT
There are even fewer opportunities, and there are only two items on the Security tab in the entire Secure Boot Configuration menu: returning to the standard keys and deleting all the keys with the system transition in the SetupMode, we need the second one: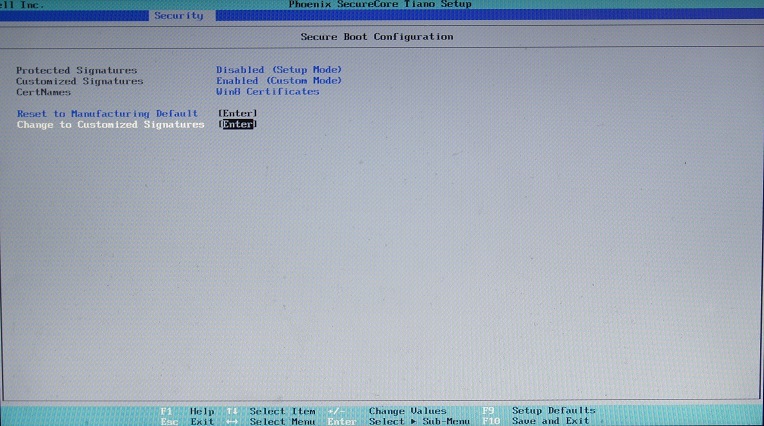
Then, on the Boot tab, you need to select the UEFI boot type, enable SecureBoot, and create a boot entry for KeyTool 'a, otherwise it will not work on this platform:
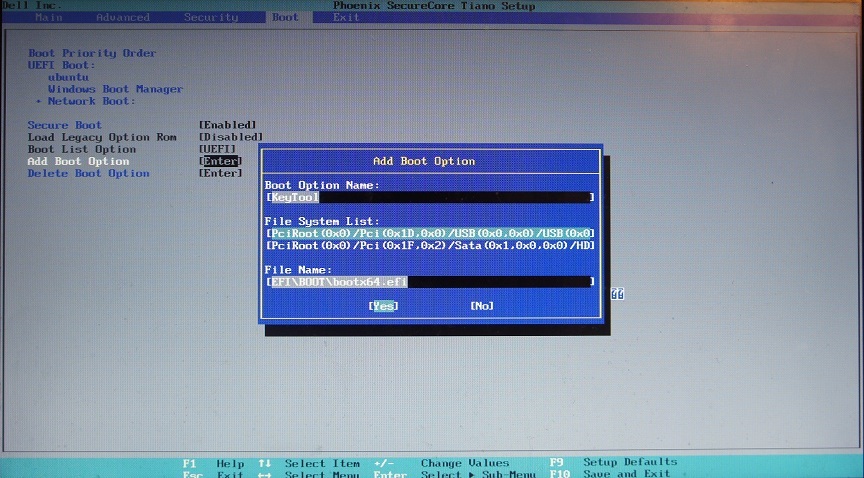
Click Yes, exit with saving changes, reboot, press F12 when loading to get into the boot menu, from there choose KeyTool , the operation with which is described above. After adding the keys and restarting, the attempt to re-launch KeyTool ’s ends like this:
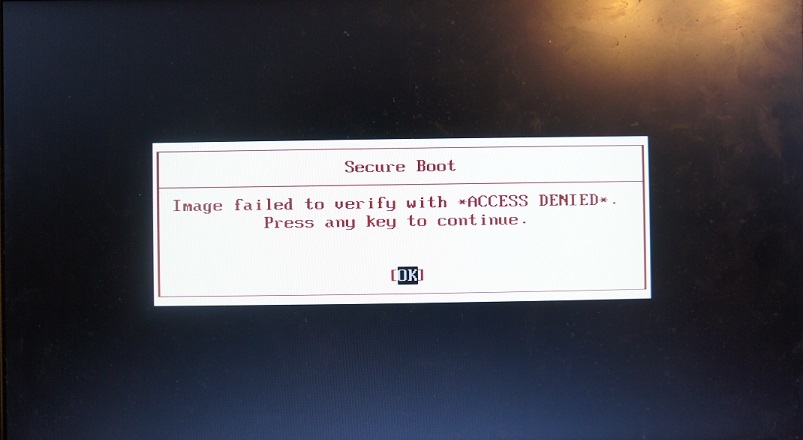
At the same time, the Linux installed on the same machine continues to load properly, like the signed RU.efi , so SecureBoot can be considered valid.
Conclusion
As a result, thanks to open source utilities, we managed to get SecureBoot on systems with UEFI of three different vendors, generate our own keys and sign the executable files we need. Now the loading of the platform entirely is in our hands, but only if the BIOS password is strong and is not stored in clear text , as in some, and there are no known (or unknown) holes in the SecureBoot implementation. By itself, SecureBoot is not a panacea for bootkits, but with it the situation with secure boot is still much better than without it.
I hope that the material will help you, and thank you for reading this footcloth.
Literature
Managing EFI Bootloaders for Linux: Controlling SecureBoot .
AltLinux UEFI SecureBoot mini-HOWTO .
Booting a self-signed Linux kernel .
Sakaki's EFI Install Guide: Configuring SecureBoot .
Ubuntu Security Team: SecureBoot .
Owning your Windows 8 UEFI Platform .
MinnowBoard Max: Quickstart UEFI Secure Boot .
Windows 8.1 Secure Boot Key Creation and Management Guidance .
Source: https://habr.com/ru/post/273497/
All Articles