complicate the iPhone app
let's complicate a little our application which displayed the habr logo.
I will use the iPhone SDK beta 4, the project from beta 2 came up and compiled. If there are problems with the compilation of the project - write in kamentah.
Let's get started Let's make it so that when you touch and hold a finger, the Habr logo moves after the finger, and when you touch it with two fingers and change their positions, the logo will scale.
First, let's connect the header file math.h to the MyView.m file. Next, in the constructor of the MyView class - - (id) initWithFrame: (CGRect) frame in the if block, we add two lines:
as you can see, we explicitly indicate that we want our UIView and UIImageView, which contains the Habr logo, to support several touches.
')
Now regarding touch processing. The following touch handlers are defined in the UIView class:
- (void) touchesBegan: (NSSet *) touches withEvent: (UIEvent *) event;
- (void) touchesMoved: (NSSet *) touches withEvent: (UIEvent *) event;
- (void) touchesEnded: (NSSet *) touches withEvent: (UIEvent *) event;
- (void) touchesChangedWithEvent: (UIEvent *) event;
- (void) touchesCancelled;
proceeding from their names it is not difficult to guess in what case what to use
We define two global variables (they do not need to be entered into the header file): CGPoint startLoc0, startLoc1. We will store the points of initial touches in them if there are two touches.
Now we define the touch start processing function:
Now we define the function of changing the position of the touches:
In the case of one touch, simply transfer the image to the touch point. In the case of two touches, I calculate the stretch ratio. I chose my method of calculating coefficients, if you have other ideas about the calculation, then write in kamentah.
To scale the image, I used the setTransform: function, which as a parameter receives the affine transformation matrix. It is worth noting that when using the CGAffineTransformMakeScale function, the final image will be stretched by coefficients based on its initial size, not the current one.
But now the main question remains: how to simulate several simultaneous touches on the emulator? As a result of zaguhlivaniya it turned out that it is enough to hold down the Option button.
Run and enjoy the result:
Add another little thing called splash screen. Splash screen is a picture that will be displayed immediately after clicking on the program icon and before the end of the function - (void) applicationDidFinishLaunching: (UIApplication *) application. Useful if you want to display brief information about the program, manufacturer, version, etc.
To add a splash screen to the program, just add a file called Default.png to the png project. It is naturally better that the image was with the same resolution as the iPhone screen.
As everyone knows, using the SDK you can not create applications that run in the background. But this does not mean that when you click on the Home button, your application closes. You can override certain functions in the UIApplication class and tell the program to use the overridden class.
Create a new Objective-C class, let's call it ApplicationSuspend, this class will be the successor of the UIApplication class.
The contents of the h file should be:
The contents of the m file should be as follows:
As you can see, just defined the function applicationSuspend. This is enough so that when you click on the Home button, the program goes into suspend, and when you click on the icon, it returns.
You can also override the applicationResume: functions, menuButtonUp :, menuButtonDown :, launchApplicationWithIdentifier: suspended :.
I did not find the description of what can be done this way in the off documentation, but I found it here . But while beta is in the iPhone SDK, it can be forgiven.
And now the most important thing is how to tell the program to use the modified UIApplication?
Open the main.m file and find the line:
int retVal = UIApplicationMain (argc, argv, nil, @ "HelloHabrAppDelegate");
as you can see, the third parameter is set to nil, here’s the name of the class we changed:
int retVal = UIApplicationMain (argc, argv, @ "ApplicationSuspend", @ "HelloHabrAppDelegate");
If everything was done correctly, then run the program, move the habr logo, click on Home and then log in again, the logo should remain in the same place.
Project file here
I will use the iPhone SDK beta 4, the project from beta 2 came up and compiled. If there are problems with the compilation of the project - write in kamentah.
multitouch
Let's get started Let's make it so that when you touch and hold a finger, the Habr logo moves after the finger, and when you touch it with two fingers and change their positions, the logo will scale.
First, let's connect the header file math.h to the MyView.m file. Next, in the constructor of the MyView class - - (id) initWithFrame: (CGRect) frame in the if block, we add two lines:
[self setMultipleTouchEnabled: YES];
[habrView setMultipleTouchEnabled: YES];
as you can see, we explicitly indicate that we want our UIView and UIImageView, which contains the Habr logo, to support several touches.
')
Now regarding touch processing. The following touch handlers are defined in the UIView class:
- (void) touchesBegan: (NSSet *) touches withEvent: (UIEvent *) event;
- (void) touchesMoved: (NSSet *) touches withEvent: (UIEvent *) event;
- (void) touchesEnded: (NSSet *) touches withEvent: (UIEvent *) event;
- (void) touchesChangedWithEvent: (UIEvent *) event;
- (void) touchesCancelled;
proceeding from their names it is not difficult to guess in what case what to use
We define two global variables (they do not need to be entered into the header file): CGPoint startLoc0, startLoc1. We will store the points of initial touches in them if there are two touches.
Now we define the touch start processing function:
- (void) touchesBegan: (NSSet *) touches withEvent: (UIEvent *) event {
if ([touches count] == 2) {
startLoc0 = [[[touches allObjects] objectAtIndex: 0] locationInView: self];
startLoc1 = [[[touches allObjects] objectAtIndex: 1] locationInView: self];
if (startLoc0.x == startLoc1.x) startLoc0.x + = 0.05;
if (startLoc0.y == startLoc1.y) startLoc0.y + = 0.05;
}
}
Now we define the function of changing the position of the touches:
- (void) touchesMoved: (NSSet *) touches withEvent: (UIEvent *) event {
if ([touches count] == 1) {
UITouch * touch = [touches anyObject];
if ([touch view] == habrView) {
CGPoint location = [touch locationInView: self];
[habrView setCenter: location];
}
}
else if ([touches count] == 2) {
UITouch * touch0 = [[touches allObjects] objectAtIndex: 0];
UITouch * touch1 = [[touches allObjects] objectAtIndex: 1];
CGPoint loc0 = [touch0 locationInView: self];
CGPoint loc1 = [touch1 locationInView: self];
CGFloat scaleX = fabs ((loc0.x - loc1.x) / (startLoc0.x - startLoc1.x));
CGFloat scaleY = fabs ((loc0.y - loc1.y) / (startLoc0.y - startLoc1.y));
[habrView setTransform: CGAffineTransformMakeScale (scaleX, scaleY)];
}
else
NSLog (@ "too many touches :(");
}
In the case of one touch, simply transfer the image to the touch point. In the case of two touches, I calculate the stretch ratio. I chose my method of calculating coefficients, if you have other ideas about the calculation, then write in kamentah.
To scale the image, I used the setTransform: function, which as a parameter receives the affine transformation matrix. It is worth noting that when using the CGAffineTransformMakeScale function, the final image will be stretched by coefficients based on its initial size, not the current one.
But now the main question remains: how to simulate several simultaneous touches on the emulator? As a result of zaguhlivaniya it turned out that it is enough to hold down the Option button.
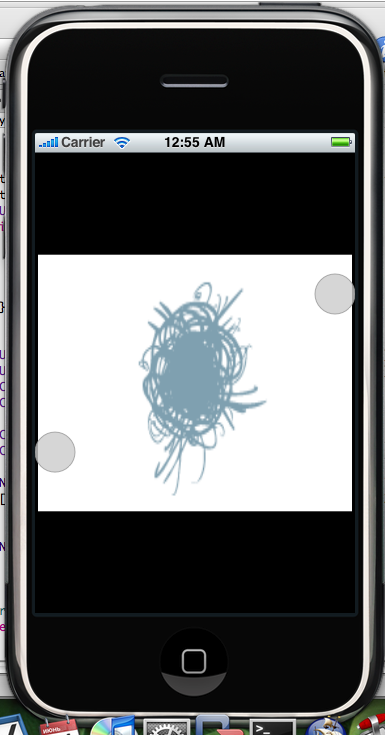
Run and enjoy the result:
splash screen
Add another little thing called splash screen. Splash screen is a picture that will be displayed immediately after clicking on the program icon and before the end of the function - (void) applicationDidFinishLaunching: (UIApplication *) application. Useful if you want to display brief information about the program, manufacturer, version, etc.
To add a splash screen to the program, just add a file called Default.png to the png project. It is naturally better that the image was with the same resolution as the iPhone screen.
application suspend
As everyone knows, using the SDK you can not create applications that run in the background. But this does not mean that when you click on the Home button, your application closes. You can override certain functions in the UIApplication class and tell the program to use the overridden class.
Create a new Objective-C class, let's call it ApplicationSuspend, this class will be the successor of the UIApplication class.
The contents of the h file should be:
#import <UIKit / UIKit.h>
interface ApplicationSuspend: UIApplication {
}
end
The contents of the m file should be as follows:
#import "ApplicationSuspend.h"
@implementation ApplicationSuspend
- (void) applicationSuspend: (struct __GSEvent *) event {
}
end
As you can see, just defined the function applicationSuspend. This is enough so that when you click on the Home button, the program goes into suspend, and when you click on the icon, it returns.
You can also override the applicationResume: functions, menuButtonUp :, menuButtonDown :, launchApplicationWithIdentifier: suspended :.
I did not find the description of what can be done this way in the off documentation, but I found it here . But while beta is in the iPhone SDK, it can be forgiven.
And now the most important thing is how to tell the program to use the modified UIApplication?
Open the main.m file and find the line:
int retVal = UIApplicationMain (argc, argv, nil, @ "HelloHabrAppDelegate");
as you can see, the third parameter is set to nil, here’s the name of the class we changed:
int retVal = UIApplicationMain (argc, argv, @ "ApplicationSuspend", @ "HelloHabrAppDelegate");
If everything was done correctly, then run the program, move the habr logo, click on Home and then log in again, the logo should remain in the same place.
Project file here
Source: https://habr.com/ru/post/27343/
All Articles