Detailed instructions for OpenVPN v2.3.8 on Windows server 2008R2
I present a detailed instruction on OpenVPN v2.3.8 on Windows server 2008R2 with TLS encryption level. All parameters will also be described in detail.
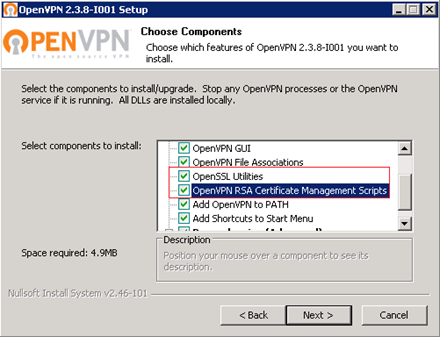
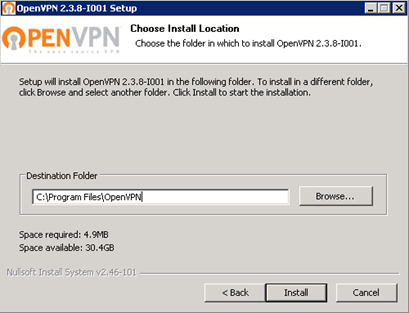
To begin, download the distribution from the official site . Run the openvpn-install-2.3.8-I001-x86_64 installer. In the components include the following:
Specify the installation path ( All further actions will be guided by this path specified in the example ):
')

During the installation process, you will need to install a virtual network adapter, we agree with the installation.

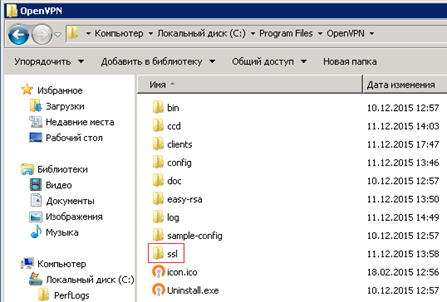
After successful installation, go to the “C: \ Programm Files \ OpenVPN” directory where we create the “SSL” directory (the directory can be called anything, this directory will be used in the subsequent settings), server certificates, encryption algorithms and customer authenticity.
Go to the directory “C: \ Programm Files \ OpenVPN \ easy-rsa”, open with notepad or notepad ++ (more correct option) " vars.bat " (a script containing response parameters for creating and generating client / server certificates and subsequent server settings).
At the very bottom of the file there are the following parameters that need to be customized:
set KEY_COUNTRY = RU
set KEY_PROVINCE = MO
set KEY_CITY = MOSCOW
set KEY_ORG = OpenVPN
set KEY_EMAIL=local@mos.local
set KEY_CN = server
set KEY_NAME = server
set KEY_OU = OU
set PKCS11_MODULE_PATH = changeme rem Default Parameter
set PKCS11_PIN = 1234 rem Default Parameter
We save.
In the same directory “C: \ Programm Files \ OpenVPN \ easy-rsa”, there is a configuration file “ openssl-1.0.0.cnf ”, open it using notepad or notepad ++ (more correct option) and change the setting that is responsible for the term certificate life, the default is 365 days, extend the life of up to 3650 days.
default_days = 3650 # how long to certify for
We save.
Next we will generate the following:
ca.crt - Own trusted certificate (Certificate Authority - hereinafter referred to as CA) for signing client certificates and checking them when authorizing a client.
dh1024.pem - Diffie Hellmann key that allows two or more parties to get a shared secret key
server.crt - server certificate
server.key - server key
ta.key - additional key for tls-authentication (increased security of the connection), the server and each client must have a copy of this key
Open the command prompt and go to the directory “C: \ Program Files \ OpenVPN \ easy-rsa”
cd C: \ Program Files \ OpenVPN \ easy-rsa
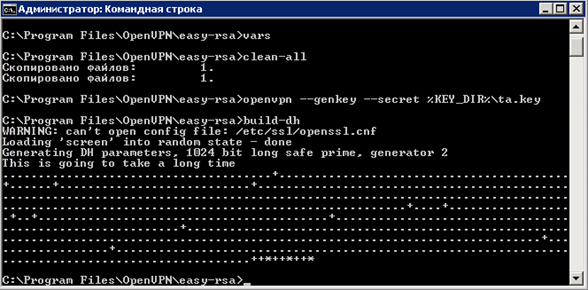
Enter the “ vars ” command , press Enter (we initiate work with scripts, in the case of closing the command line, the “ vars ” command will have to be entered)
Enter the command “ clean-all ” (Clear the directory “C: \ Program Files \ OpenVPN \ easy-rsa \ keys” with the subsequent creation of the file “index.txt” (client database, it’s database) and “serial” (key)
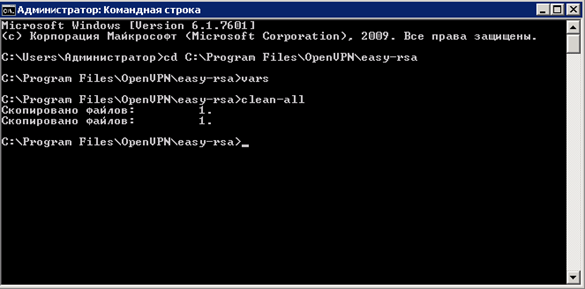
Without closing the command line, we check the contents of the “C: \ Program Files \ OpenVPN \ easy-rsa \ keys” directory, the “ index.txt and serial ” files should be created.
Enter the command “ openvpn --genkey --secret% KEY_DIR% \ ta.key ”
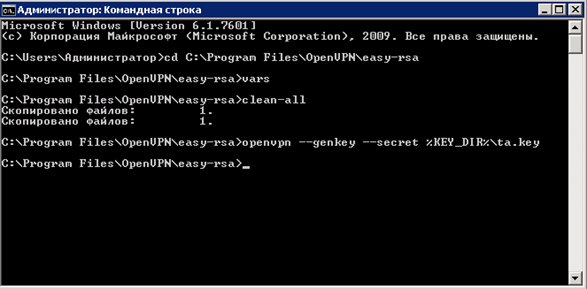
Without closing the command line, we check the contents of the “C: \ Program Files \ OpenVPN \ easy-rsa \ keys” directory, the file “ ta.key ” should be created.
Enter the command “ build-dh ” - Diffie Hellman key generation.
Without closing the command line, check the contents of the directory “C: \ Program Files \ OpenVPN \ easy-rsa \ keys”, the file “ dh1024.pem ” should be created.
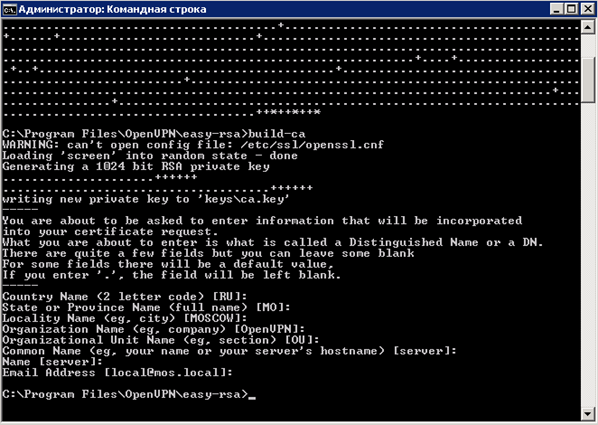
Enter the command “ build-ca ” - generating the key of the certificate authority (CA)
We answer all questions by default by pressing the Enter key; we have set these parameters in “ vars.bat ”
Without closing the command line, we check the contents of the “C: \ Program Files \ OpenVPN \ easy-rsa \ keys” directory, the files “ ca.crt and ca.key ” should be created.
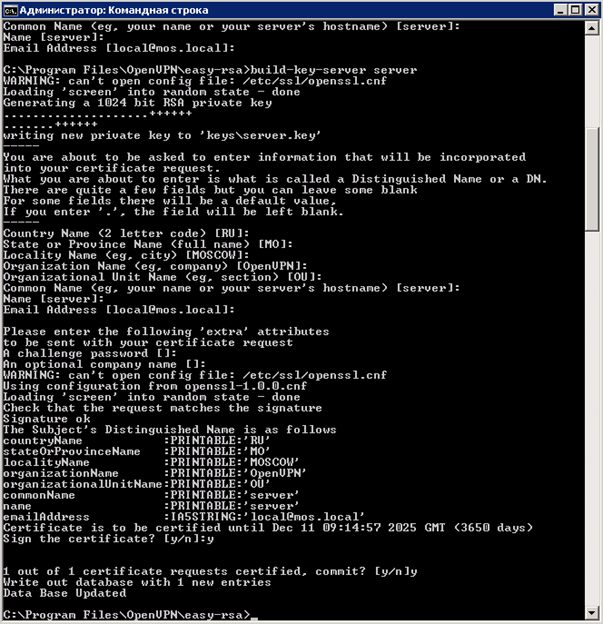
Enter the command “ build-key-server server ” - generation of server certificate.
For questions Country Name, State Name, Locality Name, etc. We answer by default by pressing the Enter key until the very end, we set these parameters in “ vars.bat ”, then we will be offered to create a certificate for a period of 3650 days (we specified this parameter in openssl-1.0.0.cnf ), click “Y”, it is proposed to write the server certificate to the database, click “Y”.
Without closing the command line, we check the contents of the “C: \ Program Files \ OpenVPN \ easy-rsa \ keys” directory, the “ server.crt, server.key, server.csr ” files should be created.
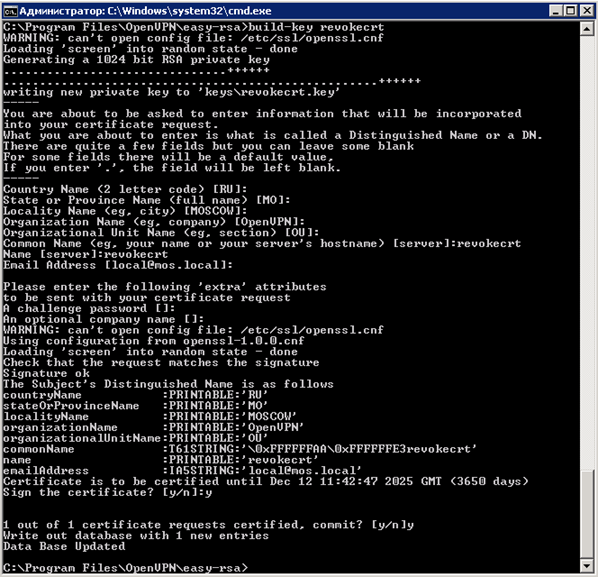
Enter the command “ build-key revokecrt ” - the command to create a user certificate, but in this case we create an arbitrary certificate “ revokecrt ” for the subsequent generation of the file “ crl.pem ”, which is responsible for the verification and subsequent revocation of certificates. Theoretically, this procedure can be done at the very end and even live without it, but then we will not be able to revoke the certificates and the “ server.ovpn ” configuration file will look different.
For questions Country Name, State Name, Locality Name, etc. We answer the default by pressing the Enter key before the Common Name and Name questions, these questions need to be answered according to the name of the user’s certificate being created, in our case this is an arbitrary “ revokecrt ” certificate for the remaining questions, press Enter, then the creation of a certificate for 3650 days will be offered ( we specified the parameter in openssl-1.0.0.cnf) press “Y”, we will be offered to write the server certificate to the database, press “Y”.
Without closing the command line, we check the contents of the directory “C: \ Program Files \ OpenVPN \ easy-rsa \ keys”, the files “ revokecrt.crt, revokecrt.key, revokecrt.csr ” should be created
Enter the command “ revoke-full revokecrt ” - the command is responsible for revoking the certificate and then creating the file “ crl.pem ”

Without closing the command line, check the contents of the directory “C: \ Program Files \ OpenVPN \ easy-rsa \ keys”, the file “ crl.pem ” should be created
Now create a user certificate, similar to the “ revokecrt ” certificate, see above.
Enter the command “ build-key user1 ” - create a user certificate with the name user1
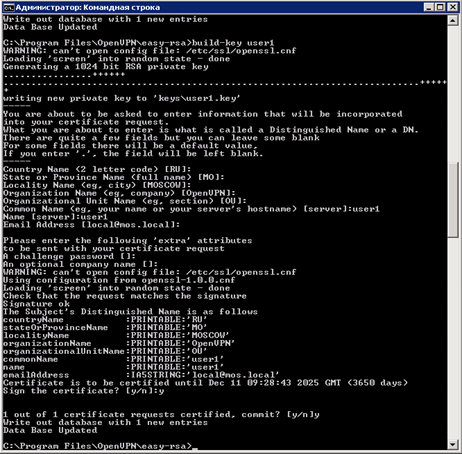 .
.
At this stage, the console is finished, you can close the window and check the contents of the directory “C: \ Program Files \ OpenVPN \ easy-rsa \ keys”, the files “ user1.crt, user1.key, user1.csr ” should be created
I recommend to create the “ Clients ” folder in any place convenient for you and copy the necessary files there for transfer to users:
1 - ca.crt
2 - user1.crt
3 - user1.key
4 - ta.key
I also want to draw your attention to the fact that the contents of the “ keys ” folder cannot be deleted, when creating user certificates or any changes in the console, make a copy of this directory to avoid losses or accidental generation of server certificates and updating the database.
Copy the server files to the previously created “ ssl ” folder in the “C: \ Program Files \ OpenVPN \ ssl” directory:
1 - ca.crt
2 - server.crt
3 - server.key
4 - dh1024.pem
5 - ta.key
Go to the directory “C: \ Program Files \ OpenVPN \ config” and create the server configuration file “ server.ovpn ” with the following contents:
# Create a routable IP tunnel.
dev tun
# Specify the protocol for the connection.
proto udp
# Specify the port on which we will listen.
port 1194
# Specify that this is a TLS server.
tls-server
# Specify the path to the trusted certificate.
ca "C: \\ Program Files \\ OpenVPN \\ ssl \\ ca.crt"
# Specify the path to the server certificate.
cert "C: \\ Program Files \\ OpenVPN \\ ssl \\ Server.crt"
# Specify the path to the server key.
key "C: \\ Program Files \\ OpenVPN \\ ssl \\ Server.key"
# Specify the path to the key Diffi Helman
dh "C: \\ Program Files \\ OpenVPN \\ ssl \\ dh1024.pem"
# Specify network addressing.
server 10.8.0.0 255.255.255.0
# Specify the encryption algorithm should be the same client / server.
cipher AES-128-CBC
# We specify not to re-read key files when the tunnel is restarted.
persist-key
# Specify the path to the security key and set the server parameter 0
tls-auth "C: \\ Program Files \\ OpenVPN \\ ssl \\ ta.key" 0
# We allow clients to communicate inside the tunnel.
client-to-client
# Specify a directory with descriptions of the configurations of each of the clients.
client-config-dir "C: \\ Program Files \\ OpenVPN \\ ccd"
# Specify the file with the description of networks between the client and the server.
ifconfig-pool-persist "C: \\ Program Files \\ OpenVPN \\ ccd \\ ipp.txt"
# Indicates reconciliation of revoked certificates.
crl-verify "C: \\ Program Files \\ OpenVPN \\ easy-rsa \\ keys \\ crl.pem"
# Specify the path to the log with the status.
status "C: \\ Program Files \\ OpenVPN \\ log \\ logopenvpn-status.log"
# Specify the path to the log.
log "C: \\ Program Files \\ OpenVPN \\ log \\ openvpn.log"
# Specifies the MTU for the tunnel, the same client / server parameters should be.
tun-mtu 1500
# Turn on compression.
comp-lzo
# Troubleshooting MTU transfer problems.
mssfix
# Indicates to send ping to the remote end of the tunnel after the specified n-seconds,
# if no traffic passed through the tunnel.
# Indicates if no packets were received within 120 seconds,
# then the tunnel will be restarted.
keepalive 10 120
# Specify the logging level.
verb 3
We save.
On the server where OpenVPN will spin, you need to do the following:
1 - If you use the built-in Windows Firewall, create an allow rule for incoming and outgoing connections using UDP protocol on port 1194.
2 - In the server services, find the OpenVPN Service and set the launch to automatic, this will allow the service to start automatically when the server is restarted.
Start the “OpenVPN GUI” from the server's desktop, double-click on the “OpenVPN GUI” icon in the tray to open the log window, if after starting the service in step 2 nothing happened, click on the bottom left to connect and if everything is fine, we should see the following contents:
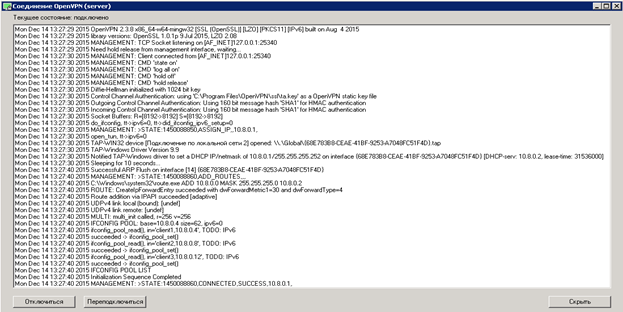
The VPN service on the server is running and ready to accept clients.
We start the previously downloaded openvpn-install-2.3.8-I001-x86_64 installer , the choice of components is left by default, the path remains the same.
After successful installation, go to the directory “C: \ Program Files \ OpenVPN \ config” and create the client configuration file “ test.ovpn ” with the following contents:
# Create a routable IP tunnel.
dev tun
# Specify the protocol for the connection.
proto udp
# Specify the IP address of the server with the port.
remote XXXX 1194
# Specify the delay in seconds to build a route.
route-delay 3
# Specify that the client takes the routing information from the server.
client
# Indicates that we are a TLS client.
tls-client
# Parameter of protection against MitM attacks.
ns-cert-type server
# Specify the path to the trusted certificate.
ca "C: \\ Program Files \\ OpenVPN \\ ssl \\ ca.crt"
# Specify the path to the client certificate.
cert "C: \\ Program Files \\ OpenVPN \\ ssl \\ user1.crt"
# Specify the path to the client key.
key "C: \\ Program Files \\ OpenVPN \\ ssl \\ user1.key"
# Specify the path to the security key and set the client parameter 1
tls-auth "C: \\ Program Files \\ OpenVPN \\ ssl \\ ta.key" 1
# Specify the encryption algorithm should be the same client / server.
cipher AES-128-CBC
# Turn on compression.
comp-lzo
# Troubleshooting MTU transfer problems.
mssfix
# Specifies the MTU for the tunnel, the same client / server parameters should be.
tun-mtu 1500
# Indicate that if no packets were received within 60 seconds,
# then the tunnel will be restarted.
ping-restart 60
# Indicates to send ping to the remote end of the tunnel after the specified n-seconds,
# if no traffic passed through the tunnel.
ping 10
# Specify the logging level.
verb 3
We save.
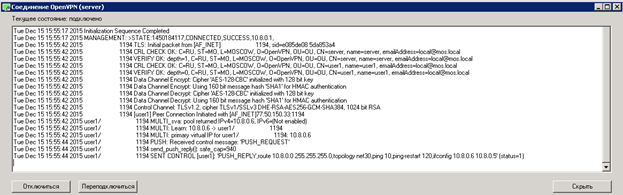
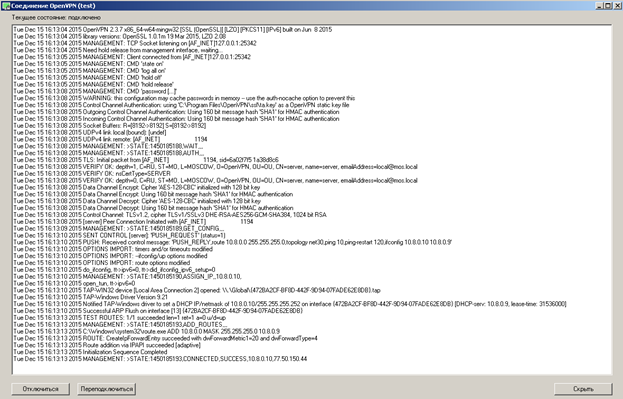
From the desktop, launch “OpenVPN GUI”, double-click on the “OpenVPN” icon in the tray, a log window will open, click on connect and if everything is good, then we will see the following:

We start the ping on 10.8.0.1 and see that the network is available (10.8.0.1 the address that the virtual network adapter received on the server).
On the server we will see the connection log:
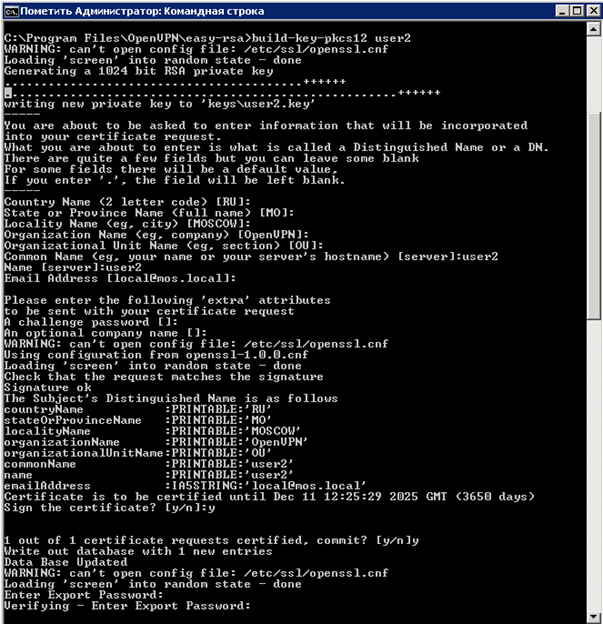
Actually at this stage you can finish and everything will work in the future. But I would like to add something else. To reduce the number of files at the client and add another item in security (connection password), you can do the following, at the stage of creating a user certificate on the server, execute the command “ build-key-pkcs12 user2 ” instead of “ build-key user1 ”, execute everything is the same as the first command, up to the point of Export Password, at this point you must specify a password, for example 12345, this password is actually assigned to the certificate “ user2.p12 ”, when trying to connect via “OpenVPN”, the program accesses the certificate and requires a password (knowing password can be changed it, delete, etc.).
In this case, the user kit will consist of:
1 - user2.p12
2 - ta.key
The configuration file “ test.ovpn ” should be as follows:
# Create a routable IP tunnel.
dev tun
# Specify the protocol for the connection.
proto udp
# Specify the IP address of the server with the port.
remote XXXX 1194
# Specify the delay in seconds to build a route.
route-delay 3
# Specify that the client takes the routing information from the server.
client
# Indicates that we are a TLS client.
tls-client
# Parameter of protection against MitM attacks.
ns-cert-type server
# Specify the path to the certificate.
pkcs12 "C: \\ Program Files \\ OpenVPN \\ ssl \\ user2.p12"
# Specify the path to the security key and set the client parameter 1
tls-auth "C: \\ Program Files \\ OpenVPN \\ ssl \\ ta.key" 1
# Specify the encryption algorithm should be the same client / server.
cipher AES-128-CBC
# Turn on compression.
comp-lzo
# Troubleshooting MTU transfer problems.
mssfix
# Specifies the MTU for the tunnel, the same client / server parameters should be.
tun-mtu 1500
# Indicate that if no packets were received within 60 seconds,
# then the tunnel will be restarted.
ping-restart 60
# Indicates to send ping to the remote end of the tunnel after the specified n-seconds,
# if no traffic passed through the tunnel.
ping 10
# Specify the logging level.
verb 3
We save.
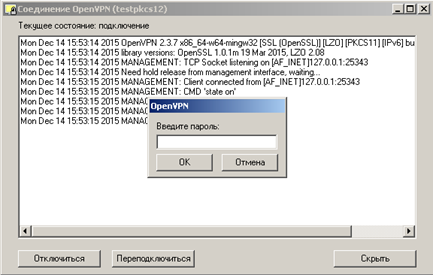
We try to connect, enter the password 12345
If everything is well see the following:
And lastly, how to revoke a user certificate and see the list of issued certificates in general. The list itself is stored in the following path “C: \ Program Files \ OpenVPN \ easy-rsa \ keys \ index.txt”

In order to revoke the certificate, go to the command line. Go to the directory “C: \ Programm Files \ OpenVPN \ easy-rsa”:
cd C: \ Program Files \ OpenVPN \ easy-rsa
Enter the command " vars " press Enter (initiate work with scripts). Enter the command to revoke the user's certificate “ revoke-full user2 ” (we indicate the name of the user who started earlier).
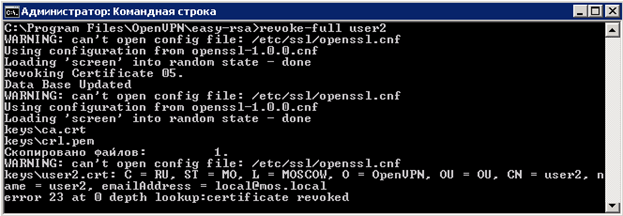
After we go to “ index.txt ” “C: \ Program Files \ OpenVPN \ easy-rsa \ keys \ index.txt” and see that the certificate has been revoked by “R”.

Not ready to say 100%, but judging by the description, the “ index.txt ” file is checked every hour, respectively in an hour, the certificate will be blocked, or simply restart the service on the server.
I also recommend using a separate account for the “OpenVPN Service” service, and if users will work with this server where the VPN is deployed, be sure to remove the rights from ordinary users to the “C: \ Program Files \ OpenVPN” directory.
Thank you all, I hope this article will help many who are faced with questions and did not find suitable answers, chewed as he could.
Server Tuning
To begin, download the distribution from the official site . Run the openvpn-install-2.3.8-I001-x86_64 installer. In the components include the following:
Specify the installation path ( All further actions will be guided by this path specified in the example ):
')
During the installation process, you will need to install a virtual network adapter, we agree with the installation.
After successful installation, go to the “C: \ Programm Files \ OpenVPN” directory where we create the “SSL” directory (the directory can be called anything, this directory will be used in the subsequent settings), server certificates, encryption algorithms and customer authenticity.
Go to the directory “C: \ Programm Files \ OpenVPN \ easy-rsa”, open with notepad or notepad ++ (more correct option) " vars.bat " (a script containing response parameters for creating and generating client / server certificates and subsequent server settings).
At the very bottom of the file there are the following parameters that need to be customized:
set KEY_COUNTRY = RU
set KEY_PROVINCE = MO
set KEY_CITY = MOSCOW
set KEY_ORG = OpenVPN
set KEY_EMAIL=local@mos.local
set KEY_CN = server
set KEY_NAME = server
set KEY_OU = OU
set PKCS11_MODULE_PATH = changeme rem Default Parameter
set PKCS11_PIN = 1234 rem Default Parameter
We save.
In the same directory “C: \ Programm Files \ OpenVPN \ easy-rsa”, there is a configuration file “ openssl-1.0.0.cnf ”, open it using notepad or notepad ++ (more correct option) and change the setting that is responsible for the term certificate life, the default is 365 days, extend the life of up to 3650 days.
default_days = 3650 # how long to certify for
We save.
Next we will generate the following:
ca.crt - Own trusted certificate (Certificate Authority - hereinafter referred to as CA) for signing client certificates and checking them when authorizing a client.
dh1024.pem - Diffie Hellmann key that allows two or more parties to get a shared secret key
server.crt - server certificate
server.key - server key
ta.key - additional key for tls-authentication (increased security of the connection), the server and each client must have a copy of this key
Open the command prompt and go to the directory “C: \ Program Files \ OpenVPN \ easy-rsa”
cd C: \ Program Files \ OpenVPN \ easy-rsa
Enter the “ vars ” command , press Enter (we initiate work with scripts, in the case of closing the command line, the “ vars ” command will have to be entered)
Enter the command “ clean-all ” (Clear the directory “C: \ Program Files \ OpenVPN \ easy-rsa \ keys” with the subsequent creation of the file “index.txt” (client database, it’s database) and “serial” (key)
Without closing the command line, we check the contents of the “C: \ Program Files \ OpenVPN \ easy-rsa \ keys” directory, the “ index.txt and serial ” files should be created.
Enter the command “ openvpn --genkey --secret% KEY_DIR% \ ta.key ”
Without closing the command line, we check the contents of the “C: \ Program Files \ OpenVPN \ easy-rsa \ keys” directory, the file “ ta.key ” should be created.
Enter the command “ build-dh ” - Diffie Hellman key generation.
Without closing the command line, check the contents of the directory “C: \ Program Files \ OpenVPN \ easy-rsa \ keys”, the file “ dh1024.pem ” should be created.
Enter the command “ build-ca ” - generating the key of the certificate authority (CA)
We answer all questions by default by pressing the Enter key; we have set these parameters in “ vars.bat ”
Without closing the command line, we check the contents of the “C: \ Program Files \ OpenVPN \ easy-rsa \ keys” directory, the files “ ca.crt and ca.key ” should be created.
Enter the command “ build-key-server server ” - generation of server certificate.
For questions Country Name, State Name, Locality Name, etc. We answer by default by pressing the Enter key until the very end, we set these parameters in “ vars.bat ”, then we will be offered to create a certificate for a period of 3650 days (we specified this parameter in openssl-1.0.0.cnf ), click “Y”, it is proposed to write the server certificate to the database, click “Y”.
Without closing the command line, we check the contents of the “C: \ Program Files \ OpenVPN \ easy-rsa \ keys” directory, the “ server.crt, server.key, server.csr ” files should be created.
Enter the command “ build-key revokecrt ” - the command to create a user certificate, but in this case we create an arbitrary certificate “ revokecrt ” for the subsequent generation of the file “ crl.pem ”, which is responsible for the verification and subsequent revocation of certificates. Theoretically, this procedure can be done at the very end and even live without it, but then we will not be able to revoke the certificates and the “ server.ovpn ” configuration file will look different.
For questions Country Name, State Name, Locality Name, etc. We answer the default by pressing the Enter key before the Common Name and Name questions, these questions need to be answered according to the name of the user’s certificate being created, in our case this is an arbitrary “ revokecrt ” certificate for the remaining questions, press Enter, then the creation of a certificate for 3650 days will be offered ( we specified the parameter in openssl-1.0.0.cnf) press “Y”, we will be offered to write the server certificate to the database, press “Y”.
Without closing the command line, we check the contents of the directory “C: \ Program Files \ OpenVPN \ easy-rsa \ keys”, the files “ revokecrt.crt, revokecrt.key, revokecrt.csr ” should be created
Enter the command “ revoke-full revokecrt ” - the command is responsible for revoking the certificate and then creating the file “ crl.pem ”
Without closing the command line, check the contents of the directory “C: \ Program Files \ OpenVPN \ easy-rsa \ keys”, the file “ crl.pem ” should be created
Now create a user certificate, similar to the “ revokecrt ” certificate, see above.
Enter the command “ build-key user1 ” - create a user certificate with the name user1
At this stage, the console is finished, you can close the window and check the contents of the directory “C: \ Program Files \ OpenVPN \ easy-rsa \ keys”, the files “ user1.crt, user1.key, user1.csr ” should be created
I recommend to create the “ Clients ” folder in any place convenient for you and copy the necessary files there for transfer to users:
1 - ca.crt
2 - user1.crt
3 - user1.key
4 - ta.key
I also want to draw your attention to the fact that the contents of the “ keys ” folder cannot be deleted, when creating user certificates or any changes in the console, make a copy of this directory to avoid losses or accidental generation of server certificates and updating the database.
Copy the server files to the previously created “ ssl ” folder in the “C: \ Program Files \ OpenVPN \ ssl” directory:
1 - ca.crt
2 - server.crt
3 - server.key
4 - dh1024.pem
5 - ta.key
Go to the directory “C: \ Program Files \ OpenVPN \ config” and create the server configuration file “ server.ovpn ” with the following contents:
# Create a routable IP tunnel.
dev tun
# Specify the protocol for the connection.
proto udp
# Specify the port on which we will listen.
port 1194
# Specify that this is a TLS server.
tls-server
# Specify the path to the trusted certificate.
ca "C: \\ Program Files \\ OpenVPN \\ ssl \\ ca.crt"
# Specify the path to the server certificate.
cert "C: \\ Program Files \\ OpenVPN \\ ssl \\ Server.crt"
# Specify the path to the server key.
key "C: \\ Program Files \\ OpenVPN \\ ssl \\ Server.key"
# Specify the path to the key Diffi Helman
dh "C: \\ Program Files \\ OpenVPN \\ ssl \\ dh1024.pem"
# Specify network addressing.
server 10.8.0.0 255.255.255.0
# Specify the encryption algorithm should be the same client / server.
cipher AES-128-CBC
# We specify not to re-read key files when the tunnel is restarted.
persist-key
# Specify the path to the security key and set the server parameter 0
tls-auth "C: \\ Program Files \\ OpenVPN \\ ssl \\ ta.key" 0
# We allow clients to communicate inside the tunnel.
client-to-client
# Specify a directory with descriptions of the configurations of each of the clients.
client-config-dir "C: \\ Program Files \\ OpenVPN \\ ccd"
# Specify the file with the description of networks between the client and the server.
ifconfig-pool-persist "C: \\ Program Files \\ OpenVPN \\ ccd \\ ipp.txt"
# Indicates reconciliation of revoked certificates.
crl-verify "C: \\ Program Files \\ OpenVPN \\ easy-rsa \\ keys \\ crl.pem"
# Specify the path to the log with the status.
status "C: \\ Program Files \\ OpenVPN \\ log \\ logopenvpn-status.log"
# Specify the path to the log.
log "C: \\ Program Files \\ OpenVPN \\ log \\ openvpn.log"
# Specifies the MTU for the tunnel, the same client / server parameters should be.
tun-mtu 1500
# Turn on compression.
comp-lzo
# Troubleshooting MTU transfer problems.
mssfix
# Indicates to send ping to the remote end of the tunnel after the specified n-seconds,
# if no traffic passed through the tunnel.
# Indicates if no packets were received within 120 seconds,
# then the tunnel will be restarted.
keepalive 10 120
# Specify the logging level.
verb 3
We save.
On the server where OpenVPN will spin, you need to do the following:
1 - If you use the built-in Windows Firewall, create an allow rule for incoming and outgoing connections using UDP protocol on port 1194.
2 - In the server services, find the OpenVPN Service and set the launch to automatic, this will allow the service to start automatically when the server is restarted.
Start the “OpenVPN GUI” from the server's desktop, double-click on the “OpenVPN GUI” icon in the tray to open the log window, if after starting the service in step 2 nothing happened, click on the bottom left to connect and if everything is fine, we should see the following contents:
The VPN service on the server is running and ready to accept clients.
Client setup
We start the previously downloaded openvpn-install-2.3.8-I001-x86_64 installer , the choice of components is left by default, the path remains the same.
After successful installation, go to the directory “C: \ Program Files \ OpenVPN \ config” and create the client configuration file “ test.ovpn ” with the following contents:
# Create a routable IP tunnel.
dev tun
# Specify the protocol for the connection.
proto udp
# Specify the IP address of the server with the port.
remote XXXX 1194
# Specify the delay in seconds to build a route.
route-delay 3
# Specify that the client takes the routing information from the server.
client
# Indicates that we are a TLS client.
tls-client
# Parameter of protection against MitM attacks.
ns-cert-type server
# Specify the path to the trusted certificate.
ca "C: \\ Program Files \\ OpenVPN \\ ssl \\ ca.crt"
# Specify the path to the client certificate.
cert "C: \\ Program Files \\ OpenVPN \\ ssl \\ user1.crt"
# Specify the path to the client key.
key "C: \\ Program Files \\ OpenVPN \\ ssl \\ user1.key"
# Specify the path to the security key and set the client parameter 1
tls-auth "C: \\ Program Files \\ OpenVPN \\ ssl \\ ta.key" 1
# Specify the encryption algorithm should be the same client / server.
cipher AES-128-CBC
# Turn on compression.
comp-lzo
# Troubleshooting MTU transfer problems.
mssfix
# Specifies the MTU for the tunnel, the same client / server parameters should be.
tun-mtu 1500
# Indicate that if no packets were received within 60 seconds,
# then the tunnel will be restarted.
ping-restart 60
# Indicates to send ping to the remote end of the tunnel after the specified n-seconds,
# if no traffic passed through the tunnel.
ping 10
# Specify the logging level.
verb 3
We save.
From the desktop, launch “OpenVPN GUI”, double-click on the “OpenVPN” icon in the tray, a log window will open, click on connect and if everything is good, then we will see the following:
We start the ping on 10.8.0.1 and see that the network is available (10.8.0.1 the address that the virtual network adapter received on the server).
On the server we will see the connection log:
Actually at this stage you can finish and everything will work in the future. But I would like to add something else. To reduce the number of files at the client and add another item in security (connection password), you can do the following, at the stage of creating a user certificate on the server, execute the command “ build-key-pkcs12 user2 ” instead of “ build-key user1 ”, execute everything is the same as the first command, up to the point of Export Password, at this point you must specify a password, for example 12345, this password is actually assigned to the certificate “ user2.p12 ”, when trying to connect via “OpenVPN”, the program accesses the certificate and requires a password (knowing password can be changed it, delete, etc.).
In this case, the user kit will consist of:
1 - user2.p12
2 - ta.key
The configuration file “ test.ovpn ” should be as follows:
# Create a routable IP tunnel.
dev tun
# Specify the protocol for the connection.
proto udp
# Specify the IP address of the server with the port.
remote XXXX 1194
# Specify the delay in seconds to build a route.
route-delay 3
# Specify that the client takes the routing information from the server.
client
# Indicates that we are a TLS client.
tls-client
# Parameter of protection against MitM attacks.
ns-cert-type server
# Specify the path to the certificate.
pkcs12 "C: \\ Program Files \\ OpenVPN \\ ssl \\ user2.p12"
# Specify the path to the security key and set the client parameter 1
tls-auth "C: \\ Program Files \\ OpenVPN \\ ssl \\ ta.key" 1
# Specify the encryption algorithm should be the same client / server.
cipher AES-128-CBC
# Turn on compression.
comp-lzo
# Troubleshooting MTU transfer problems.
mssfix
# Specifies the MTU for the tunnel, the same client / server parameters should be.
tun-mtu 1500
# Indicate that if no packets were received within 60 seconds,
# then the tunnel will be restarted.
ping-restart 60
# Indicates to send ping to the remote end of the tunnel after the specified n-seconds,
# if no traffic passed through the tunnel.
ping 10
# Specify the logging level.
verb 3
We save.
We try to connect, enter the password 12345
If everything is well see the following:
And lastly, how to revoke a user certificate and see the list of issued certificates in general. The list itself is stored in the following path “C: \ Program Files \ OpenVPN \ easy-rsa \ keys \ index.txt”
In order to revoke the certificate, go to the command line. Go to the directory “C: \ Programm Files \ OpenVPN \ easy-rsa”:
cd C: \ Program Files \ OpenVPN \ easy-rsa
Enter the command " vars " press Enter (initiate work with scripts). Enter the command to revoke the user's certificate “ revoke-full user2 ” (we indicate the name of the user who started earlier).
After we go to “ index.txt ” “C: \ Program Files \ OpenVPN \ easy-rsa \ keys \ index.txt” and see that the certificate has been revoked by “R”.
Not ready to say 100%, but judging by the description, the “ index.txt ” file is checked every hour, respectively in an hour, the certificate will be blocked, or simply restart the service on the server.
I also recommend using a separate account for the “OpenVPN Service” service, and if users will work with this server where the VPN is deployed, be sure to remove the rights from ordinary users to the “C: \ Program Files \ OpenVPN” directory.
Thank you all, I hope this article will help many who are faced with questions and did not find suitable answers, chewed as he could.
Source: https://habr.com/ru/post/273371/
All Articles