Build XGBoost for Python under Windows
Windows to make things out.

The XGBoost library rattles in all machine learning competitions and helps to win prizes. However, becoming the owner of this package for Python under Windows is not so easy.
')
The installation process is poorly described on GitHub and a little wider on the Kaggle forum . Therefore, I will try to describe step by step and in more detail. I hope this will help save a lot of time for inexperienced users.
Suppose you already have Python installed. In my case, this is an Anaconda build with Python 3.4.
1. Install the JDK from Oracle. Because for compilation we need the JNI library.
2. Install Visual Studio 2013 via the link highlighted in the screenshot. Later versions are asked to edit the decision code, therefore they are not suitable for ordinary people. The xgboost solution itself, published on GitHub, is compiled in Visual Studio 2010.

3. Download the entire XGBoost library from GitHub :

4. Unpack the archive, get the folder C: \ xgboost-master .
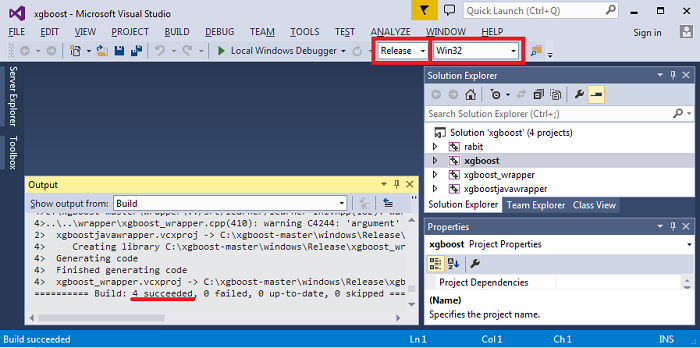
5. Using Visual Studio, open the solution file C: \ xgboost-master \ windows \ xgboost.sln . We select Release and a variant of a platform under which we will collect. Next Build -> Build Solution. As a result, you should get "4 succeeded":
Already at this stage you can collect problems.
"Could not detect CL.exe" - during installation, C # / Visual C ++ was not selected. We reinstall the components.
“Cannot open include file: 'corecrt.h'” - you are looking for a file search, most likely it is here: ProgramFiles (x86) \ Windows Kits \ 10 \ Include \ 10.0.10150.0 \ ucrt and add the directory to $ IncludePath, or you act roughly and Copy all * .h files somewhere prominently, for example in Program Files \ Microsoft Visual Studio 12.0 \ VC \ include .
“Cannot open include file: 'jni.h'” - there should be no error after installing the JDK.
However, everything can go smoothly and there will be no problems. I did it both way and that way, on different computers.
Further.
6. From the folder C: \ xgboost-master \ windows \ Release, we need the files xgboost.exe and xgboost_wrapper.dll .
Copy them to the Python package folder: C: \ xgboost-master \ python-package.
7. Open the console (cmd), change the directory:
8. Start the installer there:
That's all. Run the Python environment that is convenient for you and write the traditional one:
The XGBoost library rattles in all machine learning competitions and helps to win prizes. However, becoming the owner of this package for Python under Windows is not so easy.
')
The installation process is poorly described on GitHub and a little wider on the Kaggle forum . Therefore, I will try to describe step by step and in more detail. I hope this will help save a lot of time for inexperienced users.
Suppose you already have Python installed. In my case, this is an Anaconda build with Python 3.4.
1. Install the JDK from Oracle. Because for compilation we need the JNI library.
2. Install Visual Studio 2013 via the link highlighted in the screenshot. Later versions are asked to edit the decision code, therefore they are not suitable for ordinary people. The xgboost solution itself, published on GitHub, is compiled in Visual Studio 2010.
3. Download the entire XGBoost library from GitHub :
4. Unpack the archive, get the folder C: \ xgboost-master .
5. Using Visual Studio, open the solution file C: \ xgboost-master \ windows \ xgboost.sln . We select Release and a variant of a platform under which we will collect. Next Build -> Build Solution. As a result, you should get "4 succeeded":
Already at this stage you can collect problems.
"Could not detect CL.exe" - during installation, C # / Visual C ++ was not selected. We reinstall the components.
“Cannot open include file: 'corecrt.h'” - you are looking for a file search, most likely it is here: ProgramFiles (x86) \ Windows Kits \ 10 \ Include \ 10.0.10150.0 \ ucrt and add the directory to $ IncludePath, or you act roughly and Copy all * .h files somewhere prominently, for example in Program Files \ Microsoft Visual Studio 12.0 \ VC \ include .
“Cannot open include file: 'jni.h'” - there should be no error after installing the JDK.
However, everything can go smoothly and there will be no problems. I did it both way and that way, on different computers.
Further.
6. From the folder C: \ xgboost-master \ windows \ Release, we need the files xgboost.exe and xgboost_wrapper.dll .
Copy them to the Python package folder: C: \ xgboost-master \ python-package.
7. Open the console (cmd), change the directory:
cd "C:\xgboost-master\python-package"
8. Start the installer there:
python setup.py install
That's all. Run the Python environment that is convenient for you and write the traditional one:
import xgboost as xgb Source: https://habr.com/ru/post/273363/
All Articles