In continuation of the topic (We are testing p2p video for overload)
Hello.
Thank you all for your interest and participation in trial testing .
First, the results with their pluses minuses and surprises.
Perhaps the most important thing to note is that at the moment this technology of broadcasting is not yet able to completely replace the CDN. It can reduce server load by about 75%. And based on a more detailed acquaintance with the technology, it turns out that the authors do not set themselves the task of reducing the CDN to the maximum, but save traffic and ensure that users do not freeze the video, even when the server’s Internet channel is fully loaded (within reasonable limits).
Pros:
1. Save traffic up to 75%.
2. Does not require additional settings from the user.
3. Simple enough to set up.
4. Supports most common streaming formats.
Minuses:
1. Not supported by all browsers.
2. There is no data on compatibility with all OS.
3. I can not say anything about how the system will interact with computers behind NAT. (refer to the comment by user grey_rat )
My subjective opinion:
The system showed itself quite well in operation, especially with the HLS stream (.m3u8)
Despite the fact that the download of the Internet channel was not even close, a maximum of about 10 users at a time. It is possible to draw some conclusions, with 10 users uploading video on demand, the maximum load on the network was about 8-10 mega bits, while not constant but the peak at regular intervals of time, up to about 3s.
From what I can conclude that with my 100 mega bit network, a little more than 100 users could watch streaming video from my PC without any problems. (Correct if I'm wrong)
')
The load on my computer with 10 users was almost not noticeable, the use of RAM increased slightly, up to 200-300 megabytes.
(I have to say that for this test I used trial periods of commercial programs, they are enough for simple acquaintance with technology, if it suits you, you can buy them or use free alternatives, which I will also try to indicate.)
So, I used the Wowza Streaming Engine for broadcasting video on demand (as a free alternative, you can use Nginx for streaming). Wowza Streaming Engine can be downloaded for free on the website with a trial period of 180 days. After installation, there is a built-in test video on the first page, the link from which I used for broadcasting. It can be found on the Mobile tab, in the IOS column. (There are quite a few instructions for installing and configuring Wowza, so I will not stop here)
Next, I signed up for 30 days in streamroot (the alternative to Viblast is also paid, but they write that it is more finished, I have not tried it yet)
In streamroot, create a new stream in the Getting started tab. This is where the pitfalls begin. To streamroot saw the stream from Wowza need to do the following:
Further, if streamroot saw our stream, we will see the following window:
Where on the right is our HTML code.
The first window to insert into your page without any changes.
To use the second window, we must first have access to the player.
As a player for viewing, I chose JW7, you can register for a paid or free plan.
On the PLAYERS tab, go to License Keys & Downloads and find out the key in the table opposite JW Player 7 (Self-Hosted)
Next, go back to streamroot and in the lower window we correct the following:
Now we insert all this into the body of your site and check for performance.
Last we do not forget to open the port in the firewall on which the video stream goes.
PS I spent all this as an experiment, so I’m looking for ways to create free and not expensive video channels on the Internet (so far without success), if you know more interesting ways to create such a channel, please share it in the comments.
Thank you all for your interest and participation in trial testing .
First, the results with their pluses minuses and surprises.
Perhaps the most important thing to note is that at the moment this technology of broadcasting is not yet able to completely replace the CDN. It can reduce server load by about 75%. And based on a more detailed acquaintance with the technology, it turns out that the authors do not set themselves the task of reducing the CDN to the maximum, but save traffic and ensure that users do not freeze the video, even when the server’s Internet channel is fully loaded (within reasonable limits).
Pros:
1. Save traffic up to 75%.
Analyzing CDN / P2P traffic on my PC
2. Does not require additional settings from the user.
3. Simple enough to set up.
4. Supports most common streaming formats.
Formats
HLS (.m3u8), MPEG-DASH (.mpd) and Smooth Streaming (.ism) manifests with H264 / aac encoding.
Minuses:
1. Not supported by all browsers.
2. There is no data on compatibility with all OS.
3. I can not say anything about how the system will interact with computers behind NAT. (refer to the comment by user grey_rat )
My subjective opinion:
The system showed itself quite well in operation, especially with the HLS stream (.m3u8)
Despite the fact that the download of the Internet channel was not even close, a maximum of about 10 users at a time. It is possible to draw some conclusions, with 10 users uploading video on demand, the maximum load on the network was about 8-10 mega bits, while not constant but the peak at regular intervals of time, up to about 3s.
From what I can conclude that with my 100 mega bit network, a little more than 100 users could watch streaming video from my PC without any problems. (Correct if I'm wrong)
')
The load on my computer with 10 users was almost not noticeable, the use of RAM increased slightly, up to 200-300 megabytes.
Description of the settings of this system:
(I have to say that for this test I used trial periods of commercial programs, they are enough for simple acquaintance with technology, if it suits you, you can buy them or use free alternatives, which I will also try to indicate.)
So, I used the Wowza Streaming Engine for broadcasting video on demand (as a free alternative, you can use Nginx for streaming). Wowza Streaming Engine can be downloaded for free on the website with a trial period of 180 days. After installation, there is a built-in test video on the first page, the link from which I used for broadcasting. It can be found on the Mobile tab, in the IOS column. (There are quite a few instructions for installing and configuring Wowza, so I will not stop here)
Picture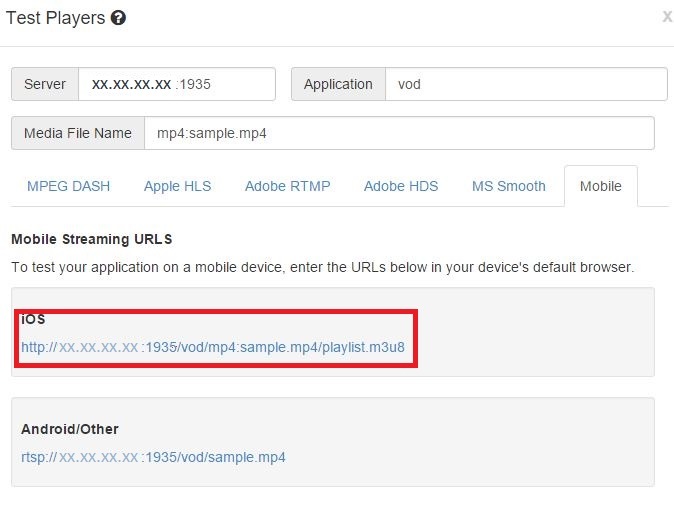
Next, I signed up for 30 days in streamroot (the alternative to Viblast is also paid, but they write that it is more finished, I have not tried it yet)
Why am I more prone to streamroot
In streamroot, create a new stream in the Getting started tab. This is where the pitfalls begin. To streamroot saw the stream from Wowza need to do the following:
Instruction
Select your Application.
Go to your application properties.
Add a custom property.
Fill in the fields with the following values.
Path: / Root / Application / HTTPStreamer
Name:
Depending on your stream format:
mpegdashUserHTTPHeaders for MPEG-DASH
cupertinoUserHTTPHeaders for HLS
smoothUserHTTPHeaders for Smooth Streaming
Type: String
Value: Access-Control-Allow-Origin: * | Access-Control-Allow-Methods: GET, POST, OPTIONS | Access-Control-Allow-Headers: Range
The Properties tab appears in Wowza only after enabling the Allow access to advanced properties and features checkbox in the section Server / users / User name / edit
Further, if streamroot saw our stream, we will see the following window:
Window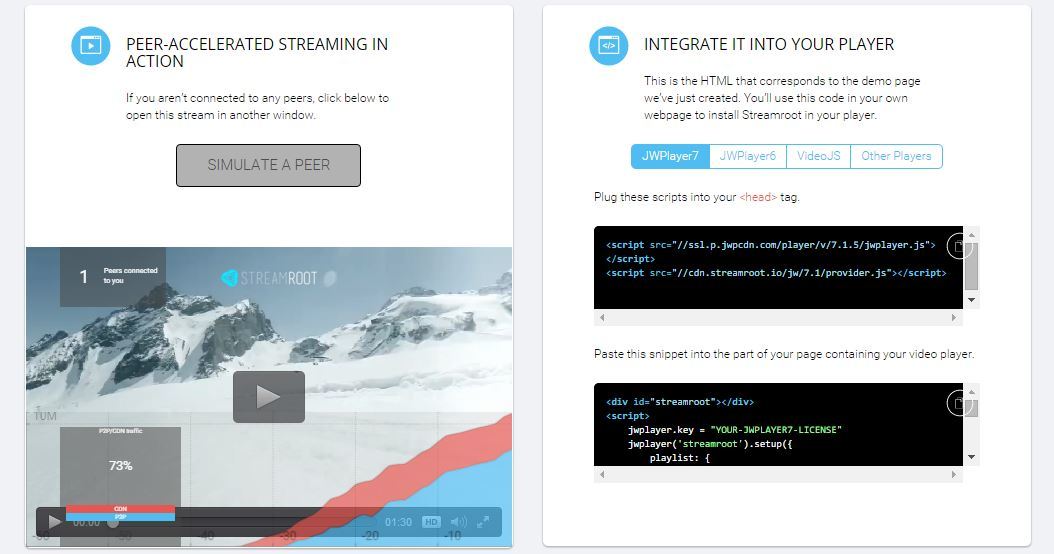
Where on the right is our HTML code.
The first window to insert into your page without any changes.
To use the second window, we must first have access to the player.
As a player for viewing, I chose JW7, you can register for a paid or free plan.
On the PLAYERS tab, go to License Keys & Downloads and find out the key in the table opposite JW Player 7 (Self-Hosted)
Next, go back to streamroot and in the lower window we correct the following:
Code
Instead of “YOUR-JWPLAYER7-LICENSE” we insert the code that we learned in the JW player.
if you also need to insert a graph reflecting CDN / P2P add to the line:
p2pConfig: {streamrootKey: “your key is xx-xxxxxxxx”, debug: true },
and more lines at the end
<div id="streamroot"></div> <script> jwplayer.key = "YOUR-JWPLAYER7-LICENSE" jwplayer('streamroot').setup({ playlist: { sources: [{ file: "http://media.streamroot.io/dash/examples/snow15/snowboard1_720p_dash.mpd" }], }, autostart: 1, p2pConfig: {streamrootKey: " -"}, }, hlsjs_options: {}, // possible hls.js options srdash_options: {} // possible streamroot-dash options }); </script> Instead of “YOUR-JWPLAYER7-LICENSE” we insert the code that we learned in the JW player.
if you also need to insert a graph reflecting CDN / P2P add to the line:
p2pConfig: {streamrootKey: “your key is xx-xxxxxxxx”, debug: true },
and more lines at the end
<script src="http://cdnjs.cloudflare.com/ajax/libs/rickshaw/1.4.6/rickshaw.min.js"> </script> <link rel="stylesheet" href="http://cdnjs.cloudflare.com/ajax/libs/rickshaw/1.4.6/rickshaw.min.css"> <script src="http://cdnjs.cloudflare.com/ajax/libs/d3/3.4.9/d3.min.js"> </script> <script src="http://files.streamroot.io/release/latest/scripts/p2pGraph.js"></script> Now we insert all this into the body of your site and check for performance.
Last we do not forget to open the port in the firewall on which the video stream goes.
PS I spent all this as an experiment, so I’m looking for ways to create free and not expensive video channels on the Internet (so far without success), if you know more interesting ways to create such a channel, please share it in the comments.
Source: https://habr.com/ru/post/273271/
All Articles