Installing the VNC server, and setting it up over SSH

Yes, for some reason, not all clients want to work in such a convenient and black terminal, the panel does not fully satisfy their aesthetic needs, and in general - “where is my favorite and convenient VNC?”.
This article will look at an example of installing and configuring a VNC server and a graphical shell ( GUI ) using the example of Debian 8 jessie OC.
Introductory: on hand there is a clean Debian 8 and a burning desire to get protected vnc access to the server at the output.
')
Let's get started
Update the list of available packages.
# apt-get update If the system is freshly installed, it is worth upgrading.
# apt-get -y upgrade (!) It is not worthwhile to run this command mindlessly on a freshly installed server, it is fraught with broken dependencies and the prospect of working with a file.
Install Xfce and VNC server (fans of GNOME , KDE , LXDE , etc. set the shell to your liking).
# apt-get install xfce4 xfce4-goodies tightvncserver We create the user from which we will start vnc the server.
# adduser vnc Install sudo (in Debian, this package is not installed by default).
# apt-get install sudo Add the user vnc to the sudo group.
# gpasswd -a vnc sudo We pass under the user of vnc.
# su - vnc We start vnc the server.
$ vncserver If this is the first launch of the vnc server, a config file will be created and some parameters will be requested:
$ vncserver You will require a password to access your desktops. Password: Verify: Would you like to enter a view-only password (y/n)? n xauth: file /home/vnc/.Xauthority does not exist New 'X' desktop is my.server:1 Creating default startup script /home/vnc/.vnc/xstartup Starting applications specified in /home/vnc/.vnc/xstartup Log file is /home/vnc/.vnc/my.server:1.log By default, the server vnc port will be 5901, the port of each subsequent display will increase by 1 (5902,5903, ...).
Check whether the VNC server is running and on which port you can listen to with the following command.
$ netstat -nltp Proto Recv-Q Send-Q Local Address Foreign Address State PID/Program name tcp 0 0 0.0.0.0:5901 0.0.0.0:* LISTEN 1054/Xtightvnc You can kill a specific display like this:
$ vncserver -kill :1 Killing Xtightvnc process ID 3246 : 1 - which display should be killed.
Creating a script autostart vnc server.
First, kill the running display: 1 (if it is running).
$ vncserver -kill :1 create startup script
$ sudo nano /usr/local/bin/myvnc Add the following lines to the file:
#!/bin/bash PATH="$PATH:/usr/bin/" DISPLAY="1" DEPTH="16" GEOMETRY="1024x768" OPTIONS="-depth ${DEPTH} -geometry ${GEOMETRY} :${DISPLAY}" case "$1" in start) /usr/bin/vncserver ${OPTIONS} ;; stop) /usr/bin/vncserver -kill :${DISPLAY} ;; restart) $0 stop $0 start ;; esac exit 0 if required - in the script, you can change the color depth or screen resolution.
Making the file executable.
$ sudo chmod +x /usr/local/bin/myvnc use of the script created by us:
$ myvnc start ### vnc $ myvnc stop ### vnc $ myvnc restart ### vnc Now you need to take care that the vnc we configured is started after the server is loaded (planned and not so).
To do this, create a file in the following path.
$ sudo nano /lib/systemd/system/myvnc.service Add the following text to the file:
[Unit] Description=MyVnc [Service] Type=forking ExecStart=/usr/local/bin/myvnc start ExecStop=/usr/local/bin/myvnc stop ExecReload=/usr/local/bin/myvnc restart User=vnc [Install] WantedBy=multi-user.target Explanation
[Unit] - we specify the description of the script (you can also specify the required dependencies and the order of launch at boot).
[Service] - specify which commands to start the service, by what user, and the type of service.
[Install] - we indicate at what level the script should run (runlevel 3 - multi-user mode without graphics).
[Service] - specify which commands to start the service, by what user, and the type of service.
[Install] - we indicate at what level the script should run (runlevel 3 - multi-user mode without graphics).
We include a unit in autoload at system startup.
$ sudo systemctl enable myvnc.service Created symlink from /etc/systemd/system/multi-user.target.wants/myvnc.service to /lib/systemd/system/myvnc.service. We look at the status of the unit created by us.
$ sudo systemctl -l status myvnc.service ? myvnc.service - MyVnc Loaded: loaded (/lib/systemd/system/myvnc.service; enabled) Active: inactive (dead) We pull systemd to search for new or modified units.
$ sudo systemctl daemon-reload Traffic encryption
Naked VNC does not encrypt traffic, and leave it in this form is not worth it.
In addition, if bots from China come to your IP and start knocking on ports, even if the password is set really high (note that the password for the vnc session is limited to 8 characters) and it will not be cracked, it will be difficult to get to the server via VNC for a constant error on the number of incorrect authorization attempts.
vncpasswd
$ vncpasswd
Using password file /home/vnc/.vnc/passwd
Password:
Warning: password truncated to the length of 8.
Verify:
Would you like to enter a view-only password (y / n)? n
Using password file /home/vnc/.vnc/passwd
Password:
Warning: password truncated to the length of 8.
Verify:
Would you like to enter a view-only password (y / n)? n

We let VNC over SSH:
$ sudo nano /usr/local/bin/myvnc Change the string:
OPTIONS="-depth ${DEPTH} -geometry ${GEOMETRY} :${DISPLAY}" OPTIONS="-depth ${DEPTH} -geometry ${GEOMETRY} :${DISPLAY} -localhost" Now to connect to the server, you first need to create a tunnel.
Under * nix:
# ssh vnc@xxx.xxx.xxx.xxx -L 5901:localhost:5901 Now it is possible to connect using a vnc client, instead of specifying the remote server’s IP as localhost and the port on which the vnc-server is listening.
# vncviewer localhost: 5901
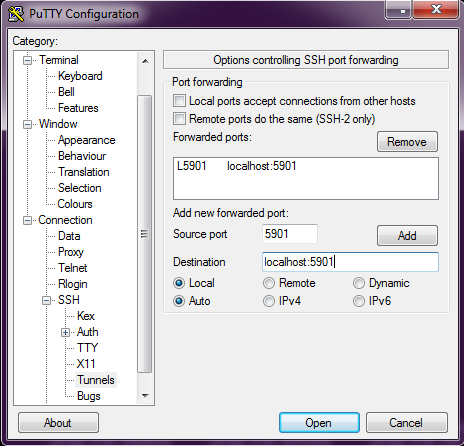
When using Windows and putty agent:
After running putty, go to Connection -> SSH -> Tunnels .
In the Source Port field we drive in the port on which the VNC server is listening - 5901, in the Destination field we enter - localhost: 5901 and click the Add button.
It should turn out as in the picture.
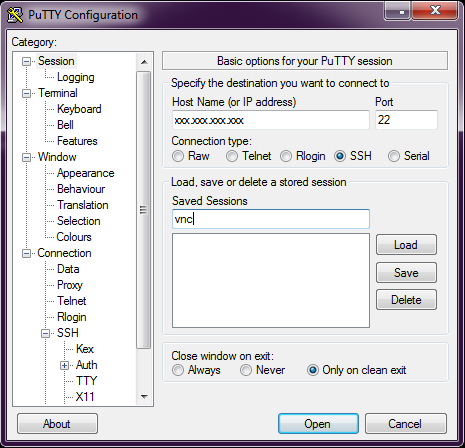
Now we return to the Session tab, enter the server's IP and port 22 (you can also save the connection configuration right there), click Open .

Install and configure fail2ban .
By default, brute-force protection for SSH is enabled, which is what we actually need.
when a specified number of unsuccessful password entries are exceeded in a row (by default - 6), an IP ban from which attempts were made for a given time (by default - 600 seconds).
Install the package from the repository.
$ sudo apt-get install fail2ban The main configuration file we are interested in is located along the path /etc/fail2ban/jail.conf
Settings block for ssh connection:
[ssh] enabled = true port = ssh filter = sshd logpath = /var/log/auth.log maxretry = 6 Syntax
ignoreip - IP addresses that should not be blocked. You can specify a list of IP addresses separated by spaces, a subnet mask, or the name of a DNS server.
bantime - ban time in seconds, after which the IP address is removed from the blocked list.
maxretry - the number of suspicious matches after which the rule applies. In the context of ssh, this is the number of failed login attempts after which blocking occurs.
enabled - the value true indicates that the given jail is active, false turns off the action of the isolator.
port - indicates which port or ports the target service is running on. The standard port of the SSH server is 22, or its literal name is ssh.
filter is the name of the filter with regular expressions that are searched for “suspicious matches” in service logs. The sshd filter matches the /etc/fail2ban/filter.d/sshd.conf file.
logpath is the path to the log file that Fail2ban will process using the previously specified filter. The entire history of successful and unsuccessful logins, including SSH, is by default written to the log file /var/log/auth.log.
The default setting satisfies our requirements (6 incorrect authorization attempts by shh and IP flies to the bank for 600 seconds), but I would advise you to add your IP to the trusted list.
It will be a shame to wait almost two hours, in case of a six-fold error in entering a password from your IP (the chance of this case is not zero).
Open the config file.
$ sudo nano /etc/fail2ban/jail.conf In the line ignoreip = 127.0.0.1/8, 127.0.0.1/8 address is replaced with our IP.
ignoreip = Your.IP Exit the nano editor ( ctrl + x , answer y to the question of saving the changes made).
We overload the service to apply changes to the rules.
$ sudo service fail2ban restart If a ban is triggered in fail2ban logs, you may notice a warning line:
$ sudo tail -100 /var/log/fail2ban.log | less 2015-12-17 09:08:54,894 fail2ban.actions[7496]: WARNING [ssh] Ban And attempts to connect from this address will be repulsed by the server automatically before the expiration of the ban.
bash-3.2# ssh my.vnc -l vnc ssh: connect to host 37.48.90.203 port 22: Connection refused Done, the VNC server setup is complete.
Source: https://habr.com/ru/post/273201/
All Articles