Pebble: Timeline - Inside View
 And on the street of the owners of the “classic” Pebble there was a holiday - the closed (by subscription) beta-testing of the Timeline firmware began (which, by the way, was promised back in August). I invite you under the cat to find out what the Timeline is, which is initially available to Pebble Time users and will soon delight (or not) all Pebble owners.
Further, very little code and a lot of words from the official documentation [1] .
Content
1. What is Timeline?
2. Receive messages
3. Sending messages
4. How Pin is arranged
5. Own timeline for "lazy"
6. Limitations of use
1. What is Timeline?
Timeline is a new Pebble interface element, available since firmware version 3.0.
It is a time-ordered tape of messages / notifications / reminders. Past elements from the active list are accessed by pressing the physical button “Up”, future events under the button “Down”. The idea itself is very similar to the well-known push notifications.
Out of the box, local messages and notifications from the calendar and the weather from the Pebble mobile app fall into the tape.
')
The main element of this interface is the Pin - JSON object, with the information necessary for display.
The work of Timeline is tied to a public web API [6] .
I duplicate the architecture from the documentation:
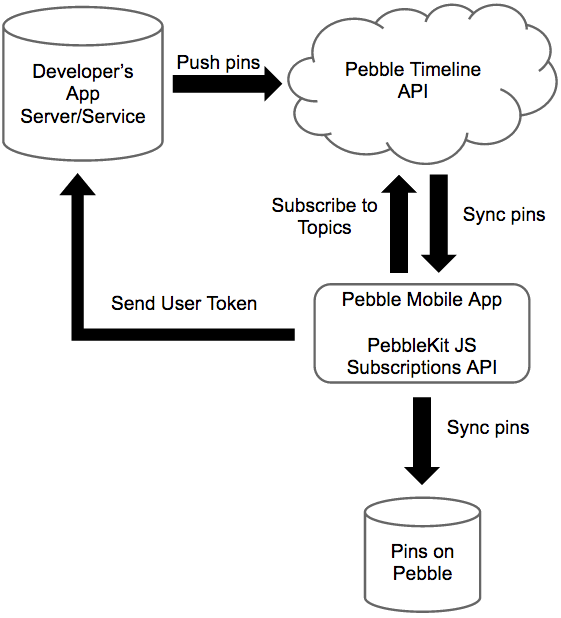
Those. developer to organize your mailing need:
- in the logic of your watchapp, to provide a mechanism for users to subscribe to the newsletter;
- set up a backend for sending pins.
And the user, so that “custom” messages should come to the clock:
- install a watchapp on the watch for which the developer has enabled the Timeline interface;
- allow the mobile application for this watchapp to receive pins and notifications.
Further, in more detail about how the messages are arranged, what is needed for sending and receiving them, which the developer will have to take care of.
to content
2. Receive messages
2.1. Recipient identification
Two approaches are used to determine the message recipient:
- individual mailing - using a token obtained on the basis of a unique bundle of the user / watchapp;
- mass mailing - using the API key associated with watchapp and the mechanism for subscribing to a named mailing list.
Both that and another becomes by means of the API implemented in Pebblekit JS [4] .
2.2. Getting user token
To get the Timeline token you need to use the following function:
Pebble.getTimelineToken( function (token) { console.log('My timeline token is ' + token); }, function (error) { console.log('Error getting timeline token: ' + error); } ); This token is necessary to “know” the backend for address marshutization of messages.
2.3. Subscribe to a topic
If the planned mailing provides for the possibility of grouping messages, then it is logical to implement a subscription management mechanism in watchapp.
In a simple version, a subscription to a specific topic, in this case “aTopic” will look like:
Pebble.timelineSubscribe('aTopic', function () { console.log('Subscribed to aTopic'); }, function (errorString) { console.log('Error subscribing to topic: ' + errorString); } ); Other operations with subscriptions
Unsubscribe from “aTopic” topic:
Get a list of current subscriptions:
Pebble.timelineUnsubscribe('aTopic', function () { console.log('Unsubscribed from aTopic'); }, function (errorString) { console.log('Error unsubscribing from topic: ' + errorString); } ); Get a list of current subscriptions:
Pebble.timelineSubscriptions( function (topics) { console.log('Subscribed to ' + topics.join(', ')); }, function (errorString) { console.log('Error getting subscriptions: ' + errorString); } ); to content
3. Sending messages
How does the backend, which will send messages? And here is a very good news, this part in no way relates to the Pebble infrastructure and can be implemented completely arbitrarily, in any programming language and on any convenient platform.
The main thing is to be able to HTTPS requests to the Pebble timeline web API [6] . In the official documentation, examples for exceptional clarity are generally made by curl.
In general, a request to the API looks like:
$ curl -X PUT https://timeline-api.getpebble.com/v1/user/pins/unique-pin-id \ --header "Content-Type: application/json" \ --header "X-User-Token: a70b23d3820e9ee640aeb590fdf03a56" \ -d @pin.json 3.1. Individual mailing
URI:
https://timeline-api.getpebble.com/v1/user/pins/ Pin creation:
$ curl -X PUT https://timeline-api.getpebble.com/v1/user/pins/unique-pin-id \ --header "Content-Type: application/json" \ --header "X-User-Token: a70b23d3820e9ee640aeb590fdf03a56" \ -d @pin.json Here
unique-pin-id - unique text (64-character) message identifier;
X-User-Token is the same user token for which the message will be addressed, it must be generated in the watchapp and received either automatically or force the user to transfer to the backend;
pin.json - a text file with a JSON description of the message.
Pin removal:
$ curl -X DELETE https://timeline-api.getpebble.com/v1/user/pins/unique-pin-id \ --header "Content-Type: application/json" \ --header "X-User-Token: a70b23d3820e9ee640aeb590fdf03a56" Sending a request to create a pin with the same id does not duplicate, but replaces the message on the clock.
3.2. Mass mailing
URI:
https://timeline-api.getpebble.com/v1/shared/pins/ Pin creation:
$ curl -X PUT https://timeline-api.getpebble.com/v1/shared/pins/unique-pin-id \ --header "Content-Type: application/json" \ --header "X-API-Key: fbbd2e4c5a8e1dbef2b00b97bf83bdc9" \ --header "X-Pin-Topics: all,aTopic,bTopic" \ -d @pin.json Here
The X-API-Key is the watchapp's key by which recipients are defined, created when the developer adds the application on dev-portal and permits for the Timeline application (NB Application publishing is not necessary, the main thing is that the watchapp is added with a unique UUID);
X-Pin-Topics - a list of topics whose subscribers will receive a message.
Pin removal:
$ curl -X DELETE https://timeline-api.getpebble.com/v1/shared/pins/unique-pin-id \ --header "Content-Type: application/json" \ --header "X-API-Key: fbbd2e4c5a8e1dbef2b00b97bf83bdc9" 3.3. Server responses
As befits any decent web API, all our requests are answered in response.
If everything is fine, then we get code 200 with the contents of “OK”.
If something is wrong, then the response code will be from the list 400, 403, 410, 429, 503, and in the body of the answer there will be a decryption of the error.
Separately, you should pay attention to the headers, which the server returns, in the x-ratelimit-percent parameter there will be a percentage of using the message limit, and in retry-after after how many (in seconds) you can start repeating requests to the server when the limit is exceeded.
to content
4. How Pin is arranged
We have reached the moment when we know how to send and how to receive, and we need to figure out what to send. For detailed study there is nothing better than official documentation [3] .
I will tell briefly what pin'y consist of.
An example of a minimum pin:
{ "id": "unique-pin-id-1", "time": "2015-12-15T18:00:00Z", "layout": { "type": "genericPin", "title": "Just pin", "tinyIcon": "system://images/NOTIFICATION_FLAG" } } And so, each pin must have:
id - identifier defined by the "mailer";
time - pin'a presentation time in ISO 8601;
layout is an object that describes pin mapping.
Learn more about the layout object:
type - type, 4 types are provided - generic, calendar, sports, weather, as is clear from the names, generic - general purpose, and the rest have a set of additional parameters for customization (for example, displaying a sports match account for sports);
tinyIcon - URI to display a predefined icon in the message.
You can also add the following objects to the pin:
createNotification and updateNotification - for notification by an alert before creating a pin in the timeline;
reminders - to notify in advance about the event in timeline;
actions - for interactivity, you can customize actions depending on the user's choice.
to content
5. Own timeline for "lazy"
Here I called “lazy” those who can do anything except programming under Pebble and at the same time want their newsletter to the Timeline.
Is it possible? And easy ...
We believe that the backend is already there, configured and regularly trying to send something through the web API. It remains to learn only to listen to him.
How-to in 4 steps:
Step 1. We write a small application on Cloudpebble
Create a new project with the type of “Pebble.js (beta)”
In app.js, we change the code to your own:
var UI = require('ui'); var myToken; Pebble.getTimelineToken( function (token) { console.log('My timeline token is ' + token); myToken = token; var tokenDisplay = new UI.Card({ subtitle: 'Timeline Token', body: myToken }); tokenDisplay.show(); }, function (error) { console.log('Error getting timeline token: ' + error); } ); Compile the application and go to the second step.
Step 2. Add the application to the Developer portal
By the button “GET PBW” we save our small application from Cloudpebble.
Go to the developer portal and add the application "Add a Watchapp": think up the name and click "Create".
Through "Add a release" add previously downloaded pbw.
Allow the timeline "Enable timeline".
In “Manage timeine settings” we find our API Key and proceed to step 3.
Step 3. Get user token
Go back to Cloudpebble.
Run the application in the emulator and voila - on the emulator screen and in the application logs Timeline user-token is the most! Add it to the backend.
Step 4. Put the application on the clock
Without leaving Cloudpebble, install the watchapp on your watch and, remember, it is completely unnecessary to run it, well, if you just remind yourself of the user-token.
Profit.
to content
6. Limitations of use
When sending by API key - 5000 requests per minute for one key.
When sending by user token - 300 requests for 15 minutes per one token.
Also, the developers estimate the delivery time of a message up to the user's hours to 15 minutes, so they do not recommend using the Timeline for realtime messages, although the actual delivery time is still significantly less - a few seconds.
All good news in Timeline!
to content
1. Pebble Timeline Integration // Pebble Developers
2. Timeline Architecture // Pebble Developers
3. Understanding Timeline Pins // Pebble Developers
4. Subscribing to the Timeline // Pebble Developers
5. Enabling the Timeline // Pebble Developers
6. Pushing Data to the Timeline // Pebble Developers
7. Libraries for Pebble Timeline // Pebble Developers
Source: https://habr.com/ru/post/273169/
All Articles