Interactive C #

Update number 1 brought to Visual Studio not only a slightly modified icon, but also various other nice innovations. By the way, this is what a new icon looks like:

')
One of the additions is the "Interactive C #". Actually this is a REPL window.
REPL abbreviation means Read-eval-print loop (in translation you get something like “count, execute, display, repeat”)
The name read-eval-print loop comes from the names of Lisp primitives that implement this functionality. This is what the REPL program looks like in Lisp. Just one line of code:
(loop (print (eval (read)))) That is, the first thing the text is read, then executed as a command, the result is displayed and all this can be done again.
The REPL environment can be useful not only for learning a language, but also for any experiments with the API. With it, you can also run scripts in C #.
Previously, REPL for Visual Studio and C # was available as an extension. Now you can also download it for VS2015 (if for some reason you don’t want to upgrade to VS2015 update 1 or if you are curious to see an alternative):
VisualStudio C # REPL
In addition, there are several sites that allow you to play with C # online. For example: C # Pad: Run C # Code Online .
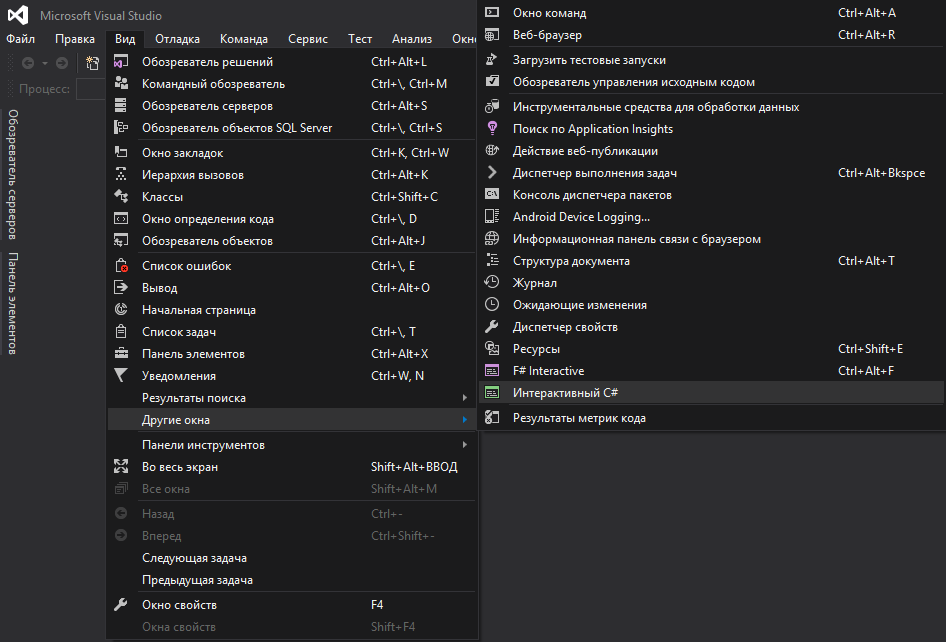
In order to open the interactive C # window from Visual Studio 2015, you need to go to the "View" menu, select the "Other Windows" item and select the "Interactive C #" sub-item.
This window will open to us:
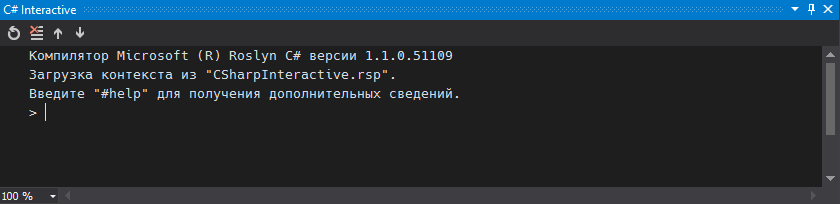
Alternatively, to work with interactive C #, you can open the “Developer Command Line for VS2015” and type csi.
Let's start with the simplest C # code you can run:
Console.Write("Hello, World!") Pressing Enter will not surprise us and is expected to display “Hello, World!” In the process of entering the code, you may notice that there is support for IntelliSense.
You can enter 5 + 10, press Enter and get the answer in the form of 15. You can assign a value to a variable. And after, in any subsequent line use this variable.
For example, you can try a simple LINQ data request from an array:
int[] source = new[] { 3, 8, 4, 6, 1, 7, 9, 2, 4, 8 }; foreach (int i in source.Where(x => x > 5)) Console.WriteLine(i); Running commands and setting values to variables is not all that can be done in the interactive line. You can also set references to namespaces with the #r directive. For example:
#r "System.Windows.Forms" using System.Windows.Forms; var f= new Form { BackgroundImage = System.Drawing.Bitmap.FromFile("D:/fun.jpg") }; f.ShowDialog(); Some namespaces can be used without the #r directive. For example, download a file from habrastorage:
using System.Net; WebClient webClient = new WebClient(); webClient.DownloadFile("https://hsto.org/files/229/aad/50d/229aad50de554be19ce60c60dbfd2e7e.png", @"d:\myfile.png"); This text can be either entered in an interactive C # console or saved in a text file of the csx format.
With the help of the directive #load you can load and execute the script. For example, like this:
#load "myScriptContext.csx"
Alternatively, you can execute the script from the “Developer Command Line for VS2015” by running the csi command and specifying the path to the script:
csi /path/myScript.csx
There is also a very useful directive - this is the directive #clear or #cls . Both values work the same and clear the screen. Only the screen is cleared, all occurring declarations of variables, namespaces and code remain in memory.
#help - this directive displays help.
#reset - clears the execution environment. If you call #reset noconfig, the launch of the configuration script that starts during initialization and adds the main namespace will be skipped.
Finally, I invite you to watch a video (in English) from Kasey Uhlenhuth in which she retrieves information from GitHub:
And read the wiki (again in English):
Interactive Window
C # Interactive Walkthrough
Source: https://habr.com/ru/post/273037/
All Articles