Simple Blender. Part 4
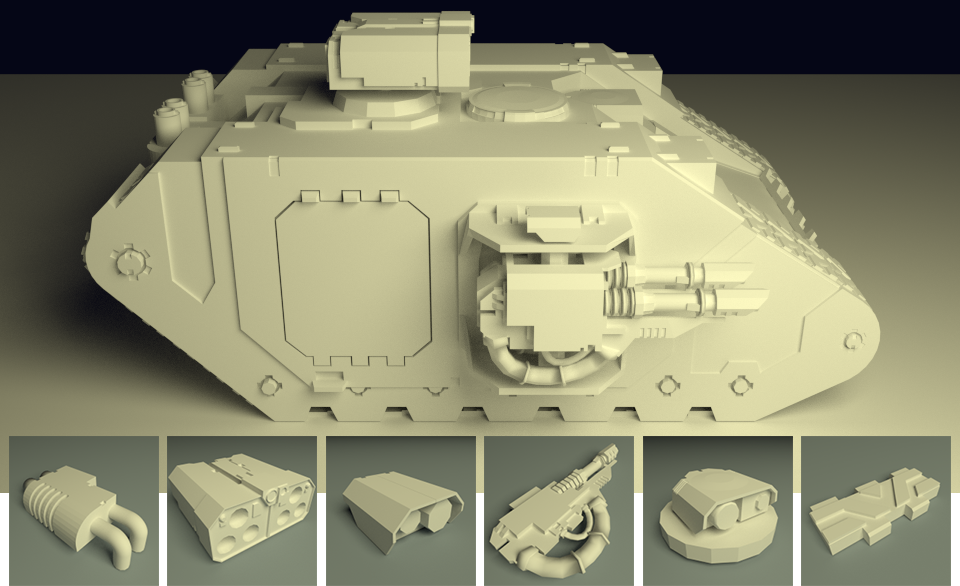
KDPV. System's check.
Disclaimer
As you guessed in advance, in this series I will not show you how to draw a tank either. In this series, I will write about object management (I wrote about geometry in the past ). Just because now is the time (in general, I wanted to insert this part immediately after the first, but did not grow together).
You already know how to work with objects and their geometry in Blender. What else do you (perhaps) not know - what the hell is this, when you

Figure 0. Proofpik.
')
Or when you import a .stl file (non-empty), and the import seems to have passed, but the object on the scene is not visible.
Or do you import a person from MakeHuman and see it perfectly, but don’t you understand if his hands are a separate object or not? And the eye? And you start clicking on the model.
And you get sad and want to understand the management of objects in Blender. And just then I came up.
In general, enough of the lyrics, go ahead. The post is long, but not very.
Data management
As I already wrote, in Blender there is a basic unit of work - this is an object. And this is a container. It contains the name, origin, geometry, the list of modifiers and a lot of other data - if it is a geometric object. Because a lamp or a bone is also an object, along with a geometric one.
Initially, all objects are equal, cubes, lamps, bones.
What Blender Provides
Blender has:
- navigation through all file objects and viewing / editing detailed information on the object.
- grouping (aka grouping aka / aka parenting hierarchy (beware, there are allegations in the help that the parentage is morally obsolete and Child Of) must be in full swing)
- visibility management (individual / group, as well as work / render)
Those. You can view the whole picture, hang tags and put it on the shelves, and also hide the unnecessary at the moment.
And Blender on ¾ supports versioning.
Navigation / viewing information
Everything that you have already written in this file is displayed in the field of the autliner (I previously called it the “Area of contents of the scene” for consistency, but I think the effect has already been achieved and I will call it an outliner).
I note that the guys from BF inserted the outliner into the default starting config (even if it adds noise), along with the timeline area, for example. That is, the fact that the management of objects is important, they also indicate from the very beginning.

Figure 1. Outline.
The screen of the autliner with a more or less non-trivial model (the tank itself) is shown in Figure 1. On the left is a tree of objects. Pay attention to its root (more on that later). Each orange icon is one object. Each gray icon is the object's geometry (note that geometry has a name, and it does not always coincide with the name of the object — one of the reasons is given below). By clicking on these icons, the corresponding artifact is highlighted.
Object modifiers are also visible. And the fact that the camera is an object is also visible. And pay attention to the nesting of objects (I casually called one object “A parent”). And on the three columns on the right - when you hover over the icons will be tips.
Almost nothing is hidden from the autliner. He knows everything and he will hand over everything with giblets. This is a gray cardinal blender. The situation in the 3D area is momentary by definition (see below). The situation in the parameter area is context-sensitive and describes only one object. What is shown in the outlaner is monumental and all encompassing. Be a big brother for your objects - use the outliner.
If you have lost an object or are not sure, one has a curve here or four of them already over each other, or when importing an object seems to have passed, but it is not visible in the 3D area (it turned out that it is a few thousand units away and size) - the outliner explains. This is its main function.
The display format of the list of objects is selected in the dropdown at the top center of the area.
Grouping objects
Having a bunch of objects in your hands - you need to be able to somehow manage them. So.
Scenes
As seen on the outliner screen, the root of the object tree is the scene. It is not just a container of objects, it is a container of everything (objects, materials, etc.).
So you can do as many scenes as part of a single file. You can do completely new, you can do new with links to existing objects. The scene is so global that

Figure 2. Scene control. The logic is the same as that of the adjacent control of the control of the layouts.
It is unlikely that you will need it in the near future.
Object groups
Objects can be grouped. Select the necessary ones, press Ctrl-G. The selected group is highlighted in green, not orange.
But here the guys from BF with terms, IMHO, have become too smart. Because groups are not containers (as at least I expected). These are, in fact, tags. The same object can belong to different groups. But the group can not belong to another group:
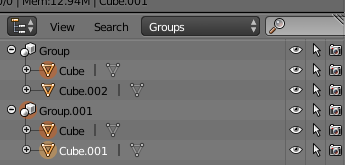
Figure 3. Groups in the atomicer. Not displayed in all display formats list. The default (All Scenes) group does not show. In Groups, of course, visible. Pay attention to the object "Cube".
It is easier to rename groups from an authliner (right click -> Rename).
You can select from the autliner, or you can select from the 3D area (select the object, press Shift-G, select Group).
In Blender, groups are tags and their respective scope.
NB Basic operations with an object from a group do not affect other objects of the group, unlike ...
Parents and restrictions
In Figure 1 it can be seen that some objects are children of others. This is all because the parent objects were explicitly specified by me as the parent. To organize parenthood, you must: select objects (using Shift-PCM), and the future parent must be the last one to be selected. Press Ctrl-P and select, for example “Object”:
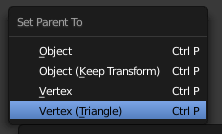
Figure 4. Parenting assignment menu.
As a result, we have:
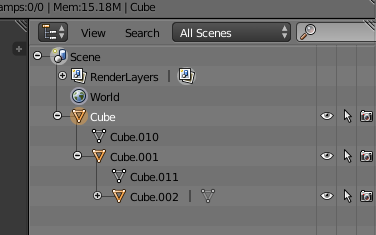
Figure 5. Cube is the parent of Cube.001 and Cube.002. But Cube.001 is a parent only for Cube.002. In general, the level of nesting seems to be unlimited.
A dotted line is drawn in the 3D area between the origin of the parent and the children.
If you apply a basic operation to the parent, then it will apply to all of his children. And grandchildren. And great-grandchildren.
When you assign a new parent, the old one is reset. Remove parenthood - Alt-P on the child.
Obvious scope - dependent objects. The tank chassis is the parent for the tower.
Above it was stated that parenthood BF is considered deprecated and recommend Child Of. What does this tell us? Firstly, that Blender is a serious product and managed to live. Secondly, what is Child Of? This is constraint, constraint. Object constraints are configured in the Constraints tab:
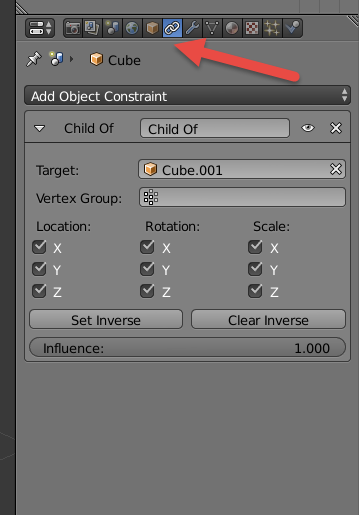
Figure 6. The constraints tab. Restrictions are added from the dropdown list.
When assigning this restriction will be the same as in parenting - the dotted line and copying the basic operations.
What are the advantages of applying this restriction?
Firstly, the fact that there are no restrictions on the number of restrictions (I directly felt that my tautology skill had been pumped through). Those. one object can be a child of seven other objects.
Secondly, you can fine-tune the copying of basic operations (see Figure 6). For the example with the tower, it is possible to emulate sight compensation — turn off Z-turn (the chassis can dive and come up, and the barrel does not move, but it will react when going left-right).
In an autliner, restrictions (like modifiers, for example) are indicated by an icon opposite the object, and not by nesting (like parenting).
Duplicate and Merge
IMHO, this also applies more to management than to just working with objects, so I will describe it here, but under a spoiler.
How to make a fence and flowers
From time to time it is required to score a stage with a mass of uniform objects (fence boards, M6 bolt heads, some flowers). You can copy-paste, of course, but this is not quite a manageable solution, so to speak. Personally, I know 2 more manageable options:
I already wrote about modifiers before, and Array is nothing special - take an object, impose Array on it and get the result. For the fence - great. In an autliner, the object remains alone, but with an indication of the applied modifier.
Duplicates Technically, these are incomplete copies of objects (that is, it is not a merciless copy-paste) - instead of some data, they have links to the original data. There are 2 types of duplicates (I am now quoting BF - “surface connection” and “deep connection”). To create - select the object and press Shift-D (or Object-> Duplicate Objects ) or Alt-D (or Object-> Duplicate Linked , italics author), respectively.
Surface link — links are created only for material and textures (but this is customizable). In the autliner it is indicated that the material coincides with the original. For flowers or spots, for example.
Deep link - link instead of a copy of almost everything, including geometry, but excluding transformation. In the autliner is indicated by the matching name of the geometry. Bolts caps are recommended.
You can merge objects into one - select all the necessary ones and press Ctrl-J (or Object-> Join). The geometry of all objects merges into the geometry of the last selected, only the last selected remains in the outliner. Very useful sometimes operation.
- Array modifier
- Duplicates
I already wrote about modifiers before, and Array is nothing special - take an object, impose Array on it and get the result. For the fence - great. In an autliner, the object remains alone, but with an indication of the applied modifier.
Duplicates Technically, these are incomplete copies of objects (that is, it is not a merciless copy-paste) - instead of some data, they have links to the original data. There are 2 types of duplicates (I am now quoting BF - “surface connection” and “deep connection”). To create - select the object and press Shift-D (or Object-> Duplicate Objects ) or Alt-D (or Object-> Duplicate Linked , italics author), respectively.
Surface link — links are created only for material and textures (but this is customizable). In the autliner it is indicated that the material coincides with the original. For flowers or spots, for example.
Deep link - link instead of a copy of almost everything, including geometry, but excluding transformation. In the autliner is indicated by the matching name of the geometry. Bolts caps are recommended.
You can merge objects into one - select all the necessary ones and press Ctrl-J (or Object-> Join). The geometry of all objects merges into the geometry of the last selected, only the last selected remains in the outliner. Very useful sometimes operation.
Summarizing the section "Grouping objects" . There is no explicit analogue of directories. But there are tags that are progressive (but their UI is complicated, which is not so progressive). Objects can depend on each other in one way or another - do not forget this when viewing other people's files.
Visibility control
“Hide” function (switching visibility for selected object (s))
Activated in 2 ways:
- Outline: eye icon in front of the object / group.
- The area of the 3D scene: H / Alt-H for the selected object (s).
Layers (switching visibility for a set of objects)
Within one scene, you can control the visibility of objects at the layer level. IMHO, if you actively use groups, then you don’t need layers - you can cut down the visibility of the group from the autliner. But the opportunity is still there.
Displaying layers is not the same as in Photoshop, for example. This is how they look in the interface (each square = layer):

Figure 7. UI layers.
The light square is the currently hidden layer, the dark one is the displayed one. If there is a ball - the layer contains something. If the ball is orange - the layer contains something and it is from this “something” that you have selected something. Clicking on the square displays this layer and hides all other displayed before. Shift-click - displays / hides this layer, without hiding the rest displayed before.
Any selected object / group can be moved to any layer. Highlight an object / group and press M, a layer selection window will appear:
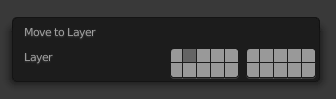
Figure 8. Popup selection layer on which the object will be moved.
Click on the desired square - and the object will be moved to the specified layer.
How to draw in the 3D area
This is not to say that this is an obvious visibility control, but I have not found a better place to describe. So, in the 3D area, there is one more important control:

Figure 9. Choosing how to draw objects in the 3D area.
The default is Solid (polygons are displayed, and textures on them are not). When editing geometry or when searching for hidden objects, Wireframe helps a lot (polygons are not displayed). You can switch between Solid and Wireframe by Z.
Save file
Actually, now you know where you have what.
It remains only to save the file (Ctrl-S, well, or through the menu). And here Blender strikes (Win-version):
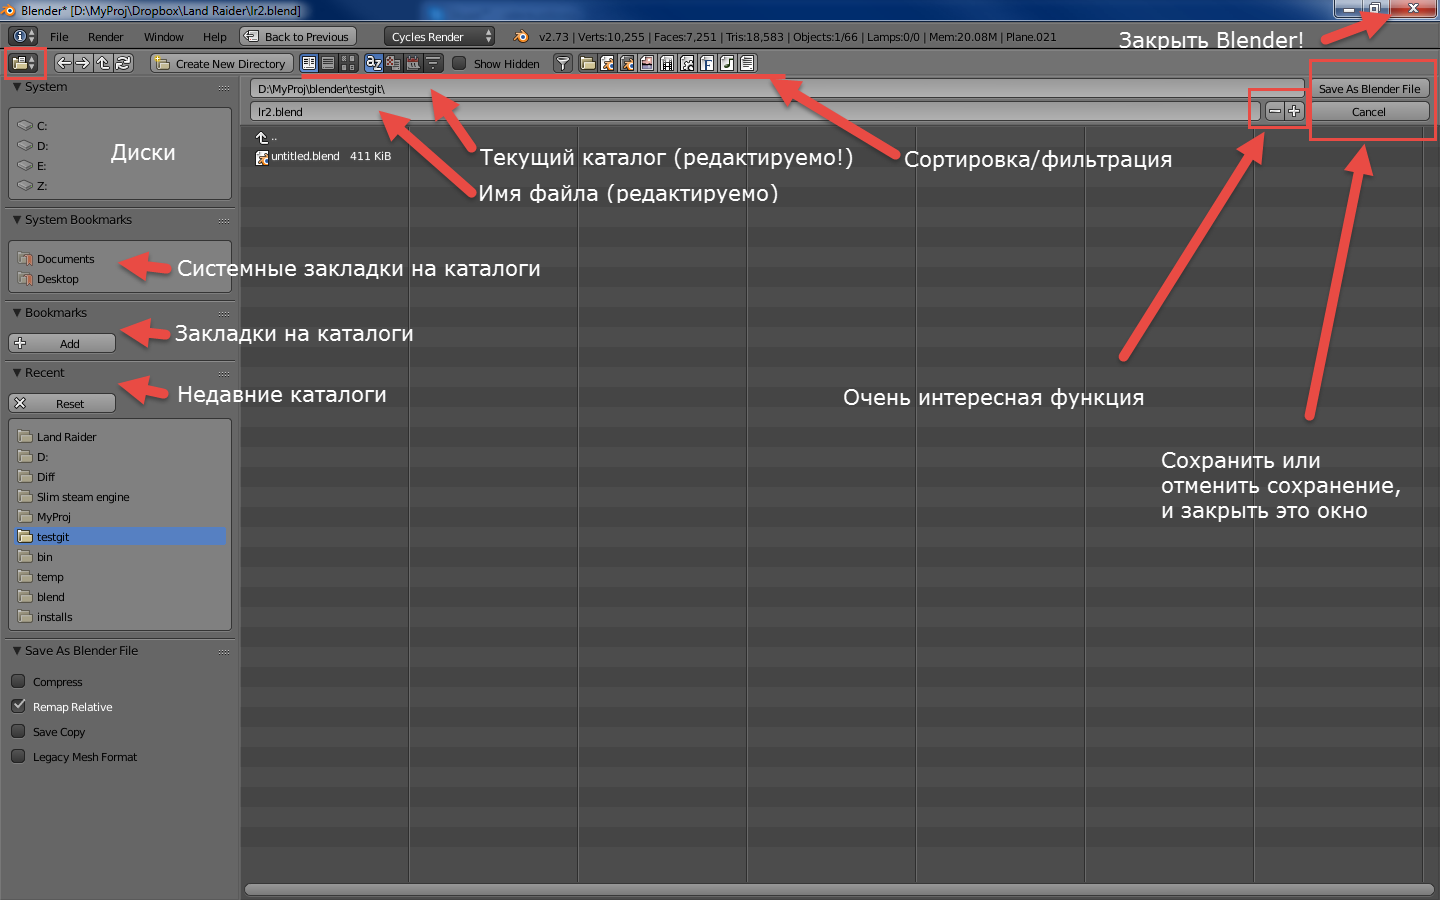
Figure 10. Blender asks where to save the file and under what name.
Then I retreat and I have nothing to say. The save window is not the standard Save File dialog, noneet. This is an area of type “File browser”. And the most important thing here is not to push the red cross out of inertia.
Versionality
Regarding the “Very Interesting Function” from the previous screen (needed at later stages). It winds the number after the file name (but before the extension): temp1.blend, temp2.blend, etc. This can be done by hand, but it is more convenient. In such an elegant way, at least some user-controlled versioning can be done in Blender. In general, this is not a stone in the Blender garden - everyone is doing it (“Completely final report 12.docx”), just in BF they decided to sweeten the pill. This is ½ version.
The remaining ¼ versioning is a similarity built into Blender, which means that when you press Ctrl-S, Blender saves the file with an increment of a number that comes after the extension (temp.blend2), but for me it is cumbersome and uncontrollable (I’m doing something with my hands , another - just updating the current version), so I don’t use this mechanism:

Figure 11. Settings for the built-in version Blender mechanism.
However, I recently learned git, after which I found the following plugin github.com/ldo/blendgit . Did not check.
Conclusion
Somehow, unexpectedly for me, the detailed response to the commentary began to turn into a set of not the shortest posts. I am well aware that a non-professional who teaches others is not always good. Therefore, when writing each post, I straightened myself so as not to slip into teaching, but simply to continue to show that Blender is just (well, or at least not more complicated than max).
At the moment, I have described all areas of the starting UI (with the exception of the timeline, but I don’t believe in animation for absolutely newbies. And describing the menu is generally offensive to those who read, I think). It remains to draw the same tank, but this is - in the next series .
Source: https://habr.com/ru/post/272993/
All Articles