Marmalade C ++ and ShiVa3D: getting started with game engines for the Android x86 platform
Are you developing a cross-platform application or game for Android? If so, then you should look at special tools. For example, to the Marmalade C ++ 8.0 SDK and the ShiVa3D game engine. Today we will talk about their use for the Android x86 platform.

The idea behind the Marmalade SDK is: “written once starts anywhere.” The idea is not new, but quite relevant. The same code can be compiled and executed on all supported platforms - instead of using different programming languages and APIs. This versatility is achieved through an API based on C / C ++, which plays the role of an abstraction layer for the API of each of the target platforms.
Marmalade SDK is a set of tools for developing cross-platform applications. It can work in different environments, we will use Windows. Marmalade includes a set of libraries, code samples, and tools for developing, testing, and deploying applications on various platforms. In particular - on Android x86. The package is well documented .
')
Below we talk about using the Marmalade SDK in a Windows environment. If you are running Mac OS, refer to this section of the documentation .
So, before installing the Marmalade SDK, you need to prepare. Namely, for further work we will need:
Before work, it is worth checking the environment variables, and if they were not configured correctly when installing the above described tools, fix it.
Editing the environment variables, be careful, make sure that at the end of the path there are no special characters or separators like "\".
Now that the preliminary training has been done, it's time to download the Marmalade SDK . We are interested in, in particular, Marmalade Core. Before you are given a link to download the package, you need to register on the site. After installation, in order to proceed with the experiments, you will need to enter the license code that will come to the e-mail specified during registration.
Consider the HelloWorld project from the example set that ships with the Marmalade SDK. In our case, the project is here: C: \ Marmalade \ 8.0 \ examples \ HelloWorld.
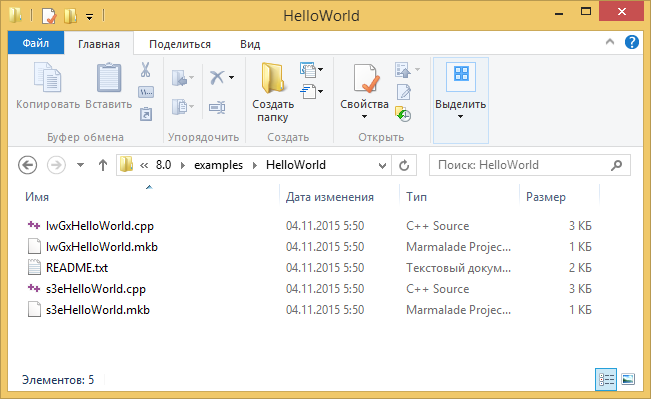
HelloWorld sample folder contents
The folder contains the MKB and CPP files for two demonstration projects. They show the different ways Marmalade can greet the world. The names of files belonging to the same project are the same.
The file with the MKB extension contains information about the project. Namely:
Details on .mkb files can be found in the documentation . A CPP file is a project source code written in C ++.
There are three ways to work with Marmalade projects. All of them are associated with MKB files. The first is used when automatically creating a project for the IDE used, the second uses the command line tools, the third is based on using the Marmalade Hub.
Double-click on the IwGxHelloWorld.mkb file. Having opened the command line interface, Marmalade will do a great job for us, which will eventually lead to the emergence of a pair of new folders next to this file and opening the IwGxHelloWorld_vc14 project in Visual Studio.

Project Opened in Visual Studio
Compile the project and run it on the x86-simulator Marmalade. To do this, execute the menu command Debug> IwGxHelloWorld_vc14 Properties ...
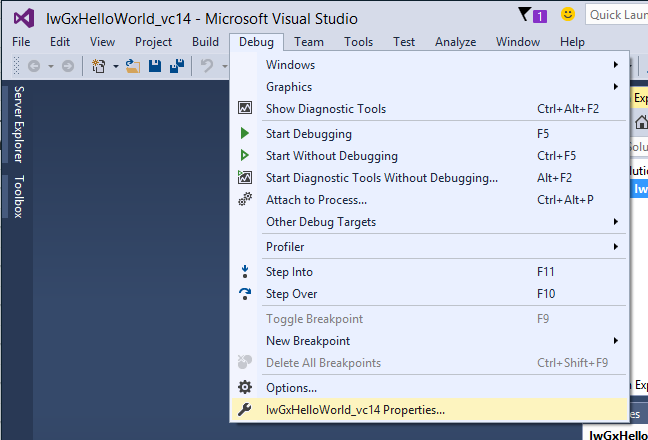
Team IwGxHelloWorld_vc14 Properties
In the window that appears, click on the button Configuration Manager.
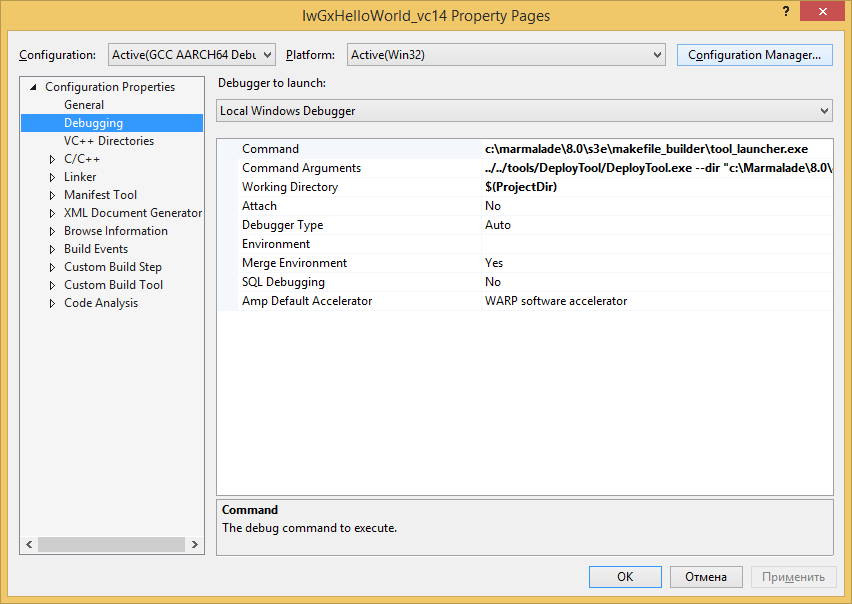
Configuration Manager Button
Now, in the Configuration field, select the x86 Debug option. Click the Close button.

Configuring the project configuration
Back in the main Visual Studio window, run the menu command Debug> Start Debugging.

Team start debugging project
If a warning window appears, click the Yes button in it.
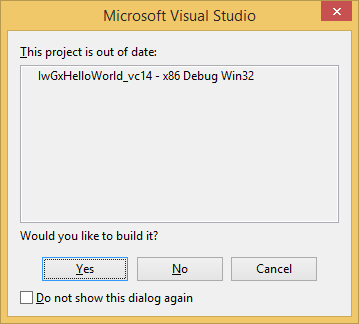
Warning window
If a window appears with a message about the absence of debug information, just click Yes. Now we can only wait, watching in the Output window the process of preparing our project for launch. If everything went as it should, the Marmalade x86 Simulator window will open with Hello World running.
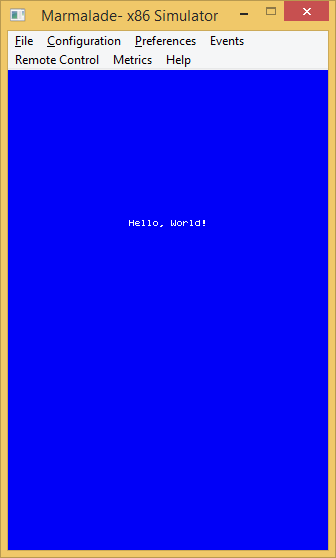
Project HelloWorld successfully launched in the emulator.
The Marmalade SDK includes the batch file mkb.bat, which you can invoke from the command line to process MKB files. This allows you to speed up the work. Suppose our .mkb file is called Hello.mkb. Go to the folder in which this file is located and use the command below to rebuild the project for all supported platforms:
If you need to work with a particular platform, in our case, with Android x86, in the MKB file, in the option section, you can make the following addition:
To build the Debug and Release versions of the project, you can use the following commands, respectively:
In order for mkb.bat to be run from the command line, you need to add the bin s3e folder for the installed copy of Marmalade to the Path environment variable. For example, the path might look like this: C: \ Marmalade \ 8.0 \ s3e \ bin.
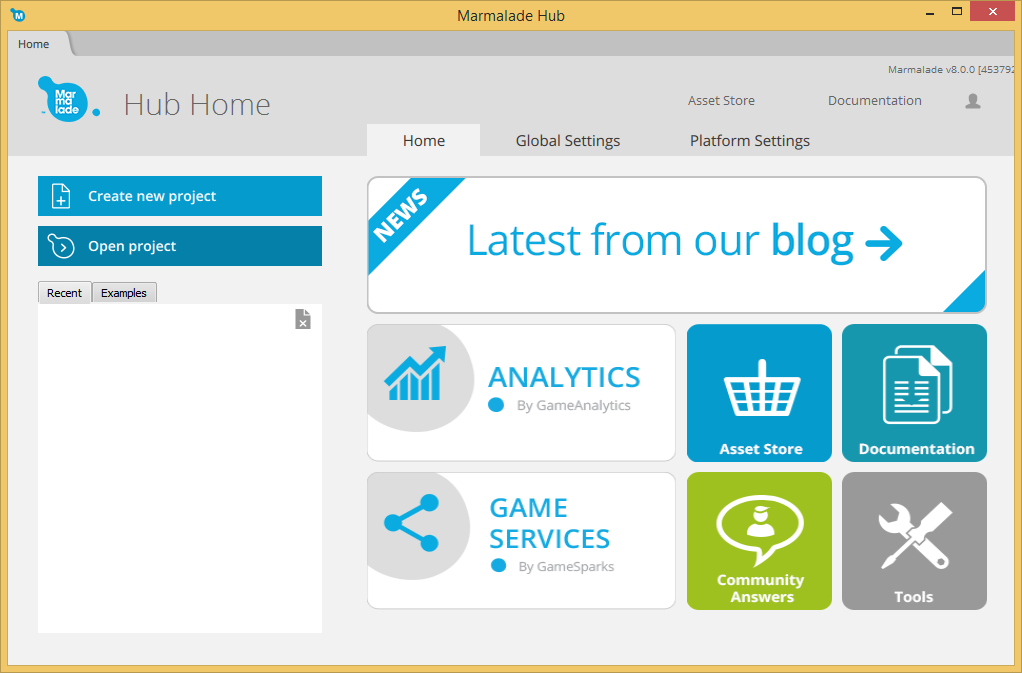
After installing Marmalade SDK, Marmalade Hub will also be installed on your system. This is a set of tools that automates the work with projects. Run it and on the first page select the command Create new project:
Creating a new project in Marmalade Hub
A window for creating a new project will appear:
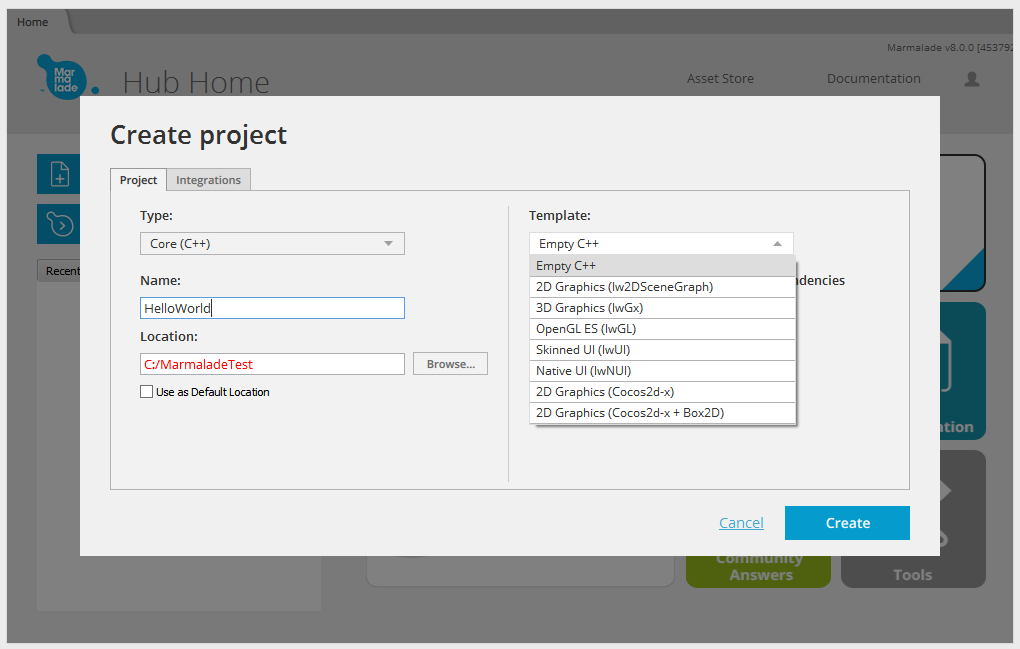
New project creation window
Here we are interested in the following fields:
After making these settings, click on the Create button. The project will be created, a new tab will open in the Marmalade Hub window:

New project in the window of Marmalade Hub
We are interested in the Android x86 platform, so we’ll click on the Create deployment button and set up the deployment options in the window that appears:
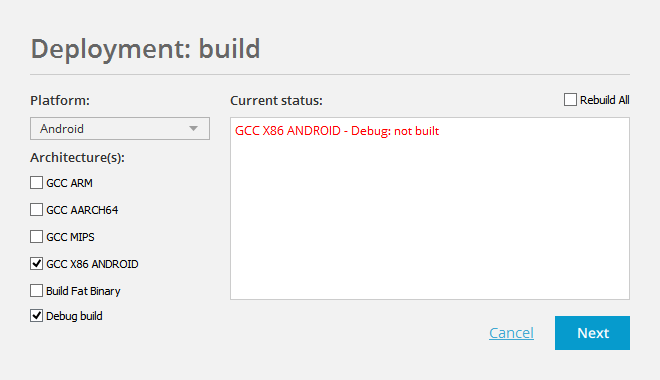
Configure project deployment options
Namely, we’ll select Android in the Platform field, in the list of supported architectures we’ll select GCC X86 ANDROID. Click on the Next button. In the next window we will be asked to specify the name of the package and its version. We will not change the default values, click on the Create button.
The project for the desired architecture will be created. Now it can be run in the emulator, for this is the Run in simulator button, accessible when the Project tab is selected, or on the device. Provided, of course, that an Android device of a suitable architecture is connected to the computer, ready for USB debugging of applications.
To deploy and launch the project on the device (in our case, this is the ASUS Fonepad 8 tablet, which is based on the Intel Atom Z3530 CPU), click on the Install and run on device button. If the project was successfully installed and launched, it will be possible to learn about it from the message in the status bar displayed in green.
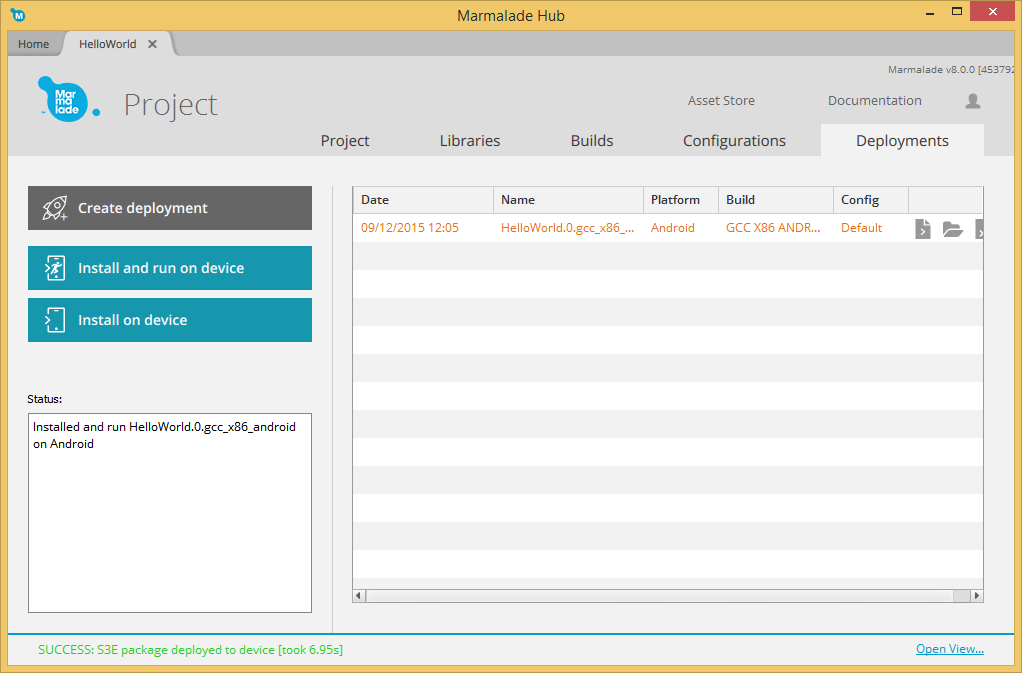
Successful installation and launch of a project on an Android device
On the device, our Marmalade project will be launched.

Application created using Marmalade SDK running on device
The project's .SO and .OBJ binary files can be found at C: \ MarmaladeTest \ HelloWorld \ build_helloworld_vc14 \ Debug_HelloWorld_vc14_gcc_x86_android. These are, respectively, HelloWorld.so and HelloWorld.obj.
The generated APK project file (HelloWorld.apk) is located here: C: \ MarmaladeTest \ HelloWorld \ deployments \ HelloWorld.0.gcc_x86_android. Marmalade SDK 8.0 supports both the creation of individual APK-files for specific variants of the Android platform, as well as universal files containing versions of libraries for various platforms (fat binary). When you post a project on Google Play, you can download different versions of APK files for different platforms.
Note: The same version of the engine, which is discussed here, is relevant, so it left everything as it is. Slightly changed the design and presentation of the material.
ShiVa3D is a set of tools for developing three-dimensional games. Everything in it is directed towards this goal. In particular, it is equipped with a graphical editor, designed to create games and applications for the Web, game consoles and mobile devices. Namely, using ShiVa3D, you can create applications for Windows, Mac OS, Linux, iPhone, iPad, BlackBerry Tablet OS / BlackBerry 10, Android, Palm OS, Wii, WebOS, these are standalone applications and applications running in a web browser.
The engine uses OpenGL, OpenGL ES, or DirectX, can perform software graphics output. ShiVa3D supports plug-ins that have become industry standards, in particular, NVIDIA PhysX, a library for working with FMOD sound and ARToolKit.
ShiVa3D Web Edition is a full free version that you can use for experiments.
In addition to the aforementioned editor, ShiVa3D provides the developer with the ShiVa3D Authoring Tool — a tool for authoring projects created in the editor for Windows, Mac OS, Linux, iPhone, iPod, iPad, Android, BlackBerry QNX, and Palm platforms.
Before installing ShiVa3D, you will need to prepare. In general, the following list of additional tools is consistent with what we considered above in preparation for installing the Marmalade SDK, however, there are some special requirements that are typical for ShiVa3D. Namely, we need:
Now it is worth checking the environment variables, and if they were not properly configured when installing the above tools, fix it.
We remind you that when editing environment variables, you should ensure that at the end of the path there are no special characters or delimiters like "\".
Now everything is ready to download and install ShiVa3D . In particular, we are interested in ShiVa3D Web Edition.
The package comes with many examples, for the first experiments you can download one of them. In order to do this, you need, after launching ShiVa Editor, use the Open or Drop a Game button in the Game Editor section of the main window. The Open window will open with a list of game projects. Assuming that you have found a game project for experiments, consider the procedure for exporting a project using the ShiVa3D editor.
Run the command General> Game Editor> Game> Export to start the export procedure.

Starting the project export procedure in ShiVa3D
Fill in the fields in the window that appears by entering the name (name) and version (version) of the exported application. We specify the location for the files to be received as a result of the export. In our case, the folder is D: \ ShiVa3D_prog \ game_export. You can use any other folder.
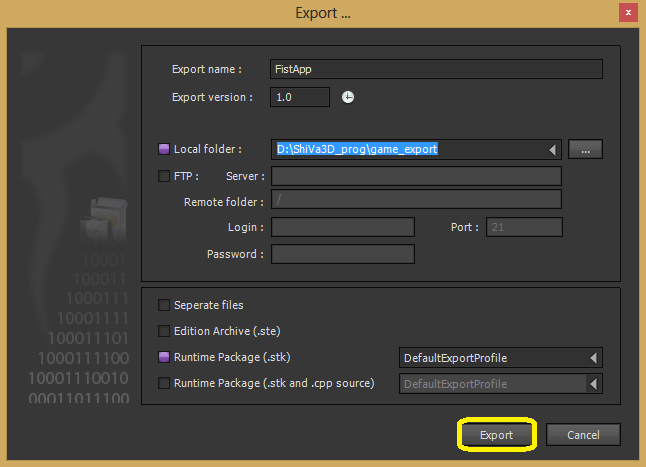
Setting export options
Note that the output should be a single STK file, the Runtime Package flag is responsible for this.
After exporting the project, close the ShiVa Editor and launch the ShiVa 3D Authoring Tool.
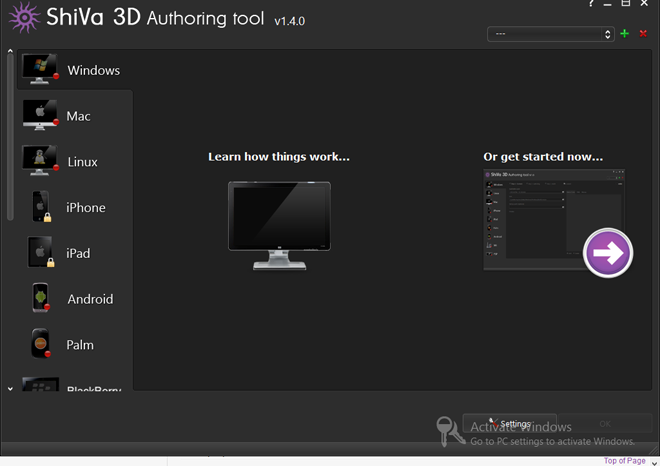
ShiVa 3D Authoring Tool window
Select, on the left side of the window, the Android item by double-clicking on it.
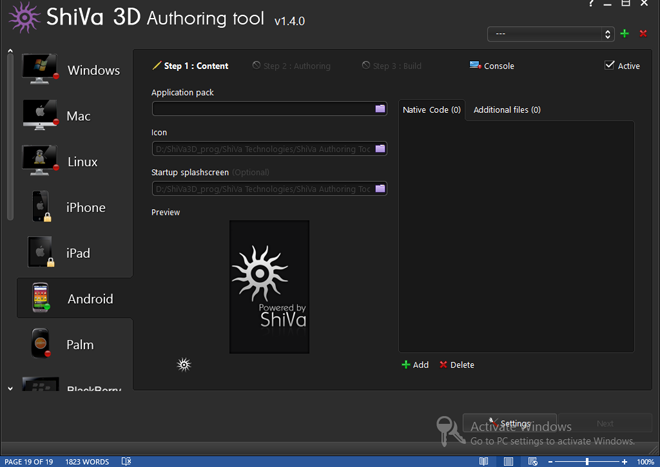
ShiVa 3D Authoring Tool window after selecting Android item
We import the application, which we exported earlier. To do this, fill in the appropriate fields in this window, specifying the paths to the necessary files. You can also add an image for the application icon, a picture for the start screen.
Select files to create a project
Press the Settings button, which is located in the lower right part of the window, the settings screen will open.
Settings window
In this window, in the appropriate fields, you need to specify the path to the various software tools that are needed to prepare the application. Among them - Cygwin, Android NDK and others.
After the data entry is completed, click OK, and returning to the main ShiVa 3D Authoring Tool window, activate the Step 2: Authoring tab.
Go to tab Step 2: Authoring
Here you need to enter the name of the application package.

Working with the Step 2: Authoring tab
Go to the tab Step 3: Build. Here you can set the build parameters. Namely - the minimum version of Android, the target platform (x86 in our case), the output directory.
Setting application build options on the Step 3: Build tab
After setting the appropriate values, click on the Build button, which is located in the lower right of the screen. If everything goes well, the system will report it.
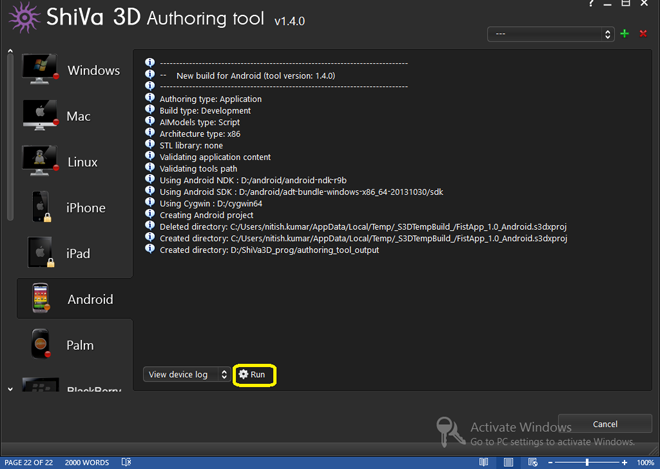
Successful application compilation
Working with ShiVa3D, we are limited to using the ShiVa 3D Authoring Tool, a GUI tool. Support for command line tools is not provided here. Let's take a closer look at the Authoring Tool settings for preparing applications designed for the x86 platform.

Field Authoring type
By default, this field is set to APK Package. If the APK package of the application, which can be immediately installed on the device, is all you need, do not change the value of this field.
Please note that with these settings you will not receive any additional files. They, of course, exist in the process of building a package, but are stored in a temporary folder, and when they are no longer needed, are deleted.
If you need source files, and not an APK package, select the Project option in the Authoring type field. As a result, a ZIP file with the project source files will be generated, but the APK file will not be created.
The folder into which the files generated during compilation (APK or ZIP) fall into is specified on the Step 3: Build tab, in the Output folder field. In order to get to this field, you need to use the scroll bar.

Output folder field
This field can be filled in either by using the folder icon in its right side and finding the desired directory, or by entering the full path to it manually.
To select the target platform for compiling the project, use the CPU support field on the Step 3: Build tab. It is located above the Output folder. The default value here is Default. We are interested in x86.
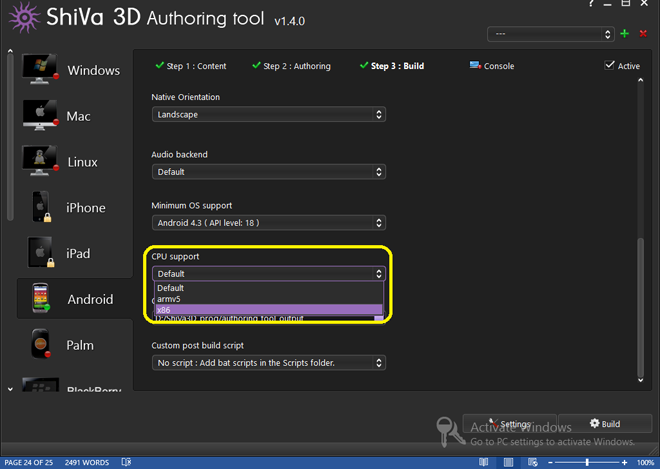
Target platform selection
By setting the minimum Android version required for the application to work and setting the API version less than 9 in the Minimum OS support field, you may encounter errors.

Select the minimum version of the Android API
After you have taken into account all that we have just talked about, your ShiVa3D game is ready for compilation for the x86 platform. What happens at the output depends on the selected option Authoring type: APK Package or Project. However, in any case, the files will be in the specified output directory. Our folder is located at the following address: D: \ ShiVa3D_prog \ authoring_tool_output.
When you select the APK Package option, it will contain one .apk file:
If you select the Project option, the file will also be one, but this time with the .zip extension:
This archive, in turn, contains binary files, manifest files, makefiles, resources, and project build files.
In this tutorial, you learned how to take the first steps in working with the Marmalade SDK and ShiVa 3D, focusing on the Android x86 platform. If you are thinking about writing your own mobile game, then quite possibly one of these tools will turn out to be exactly what you need.
Original article here .
Marmalade C ++ SDK
The idea behind the Marmalade SDK is: “written once starts anywhere.” The idea is not new, but quite relevant. The same code can be compiled and executed on all supported platforms - instead of using different programming languages and APIs. This versatility is achieved through an API based on C / C ++, which plays the role of an abstraction layer for the API of each of the target platforms.
Marmalade SDK is a set of tools for developing cross-platform applications. It can work in different environments, we will use Windows. Marmalade includes a set of libraries, code samples, and tools for developing, testing, and deploying applications on various platforms. In particular - on Android x86. The package is well documented .
')
Preliminary preparation
Below we talk about using the Marmalade SDK in a Windows environment. If you are running Mac OS, refer to this section of the documentation .
So, before installing the Marmalade SDK, you need to prepare. Namely, for further work we will need:
- Windows 7 or newer OS version;
- Java JRE 5 or higher;
- Microsoft Visual Studio 2008 SP1 / 2010/2012/2013/2015 (C ++), various options will fit, including the Express version of the package;
- Scons (C ++), ZeroBrane Studio (Lua);
- Android development environment You can download it from Google or get it as part of Intel INDE ;
- Android NDK . If you have installed Intel INDE, the NDK will already be present on the system.
- Apache Ant (optional).
Before work, it is worth checking the environment variables, and if they were not configured correctly when installing the above described tools, fix it.
- The ANDROID_SDK_ROOT variable must contain the full path to the Android SDK folder. In our case, the SDK is installed as part of Intel INDE, this variable looks like this: C: \ Intel \ INDE \ IDEintegration \ SDK
- The variable ANDROID_NDK_ROOT, respectively, should point to the Android NDK folder. In our case, this is C: \ Intel \ INDE \ IDEintegration \ NDK
- The variable JAVA_HOME contains the path to the JAVA JDK. In our case, this is C: \ Program Files \ Java \ jdk1.7.0_79
- The variable ANT_HOME should point to the Apache ANT folder. For example, it might look like this: C: \ ant \ apache-ant-1.9.6
- The Path variable, among other things, should contain the paths to the following folders: JDK, JDK bin, NDK, ANT bin, Android SDK tools, Android SDK platform-tools. Paths are separated by a semicolon.
Editing the environment variables, be careful, make sure that at the end of the path there are no special characters or separators like "\".
Now that the preliminary training has been done, it's time to download the Marmalade SDK . We are interested in, in particular, Marmalade Core. Before you are given a link to download the package, you need to register on the site. After installation, in order to proceed with the experiments, you will need to enter the license code that will come to the e-mail specified during registration.
Android x86 development using Marmalade SDK
Consider the HelloWorld project from the example set that ships with the Marmalade SDK. In our case, the project is here: C: \ Marmalade \ 8.0 \ examples \ HelloWorld.
HelloWorld sample folder contents
The folder contains the MKB and CPP files for two demonstration projects. They show the different ways Marmalade can greet the world. The names of files belonging to the same project are the same.
The file with the MKB extension contains information about the project. Namely:
- Compilation options
- Information about the libraries used
- Information about source files
- Data on graphic, sound and other resources
- Project Deployment Options
Details on .mkb files can be found in the documentation . A CPP file is a project source code written in C ++.
There are three ways to work with Marmalade projects. All of them are associated with MKB files. The first is used when automatically creating a project for the IDE used, the second uses the command line tools, the third is based on using the Marmalade Hub.
Working with a Marmalade project in Visual Studio
Double-click on the IwGxHelloWorld.mkb file. Having opened the command line interface, Marmalade will do a great job for us, which will eventually lead to the emergence of a pair of new folders next to this file and opening the IwGxHelloWorld_vc14 project in Visual Studio.
Project Opened in Visual Studio
Compile the project and run it on the x86-simulator Marmalade. To do this, execute the menu command Debug> IwGxHelloWorld_vc14 Properties ...
Team IwGxHelloWorld_vc14 Properties
In the window that appears, click on the button Configuration Manager.
Configuration Manager Button
Now, in the Configuration field, select the x86 Debug option. Click the Close button.
Configuring the project configuration
Back in the main Visual Studio window, run the menu command Debug> Start Debugging.
Team start debugging project
If a warning window appears, click the Yes button in it.
Warning window
If a window appears with a message about the absence of debug information, just click Yes. Now we can only wait, watching in the Output window the process of preparing our project for launch. If everything went as it should, the Marmalade x86 Simulator window will open with Hello World running.
Project HelloWorld successfully launched in the emulator.
Building a project from the command line
The Marmalade SDK includes the batch file mkb.bat, which you can invoke from the command line to process MKB files. This allows you to speed up the work. Suppose our .mkb file is called Hello.mkb. Go to the folder in which this file is located and use the command below to rebuild the project for all supported platforms:
>>mkb.bat Hello.mkb –execute –rebuild If you need to work with a particular platform, in our case, with Android x86, in the MKB file, in the option section, you can make the following addition:
option { android-x86 } To build the Debug and Release versions of the project, you can use the following commands, respectively:
>> mkb.bat Hello.mkb --execute --debug >> mkb.bat Hello.mkb --execute --release In order for mkb.bat to be run from the command line, you need to add the bin s3e folder for the installed copy of Marmalade to the Path environment variable. For example, the path might look like this: C: \ Marmalade \ 8.0 \ s3e \ bin.
Work with Marmalade Hub
After installing Marmalade SDK, Marmalade Hub will also be installed on your system. This is a set of tools that automates the work with projects. Run it and on the first page select the command Create new project:
Creating a new project in Marmalade Hub
A window for creating a new project will appear:
New project creation window
Here we are interested in the following fields:
- In the Type field, select Core C ++;
- In the Name field, enter the name of the project;
- In the Location field, specify the project directory;
- In the Template field, select the Empty C ++ template;
After making these settings, click on the Create button. The project will be created, a new tab will open in the Marmalade Hub window:
New project in the window of Marmalade Hub
We are interested in the Android x86 platform, so we’ll click on the Create deployment button and set up the deployment options in the window that appears:
Configure project deployment options
Namely, we’ll select Android in the Platform field, in the list of supported architectures we’ll select GCC X86 ANDROID. Click on the Next button. In the next window we will be asked to specify the name of the package and its version. We will not change the default values, click on the Create button.
The project for the desired architecture will be created. Now it can be run in the emulator, for this is the Run in simulator button, accessible when the Project tab is selected, or on the device. Provided, of course, that an Android device of a suitable architecture is connected to the computer, ready for USB debugging of applications.
To deploy and launch the project on the device (in our case, this is the ASUS Fonepad 8 tablet, which is based on the Intel Atom Z3530 CPU), click on the Install and run on device button. If the project was successfully installed and launched, it will be possible to learn about it from the message in the status bar displayed in green.
Successful installation and launch of a project on an Android device
On the device, our Marmalade project will be launched.
Application created using Marmalade SDK running on device
The project's .SO and .OBJ binary files can be found at C: \ MarmaladeTest \ HelloWorld \ build_helloworld_vc14 \ Debug_HelloWorld_vc14_gcc_x86_android. These are, respectively, HelloWorld.so and HelloWorld.obj.
The generated APK project file (HelloWorld.apk) is located here: C: \ MarmaladeTest \ HelloWorld \ deployments \ HelloWorld.0.gcc_x86_android. Marmalade SDK 8.0 supports both the creation of individual APK-files for specific variants of the Android platform, as well as universal files containing versions of libraries for various platforms (fat binary). When you post a project on Google Play, you can download different versions of APK files for different platforms.
ShiVa3D game engine
Note: The same version of the engine, which is discussed here, is relevant, so it left everything as it is. Slightly changed the design and presentation of the material.
ShiVa3D is a set of tools for developing three-dimensional games. Everything in it is directed towards this goal. In particular, it is equipped with a graphical editor, designed to create games and applications for the Web, game consoles and mobile devices. Namely, using ShiVa3D, you can create applications for Windows, Mac OS, Linux, iPhone, iPad, BlackBerry Tablet OS / BlackBerry 10, Android, Palm OS, Wii, WebOS, these are standalone applications and applications running in a web browser.
The engine uses OpenGL, OpenGL ES, or DirectX, can perform software graphics output. ShiVa3D supports plug-ins that have become industry standards, in particular, NVIDIA PhysX, a library for working with FMOD sound and ARToolKit.
ShiVa3D Web Edition is a full free version that you can use for experiments.
In addition to the aforementioned editor, ShiVa3D provides the developer with the ShiVa3D Authoring Tool — a tool for authoring projects created in the editor for Windows, Mac OS, Linux, iPhone, iPod, iPad, Android, BlackBerry QNX, and Palm platforms.
ShiVa3D installation
Before installing ShiVa3D, you will need to prepare. In general, the following list of additional tools is consistent with what we considered above in preparation for installing the Marmalade SDK, however, there are some special requirements that are typical for ShiVa3D. Namely, we need:
- Windows 7 or higher;
- Android development environment;
- Android NDK;
- Cygwin . This application allows you to organize a Linux-style work environment in Windows. When installing Cygwin, you need to select and install the following packages: autoconf, automake, binutils, gcc-core, gcc-g ++, gcc4-core, gcc4-g ++, gdb, pcre, pcre-devel, gawk, make, python. Do not forget to choose the GNU version of make, otherwise you will not be able to build projects using NDK.
- Java JDK;
- Apache Ant;
- Microsoft Visual Studio C ++;
Now it is worth checking the environment variables, and if they were not properly configured when installing the above tools, fix it.
- The ANDROID_SDK_ROOT variable must contain the full path to the Android SDK folder. In our case, the SDK is installed as part of Intel INDE, this variable looks like this: C: \ Intel \ INDE \ IDEintegration \ SDK
- The variable ANDROID_NDK_ROOT, respectively, should point to the Android NDK folder. In our case, this is C: \ Intel \ INDE \ IDEintegration \ NDK
- The variable ANT_HOME should point to the Apache ANT folder. For example, it might look like this: C: \ ant \ apache-ant-1.9.6
- The Path variable, among other things, should contain the paths to the following folders: JDK, JDK bin, NDK, Cygwin bin, ANT bin, Android SDK tools, Android SDK platform-tools. Paths are separated by a semicolon.
We remind you that when editing environment variables, you should ensure that at the end of the path there are no special characters or delimiters like "\".
Now everything is ready to download and install ShiVa3D . In particular, we are interested in ShiVa3D Web Edition.
The package comes with many examples, for the first experiments you can download one of them. In order to do this, you need, after launching ShiVa Editor, use the Open or Drop a Game button in the Game Editor section of the main window. The Open window will open with a list of game projects. Assuming that you have found a game project for experiments, consider the procedure for exporting a project using the ShiVa3D editor.
Export project to STK file
Run the command General> Game Editor> Game> Export to start the export procedure.
Starting the project export procedure in ShiVa3D
Fill in the fields in the window that appears by entering the name (name) and version (version) of the exported application. We specify the location for the files to be received as a result of the export. In our case, the folder is D: \ ShiVa3D_prog \ game_export. You can use any other folder.
Setting export options
Note that the output should be a single STK file, the Runtime Package flag is responsible for this.
Compiling an application using ShiVa 3D Authoring Tool
After exporting the project, close the ShiVa Editor and launch the ShiVa 3D Authoring Tool.
ShiVa 3D Authoring Tool window
Select, on the left side of the window, the Android item by double-clicking on it.
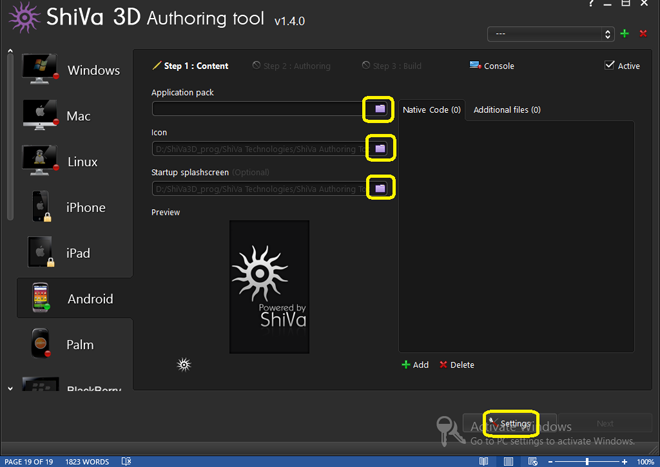
ShiVa 3D Authoring Tool window after selecting Android item
We import the application, which we exported earlier. To do this, fill in the appropriate fields in this window, specifying the paths to the necessary files. You can also add an image for the application icon, a picture for the start screen.
Select files to create a project
Press the Settings button, which is located in the lower right part of the window, the settings screen will open.
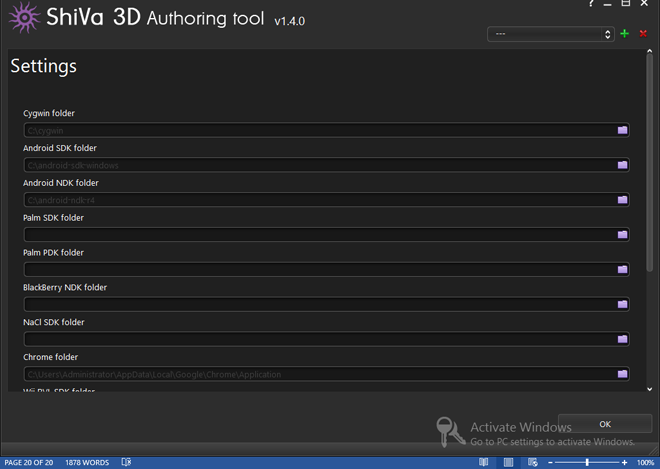
Settings window
In this window, in the appropriate fields, you need to specify the path to the various software tools that are needed to prepare the application. Among them - Cygwin, Android NDK and others.
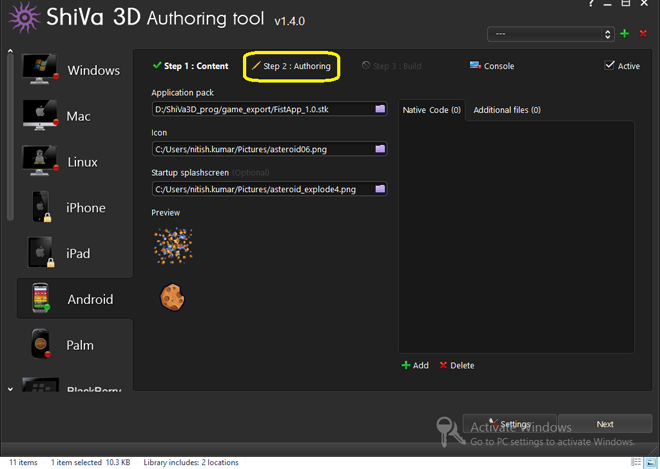
After the data entry is completed, click OK, and returning to the main ShiVa 3D Authoring Tool window, activate the Step 2: Authoring tab.
Go to tab Step 2: Authoring
Here you need to enter the name of the application package.
Working with the Step 2: Authoring tab
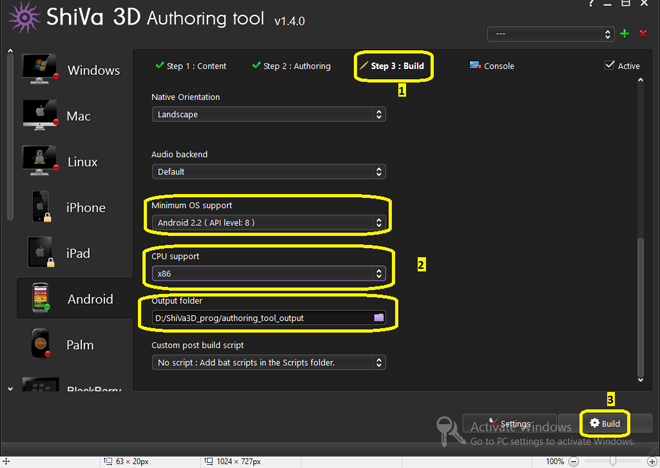
Go to the tab Step 3: Build. Here you can set the build parameters. Namely - the minimum version of Android, the target platform (x86 in our case), the output directory.
Setting application build options on the Step 3: Build tab
After setting the appropriate values, click on the Build button, which is located in the lower right of the screen. If everything goes well, the system will report it.
Successful application compilation
Working with ShiVa3D, we are limited to using the ShiVa 3D Authoring Tool, a GUI tool. Support for command line tools is not provided here. Let's take a closer look at the Authoring Tool settings for preparing applications designed for the x86 platform.
Configuring ShiVa 3D Authoring Tool for x86
- Create an application in the ShiVa Editor and export it. Pay particular attention to the project file name. It should consist of uppercase and uppercase letters of the Latin alphabet (az or AZ), numbers (0-9), and may include an underscore (_). Other characters in the file name will lead to errors at compile time. It is important to consider that the game project must first be exported using the ShiVa Editor, and then processed using the ShiVa Authoring Tool.
- Open the ShiVa 3D Authoring Tool, double-click on the Android item. From this point on, you can use the above manual with some differences. Namely, when you find yourself on the Step 2: Authoring tab, you will see the Authoring type field there.
Field Authoring type
By default, this field is set to APK Package. If the APK package of the application, which can be immediately installed on the device, is all you need, do not change the value of this field.
Please note that with these settings you will not receive any additional files. They, of course, exist in the process of building a package, but are stored in a temporary folder, and when they are no longer needed, are deleted.
If you need source files, and not an APK package, select the Project option in the Authoring type field. As a result, a ZIP file with the project source files will be generated, but the APK file will not be created.
The folder into which the files generated during compilation (APK or ZIP) fall into is specified on the Step 3: Build tab, in the Output folder field. In order to get to this field, you need to use the scroll bar.
Output folder field
This field can be filled in either by using the folder icon in its right side and finding the desired directory, or by entering the full path to it manually.
To select the target platform for compiling the project, use the CPU support field on the Step 3: Build tab. It is located above the Output folder. The default value here is Default. We are interested in x86.
Target platform selection
By setting the minimum Android version required for the application to work and setting the API version less than 9 in the Minimum OS support field, you may encounter errors.
Select the minimum version of the Android API
About files received as a result of project compilation
After you have taken into account all that we have just talked about, your ShiVa3D game is ready for compilation for the x86 platform. What happens at the output depends on the selected option Authoring type: APK Package or Project. However, in any case, the files will be in the specified output directory. Our folder is located at the following address: D: \ ShiVa3D_prog \ authoring_tool_output.
When you select the APK Package option, it will contain one .apk file:
D: \ ShiVa3D_prog \ authoring_tool_output \ FistApp_1-debug.apk
If you select the Project option, the file will also be one, but this time with the .zip extension:
D: \ ShiVa3D_prog \ authoring_tool_output \ FistApp_1_Android.zip
This archive, in turn, contains binary files, manifest files, makefiles, resources, and project build files.
findings
In this tutorial, you learned how to take the first steps in working with the Marmalade SDK and ShiVa 3D, focusing on the Android x86 platform. If you are thinking about writing your own mobile game, then quite possibly one of these tools will turn out to be exactly what you need.
Original article here .
Source: https://habr.com/ru/post/272821/
All Articles