Using the MVVM (Model-View-ViewModel) pattern in Android

Author: Anton Valyukh, Senior Mobile Developer.
In this article we will talk about the theory and practice of using a very convenient design pattern MVVM (Model-View-ViewModel) when developing Android applications.
')
MVP - Model-View-Presenter
For a start - a little theory. It all started with what many thought how to adapt the MVC pattern (Model-View-Controller) for writing applications with a user interface. And in 2006, in the work of “ GUI Architectures ”, Martin Fowler considered in detail the template, which later became known as “MVP” (“Model-View-Presenter”).
So, MVP is a design pattern derived from MVC, designed primarily to build a user interface. MVP is used to facilitate automated unit testing and improve the separation of logic and display.
There are three elements in this template:
- View.
- Presenter.
- Model (model).
Here's how it all works:

- The View element is responsible for displaying user data and intercepting user actions. All this he sends Presenter.
- Presenter processes user actions in the UI, takes into account changes to the data in the Model, and sends this View information. Presenter is an element that contains all the business logic of working with the user interface.
- Model contains models from the domain that display the knowledge and data of the subject area of your application. The model sends information about changes to the Presenter data and receives messages from the Presenter.
MVP - implementation on Android
MVP allows you to create a representation abstraction. To do this, you must select the presentation interface with a specific set of properties and methods.
Now let's see, this can be implemented in Android - for this we will write a small “bicycle”.
The Presenter interacts with the View by using a special interface that describes the abstraction of this View.
Suppose we have the following View model:
public interface SomeScreenView { void startLoading(); void stopLoading(); void mapDataItems(final Collection<DataItem> items); } Please note: do not confuse this View model with the view that we see on the screen. View, which is used in MVP - a kind of abstraction View. In other words, this is a generalization of the behavior of our View. The MVP View is not responsible for how exactly everything will be displayed on the user interface. She is responsible for how the user interface will behave.
Presenter receives a link to the implementation of the interface, interacts with the model of our View, initializes it, calls all its messages, sends it some messages, etc. All the interaction happens directly: we have a View implementation, we call its methods and get some result.
In other words, Presenter as if subscribes for View events and, if necessary, changes data in the Model.
public class SomeScreenPresenter extends Presenter { private SomeScreenView mView; public void setView(SomeScreenView view) { mView = view; } @Override public void initialize() { mView.startLoading(); mView.mapDataItems(...); mView.stopLoading(); } } As an example, View in our case will be the Activity responsible for implementing the behavior of SomeScreenView. The role of View can play not only Activity, but Fragment, Dialog or just Android View. To do this, it also needs to implement the behavior of SomeScreenView. In the specified Activity, an object of type SomeScreenPresenter is used, which acts as the Presente in our example. To this object we provide a link to the implementation of your View, which interacts with Presenter by directly calling its necessary methods. In turn, the Presenter calls the methods implemented within your Activity, because it is an implementation of your View.
@EActivity(R.layout.activity_some_screen) public class SomeScreenActivity extends Activity implements SomeScreenView { private SomeScreenPresenter mPresenter; @ViewById(R.id.drawer_layout) protected ProgressBar mProgressBar; @Override protected void onCreate(Bundle savedInstanceState) { super.onCreate(savedInstanceState); mPresenter = new SomeScreenPresenter(this); mPresenter.initialize(); } } This simple example demonstrates how MVP allows you to decompose logic that was previously entirely in an Activity and was related to data processing and user actions. We carried this logic into a separate module, and we, for example, can test this module with ordinary unit testing. From my point of view, this is much easier than testing our UI functionality using Robotium, running emulators, etc. In other words, we took all of our logic from Activity, which was Contrloller before, carried to the new Element Presenter, and now we can safely test this element without creating any Controller and View. In addition, this code can be further improved — for example, using dependency injection (say, using RoboGuice or Dagger).
MVVM
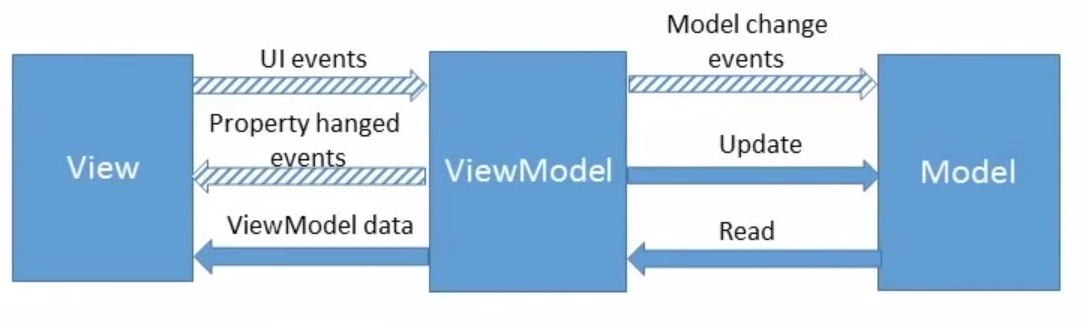
The MVP template is not bad, but Microsoft came up with a template even better - MVVM (Model-View-ViewModel). This template is very fond of .NET-developers, it is used in Silverlight, its implementation is in AngularJS. MVVM is a very convenient template.
What is the difference between MVVM and MVP?
MVVM allows you to associate View elements with ViewModel properties and events. In this case, the ViewModel is an abstraction of the view. MVVM has:
- View - contains fields corresponding to the user interface.
- ViewModel - contains the same fields, but in the subject area.
- Actually, Model.
View properties are the same as ViewModel / Model properties. At the same time, the ViewModel does not have a link to the view interface. Changing the state of the ViewModel automatically changes the View, and vice versa. For this, a data binding mechanism is used. Also characteristic of MVVM is two-way communication with View.
Next, I will briefly go through the MVVM implementations for Android, which I encountered in my work, and consider the advantages and disadvantages of each. At one time I noted for myself three implementations: RoboBinding, ngAndroid, Bindroid . At the end of this review I’ll briefly review Android Data Binding , which I am just starting to discover for myself, and which looks very promising. Here , by the way, good material on the topic.
Robobinding
RoboBinding is an MVVM framework for the Android platform. It makes it easy to bind attributes to any custom components, third-party components, or widgets for Android. As a result, you can throw out a lot of unnecessary code through the use of bins.
RoboBinding - installation
RoboBinding, in my opinion, is not easy to install, since it requires Android Annotation Processing Toolkit to work. This is due to the fact that RoboBinding is based on generating code at the precompilation stage. In this case, the code is generated on the basis of additional annotations that are contained in the framework and need to be processed. This is what the Android Annotation Processing Toolkit does.
Honestly, I managed to connect and configure APT and RoboBinding from the second time. Hopefully most will turn out faster.
RoboBinding — apply plugin: 'com.android.application' apply plugin: 'com.neenbedankt.android-apt' apt("org.robobinding:codegen:$robobindingVersion") { exclude group: 'com.google.android', module: 'android' } compile("org.robobinding:robobinding:$robobindingVersion") { exclude group: 'com.google.android', module: 'android' } buildscript { dependencies { classpath 'com.android.tools.build:gradle:xxx' classpath 'com.neenbedankt.gradle.plugins:android-apt:1.4' } } RoboBinding - ViewModel
This is our view model:
RoboBinding — ViewModel @PresentationModel public class SomeScreenViewModel implements HasPresentationModelmChangeSupport { private PresentationModelChangeSupport mChangeSupport; private String mUserFirstName; private String mUserLastName; public SomeScreenViewModel() { mChangeSupport = new PresentationModelChangeSupport(this); } public String getUserFirstName() { return mUserFirstName; } public String getUserLastName() { return mUserLastName; } public String getUserFullName() { return mUserFirstName + " " + mUserLastName; } public void setUserFirstName(String userFirstName){ mUserFirstName = userFirstName; } public void setUserLastName(String userLastName){ mUserLastName = userLastName; } public void updateUser() { mChangeSupport.firePropertyChange("userFullName"); } @Override public PresentationModelChangeSupport getPresentationModelmChangeSupport() { return mChangeSupport; } } Despite the fact that this model is designed as “Presentation Model”, this is exactly the ViewModel in the concept of the MVVM template. This is a common POJO model that contains fields that will later be displayed on your View (later in the examples you will see how to do this). In order for your data to be displayed bilaterally, you still need to implement the HasPresentationModelmChangeSupport interface, where in the getPresentationModelmChangeSupport method you just have to return the ChangeSupport implementation that will change your data.
In SomeScreenViewModel there are two fields that will contain the values displayed and received on the user interface, and methods that provide access to these fields. There is also a method that will be responsible for user interaction. How exactly this all will work, we will figure it out as we go.
RoboBinding - Layout
In the View itself, we use custom attributes so that we can associate the fields of our Model with some specific interface elements. To make it all work, we add an extra namespace, and then specify custom additional fields to our interface elements.
<LinearLayout xmlns:android="http://schemas.android.com/apk/res/android" xmlns:tools="http://schemas.android.com/tools" xmlns:bind="http://robobinding.org/android" android:orientation="vertical"> <TextView …… bind:text="{userFullName}"/> <EditText …… bind:text="${userFirstName}"/> <EditText …… bind:text="${userLastName}"/> <Button …… bind:onClick="updateUser"/> </LinearLayout> Our markup has EditText, which is using
bind:text="${userLastName}"
bind:text="${userLastName}"
"Binds" to the private String field of mUserFirstName by our SomeScreenViewModel. Now, any changes to the mUserFirstName field will be displayed in the specified EditText, and any changes to the data in this EditText will be displayed in the mUserFirstName field. According to this principle, the data binding mechanism between the View and the ViewModel works.In addition, we can process user data. There is a
bind:onClick
bind:onClick
that contains the name of the method, and in SomeScreenViewModel there is a method with the same name that will be called after pressing the button.RoboBinding - Activity
But how does the Model know about the existence of the View, and how does the View know about the existence of the Model? What exactly does the data binding process do? In the case of RoboBinding, this is the binder class. He is given a link to the Layout, in which the interface elements contain custom fields, and he is given a link to the implementation of the Model. Then binder connects the interface elements with the fields inside the Model. Now, using some setter / getter or simply writing data to our Model in the fields, we get their display on the View.
RoboBinding — Activity public class SomeScreenActivity extends Activity { @Override protected void onCreate(Bundle savedInstanceState) { super.onCreate(savedInstanceState); SomeScreenViewModel presentationModel = new SomeScreenViewModel(); View rootView = Binders.inflateAndBindWithoutPreInitializingViews(this, R.layout.activity_some_screen, presentationModel); setContentView(rootView); } } Everything is quite simple. At the same time, firstly, there is no findViewById. Secondly, you are not responsible for what you specifically interact with - for you there is only an abstract model in which you can set values and get them from there.
Now let's talk about how it works. For example, a user pressed a button on a user interface. The event, updateUser, tied to this button with the help of
bind:onClick="updateUser"
bind:onClick="updateUser"
(see RoboBinding - Layout). This leads to calling the updateUser () method associated with this action in SomeScreenViewModel (see RoboBinding - ViewModel). Do not forget that our SomeScreenViewModel contains the implementation of PresentationModelChangeSupport, which we talked about before. This is necessary to display the status of your Model in your View.From the outside, this can be represented as follows:
- Hey, an object of type PresentationModelChangeSupport, take a field called "userFullName" and update it! “We say” in the updateUser () method.
- Well, - "thinks" an object of type PresentationModelChangeSupport - "userFullName", is tied in
bind:text="{userFullName}"
bind:text="{userFullName}"
. - Do I have a getter somewhere called “getUserFullName”? There is. I call it, get the value (which is equal to mUserFirstName + "" + mUserLastName), and this value is displayed in <TextView ... ... bind:text="{userFullName}"/>
bind:text="{userFullName}"/>
.This is how the implementation of two-way data binding in RoboBinding works.
RoboBinding - advantages and disadvantages
Advantages of RoboBinding:
- bidirectional (two-way) binding;
- code generation;
- list support.
Disadvantages:
- problems with the AppCompat library;
- No support for RecyclerView.
Bilateral binding: the “$” sign in the code means that when the data in the Model changes, they will be displayed in the View and, if the data in the View changes, they will be projected in the Model. If there is no “$” sign, it means that the data from the Model will be displayed in View, but not vice versa.
RoboBinding is based on code generation. That is, at the preliminary compilation stage, the necessary code will be generated on the basis of the annotations that you painted in the class, after which it will be copied. This means that at the execution stage you will not need any additional costs.
In addition to the fact that you can bind simple data, you can also bind lists (collections), which is great. In addition, there is support for working with ListView: you can tie up any collection on the ListView, and everything will work well (at least, it worked for me).
As for the flaws, if RoboBinding works with lists, then with RecyclerView - no, at least not yet.
There is also a problem with the compatibility library, because the binding is built on custom attributes. This means that if we have interface elements from the compatibility library, and you are trying to add a custom attribute to it, this does not always work, and if it works, it is very bad. On the RoboBinding site, all these bugs have already been noted - surely, work on fixing them is already underway, as RoboBinding is developing and developing quite quickly.
ngAndroid
The next library I liked was ngAndroid, based on the ideas of the AngularJS JavaScript framework (but only on ideas — there is no JavaScript here). It works very similar to RoboBinding.
ngAndroid - installation
Unlike RoboBinding, ngAndroid is very easy to install, and everything works the first time:
compile 'com.github.davityle:ngandroid:0.0.4'.
compile 'com.github.davityle:ngandroid:0.0.4'.
ngAndroid - Model
ngAndroid - Model public class Model { private String mUserFirstName; private String mUserLastName; private String mUserFullName; public String getUserFirstName() { return mUserFirstName; } public String getUserLastName() { return mUserLastName; } public String getUserFullName() { return mUserFullName; } public void setUserFirstName(String userFirstName){ mUserFirstName = userFirstName; } public void setUserLastName(String userLastname){ mUserLastName = userLastname; } public void setUserFullName(String userFullName) { mUserFullName = userFullName; } } Model is practically no different - this is ordinary data, ways to access data. There is no action here - they are supported, but not in this form.
ngAndroid - Layout
Layout is the same - the differences are minimal. In the same way, the work is based on custom attributes — we connected the namespace we needed and displayed a model with the attribute name inside this model: model — attribute name, model — attribute name ... There is also support for user interface events, but more on that later.
ngAndroid — Layout <LinearLayout xmlns:android="http://schemas.android.com/apk/res/android" xmlns:tools="http://schemas.android.com/tools" xmlns:ng="http://schemas.android.com/apk/res-auto" android:orientation="vertical"> <TextView …… ng:ngModel="model.userFullName" <EditText …… ng:ngModel="model.userFirstName"/> <EditText …… ng:ngModel="model.userLastName"/> <Button …… ng:ngClick="updateUser()"/> </LinearLayout> ngAndroid - Activity
Differences begin in Activity. Consider an example in which there is a certain Activity (there may be a Fragment, View, etc.). And in this Activity, the @NgScope annotation is used so that ngAndroid knows that this View must contain a binder. We implement the ViewModel of our example (SomeScreenViewModel) in the Activity using the @ NgModel annotation. Here, strictly speaking, that's all: indicated the View, indicated the ViewModel. Unlike RoboBinding, at this stage of work inside ngAndroid, the injector is turned on, which performs the necessary implementation of the specified dependencies and sets them up.
Thus bilateral binding is realized. At the same time, the Activity itself acts as a class that is responsible for handling events. In Activity, the updateUser () method is implemented, which was previously bound in a file with markup to a button. From the example it also shows that, unlike RoboBinding, in ngAndroid updateUser () is in the Activity and not in the ViewModel.
@NgScope public class SomeScreenActivity extends Activity { @NgModel SomeScreenViewModel mScreenViewModel; private final NgAndroid mNg = NgAndroid.getInstance(); @Override protected void onCreate(Bundle savedInstanceState) { super.onCreate(savedInstanceState); mNg.setContentView(this, R.layout.activity_some_screen); } protected void updateUser(){ String firstName = mScreenViewModel.getUserFirstName(); String lastName = mScreenViewModel.getUserLastName(); mScreenViewModel.setUserFullName(firstName + " " + lastName); } } ngAndroid - advantages and disadvantages
Advantages:
- bidirectional binding;
- project is under active development.
Disadvantages:
- no list support / RecyclerView;
- Reflection is used (they promise to switch to code generation);
- The project is at the stage of active development, therefore it is rather raw.
NgAndroid is now developing rapidly - besides models and clicks, the library supports long-click, change, disable, etc. The supported directives are becoming more and more. At the same time, such rapid development can be considered as a disadvantage - I would be careful not to use ngAndroid at work.
The following angular directives are currently supported:
- Ngmode
- Ngclick
- NgLongClick
- NgChange
- NgDisabled
- NgInvisible
- Nggone
- Ngblur
- NgFocus
In general, I liked the library very much - by its transparency, simplicity, because there is dependency injection (less code, which is good), because there is two-way (bidirectional) binding.
Bindroid
Bindroid is another implementation of the MVVM pattern for Android applications. Bindroid is an open source library, the main purpose of which is to simplify the linking of user interface and data. It is based on the Observer pattern for working with models, as well as a set of methods for quickly linking these objects and user interfaces.
Bindroid - Model
Bindroid is fundamentally different from the implementations already discussed in that there are no custom fields for your UI attributes, in other words, there is no element that links your View to the fields of your Model. Instead, there is a TrackableField field that is inside the Model - all data fields must be TrackableField. This is done so that when you change a field, it changes on your View. Thus, the Observer template is implemented here, which ensures that changes to the data are displayed in the UI.
Bindroid — Model public class SomeScreenViewModel { private TrackableField<String> mUserFirstName = new TrackableField<String>(); private TrackableField<String> mUserLastName = new TrackableField<String>(); private TrackableField<String> mUserFullName = new TrackableField<String>("Here could be your advertising."); public String getUserFirstName() { return mUserFirstName.get(); } public void setUserFirstName(String firstName) { mUserFirstName.set(firstName);} public String getUserLastName() { return mUserLastName.get(); } public void setUserLastName(String lastName) { mUserLastName.set(lastName); } public String getUserFullName() { return mUserFullName.get(); } public void setUserFullName(String fullName) { mUserFullName.set(fullName); } } Bindroid - Layout
Bindroid - Layout <LinearLayout xmlns:android="http://schemas.android.com/apk/res/android" xmlns:tools="http://schemas.android.com/tools" android:orientation="vertical"> <TextView …… android:id="@+id/text_user_fullname" <EditText …… android:id="@+id/edit_user_firstname"/> <EditText …… android:id="@+id/edit_user_lastname"/> <Button …… android:onClick="updateUser"/> </LinearLayout> Unfortunately, for linking, you must manually link each field from the Model to its specific implementation within your View, using findViewById. Although you can get rid of findViewById using ButterKnife or Android Annotations.
Bindroid - Activity
Bindroid — Activity public class SomeScreenActivity extends Activity { SomeScreenViewModel mScreenViewModel = new SomeScreenViewModel(); @Override protected void onCreate(Bundle savedInstanceState) { super.onCreate(savedInstanceState); setContentView(R.layout.activity_some_screen); UiBinder.bind(new EditTextTextProperty(this.findViewById( R.id.edit_user_firstname)), mScreenViewModel, "userFirstName", BindingMode.TWO_WAY); UiBinder.bind(new EditTextTextProperty(this.findViewById( R.id.edit_user_lastname)), mScreenViewModel, "userLastName", BindingMode.TWO_WAY); UiBinder.bind(new TextViewTextProperty(this.findViewById(R.id.text_user_fullname)), mScreenViewModel, "userFullName", BindingMode.TWO_WAY); } public void updateUser(View v){ String firstName = mScreenViewModel.getUserFirstName(); String lastName = mScreenViewModel.getUserLastName(); mScreenViewModel.setUserFullName(firstName + " " + lastName); } } Bindroid - advantages and disadvantages
Advantages:
- bidirectional binding;
- supports working with the AppCompat library.
Disadvantages:
- no support for code generation;
- no validation at compile time;
- too much code to link.
Bindroid may seem interesting to you if you don’t like custom fields on interface elements or dependency injection, or if you don’t like to switch extra tools like Android Annotation Processing Toolkit that consume additional resources. Or maybe you need to quickly compile and work. Then Bindroid will suit you, but you will need to write code a little longer.
In my opinion, a big drawback is the lack of verification at the compilation stage. For example, if the Model field is called userLastName, and in Activity you make an error, everything will be compiled, but an exception will occur during the execution. And, since the Stack Trace will be very fun when you perform the binding, you will be looking for a very long time what is wrong. This is a serious flaw.
Android Data Binding
In the spring of 2015, Google on Google I / O introduced the Android Data Binding library, which is currently available in beta. She has a lot of opportunities, but in the article I’ll tell you about her possibilities related to MVVM.
Android Data Binding —installation
Installation is quite simple. It is worth saying that, since Android Data Binding is in beta testing, Android Studio does not yet support normal operation from (July 2015, Android Studio v 1.3.0).
Android Data Binding — apply plugin: 'com.android.databinding' dependencies { classpath 'com.android.tools.build:gradle:1.3.0-beta2' classpath 'com.android.databinding:dataBinder:1.0-rc0' } Android Data Binding - Model
In Model, there is nothing unusual - we have the same fields and there are methods for accessing these fields.
Android Data Binding — Model public class User { private String mFirstName; private String mLastName; private String mFullName; public User(String firstName, String lastName) { mFirstName = firstName; mLastName = lastName; } public String getFirstName() { return mUserFirstName; } public String getLastName() { return mLastName; } public String getFullName() { return mFullName; } public void setFirstName(String userFirstName) { mUserFirstName = userFirstName; } public void setLastName(String userLastname){ mUserLastName = userLastname; } public void setFullName(String userFullName) { mUserFullName = userFullName; } public void updateUser(View v){ mFullName = mFirstName + " " + mLastName; } } Android Data Binding - Layout
As for the markup file of our View, there are already major differences from the implementations discussed earlier. First, the root node is now with us - the so-called Layout. The data section indicates the model and how it will be called (namespace). And then there is a mapping of data from the UI to the fields of the specified model (in this case it is, respectively, the same fields inside your model). That is, as before, we have fields, there is a model and there is a binding mechanism that allows you to map the fields of your divide into UI elements of the interface. The difference is that your root node is a Layout, and besides the Layout itself, you also have a data section where you must indicate which model you are using. Detailed use can be seen in the following example.
user.fullName, user.firstName user.lastName
Android Data Binding — Layout <layout xmlns:android="http://schemas.android.com/apk/res/android"> <data> <variable name="user" type="com.example.User"/> </data> <LinearLayout ……> <TextView …… android:text="{user.fullName}"/> <EditText …… android:text="@{user.firstName}"/> <EditText …… android:text="@{user.lastName}"/> <Button …… android:onClick="updateUser"/> </LinearLayout> </layout> Android Data Binding - Activity
In the Activity, minimal changes: made the data model, linked the View and the data model, after which, in the process of changing some values within the model, this data will change within the View. If the data is changed to View, the changes will be available in the model. For two-way binding between data and its place of display in the UI, the “@” character is used (for example,
android:text="@{user.lastName}"
).Otherwise, the implementation of the binding is one-way.Thus, the use of Data Binding, from my point of view, looks quite simple and transparent, and is an implementation of the MVVM pattern.
Android Data Binding — Activity public class SomeScreenActivity extends Activity { private User mUser = new User("Anton", "Valiuh"); @Override protected void onCreate(Bundle savedInstanceState) { super.onCreate(savedInstanceState); MainActivityBinding binding = DataBindingUtil.setContentView(this, R.layout.main_activity); binding.setUser(mUser); } } Android Data Binding - features
Besides the fact that Data Binding has the ability to implement the MVVM pattern, this technology has many good features (in fact, Android Data Binding is a topic for a separate report or article).
Expression Language . Allows you to write primitive logic within your View. The main thing is not to overdo it so that the logic does not move to View. Nevertheless, the expression language allows you to make simplifications - depending on the state, you can pick up different handlers, do formatting. It is very convenient.
android:text="@{String.format("Hello %s",viewModel.field )}" android:onClick="@{user.isFriend ? handlers.onClickFriend : handlers.onClickEnemy}“ Imports . You can additionally import any classes: for example, you imported the View, and then you can use the property of this class in some of your expressions.
Resource support . They wrote the expression, indicated which resources to take, and everything works fine.
android:padding="@{large? @dimen/largePadding : @dimen/smallPadding}“ Collection support.
android:text="@{list[index]}" android:text="@{map[`firstName`}“ You can create custom bins .
You can list for a long time - there is a lot more.
Surely, sooner or later, Android Data Binding will become the new standard for creating Android applications - I'm sure of almost 100 of them.
Android Data Binding - advantages and disadvantages
Advantages:
- official library from Google;
- code generation;
- check at compile time;
- ease of use and expansion;
- new Android standard.
Disadvantages:
- no support for bidirectional binding (yet);
- no IDE support (yet);
- a lot of false errors in Android Studio (but everything compiles and runs).
An important drawback is the lack of full-fledged bidirectional binding - it exists, but so far it works poorly. Well, what to take with the beta version ... for sure, this is the first thing that will fully work in the near future.
No IDE support - as a result, a lot of errors in Android Studio. But everything compiles, everything starts, everything works. If someone is interested and want to connect, I think you will not regret.
Source: https://habr.com/ru/post/272737/
All Articles