Robo code game challenge
The Code Game Challenge is an exciting competition format that arouses great interest among students. As part of the IV All-Russian Youth School on Robotics, Embedded Systems and Computer Vision ( http://roboschool.org ), which took place in November in Volgograd, we wanted to present something new to the participants. So the idea was born RoboCGC - to combine robots and CGC. Details under the cut.
So, for starters, who cares about what the classic CGC is, but it’s not well informed: you can read it here and here .
What is RoboCGC? This is a classic Code Game Challenge, in which the strategies of the participants are launched not only in the simulator, but also on real robots. Otherwise, it is no different - the participants in the same way implement the program to control the robot, and launch it in the simulator to assess the quality of work. In the simulator, they have access to basic strategies provided by the organizers of the competition, and strategies of other participants.
')
This time in the game world, the participants had the task of controlling a robot equipped with a laser. The laser is fixed and aligned with the robot. A volley (projectile) of a laser has infinite speed. The instrument itself has three states:
As soon as the charge of the gun reaches its maximum value, the shot will occur automatically. In addition, the user can, at any time from the start of the charge and before the automatic shot, fire a shot. Damage caused by hitting linearly depends on the accumulated charge.
On the map there are two robots (one for each team) and several obstacles. The obstacles are mobile - the robot can push them.
We now turn to the system itself.
The system consists of several components:
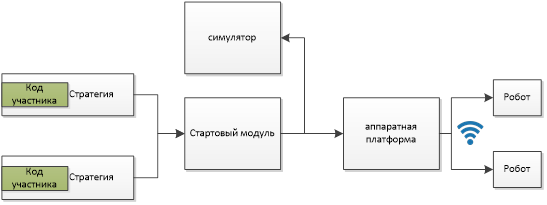
Consider each of the modules separately
The user class interface is very simple and consists of only one function that is called on every clock of the game world. The function transmits information about the game world, which includes information about the position of units and their state, information about the position of obstacles, as well as information about the game world (game time, field size, etc.).
The user can work within the same file, because One file is sent to the server for compilation. On the server, this file is compiled with a wrapper that provides interaction with the simulator.
Previously, we used the DLL model — user strategies were compiled into separate DLLs and loaded into the simulator, and then the simulator called the methods of this DLL. This time we moved to the model of individual processes - in this case we get several advantages: more free control of execution time and memory consumption (in case of violation of restrictions, we just complete the process with the strategy, without fear that a lot can spoil in the simulator or remain un-freed resources). The interaction between the client code and the game world module is carried out through sockets.
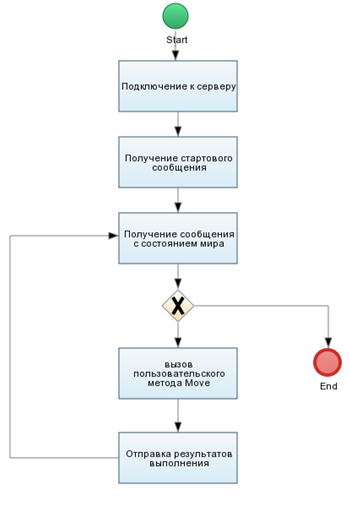
The sequence of the user code is as follows:
To send messages, we used aligned structures - the simplest way without additional serialization / deserialization.
The title of the package with information about the game world looks like this:
Information about one unit is given by the structure:
Barrier Information:
The course header information about the player’s progress:
Information about the actions of the unit:
This module is responsible for reading the configuration, creating the appropriate environment (simulator or hardware platform), starting user strategies and implementing the game cycle.
The description of the game world is set by configuration files with which you can set the physical characteristics of the robot (radius, wheelbase, wheel diameter, etc.), simulation parameters (field size, simulation duration, number of players, number of units for each player, number of obstacles , gun characteristics, etc.), starting parameters (initial positions of robots and obstacles), configuration of the hardware platform (IP addresses of robots, markers for robots and obstacles).
After reading the configuration, an environment is created - either a simulator or a hardware platform. Both environments have the same interface, so working with them is the same:
Then the processes of user strategies are launched, and the expectation of environment readiness begins (for what it is needed, I will describe below). As soon as the preparation of the environment is completed, the starting message is sent to the strategies and a simulation cycle is started, inside which a strategy is sent to each strategy with the state of the game world and a response is expected with the user's reaction. At this stage, the execution time of the user code is monitored - if the answer has not come at the set time, the user strategy ends. After receiving answers from all strategies, they are processed - the data is transferred to the environment where they are processed, and the state of the game world is updated. Then there is a transition to the next iteration.
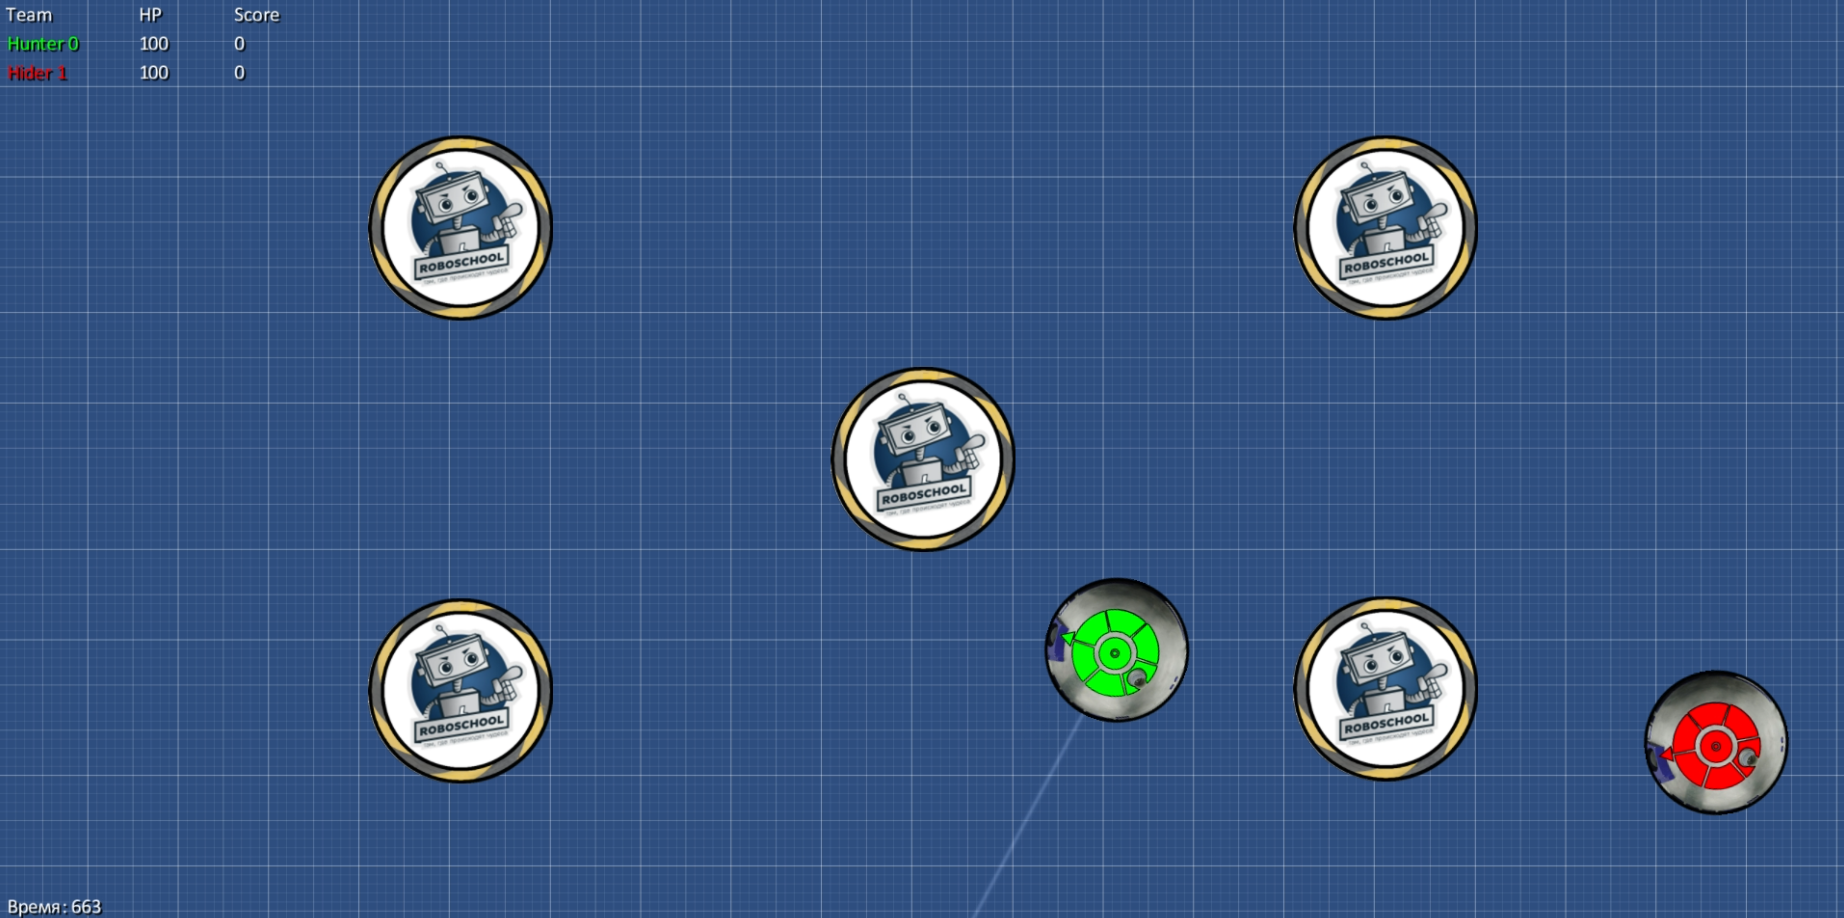
The simulation module is used by participants to test their strategy during the full-time part of the competition (ie, writing strategies). The simulator has simple graphics and simulates physics (collisions, hits), etc.
The most difficult and interesting module. This module transmits commands to robots, and also receives their current coordinates.
All logic is executed on the computer where the system is running, only the resulting commands are sent to robots (at the level of engine control and setting the state of the LEDs). To communicate with robots, a WiFi connection is used, to which a server computer and both robots are connected.
To obtain the current coordinates above the playing field, there is a camera, and markers are pasted on all moving objects. During the simulation, markers are recognized and their position is determined.
We used the first generation Intel RealSense as a camera. With the second-generation camera, there were problems when working with a long USB cable, so they turned to the first version.
Since, unlike simulators, we need to wait for the robots to be ready (to make sure that the robots are connected), we have entered an intermediate stage of the environment state — as soon as the robots are connected, the environment sends a readiness message.
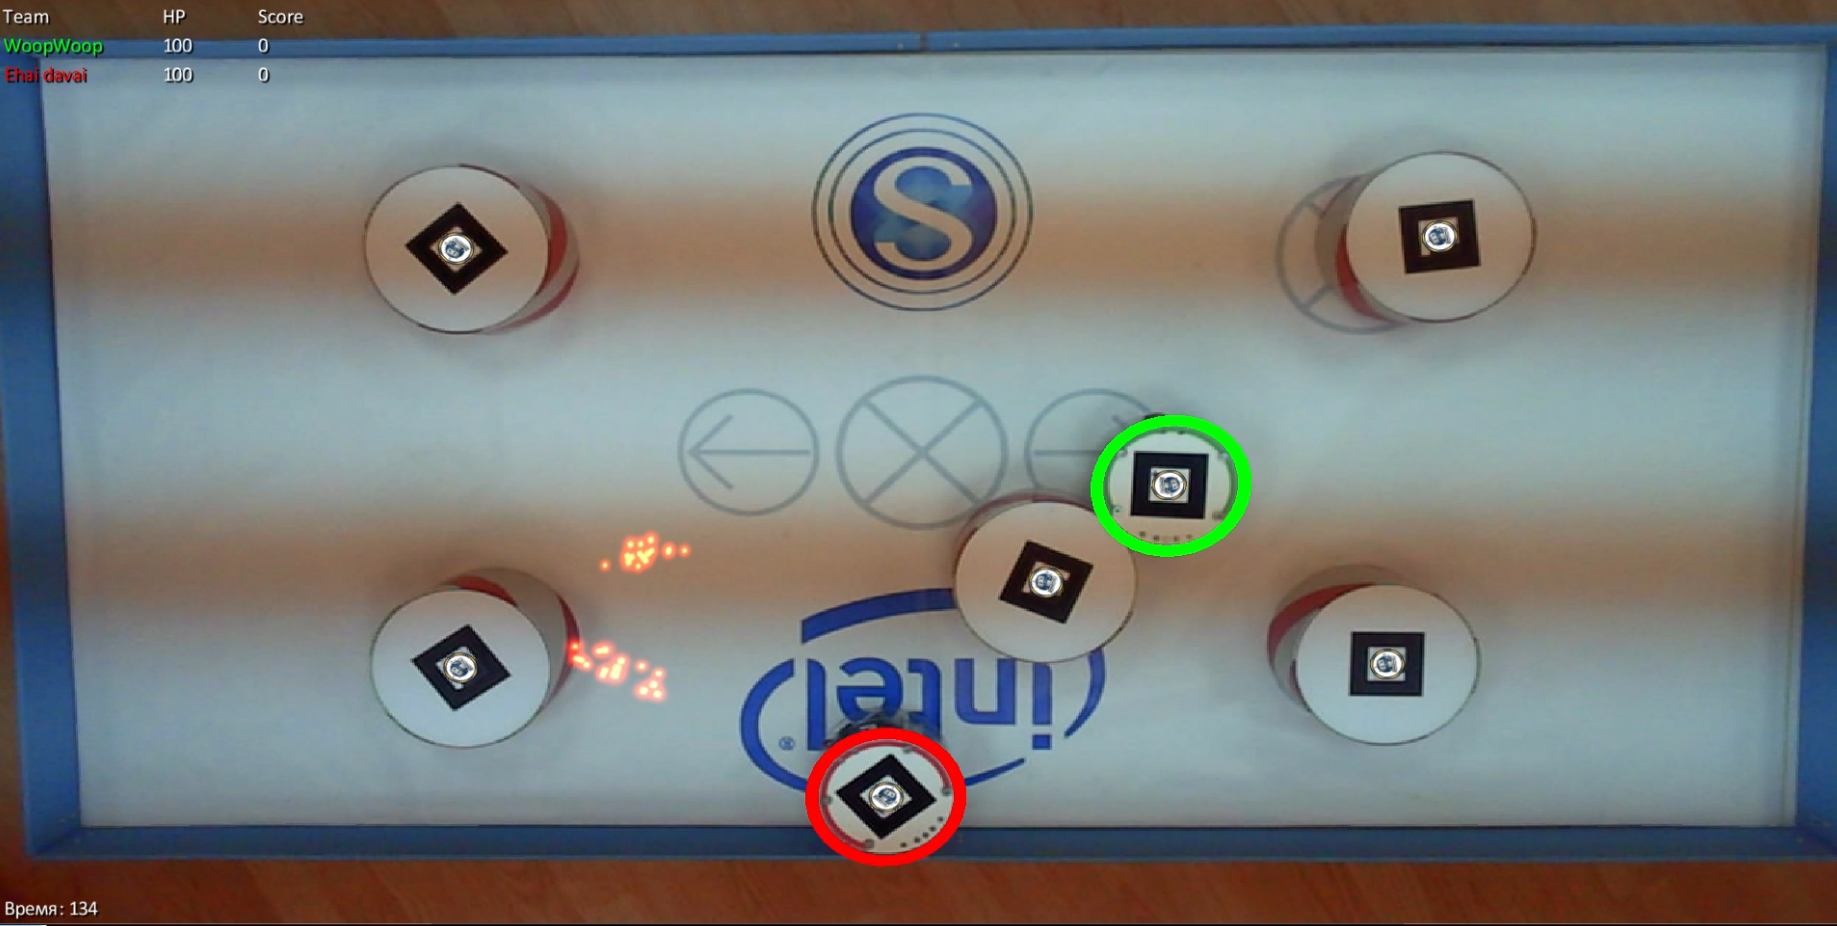
In addition to searching for markers and determining their positions, the module also renders augmented reality objects. During the competition, the picture from the camera was broadcast to the projector. In addition to the image from the camera, the state of the robots was displayed on it and shots were drawn.
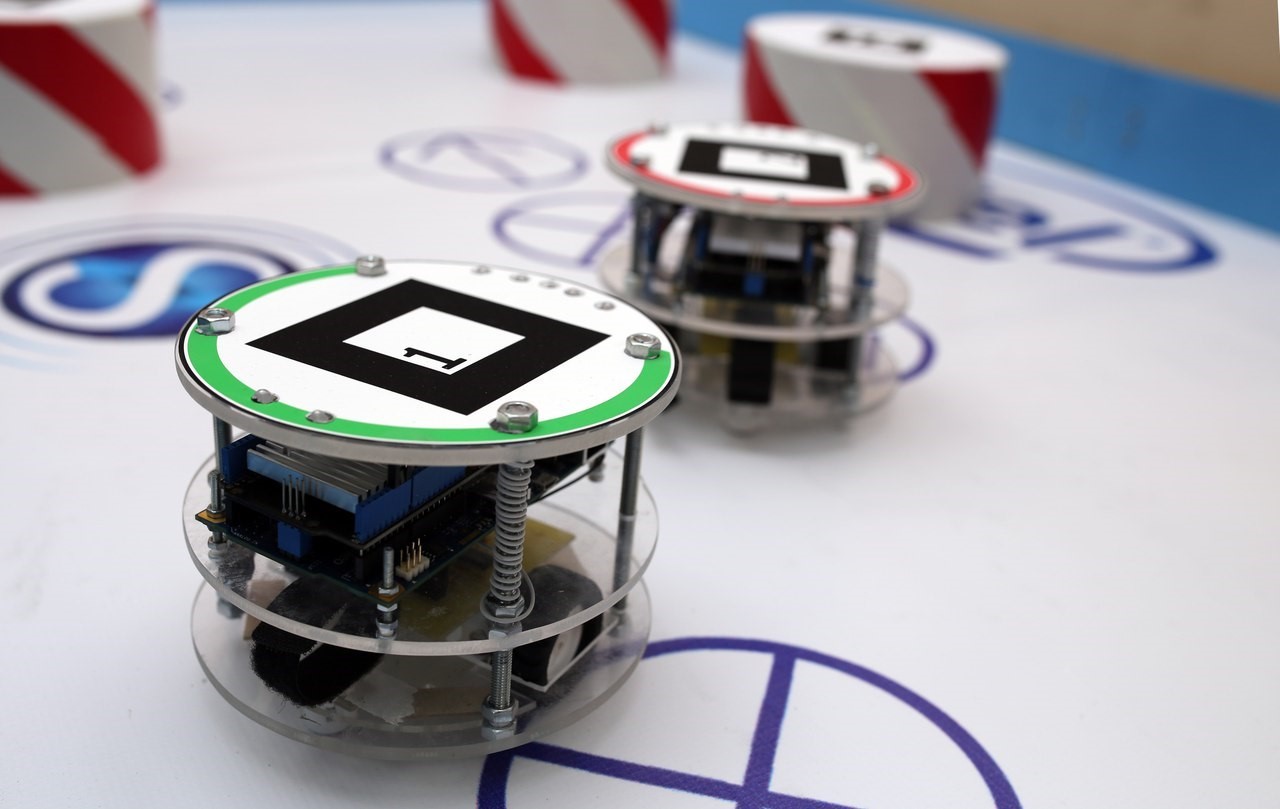
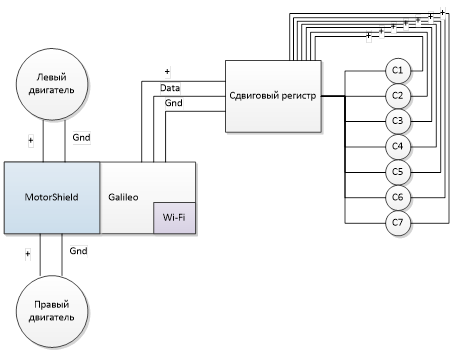
The robot is built on the basis of Intel Galileo. Additionally, MotorShiled was installed to control the engines and WiFi module. Also, a control board with a shift register was made for controlling the LEDs (after installing MotorShield on the Arduino, there are very few free pins). Two DC motors operating in the range 3.3 - 9 V were used as actuators. It was powered by a li-po battery of 7.4 V x 1500 mA.
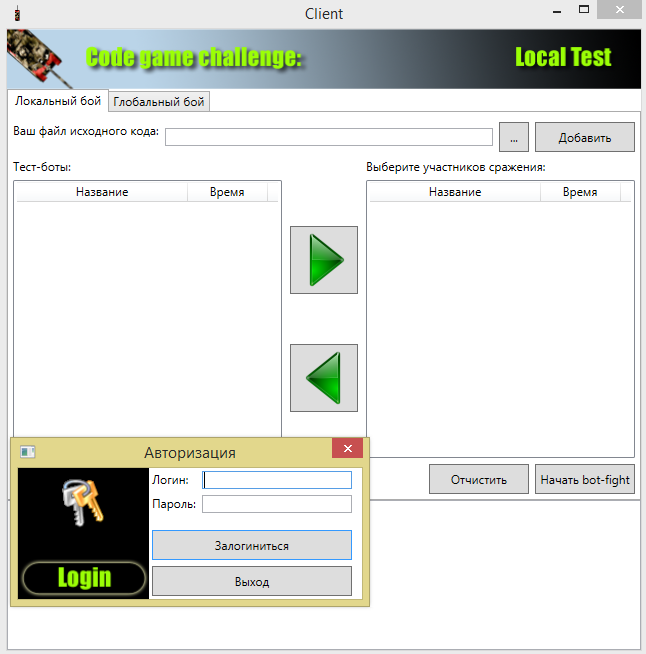
In addition, we prepared the tournament software - the client and server, which were used during the full-time part of the competition. The server allowed to send custom strategies for compilation and to receive the compiled strategy, as well as to receive the compiled strategies of other participants and to perform simulations with their participation.
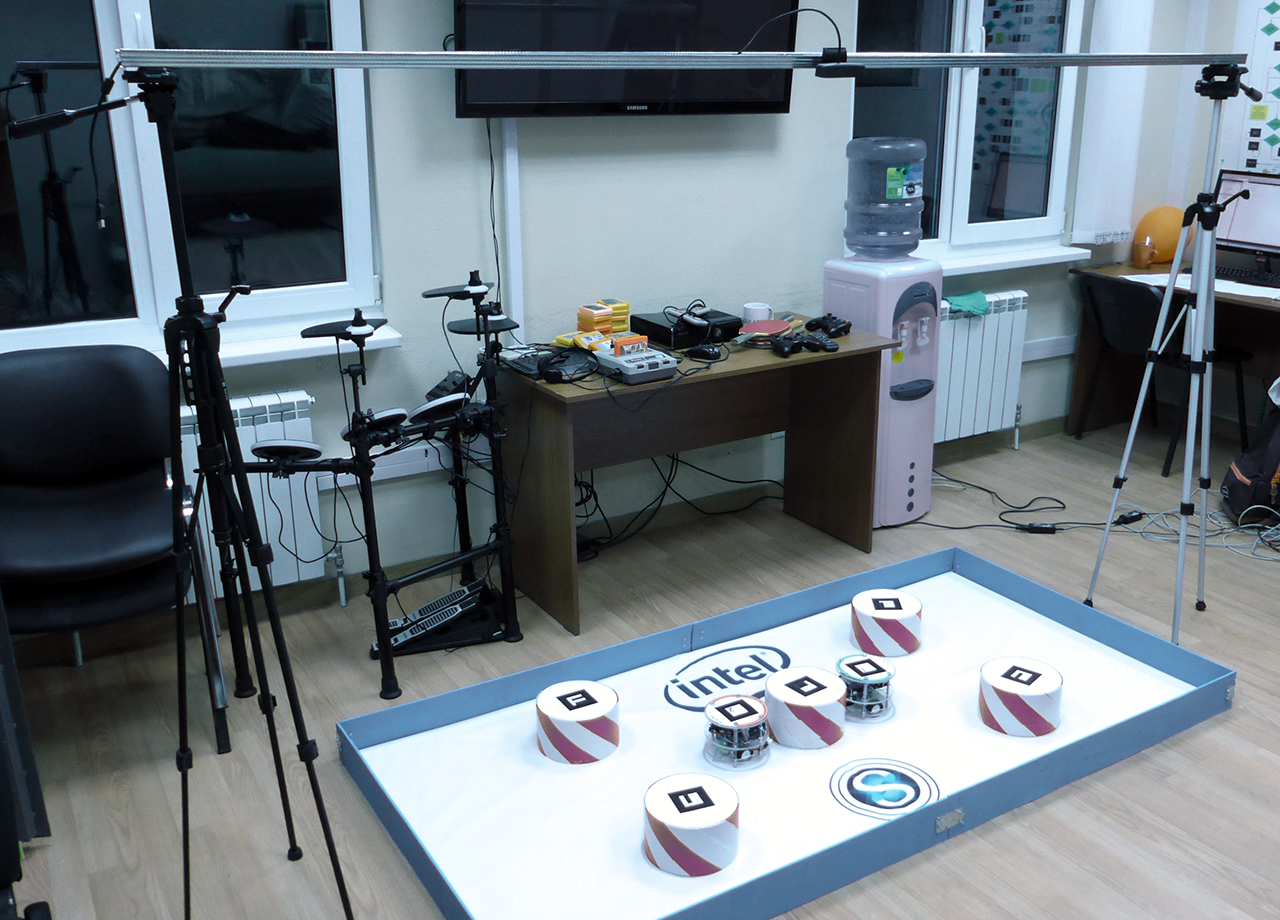
Installation complete:
During the development and conduct of the competition, we faced a number of problems, some of which we decided, some remained for us to work on the bugs.
Initially we planned to use a camera that would stand on one side of the field.
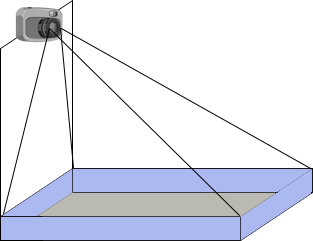
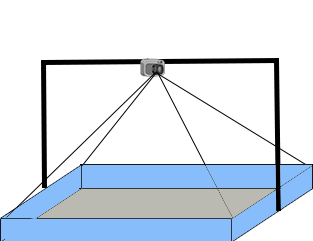
However, during the testing process, we realized that objects located at the far end of the field are very poorly recognized. Therefore, it was necessary either to raise the camera strongly to change the angle, or to hang it above the field. As a result, stopped at the last version.
The big problem was flickering lighting. Very much I did not want to do additional image processing to compensate for the flickering of gas-discharge lamps. As a result, the problem was “backed up” with a crutch - they switched to 25 frames (that is, a frequency that is a multiple of the flickering frequency) and added a small adjustment for the threshold contrast, which could be changed “on the fly”.
Initially, we had two WiFi modules without antennas. In general, this was enough for development, but at the very first start it became clear that this option would not work for further work - the signal was constantly lost, the packets arrived with a long delay. As a result, equipped with robots antennas.
Since the system was repeatedly assembled and disassembled and the location of the parts (the field relative to the camera) was constantly changing, we added a calibration procedure — placing markers at predetermined positions after the installation was installed, we calibrated and saved it in the configuration file for subsequent launches.
The biggest problem. The physics in the simulator was ultimately different from the physics of a real robot. This difference consisted of several components:
Despite all the difficulties, the students were interested in our event, and we plan to develop the platform to eliminate the existing problems and realize all our ideas.
A significant limitation on game mechanics was the inability to visualize projectiles. This can be solved by placing a projector over the field that would project additional objects onto the playing field. This opens up a wide range of mechanics: we can add bonuses, projectiles with finite speed, an indication of health and other conditions. Plus, this is an interesting task.
I would also like to increase the size of the playing field, but here we were limited to one camera. Therefore, the plans have the use of multiple cameras.
Introduction
So, for starters, who cares about what the classic CGC is, but it’s not well informed: you can read it here and here .
What is RoboCGC? This is a classic Code Game Challenge, in which the strategies of the participants are launched not only in the simulator, but also on real robots. Otherwise, it is no different - the participants in the same way implement the program to control the robot, and launch it in the simulator to assess the quality of work. In the simulator, they have access to basic strategies provided by the organizers of the competition, and strategies of other participants.
')
This time in the game world, the participants had the task of controlling a robot equipped with a laser. The laser is fixed and aligned with the robot. A volley (projectile) of a laser has infinite speed. The instrument itself has three states:
- reloading - from the time of the shot to the moment when the gun can be recharged, the reload time must pass;
- simple - after the gun was recharged, but did not start to accumulate a charge, it is idle;
- charge accumulation - at the command of the user, the weapon goes from idle mode to charge accumulation mode.
As soon as the charge of the gun reaches its maximum value, the shot will occur automatically. In addition, the user can, at any time from the start of the charge and before the automatic shot, fire a shot. Damage caused by hitting linearly depends on the accumulated charge.
On the map there are two robots (one for each team) and several obstacles. The obstacles are mobile - the robot can push them.
Dive
We now turn to the system itself.
The system consists of several components:
Consider each of the modules separately
Custom strategy
The user class interface is very simple and consists of only one function that is called on every clock of the game world. The function transmits information about the game world, which includes information about the position of units and their state, information about the position of obstacles, as well as information about the game world (game time, field size, etc.).
#pragma once #include "Common/IWorld.h" using namespace GameWorld::Strategy; namespace Client { namespace Strategy { class Player { public: void Move(IWorld* world); }; } } The user can work within the same file, because One file is sent to the server for compilation. On the server, this file is compiled with a wrapper that provides interaction with the simulator.
Previously, we used the DLL model — user strategies were compiled into separate DLLs and loaded into the simulator, and then the simulator called the methods of this DLL. This time we moved to the model of individual processes - in this case we get several advantages: more free control of execution time and memory consumption (in case of violation of restrictions, we just complete the process with the strategy, without fear that a lot can spoil in the simulator or remain un-freed resources). The interaction between the client code and the game world module is carried out through sockets.
The sequence of the user code is as follows:
To send messages, we used aligned structures - the simplest way without additional serialization / deserialization.
The title of the package with information about the game world looks like this:
struct StateHeader { int TotalUnits; // int TotalObstacles; // int Tick; // double Width; // double Height; // int CurrentTeam; // int TotalTeams; // int IsFinished; // }; Information about one unit is given by the structure:
struct UnitDTO { double X; // double Y; // Y double Angle; // double Radius; // int Charge; // int HP; // int TeamId; // int Id; // }; Barrier Information:
struct ObstacleDTO { double X; // double Y; // Y double Angle; // double Radius; // int Id; // }; The course header information about the player’s progress:
struct ControlHeader { int TotalUnits; // , int IsCrashed; // «» char Name[31]; // }; Information about the actions of the unit:
struct UnitControlDTO { double LeftControl; // double RightControl; // bool IsStartCharging;// bool Fire; // int UnitId; // }; Start module
This module is responsible for reading the configuration, creating the appropriate environment (simulator or hardware platform), starting user strategies and implementing the game cycle.
The description of the game world is set by configuration files with which you can set the physical characteristics of the robot (radius, wheelbase, wheel diameter, etc.), simulation parameters (field size, simulation duration, number of players, number of units for each player, number of obstacles , gun characteristics, etc.), starting parameters (initial positions of robots and obstacles), configuration of the hardware platform (IP addresses of robots, markers for robots and obstacles).
After reading the configuration, an environment is created - either a simulator or a hardware platform. Both environments have the same interface, so working with them is the same:
class IEnvironment { public: virtual void Initialize(boost::shared_ptr<GameWorld::Internal::World> world) = 0; virtual void Step() = 0; virtual bool CloseRequested() = 0; virtual bool Paused() = 0; virtual bool Idle() = 0; }; Then the processes of user strategies are launched, and the expectation of environment readiness begins (for what it is needed, I will describe below). As soon as the preparation of the environment is completed, the starting message is sent to the strategies and a simulation cycle is started, inside which a strategy is sent to each strategy with the state of the game world and a response is expected with the user's reaction. At this stage, the execution time of the user code is monitored - if the answer has not come at the set time, the user strategy ends. After receiving answers from all strategies, they are processed - the data is transferred to the environment where they are processed, and the state of the game world is updated. Then there is a transition to the next iteration.
Simulation module
The simulation module is used by participants to test their strategy during the full-time part of the competition (ie, writing strategies). The simulator has simple graphics and simulates physics (collisions, hits), etc.
Hardware interaction module
The most difficult and interesting module. This module transmits commands to robots, and also receives their current coordinates.
All logic is executed on the computer where the system is running, only the resulting commands are sent to robots (at the level of engine control and setting the state of the LEDs). To communicate with robots, a WiFi connection is used, to which a server computer and both robots are connected.
To obtain the current coordinates above the playing field, there is a camera, and markers are pasted on all moving objects. During the simulation, markers are recognized and their position is determined.
We used the first generation Intel RealSense as a camera. With the second-generation camera, there were problems when working with a long USB cable, so they turned to the first version.
Since, unlike simulators, we need to wait for the robots to be ready (to make sure that the robots are connected), we have entered an intermediate stage of the environment state — as soon as the robots are connected, the environment sends a readiness message.
In addition to searching for markers and determining their positions, the module also renders augmented reality objects. During the competition, the picture from the camera was broadcast to the projector. In addition to the image from the camera, the state of the robots was displayed on it and shots were drawn.
Robot
The robot is built on the basis of Intel Galileo. Additionally, MotorShiled was installed to control the engines and WiFi module. Also, a control board with a shift register was made for controlling the LEDs (after installing MotorShield on the Arduino, there are very few free pins). Two DC motors operating in the range 3.3 - 9 V were used as actuators. It was powered by a li-po battery of 7.4 V x 1500 mA.
Tournament software
In addition, we prepared the tournament software - the client and server, which were used during the full-time part of the competition. The server allowed to send custom strategies for compilation and to receive the compiled strategy, as well as to receive the compiled strategies of other participants and to perform simulations with their participation.
How it looked
Installation complete:
Camera recording
Simulator
Problems and solutions
During the development and conduct of the competition, we faced a number of problems, some of which we decided, some remained for us to work on the bugs.
Cameras
Initially we planned to use a camera that would stand on one side of the field.
However, during the testing process, we realized that objects located at the far end of the field are very poorly recognized. Therefore, it was necessary either to raise the camera strongly to change the angle, or to hang it above the field. As a result, stopped at the last version.
Lighting
The big problem was flickering lighting. Very much I did not want to do additional image processing to compensate for the flickering of gas-discharge lamps. As a result, the problem was “backed up” with a crutch - they switched to 25 frames (that is, a frequency that is a multiple of the flickering frequency) and added a small adjustment for the threshold contrast, which could be changed “on the fly”.
WiFi
Initially, we had two WiFi modules without antennas. In general, this was enough for development, but at the very first start it became clear that this option would not work for further work - the signal was constantly lost, the packets arrived with a long delay. As a result, equipped with robots antennas.
Positioning
Since the system was repeatedly assembled and disassembled and the location of the parts (the field relative to the camera) was constantly changing, we added a calibration procedure — placing markers at predetermined positions after the installation was installed, we calibrated and saved it in the configuration file for subsequent launches.
Physics
The biggest problem. The physics in the simulator was ultimately different from the physics of a real robot. This difference consisted of several components:
- Time lag - in the simulator, the participants immediately received the current position, in the case of the hardware platform, they got the position of the robot with some delay, which led to "overshoot", a lot of robots were spinning left-right because they could not get to the right angle.
- • The difference between physics itself - the physics of the movement of the obstacles in the simulator and in reality did not correspond (we missed the mass a bit, and the real obstacles moved more difficult).
Further development
Despite all the difficulties, the students were interested in our event, and we plan to develop the platform to eliminate the existing problems and realize all our ideas.
A significant limitation on game mechanics was the inability to visualize projectiles. This can be solved by placing a projector over the field that would project additional objects onto the playing field. This opens up a wide range of mechanics: we can add bonuses, projectiles with finite speed, an indication of health and other conditions. Plus, this is an interesting task.
I would also like to increase the size of the playing field, but here we were limited to one camera. Therefore, the plans have the use of multiple cameras.
Source: https://habr.com/ru/post/272729/
All Articles