Heavy armor sound design for the InSomnia project
My name is Peter, I'm a sound designer, working on an InSomnia project. In this article I would like to briefly describe the process of working on the voice acting of heavy armor. Here is the final result:
In this paper, we will not use well-known middleware tools for sound ( Wwise , Fmod ), but we will do with regular Unreal Engine 4 tools.
All work can be divided into several main stages:
')
Next, everything in order.
The game is made in diesel-punk style, so we will use mechanical sounds. There should be no electronics or sci-fi elements. This is not a robot, this is exactly armor. Inside is a man. Man is surrounded by mechanisms and systems.
Sounding armor is a powerful thing in the game. The sound obviously should not be miniature or cute. When we see such a character, we must understand that this guy is serious.
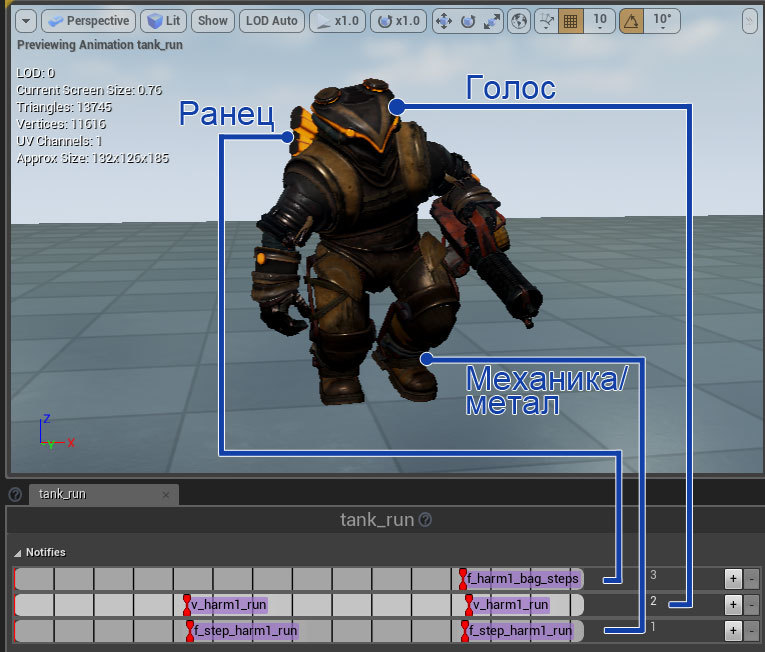
Let's take a closer look at the character - he is wearing a helmet, he has a satchel with some systems, suppose there is liquid in them, the armor itself is quite mobile - there are a lot of mechanical parts and structures. We use this as the main categories of sounds:
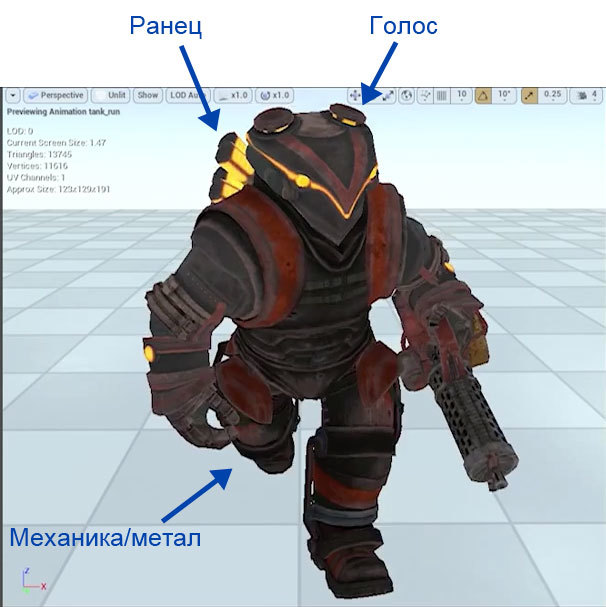
For the voice, we will use the standard human breath, but mix it with the water component, process it to give a “helmet” effect. For the knapsack, we will also use water and acid components. For mechanics / metal, we use metal rattles, servo drives and all sorts of mechanical sheaving.
Introduce the project will be the standard means of the Unreal Engine - using Sound Cue and their attachment to the appropriate animations.
For sound design, I use Ableton Live , because it comes with very simple and interesting plug-ins for audio manipulations, and the design of the program itself is focused on high speed audio.
For the original materials we planned to record the sounds ourselves. But, considering the cost of decent equipment, the room for recording, the time for recording and processing the material, we came to the conclusion that this will be the next step for us. For now we’ll confine ourselves to material from audio libraries. The exception is the voice. After the test takes, it became clear that we could record it ourselves.
To record the voice, I used the domestic microphone Oktava MK-012 with a cap from MK-101 . It is inexpensive and, given that we will seriously distort the material received, the quality of the recording is not so important to us. Here is the result of the recording:
This is how the processed material sounds:
The essence of processing is the use of vocoder. We simply mix the voice in it with a water base (water bubbles) and further we process each channel to taste. You can see the detailed processing scheme with my settings here:
For the knapsack we use the following materials:
We throw everything into one boiler, process, we get the following sounds:
You can see the detailed processing scheme with my settings here:
The main part of the whole design - makes it clear that we are dealing with iron armor. There are no special features here, everything is done by standard layers (layering) with a minimum of effects (equalizer). As an example of such work, you can see the death of the character. First, we hear a blow (hitting an abstract “something”), then a rattle of a crumbling mass of armor and a fall. Here is what it looks like in the sequencer (the layers of the original samples are visible):

Here’s how it sounds:
After all the wav-files are rendered, we drive them into the audio editor (I use Adobe Audition ), edit it to the final one (we cut off the silence at the end, we remove possible artifacts). All files do 44.1kHz, 16 bit, mono. We get a pack of sound files ready to be loaded into the Unreal Engine 4.
Now our task is to recreate the work done in the sequencer, but using the Unreal Engine tools. We import the prepared wav-files, create Sound Cue assets with the names corresponding to our events. In this paper, I divided the sounds of armor, knapsack and voice into three separate Sound Cue assets. This is due to the fact that in our system of audiophiles naming all the steps and voices lie separately. It is not logical to merge everything into one asset, although in this case the voice of the armor would be convenient. We will adhere to the existing system.
When creating a Sound Cue, the main tool are the following sound components (Sound Nodes):
Here is how our heavy armor steps assset looks like:
Here we see both Random (selects from 4 samples) and Modulator (modulates selected samples randomly). We also see two separated packs of steps - one has just “harm” in the file name, and the second, “harm1”. This happened because two different heavy armor were supposed to be in the game, voiced a little bit differently. For technical reasons, so far there is only one voice acting, but the separation made is preserved (perhaps in the future this moment is realized). “Harm” is the common low-frequency parts of the steps, and “harm1” is the higher-frequency parts. For the second armor, the “harm1” files will be exchanged for “harm2” (visually, the second armor is of a more “mail type”, just here it is taken into account).
Further, we will attach the obtained steps steps to the corresponding animations. For example, a mount for running animation looks like this:
In conclusion, I propose once again to review all the resulting asseta:
In the video:
By the way the connections on the left side of the screen light up, you can track which wav file has been played at a given time.
I hope this article will be useful to everyone who works with the Unreal Engine. Thanks for attention!
In this paper, we will not use well-known middleware tools for sound ( Wwise , Fmod ), but we will do with regular Unreal Engine 4 tools.
Overall work plan
All work can be divided into several main stages:
')
- Concept - think over questions: how are we going to make a sound? How will we implement?
- Sound design in the audio sequencer - we prepare all the necessary wav-files.
- Sound design in Unreal Engine 4 - we embed wav files, create assets, attach to animations.
Next, everything in order.
1. Concept
The game is made in diesel-punk style, so we will use mechanical sounds. There should be no electronics or sci-fi elements. This is not a robot, this is exactly armor. Inside is a man. Man is surrounded by mechanisms and systems.
Sounding armor is a powerful thing in the game. The sound obviously should not be miniature or cute. When we see such a character, we must understand that this guy is serious.
Let's take a closer look at the character - he is wearing a helmet, he has a satchel with some systems, suppose there is liquid in them, the armor itself is quite mobile - there are a lot of mechanical parts and structures. We use this as the main categories of sounds:
- Vote.
- Satchel.
- Metal / mechanical sounds.
For the voice, we will use the standard human breath, but mix it with the water component, process it to give a “helmet” effect. For the knapsack, we will also use water and acid components. For mechanics / metal, we use metal rattles, servo drives and all sorts of mechanical sheaving.
Introduce the project will be the standard means of the Unreal Engine - using Sound Cue and their attachment to the appropriate animations.
2. Sound design in the audio sequencer
For sound design, I use Ableton Live , because it comes with very simple and interesting plug-ins for audio manipulations, and the design of the program itself is focused on high speed audio.
For the original materials we planned to record the sounds ourselves. But, considering the cost of decent equipment, the room for recording, the time for recording and processing the material, we came to the conclusion that this will be the next step for us. For now we’ll confine ourselves to material from audio libraries. The exception is the voice. After the test takes, it became clear that we could record it ourselves.
2.1. Vote
To record the voice, I used the domestic microphone Oktava MK-012 with a cap from MK-101 . It is inexpensive and, given that we will seriously distort the material received, the quality of the recording is not so important to us. Here is the result of the recording:
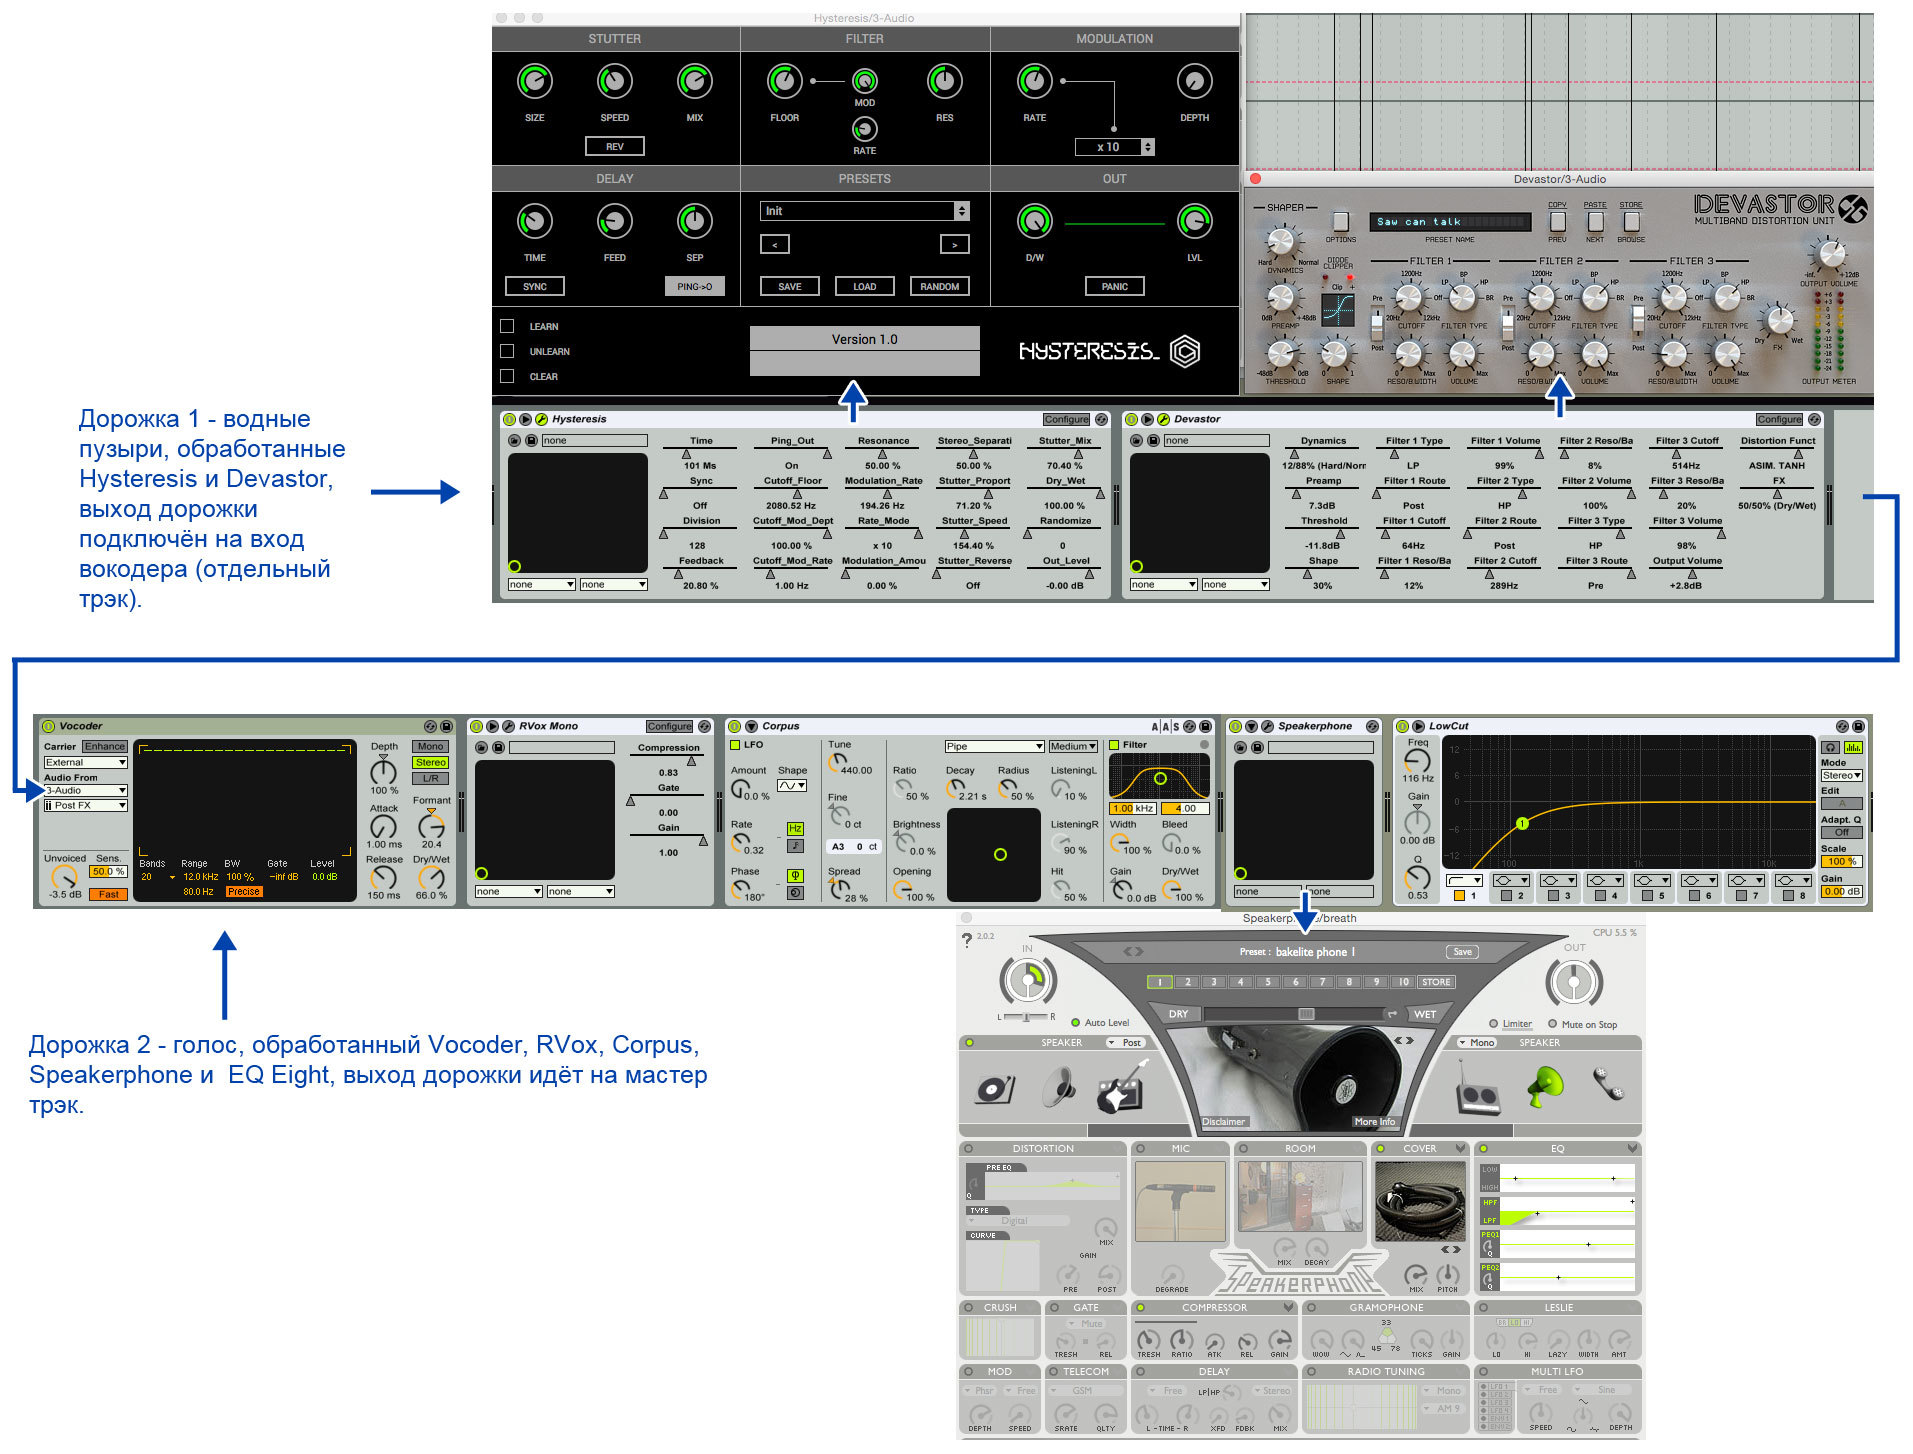
This is how the processed material sounds:
The essence of processing is the use of vocoder. We simply mix the voice in it with a water base (water bubbles) and further we process each channel to taste. You can see the detailed processing scheme with my settings here:
2.2. Satchel
For the knapsack we use the following materials:
- Air steam (steam).
- Water bubbles - forward communication with voice.
- Analog Synthesizer with a gurgling sound - for additional coloring. On the synthesizer, we use only the la note (A-1), since the main key in the game in A minor. Of course, this component is hardly audible and rather works at some subconscious level, but it would be better if everything was okay here too.
- Light electric spark.
- Acid hiss.
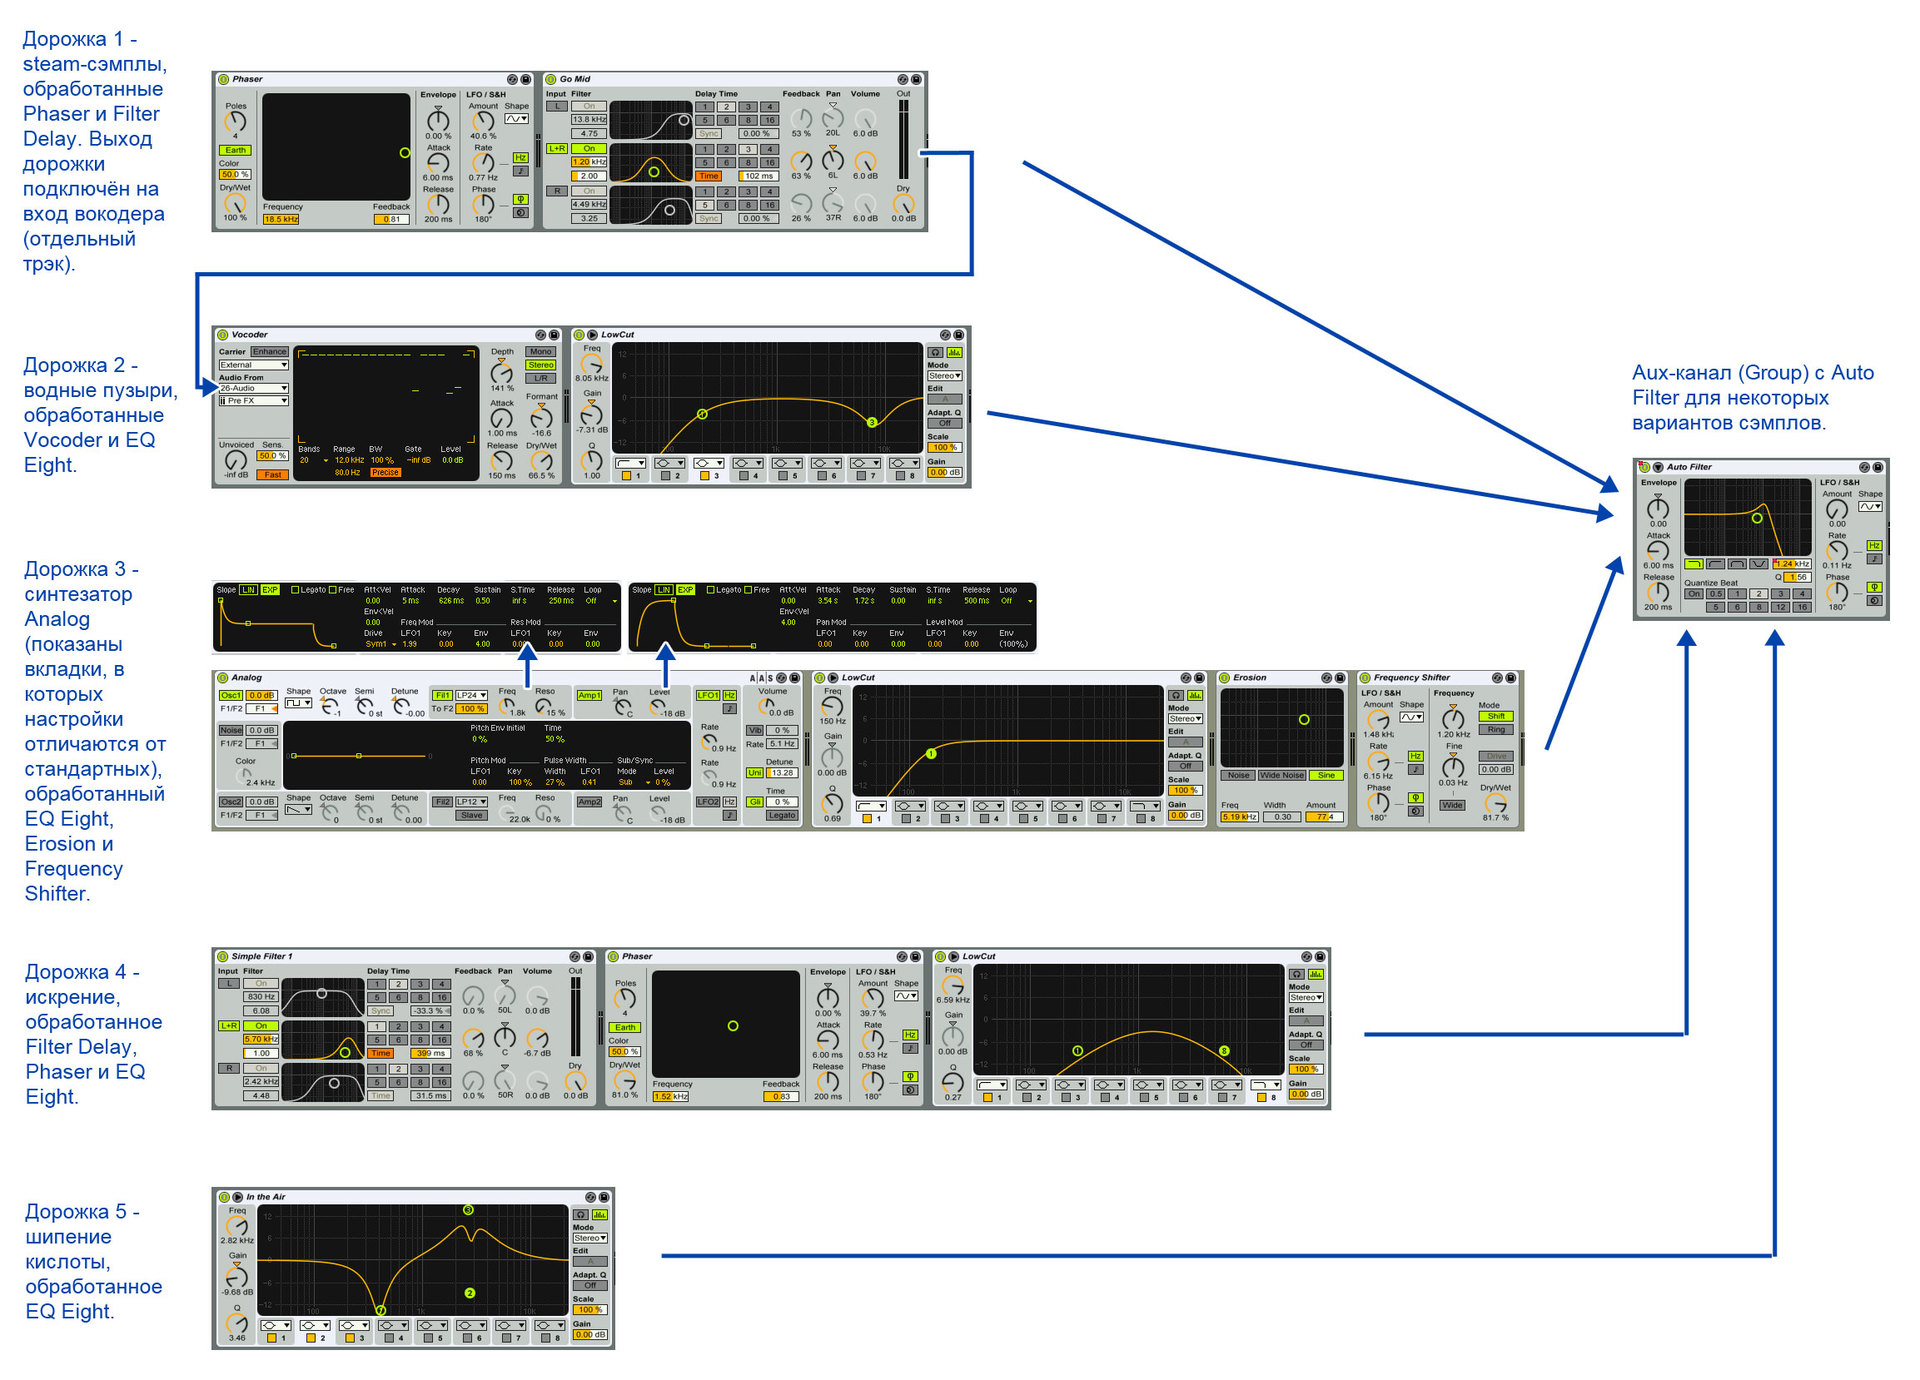
We throw everything into one boiler, process, we get the following sounds:
You can see the detailed processing scheme with my settings here:
2.3. Mechanics / Metal
The main part of the whole design - makes it clear that we are dealing with iron armor. There are no special features here, everything is done by standard layers (layering) with a minimum of effects (equalizer). As an example of such work, you can see the death of the character. First, we hear a blow (hitting an abstract “something”), then a rattle of a crumbling mass of armor and a fall. Here is what it looks like in the sequencer (the layers of the original samples are visible):
Here’s how it sounds:
After all the wav-files are rendered, we drive them into the audio editor (I use Adobe Audition ), edit it to the final one (we cut off the silence at the end, we remove possible artifacts). All files do 44.1kHz, 16 bit, mono. We get a pack of sound files ready to be loaded into the Unreal Engine 4.
2. Sound design in the Unreal Engine
Now our task is to recreate the work done in the sequencer, but using the Unreal Engine tools. We import the prepared wav-files, create Sound Cue assets with the names corresponding to our events. In this paper, I divided the sounds of armor, knapsack and voice into three separate Sound Cue assets. This is due to the fact that in our system of audiophiles naming all the steps and voices lie separately. It is not logical to merge everything into one asset, although in this case the voice of the armor would be convenient. We will adhere to the existing system.
When creating a Sound Cue, the main tool are the following sound components (Sound Nodes):
- Modulator - modulates each iteration of sound by pitch and volume.
- Random - randomly selects one sample from all offered.
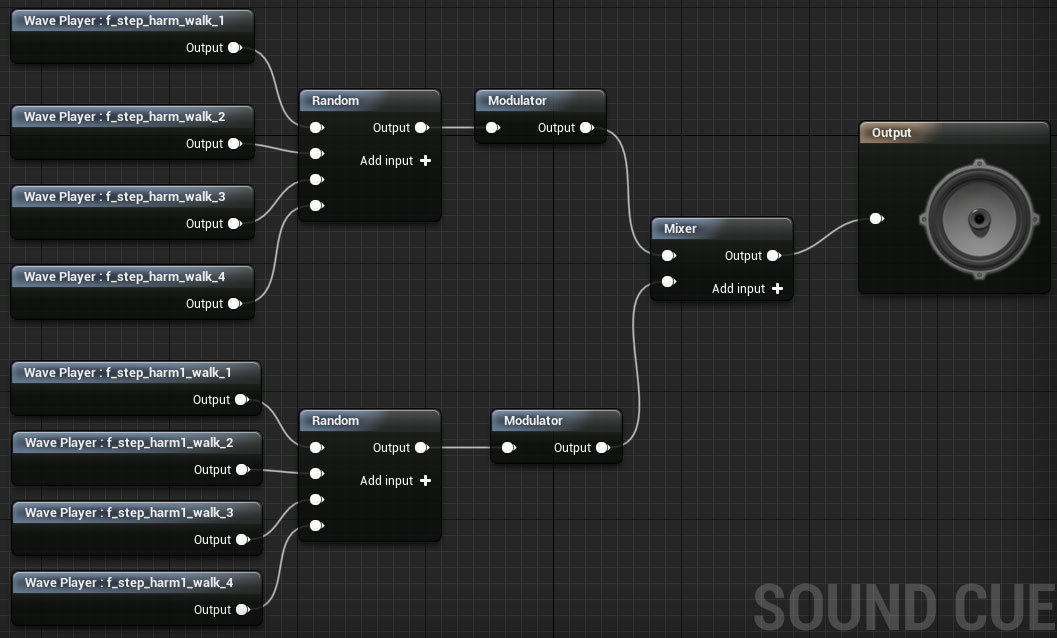
Here is how our heavy armor steps assset looks like:
Here we see both Random (selects from 4 samples) and Modulator (modulates selected samples randomly). We also see two separated packs of steps - one has just “harm” in the file name, and the second, “harm1”. This happened because two different heavy armor were supposed to be in the game, voiced a little bit differently. For technical reasons, so far there is only one voice acting, but the separation made is preserved (perhaps in the future this moment is realized). “Harm” is the common low-frequency parts of the steps, and “harm1” is the higher-frequency parts. For the second armor, the “harm1” files will be exchanged for “harm2” (visually, the second armor is of a more “mail type”, just here it is taken into account).
Further, we will attach the obtained steps steps to the corresponding animations. For example, a mount for running animation looks like this:
In conclusion, I propose once again to review all the resulting asseta:
In the video:
- The right part of the screen is an animation asset and a time bar with audio settings.
- The left side of the screen is the open sound assets used in this animation.
By the way the connections on the left side of the screen light up, you can track which wav file has been played at a given time.
I hope this article will be useful to everyone who works with the Unreal Engine. Thanks for attention!
Source: https://habr.com/ru/post/272635/
All Articles