Installing a virtual environment and agent program on the example of antivirus
Virtualization This word is widely known. Especially among those who follow current trends in the field of IT. On Habré, this question has formed a whole hub , which speaks volumes.
I happened to deal with the topic of virtualization in the context of antivirus installation, but practice suggests that solutions based on a virtual platform can be justified in other software areas: mail servers, accounting software, data backup, software testing, etc. The purpose of the article is to help an inexperienced but competent user install and configure a virtual application, so I will try to detail and illustrate each step with screenshots, but I will hide the most obvious ones in the spoiler.
I will describe the process, starting with the installation stage of the hypervisor and ending with the initial configuration stage of the antivirus (to the “started” state).
For connectedness, I will say a few words about virtualization, how to implement it and why it is needed.
')
Virtualization programs create an environment that simulates a hardware environment on which other programs can run and run. Such a class of programs is called “hypervisors”. Here is a thematic article from the wiki, if to formulate briefly, then:
A hypervisor is a tool that allows you to run multiple operating systems on a single computer (whether it is a desktop PC, laptop, server, or even a server complex).
There are different software hypervisors, the implementation of each of them is a separate topic, worthy of a full-fledged article (of which there are also a lot), therefore, in order not to litter the information field, we will limit ourselves to considering installing and configuring a virtual system in the standard Windows hypervisor Hyper-v . Immediately, I’ll make a reservation that it became “regular” in the desktop OS starting with the Windows 8.1 version, and in the server ones starting with Windows Server 2008. It is also available as a separate Microsoft Hyper-V Server product that can be installed on other OS, for example Windows 7. Other popular hypervisors: VMware ESX , Citrix XenServer , Microsoft Virtual PC , VMware Workstation , QEMU , Parallels , VirtualBox .
Why is it at all? For economy and optimization. Time, money, nerves - and other resources. Both directly and indirectly. Allows the software to decouple from the hardware, run several parallel services independently of each other, allows on-the-fly, without interruption, to move running virtual computers from one hardware environment to another, facilitates information protection, balances the load between different services and provides many other usefulness.
All the manipulations will be carried out in Windows 10 Enterprise (ru), which includes the service and the Hyper-v manager. Let's start by turning on the hypervisor, since it is disabled by default.
Let's proceed along the following path: Control Panel -> Programs -> Programs and Components -> Turn Windows Components On or Off
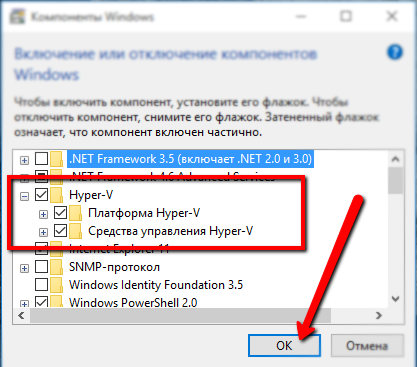
Check the checkbox in front of Hyper-V, click OK and reboot.
Now, in our operating system (in what follows, we will denote it host, that is, “host”), the Hyper-V hypervisor is installed. Open its GUI, which is called Hyper-V Dispatcher , for example, by typing its name in the Windows 10 search box:
The Hyper-V Manager window should open. First of all, you need to configure a virtual switch so that the virtual environment (sometimes called guest, English guest) has access to the network. To do this, in the Actions menu, select the Virtual Switch Manager ... item.
In the dispatcher's window, note the type of virtual switch "external":
In the "Virtual Switch Properties" window we assign a name to it, here you can select the type of network:
If we select the External network , then we will be given the choice of the physical adapter through which the switching will be carried out, as well as the ability to allow the managing (host) OS to share the adapter. If unchecked, the guest OS will lose touch with the outside world.
The VLAN ID parameter is relevant only if the network is divided into logical subnets (Virtual Local Area Network, VLAN). All virtual operating systems connected to the switch will be on the same network segment as indicated by the VLAN ID parameter.
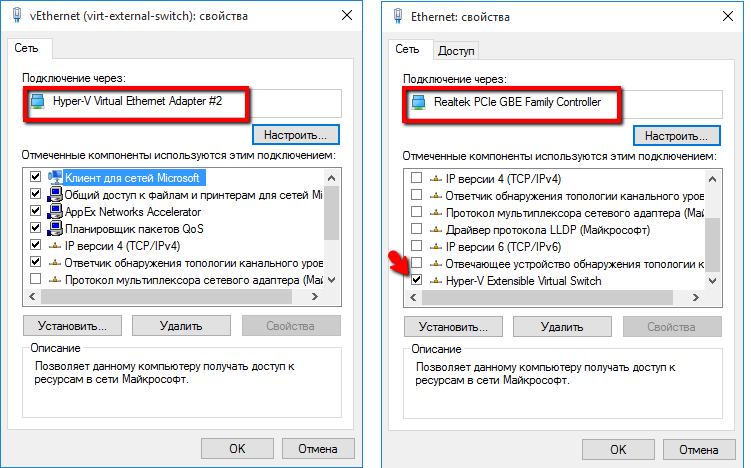
We press OK, we accept as a vital reality the risk of network disruption, which Hyper-V warns us about, and the hypervisor adds one more switch (virtual) to the system. Now all traffic will go through it. Even from the host system: the physical adapter will serve as a port for the virtual one. This can be seen by viewing the properties of the adapters (virtual on the left, physical on the right):
So, the hypervisor — the virtual machine management tool — is installed and configured. It's time to start installing a virtual environment.
Guinea pig is Bitdefender antivirus, or rather, the version for corporate clients is Business Security. Why are we going to torture him? Because antivirus is a very common, standard, and, unfortunately, necessary product. At the same time, the installation of Bitdefender involves the installation and configuration of a virtual environment, which remarkably corresponds to the topic of the article. Those who want to experiment can download the trial version from offsite . I warn you immediately that you will have to specify a real e-mail address for downloading, as well as later to enter the management console.
According to current trends, many software products, including this one, are installed as a virtual machine. So download the disk image in a format that matches the installed hypervisor. For example, for Hyper-v it is * .vhd.
We have a working hypervisor (I have Hyper-V) with a configured Internet connection, a disk file in * .vhd format, and we can safely proceed directly to the installation.
In the interface of the hypervisor, we start creating a new virtual machine, for example, by right-clicking on the host name and selecting the item “Create” -> “Virtual Machine”:
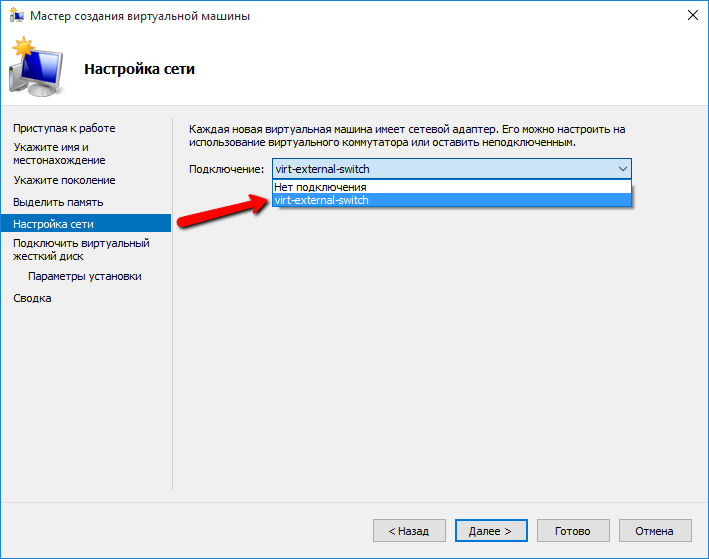
Select the name of the VM and the location of its virtual hard disk. The next step is the choice of generation. It depends on what you bet. For our needs, you need to choose "Generation 1". Next, you need to specify how much memory we allocate to the machine at startup, it is also possible to choose a dynamic change in the amount of memory. This parameter can be changed after the creation of the virtual machine. The optimal amount of memory can be determined by the recommendations of the manufacturer, from the recommendations of users and from my own experience (I will put 2.5 GB for a start, then I will experiment). The next step is to assign the previously created switch to the virtual machine.
The next step is to create / connect a hard disk.
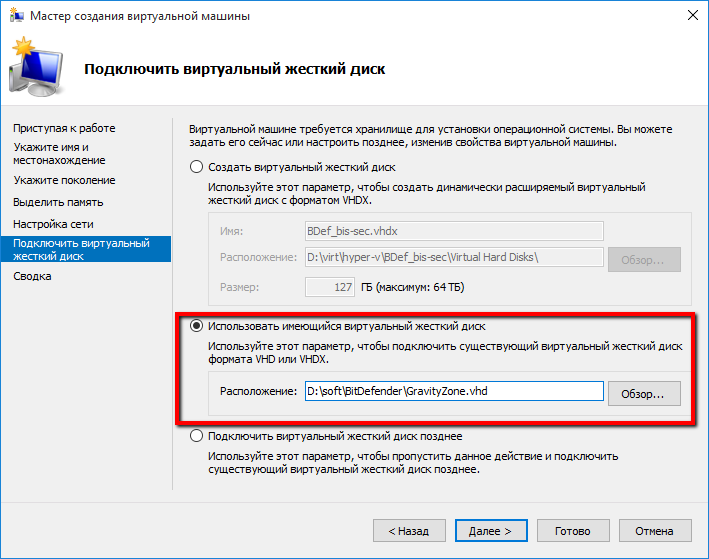
If you need to install a virtual OS, you need to select the "Create a virtual hard disk" option and specify the name, location and size of the virtual hard disk. But, since we install the finished image, we select the item “Use existing virtual hard disk” and indicate to the program where it lies.
Further, the program offers us a kind of summary with basic information about the virtual machine being created. If we see that everything is correct, click “Finish” and observe how the new virtual machine is displayed in the main window of the hypervisor.
But the process is far from over. If we draw analogies with the physical process of installation, then we now just inserted the program disk into the computer drive. To start the installation process, you need to “power on” the virtual machine, for example, by right-clicking on the name of the created virtual machine and selecting the “Connect” option.
The specific virtual machine window has opened. Turn it on, for example, by clicking the "Start" button.
If until now the actions are more or less the same for all programs running in a virtual environment, then all further events will depend on which program you are installing.
I will describe what happens when I install an antivirus. I want to note that for successful installation you will need an Internet connection.
The program asks you to enter a password with which you can login in a virtual environment.
After requesting the re-entry of the password and accepting it, the virtual environment asks us to log in.
Enter the password that you just installed (character input is not displayed, so be careful), we get to the environment settings page (it’s the Appliance).
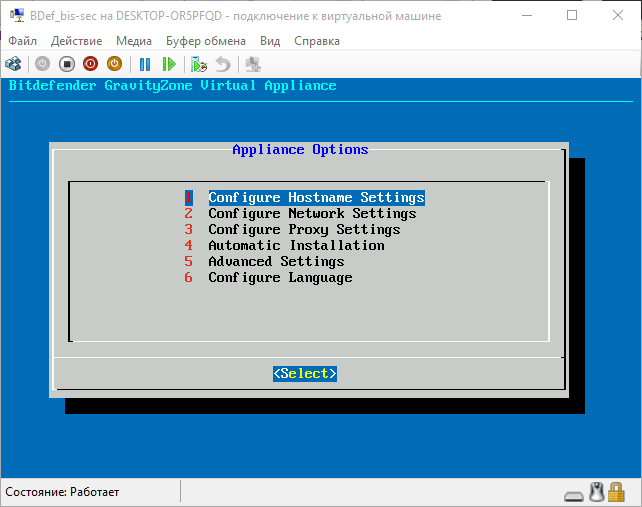
For reference. In fact, we see the operating system interface (in this case, a specially configured Linux). Accordingly, we can customize it so that it does exactly what we need. To begin with we will configure a network. Hostname settings is the name of the system (which will be visible on the network), domain is the name of the Active Directory domain (if not relevant, you can not change or fill in). Configure Network Settings - configure network settings. Go here, select the network interface (I have only one - eth0 ), we see the configuration menu of this interface.
Here you can either configure the settings manually, or tell the program to get them automatically via DHCP. It must be remembered that the IP of the virtual machine must be the same, since the clients that will be installed on the protected machines will access the server by IP, and if it changes, they will have to be reconfigured. From the same menu, you can check the current IP of the virtual machine and the connection with the outside world (points 3 and 4, respectively). I like the automatic configuration option. The program is independently configured.
From the main menu, you can also configure the proxy settings, if necessary. The Advanced settings item is useful to you if you need to configure where the update will come from or only partially install the application. Read more about this in
After you have configured everything you need (or left the default settings), you can run Automatic Installation from the main menu.
We agree with the license agreement, after which the program informs us about the components (we called them roles) that will be installed. Since we have chosen automatic installation, all roles are listed.
The screen shows those that could be installed separately (information for a general understanding of the process). We agree on the installation, and - rushed. The installation process took about 15 minutes. After the installation was completed, the interface did not change much. Appeared graph MDM Communication Server , which is responsible for connecting mobile devices. In addition, through the Advanced Settings submenu, you can connect to an existing database (important if you have already installed an antivirus), configure Replica set (duplicate databases to speed up the system if a large number of clients are serviced, or need high resiliency) also configure the Role Balancer , which distributes the load on the server (must be installed as a separate virtual environment).
However, the installation process of the virtual environment is complete. Now it is possible to get to the Bitdefender control center via the web interface from the network (the Web console is responsible for it). To do this, you need to know which IP is assigned to the virtual machine. This can be checked from the virtual environment menu by successively selecting the following items: Configure Network Settings -> eth0 (or another one that is relevant for you) -> Show IP information.
We enter this address in the browser line on any computer on the network, agree to go over an unprotected protocol, and get to the login page in the Web console. In fact, we connected to a virtual machine using network protocols and will perform some kind of manipulation on it. This process is not much different from the usual entrance to the router settings page.
To log in to the console for the first time, you need to register an account in the my.bitdefender system using the link that is located under the input fields (if you are already registered in the system, you can use the old account, creating a new one is not necessary). Then we enter the key that was received by mail (a special free key will be sent to use the trial version). We get to the company registration page (it is assumed that Business security will be used only in the corporate segment). Enter the data, create a root-user console.
Finally, we get to the interface of the user web console.
So what do we have? We have installed a virtual machine, which, in fact, is an operating system equipped and sharpened specifically to serve as an antivirus for surrounding physical and virtual machines. But in order for it to perform its functions, a client program must be installed on the protected computers. You can generate such a program through a web console. To do this, go to the Web console in the tab Network -> Packages and click the Add button. We configure the package (I will not go into details here - the topic is different), give it a name and click Save . Now the new package is available in the list. Select its checkbox and click the Download button at the top. In the drop-down list, select the OS on which you want to install the package.
The package will not be available for download immediately, as the system loads its database from the Internet. Will have to wait. The process can be tracked on the Update tab.
After the package is downloaded from the Internet to the server, you need to return to the Packages tab, select the package you need again and click Download again. We choose which system we will protect - and now the download of the package with the client program installed on the protected computer will begin. In fact, Bitdefender allows for remote installation of the client, but this is a topic for a separate article.
I downloaded the package to the computer where the Bitdefender virtual environment is running, so I just run the executable file. During installation, the program “cleans up” the computer from traces of previous antiviruses, if any. During the installation, you will need to reboot, perhaps even several times. As a result, Bitdefender Agent is installed on the computer, as evidenced by the tray icon. Using this icon, you can launch the agent interface:
Actually, we arrived at the goal set at the beginning of the article: install a virtual environment and install an agent program on a real machine that will perform the tasks assigned to it (on my screen it is clear that the firewall managed to block port scans).
The main thing that you should take with you after reading this article:
Virtualization is a powerful tool that allows you to save a lot of resources; a virtual environment is an operating system that can perform certain functions assigned to it; The key point in installing and configuring a virtual machine is competent configuration of network parameters.
I happened to deal with the topic of virtualization in the context of antivirus installation, but practice suggests that solutions based on a virtual platform can be justified in other software areas: mail servers, accounting software, data backup, software testing, etc. The purpose of the article is to help an inexperienced but competent user install and configure a virtual application, so I will try to detail and illustrate each step with screenshots, but I will hide the most obvious ones in the spoiler.
I will describe the process, starting with the installation stage of the hypervisor and ending with the initial configuration stage of the antivirus (to the “started” state).
For connectedness, I will say a few words about virtualization, how to implement it and why it is needed.
')
Virtualization programs create an environment that simulates a hardware environment on which other programs can run and run. Such a class of programs is called “hypervisors”. Here is a thematic article from the wiki, if to formulate briefly, then:
A hypervisor is a tool that allows you to run multiple operating systems on a single computer (whether it is a desktop PC, laptop, server, or even a server complex).
There are different software hypervisors, the implementation of each of them is a separate topic, worthy of a full-fledged article (of which there are also a lot), therefore, in order not to litter the information field, we will limit ourselves to considering installing and configuring a virtual system in the standard Windows hypervisor Hyper-v . Immediately, I’ll make a reservation that it became “regular” in the desktop OS starting with the Windows 8.1 version, and in the server ones starting with Windows Server 2008. It is also available as a separate Microsoft Hyper-V Server product that can be installed on other OS, for example Windows 7. Other popular hypervisors: VMware ESX , Citrix XenServer , Microsoft Virtual PC , VMware Workstation , QEMU , Parallels , VirtualBox .
Why is it at all? For economy and optimization. Time, money, nerves - and other resources. Both directly and indirectly. Allows the software to decouple from the hardware, run several parallel services independently of each other, allows on-the-fly, without interruption, to move running virtual computers from one hardware environment to another, facilitates information protection, balances the load between different services and provides many other usefulness.
All the manipulations will be carried out in Windows 10 Enterprise (ru), which includes the service and the Hyper-v manager. Let's start by turning on the hypervisor, since it is disabled by default.
Let's proceed along the following path: Control Panel -> Programs -> Programs and Components -> Turn Windows Components On or Off
Screen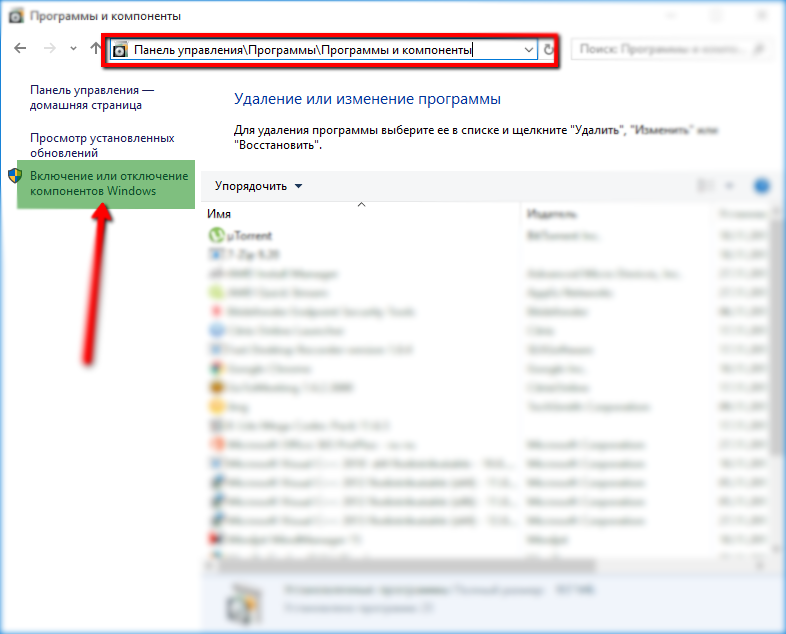
Check the checkbox in front of Hyper-V, click OK and reboot.
Now, in our operating system (in what follows, we will denote it host, that is, “host”), the Hyper-V hypervisor is installed. Open its GUI, which is called Hyper-V Dispatcher , for example, by typing its name in the Windows 10 search box:
Screen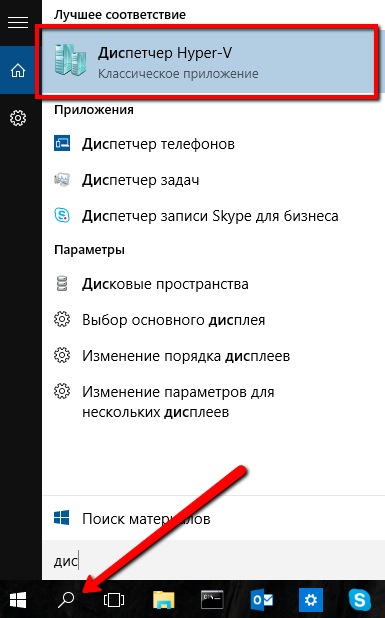
The Hyper-V Manager window should open. First of all, you need to configure a virtual switch so that the virtual environment (sometimes called guest, English guest) has access to the network. To do this, in the Actions menu, select the Virtual Switch Manager ... item.
Screen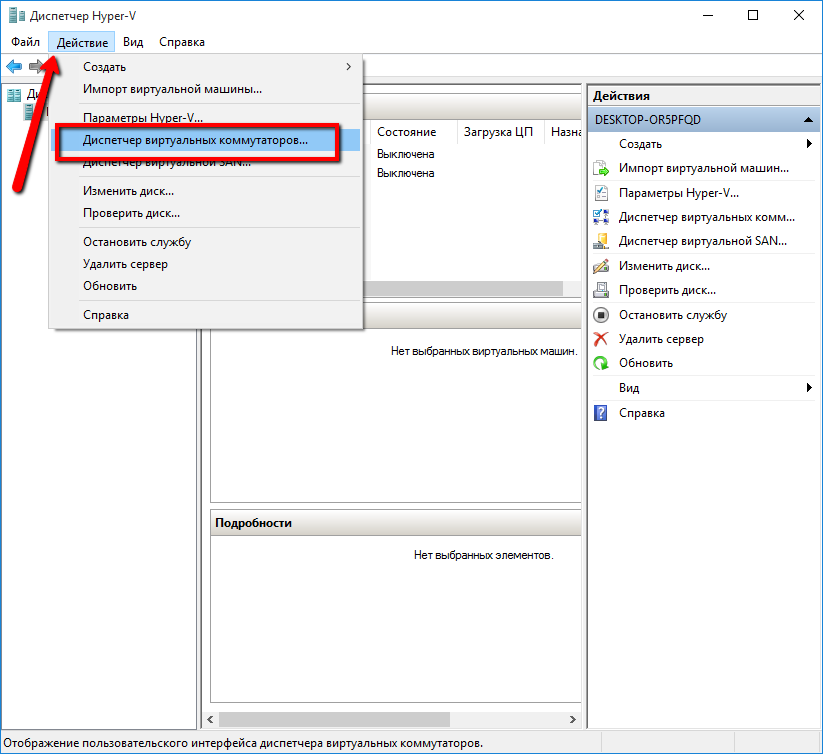
In the dispatcher's window, note the type of virtual switch "external":
Screen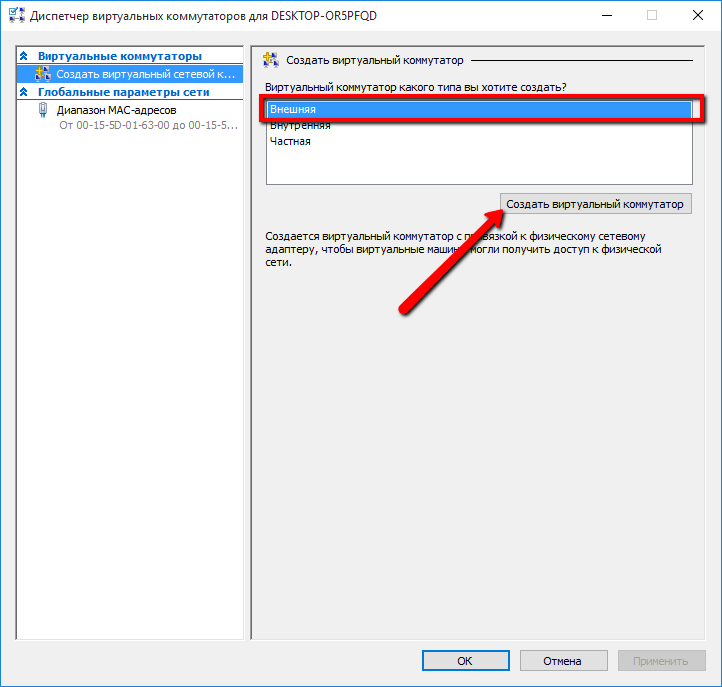
In the "Virtual Switch Properties" window we assign a name to it, here you can select the type of network:
- external - the guest OS will have access to the external network directly
- internal - the guest OS will only see the host OS
- private - the guest OS will be isolated from the host. In this case, a connection can be established between several guest OSs operating on the same hypervisor.
If we select the External network , then we will be given the choice of the physical adapter through which the switching will be carried out, as well as the ability to allow the managing (host) OS to share the adapter. If unchecked, the guest OS will lose touch with the outside world.
The VLAN ID parameter is relevant only if the network is divided into logical subnets (Virtual Local Area Network, VLAN). All virtual operating systems connected to the switch will be on the same network segment as indicated by the VLAN ID parameter.
Screen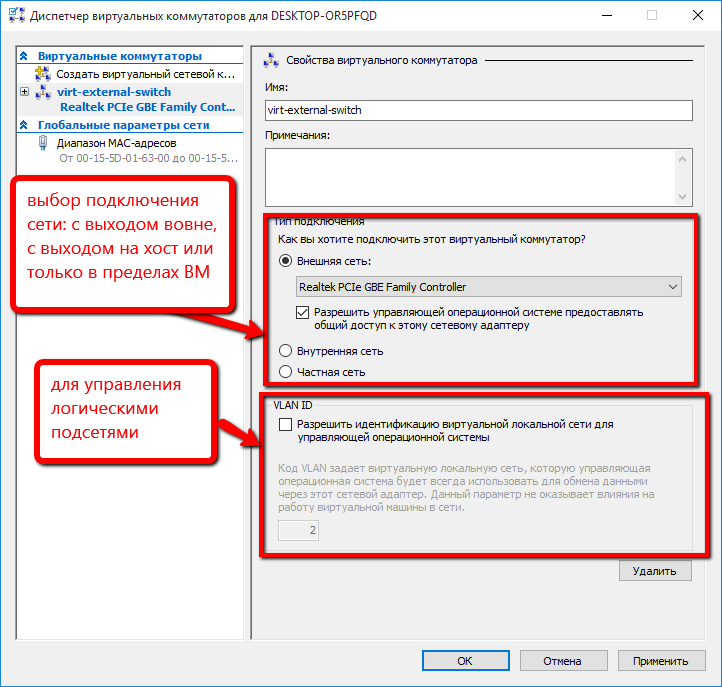
We press OK, we accept as a vital reality the risk of network disruption, which Hyper-V warns us about, and the hypervisor adds one more switch (virtual) to the system. Now all traffic will go through it. Even from the host system: the physical adapter will serve as a port for the virtual one. This can be seen by viewing the properties of the adapters (virtual on the left, physical on the right):
So, the hypervisor — the virtual machine management tool — is installed and configured. It's time to start installing a virtual environment.
Guinea pig is Bitdefender antivirus, or rather, the version for corporate clients is Business Security. Why are we going to torture him? Because antivirus is a very common, standard, and, unfortunately, necessary product. At the same time, the installation of Bitdefender involves the installation and configuration of a virtual environment, which remarkably corresponds to the topic of the article. Those who want to experiment can download the trial version from offsite . I warn you immediately that you will have to specify a real e-mail address for downloading, as well as later to enter the management console.
According to current trends, many software products, including this one, are installed as a virtual machine. So download the disk image in a format that matches the installed hypervisor. For example, for Hyper-v it is * .vhd.
We have a working hypervisor (I have Hyper-V) with a configured Internet connection, a disk file in * .vhd format, and we can safely proceed directly to the installation.
In the interface of the hypervisor, we start creating a new virtual machine, for example, by right-clicking on the host name and selecting the item “Create” -> “Virtual Machine”:
Screen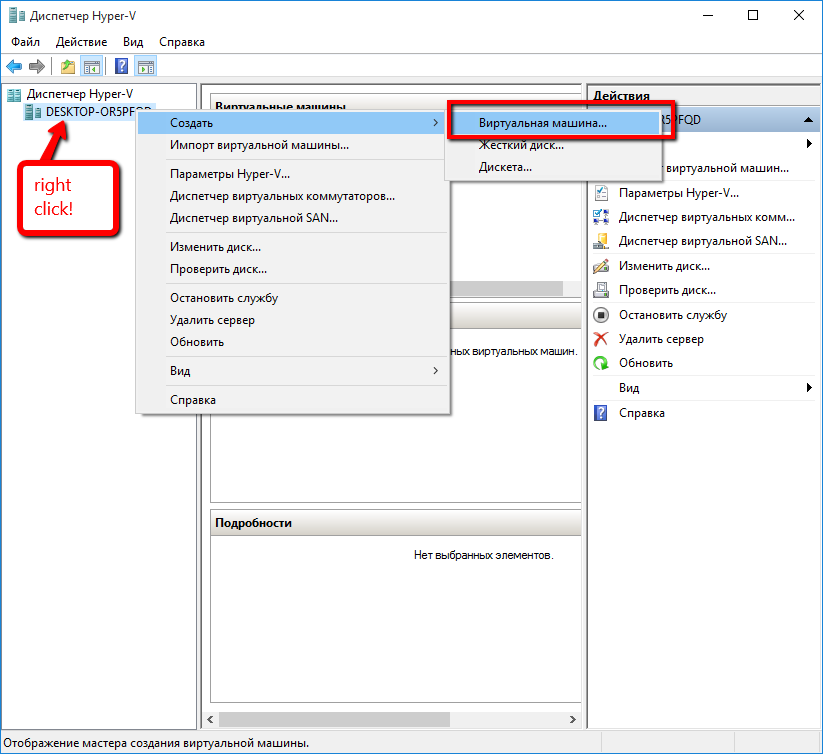
Select the name of the VM and the location of its virtual hard disk. The next step is the choice of generation. It depends on what you bet. For our needs, you need to choose "Generation 1". Next, you need to specify how much memory we allocate to the machine at startup, it is also possible to choose a dynamic change in the amount of memory. This parameter can be changed after the creation of the virtual machine. The optimal amount of memory can be determined by the recommendations of the manufacturer, from the recommendations of users and from my own experience (I will put 2.5 GB for a start, then I will experiment). The next step is to assign the previously created switch to the virtual machine.
Screen and comment
I have a simple one-tier network, all computers are connected via a switch to the interface of the provider. Distribution of addresses occurs through DHCP. Therefore, I choose an external network so that the virtual machine through the virtual network card independently receives an IP address and connects directly to the network. If your picture is different, you may need to create another type of network. For example, if you have to install a hypervisor on a server that distributes addresses itself, then you need to select the Internal network.
The next step is to create / connect a hard disk.
If you need to install a virtual OS, you need to select the "Create a virtual hard disk" option and specify the name, location and size of the virtual hard disk. But, since we install the finished image, we select the item “Use existing virtual hard disk” and indicate to the program where it lies.
Further, the program offers us a kind of summary with basic information about the virtual machine being created. If we see that everything is correct, click “Finish” and observe how the new virtual machine is displayed in the main window of the hypervisor.
Screen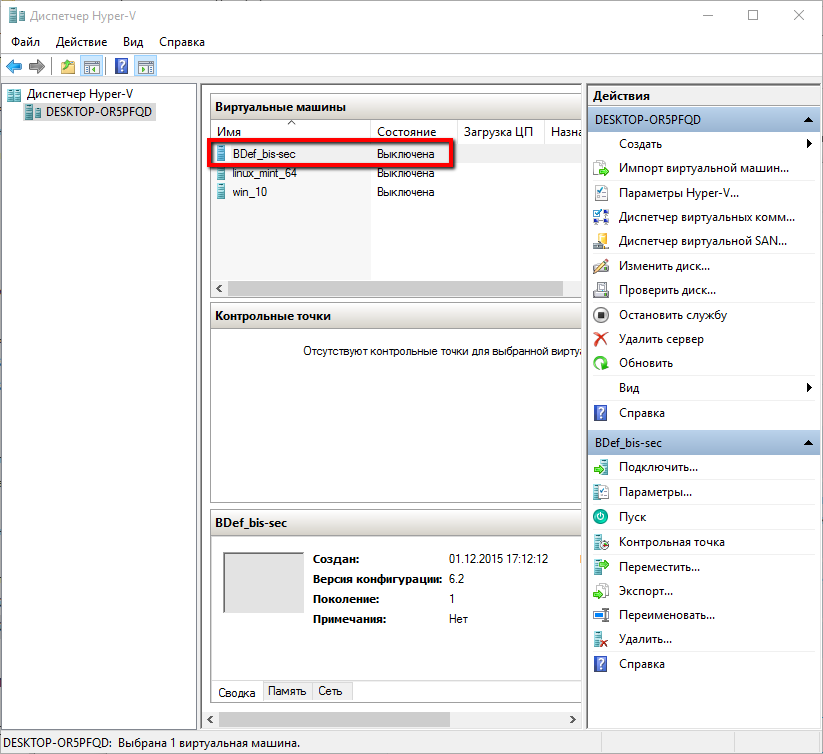
But the process is far from over. If we draw analogies with the physical process of installation, then we now just inserted the program disk into the computer drive. To start the installation process, you need to “power on” the virtual machine, for example, by right-clicking on the name of the created virtual machine and selecting the “Connect” option.
Screen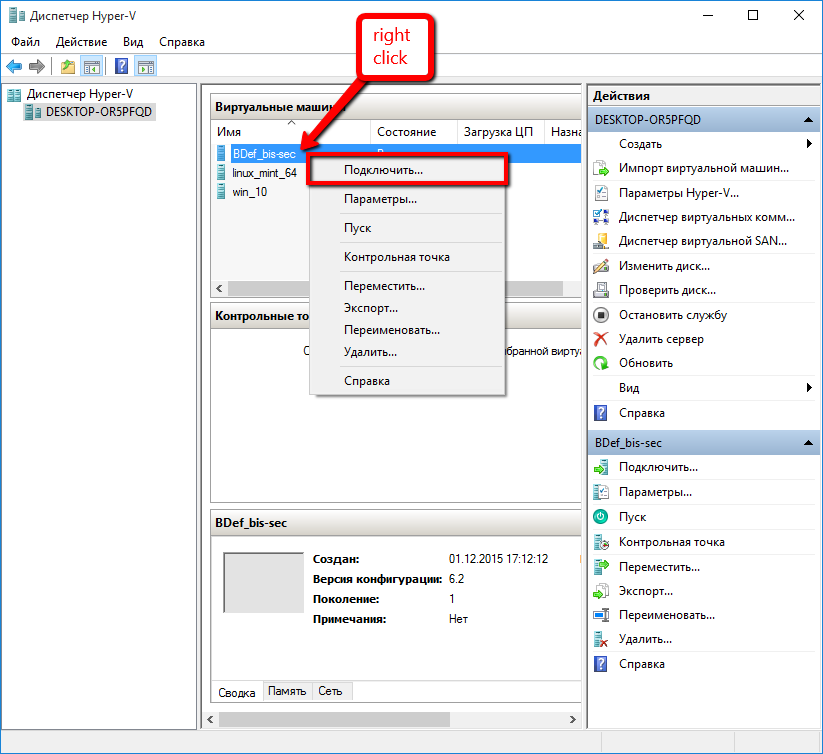
The specific virtual machine window has opened. Turn it on, for example, by clicking the "Start" button.
Screen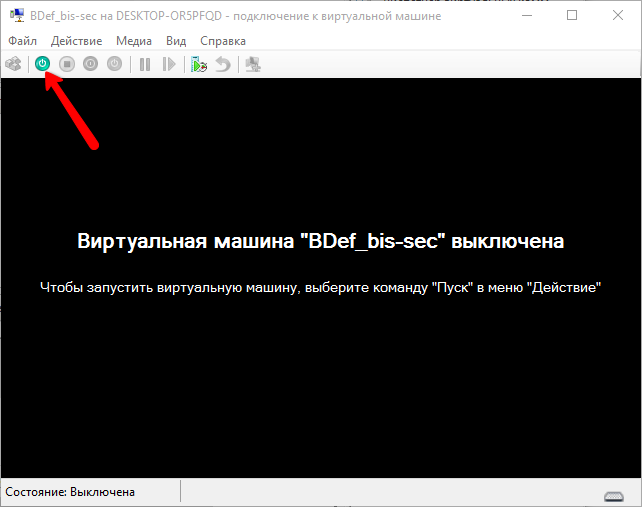
If until now the actions are more or less the same for all programs running in a virtual environment, then all further events will depend on which program you are installing.
I will describe what happens when I install an antivirus. I want to note that for successful installation you will need an Internet connection.
The program asks you to enter a password with which you can login in a virtual environment.
Screen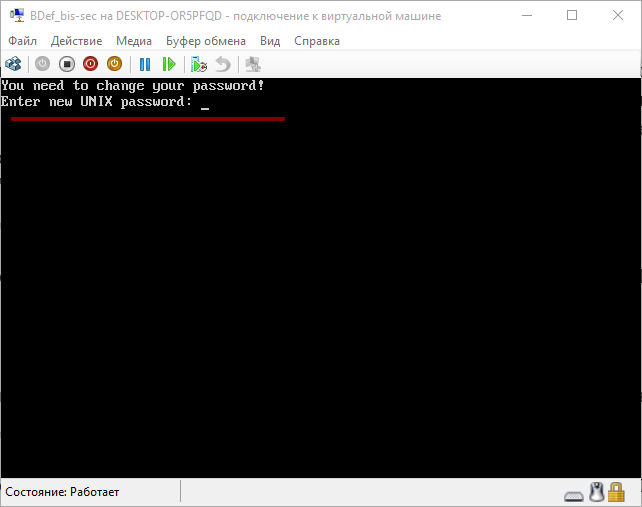
After requesting the re-entry of the password and accepting it, the virtual environment asks us to log in.
Screen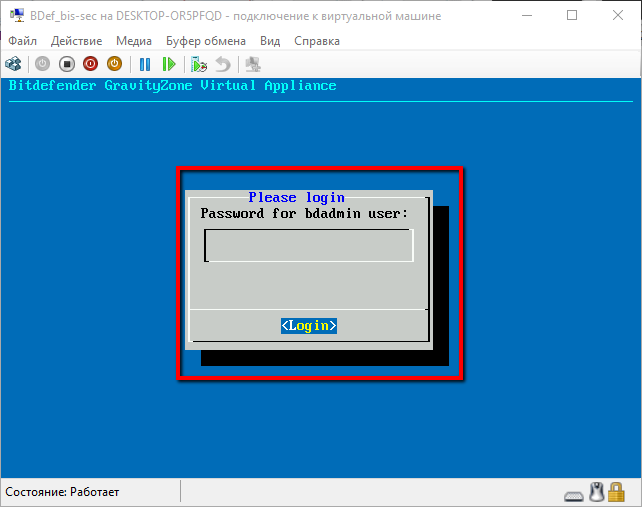
Enter the password that you just installed (character input is not displayed, so be careful), we get to the environment settings page (it’s the Appliance).
For reference. In fact, we see the operating system interface (in this case, a specially configured Linux). Accordingly, we can customize it so that it does exactly what we need. To begin with we will configure a network. Hostname settings is the name of the system (which will be visible on the network), domain is the name of the Active Directory domain (if not relevant, you can not change or fill in). Configure Network Settings - configure network settings. Go here, select the network interface (I have only one - eth0 ), we see the configuration menu of this interface.
Screen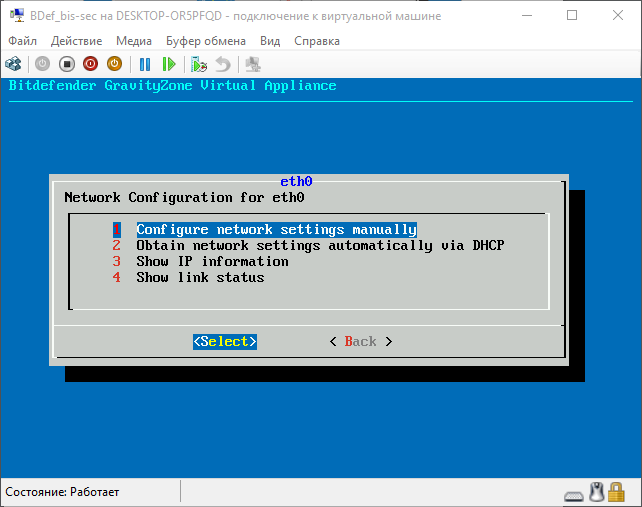
Here you can either configure the settings manually, or tell the program to get them automatically via DHCP. It must be remembered that the IP of the virtual machine must be the same, since the clients that will be installed on the protected machines will access the server by IP, and if it changes, they will have to be reconfigured. From the same menu, you can check the current IP of the virtual machine and the connection with the outside world (points 3 and 4, respectively). I like the automatic configuration option. The program is independently configured.
From the main menu, you can also configure the proxy settings, if necessary. The Advanced settings item is useful to you if you need to configure where the update will come from or only partially install the application. Read more about this in
spoiler
The virtual environment of Bitdefender consists of several parts, the so-called “roles”: Database, Update Server, Communication Server, Web Console (through which other computers are connected to the Bitdefender virtual environment). Each of them can be installed separately (for example, for reasons of load distribution on iron), but in the general case all are put together.
After you have configured everything you need (or left the default settings), you can run Automatic Installation from the main menu.
Screen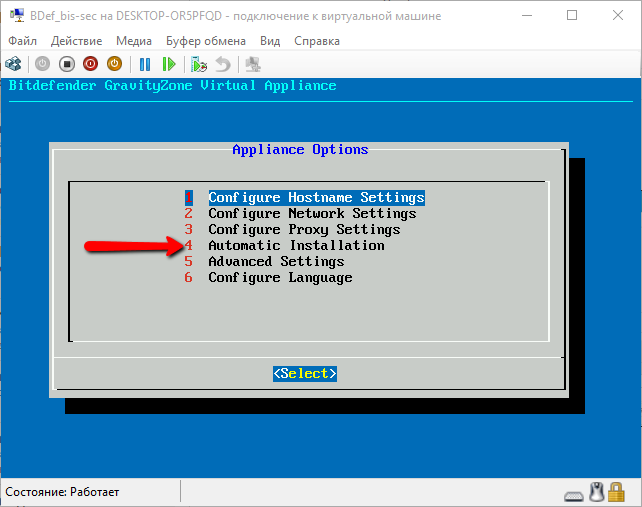
We agree with the license agreement, after which the program informs us about the components (we called them roles) that will be installed. Since we have chosen automatic installation, all roles are listed.
Screen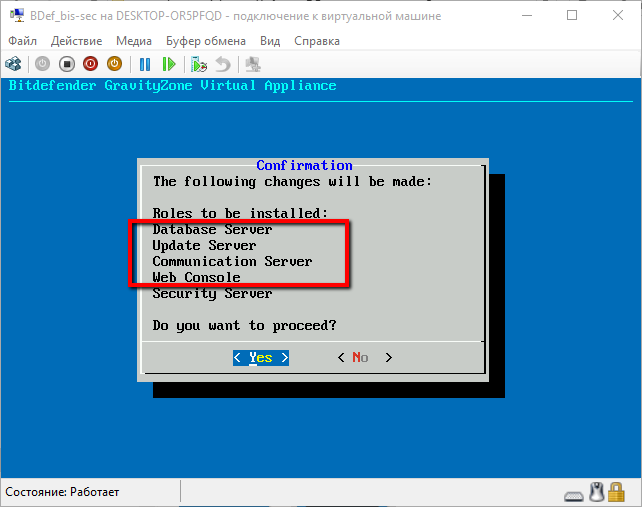
The screen shows those that could be installed separately (information for a general understanding of the process). We agree on the installation, and - rushed. The installation process took about 15 minutes. After the installation was completed, the interface did not change much. Appeared graph MDM Communication Server , which is responsible for connecting mobile devices. In addition, through the Advanced Settings submenu, you can connect to an existing database (important if you have already installed an antivirus), configure Replica set (duplicate databases to speed up the system if a large number of clients are serviced, or need high resiliency) also configure the Role Balancer , which distributes the load on the server (must be installed as a separate virtual environment).
However, the installation process of the virtual environment is complete. Now it is possible to get to the Bitdefender control center via the web interface from the network (the Web console is responsible for it). To do this, you need to know which IP is assigned to the virtual machine. This can be checked from the virtual environment menu by successively selecting the following items: Configure Network Settings -> eth0 (or another one that is relevant for you) -> Show IP information.
We enter this address in the browser line on any computer on the network, agree to go over an unprotected protocol, and get to the login page in the Web console. In fact, we connected to a virtual machine using network protocols and will perform some kind of manipulation on it. This process is not much different from the usual entrance to the router settings page.
To log in to the console for the first time, you need to register an account in the my.bitdefender system using the link that is located under the input fields (if you are already registered in the system, you can use the old account, creating a new one is not necessary). Then we enter the key that was received by mail (a special free key will be sent to use the trial version). We get to the company registration page (it is assumed that Business security will be used only in the corporate segment). Enter the data, create a root-user console.
Finally, we get to the interface of the user web console.
Screen
Initially, two informational messages will appear with a brief guide for further work with the antivirus, and only then - the main console window:

So what do we have? We have installed a virtual machine, which, in fact, is an operating system equipped and sharpened specifically to serve as an antivirus for surrounding physical and virtual machines. But in order for it to perform its functions, a client program must be installed on the protected computers. You can generate such a program through a web console. To do this, go to the Web console in the tab Network -> Packages and click the Add button. We configure the package (I will not go into details here - the topic is different), give it a name and click Save . Now the new package is available in the list. Select its checkbox and click the Download button at the top. In the drop-down list, select the OS on which you want to install the package.
Screen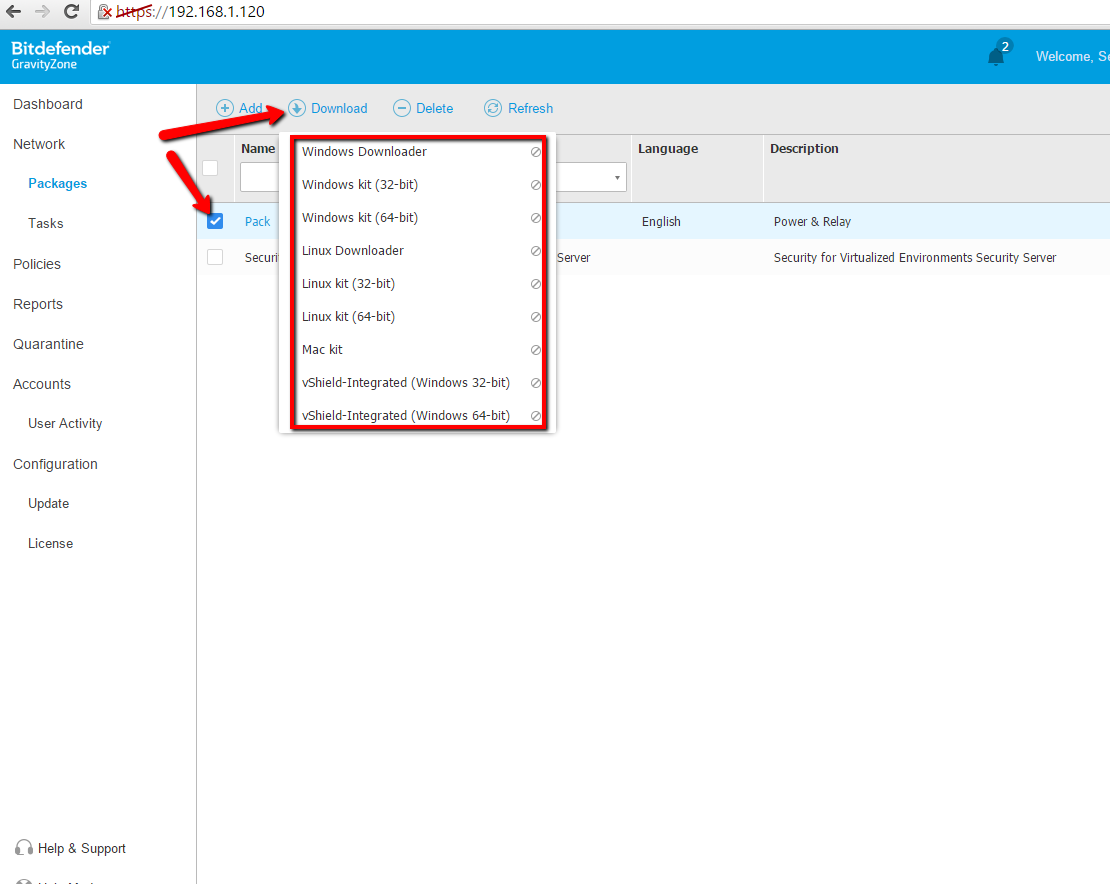
The package will not be available for download immediately, as the system loads its database from the Internet. Will have to wait. The process can be tracked on the Update tab.
Screen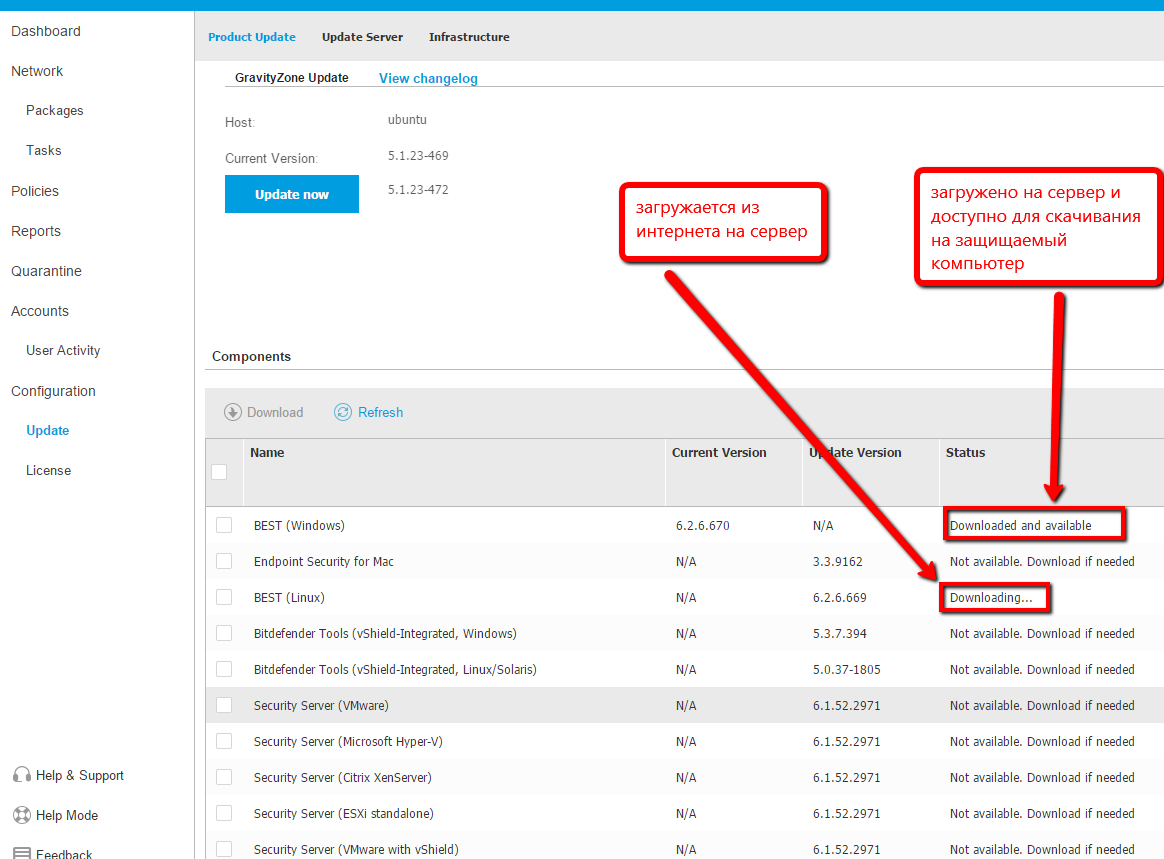
After the package is downloaded from the Internet to the server, you need to return to the Packages tab, select the package you need again and click Download again. We choose which system we will protect - and now the download of the package with the client program installed on the protected computer will begin. In fact, Bitdefender allows for remote installation of the client, but this is a topic for a separate article.
I downloaded the package to the computer where the Bitdefender virtual environment is running, so I just run the executable file. During installation, the program “cleans up” the computer from traces of previous antiviruses, if any. During the installation, you will need to reboot, perhaps even several times. As a result, Bitdefender Agent is installed on the computer, as evidenced by the tray icon. Using this icon, you can launch the agent interface:
Screen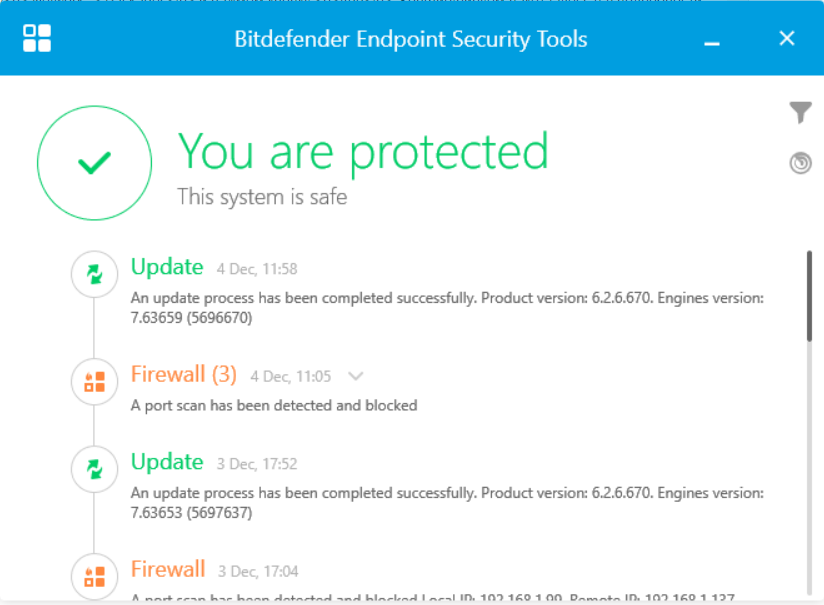
Actually, we arrived at the goal set at the beginning of the article: install a virtual environment and install an agent program on a real machine that will perform the tasks assigned to it (on my screen it is clear that the firewall managed to block port scans).
The main thing that you should take with you after reading this article:
Virtualization is a powerful tool that allows you to save a lot of resources; a virtual environment is an operating system that can perform certain functions assigned to it; The key point in installing and configuring a virtual machine is competent configuration of network parameters.
Source: https://habr.com/ru/post/272627/
All Articles