Software design for beginners using the snowflake method
Publication may be useful rather for novice programmers than for those who are familiar with the development and design of software (no need to know any products for software design).
I think, those who know will agree that their first experience of programming a real application (not Hello World) came down to a simple question: where to start? How to start designing a program? What to write something?
And, as a rule, the first experience is a bunch of code, which was then either forgotten or corresponded completely, depending on the need of the program.
')
For a long time I searched the Internet for design recipes, but everywhere they were reduced to certain models, which, like templates, needed to be applied and to pull my own program on them. For example, you can take MVC - everyone knows what it is, but the recommendations on how to implement it vary dramatically.
And then, one morning, a simple thought occurred to me: what if the program was designed using the snowflake method?
What I've done:
1. I drew on a piece of paper what the program looks like (there is not much difference for consoles, you will understand in the course of the story). For example, take a calculator.
2. Conditionally divided a piece of paper into two parts, in one I will begin to describe the interface, in the other - what the program itself can do, its model (business logic). Already at this stage it is clear that we have divided the program into 2 parts: representation and logic. At the same time, if the program is a console program, we will get into the presentation the commands to which the program reacts and the output it returns.
The controller is the connection between the interface part and the program model.
3. To describe the interface, all the same type of elements are listed first (for example, buttons, labels, etc.). It turns out that already at this stage we are describing parent classes. For example, a calculator:
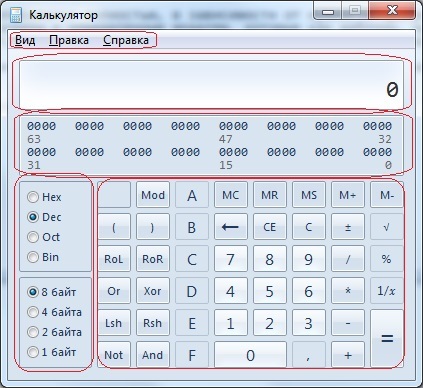
I turned the same elements in red: menu, label, text box, buttons and radio.
Then I look, can I break these elements into more specific ones? (Which, of course, is possible, since we have more than one button). Accordingly, I try to form as few general groups as possible from the button or, to make it clearer, classes: these are letter-lettering (do not calculate, only enter data) and operational (clicking on them can lead to calculations or other operations). The less we form simultaneous classes, the greater the level of abstraction we get, which can be very useful in the future, I think everyone agrees with this (it will be more convenient to complement the functionality, there is always something to inherit from).
Continuing to further break into groups, we come to the definition of each final class, when the partition is no longer possible. And the chain from it to our initial program will be a chain of inheritance. If we are not satisfied with something, for example, where to put the button for erasing the last character - we can always walk through the inheritance tree and change the branch or division into classes. Having described the interface, we will get a cheat sheet for further design (after all, we will not sculpt empty elements on the form).
4. We proceed in the same way with logic, starting from a general class, more concretely specifying operations.
If we have any operation, already known, but not classified, it is enough to add it, and then enter it into the lining up model.
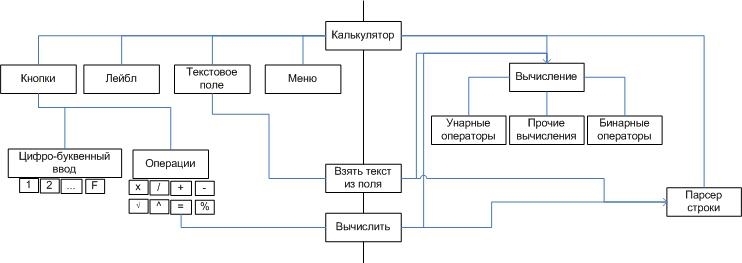
It turns out something like this:

5. With the expansion of our program - the modification is quite easy. For example, we needed the program to first read the line, and then calculate it. Those. a parser appears, which uses the computation class (already implemented) and the controller (which reads the string, storing it in the text field as it is entered and passing after the parser). Modifications will fit almost in three lines, plus the class that describes the parser.
If the program is very large, complex - you can always take a separate element and describe it using the above method. For example, for a multi-window application, you can draw a snowflake for each window. For complex logic, select global operations, and do the same. In addition, this method works not only from the general to the particular, but vice versa. First, we recruit everything that comes to our mind in the form of bricks or small trees. If we can combine into something common - we get the parent class. If we can categorize, we get subclasses. And so, until there are no bricks without ties, there will be no possibility to break into subclasses and there will be no snowflake.
When everything is done - you can start writing code. But how to write it is another story ... However, at the design stage it is already possible to give names to classes and briefly describe their functionality.
From the pros - you do not need to know anything, you only need a piece of paper, a pen (or vector editor) and basic knowledge of the language in which the program will be written (I relied on Java). It turns out very clearly and quite easily, especially for beginners.
Of the minuses - simplicity, perhaps some features of the design are lost, but this is a question for those who have been doing this for a long time and can suggest or add something.
I think, those who know will agree that their first experience of programming a real application (not Hello World) came down to a simple question: where to start? How to start designing a program? What to write something?
And, as a rule, the first experience is a bunch of code, which was then either forgotten or corresponded completely, depending on the need of the program.
')
For a long time I searched the Internet for design recipes, but everywhere they were reduced to certain models, which, like templates, needed to be applied and to pull my own program on them. For example, you can take MVC - everyone knows what it is, but the recommendations on how to implement it vary dramatically.
And then, one morning, a simple thought occurred to me: what if the program was designed using the snowflake method?
What I've done:
1. I drew on a piece of paper what the program looks like (there is not much difference for consoles, you will understand in the course of the story). For example, take a calculator.
2. Conditionally divided a piece of paper into two parts, in one I will begin to describe the interface, in the other - what the program itself can do, its model (business logic). Already at this stage it is clear that we have divided the program into 2 parts: representation and logic. At the same time, if the program is a console program, we will get into the presentation the commands to which the program reacts and the output it returns.
The controller is the connection between the interface part and the program model.
3. To describe the interface, all the same type of elements are listed first (for example, buttons, labels, etc.). It turns out that already at this stage we are describing parent classes. For example, a calculator:
I turned the same elements in red: menu, label, text box, buttons and radio.
Then I look, can I break these elements into more specific ones? (Which, of course, is possible, since we have more than one button). Accordingly, I try to form as few general groups as possible from the button or, to make it clearer, classes: these are letter-lettering (do not calculate, only enter data) and operational (clicking on them can lead to calculations or other operations). The less we form simultaneous classes, the greater the level of abstraction we get, which can be very useful in the future, I think everyone agrees with this (it will be more convenient to complement the functionality, there is always something to inherit from).
Continuing to further break into groups, we come to the definition of each final class, when the partition is no longer possible. And the chain from it to our initial program will be a chain of inheritance. If we are not satisfied with something, for example, where to put the button for erasing the last character - we can always walk through the inheritance tree and change the branch or division into classes. Having described the interface, we will get a cheat sheet for further design (after all, we will not sculpt empty elements on the form).
4. We proceed in the same way with logic, starting from a general class, more concretely specifying operations.
If we have any operation, already known, but not classified, it is enough to add it, and then enter it into the lining up model.
It turns out something like this:
5. With the expansion of our program - the modification is quite easy. For example, we needed the program to first read the line, and then calculate it. Those. a parser appears, which uses the computation class (already implemented) and the controller (which reads the string, storing it in the text field as it is entered and passing after the parser). Modifications will fit almost in three lines, plus the class that describes the parser.
If the program is very large, complex - you can always take a separate element and describe it using the above method. For example, for a multi-window application, you can draw a snowflake for each window. For complex logic, select global operations, and do the same. In addition, this method works not only from the general to the particular, but vice versa. First, we recruit everything that comes to our mind in the form of bricks or small trees. If we can combine into something common - we get the parent class. If we can categorize, we get subclasses. And so, until there are no bricks without ties, there will be no possibility to break into subclasses and there will be no snowflake.
When everything is done - you can start writing code. But how to write it is another story ... However, at the design stage it is already possible to give names to classes and briefly describe their functionality.
PS
From the pros - you do not need to know anything, you only need a piece of paper, a pen (or vector editor) and basic knowledge of the language in which the program will be written (I relied on Java). It turns out very clearly and quite easily, especially for beginners.
Of the minuses - simplicity, perhaps some features of the design are lost, but this is a question for those who have been doing this for a long time and can suggest or add something.
Source: https://habr.com/ru/post/272569/
All Articles